ComfyUI Workflow for Stunning Product Photography (customized placement&detail retention)
In this tutorial, I’ll introduce you to a newly developed ComfyUI workflow for enhancing product photography. With this workflow, you can take a product image and, using a simple prompt, generate a professional-quality product photo with a natural effect.
For those who love diving into Stable Diffusion with video content, you’re invited to check out the engaging video tutorial that complements this article:
Gain exclusive access to advanced ComfyUI workflows and resources by joining our community now!
Here’s a mind map illustrating all the premium workflows: https://myaiforce.com/mindmap
Run ComfyUI with Pre-Installed Models and Nodes: https://youtu.be/T4tUheyih5Q
Workflow Introduction
Let’s start with an example. Imagine you have an image of a skincare product. By inputting a descriptive prompt, this workflow processes the image so that the product blends seamlessly into a background.
The light and shadow effects on the product match the background perfectly, maintaining all the product’s details, including the text on its label.
For best results, I recommend pre-generating a background using AI. For instance, I used Midjourney to create a background with better lighting and a marble base than what Stable Diffusion can produce.
Adjust the product’s size precisely using the “ImageBlend” node, placing it exactly on the stone base.
Next, we’ll relight the scene using a “Relight” node group I created.
If the lighting isn’t ideal, you can use the following node group to repaint the image.
This process may cause some detail loss in the product. We’ll use the bottom node group to restore the product’s detail and color.
Other Product and Background Tests
I’ve also tested this workflow with other products and backgrounds. For example, I used a product image of red wine and a background image.
I placed the red wine bottle on a wooden base.
Then, I relighted the scene.
Next, I repainted the image to make the effect more natural.

Finally, I restored the product’s details step by step using the bottom node.
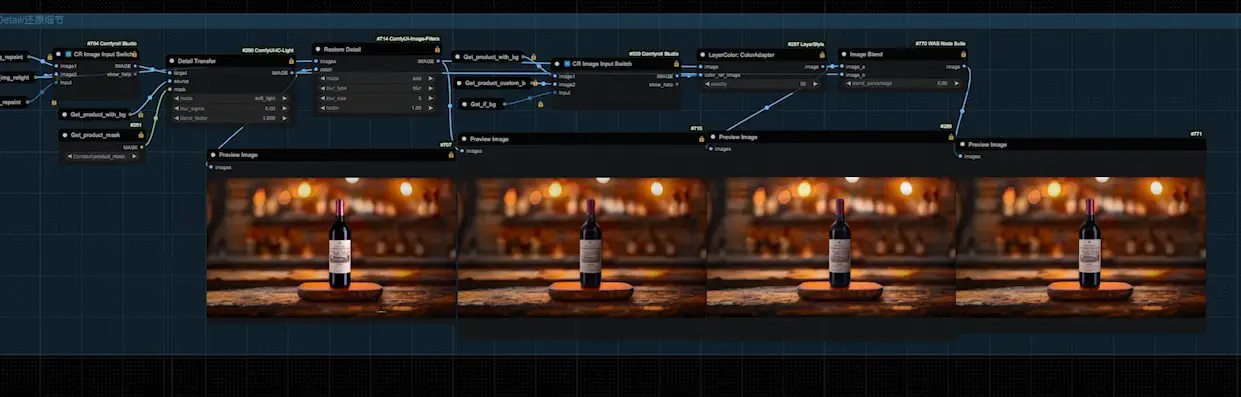
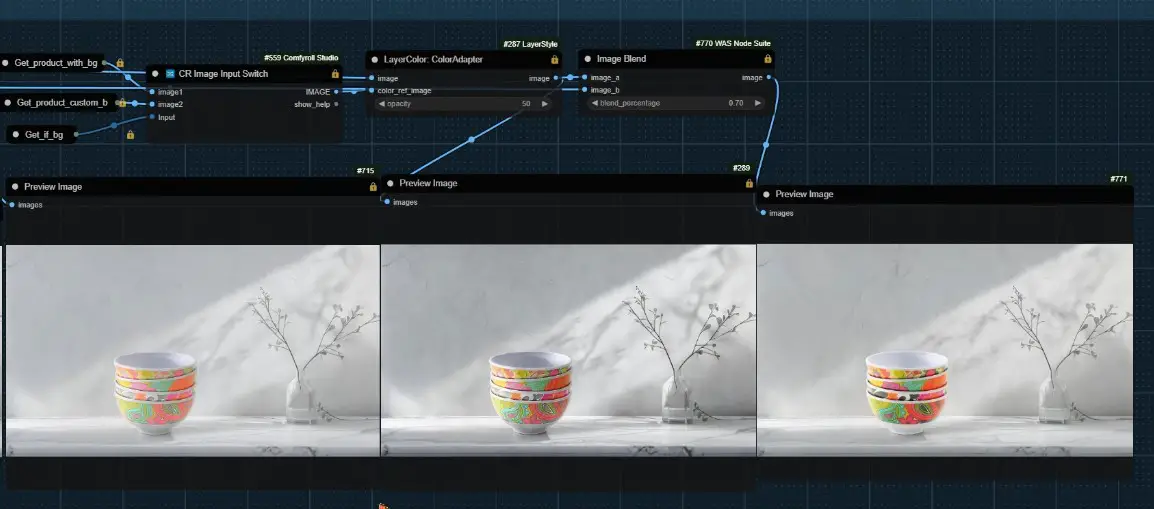
Another test involved placing a porcelain bowl on a marble countertop. The bowl’s details and colors were well preserved.
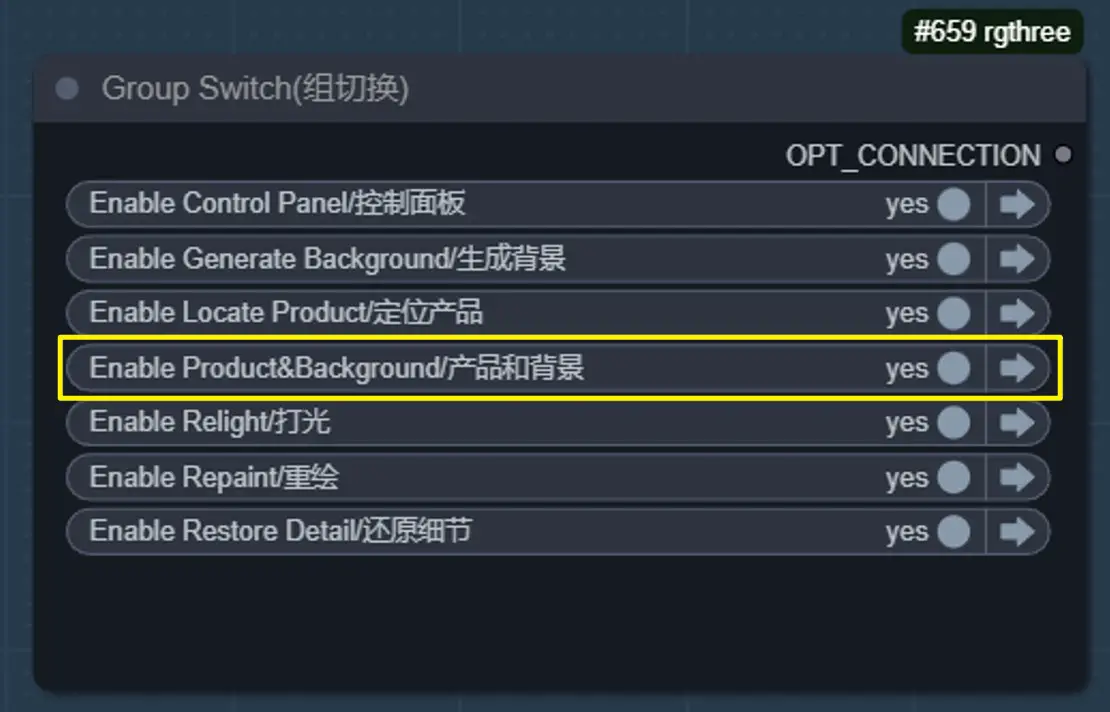
Workflow Details (Pre-Uploaded Background Image)
After demonstrating the effects of the ComfyUI workflow, let’s delve into its logic and parameterization. Links to the main nodes used in this workflow will be provided at the end of the article.
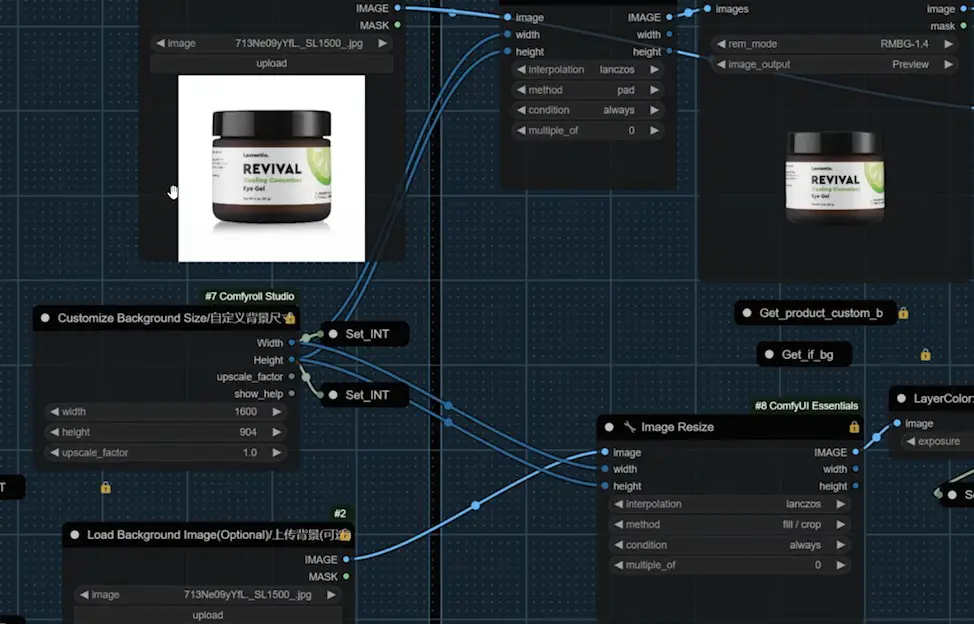
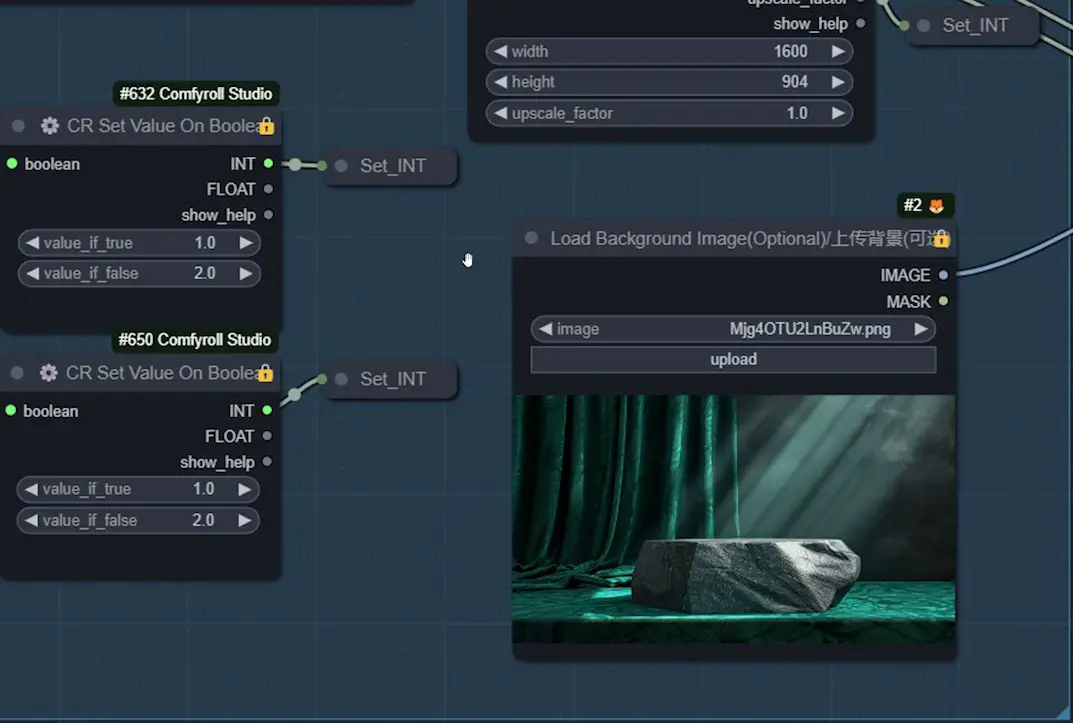
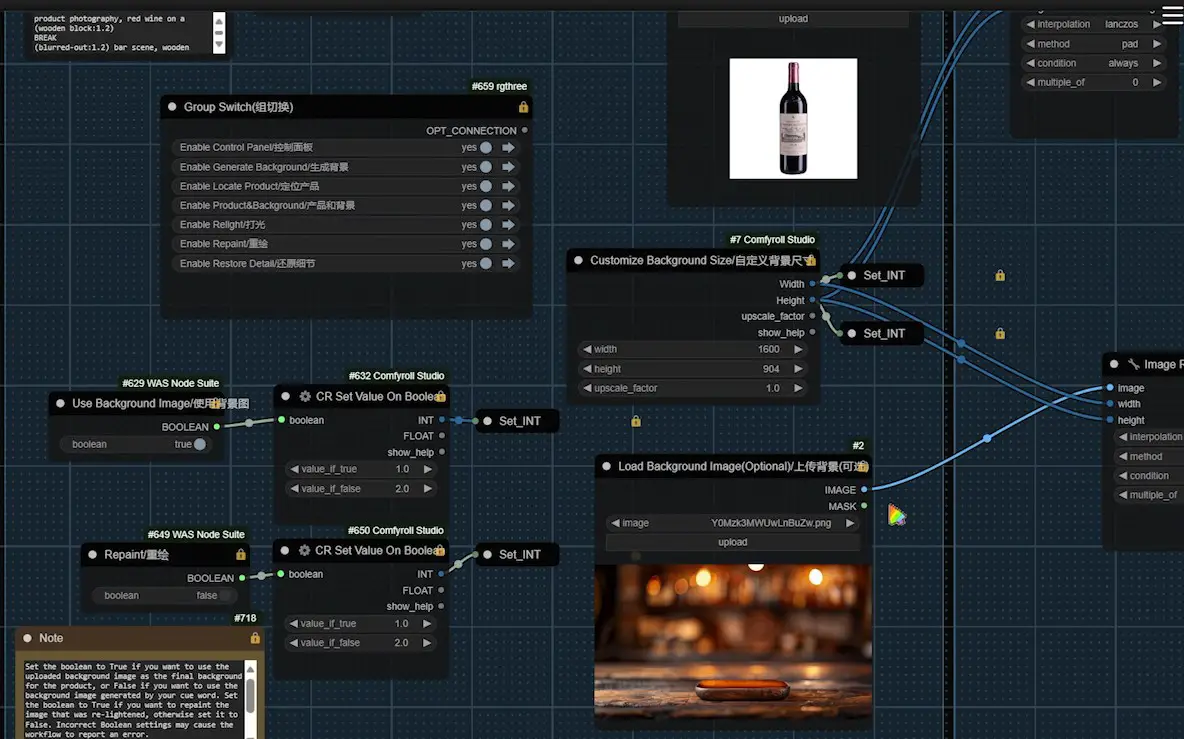
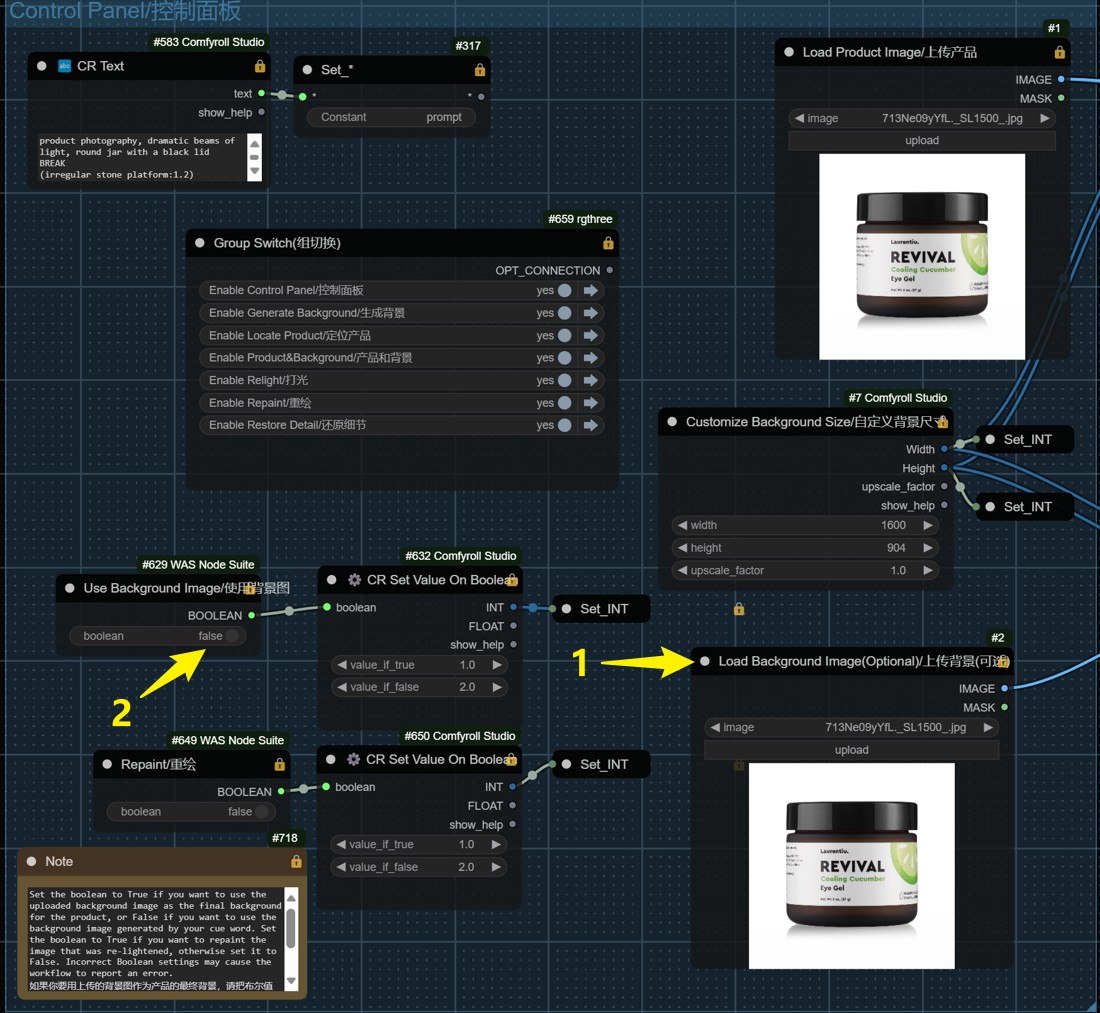
1. Uploading Images and Setting Backgrounds
1️⃣ Upload the Product Image and Background Image
- In the control panel in the upper left corner, upload both the product image and the background image.
- Enter your prompt.
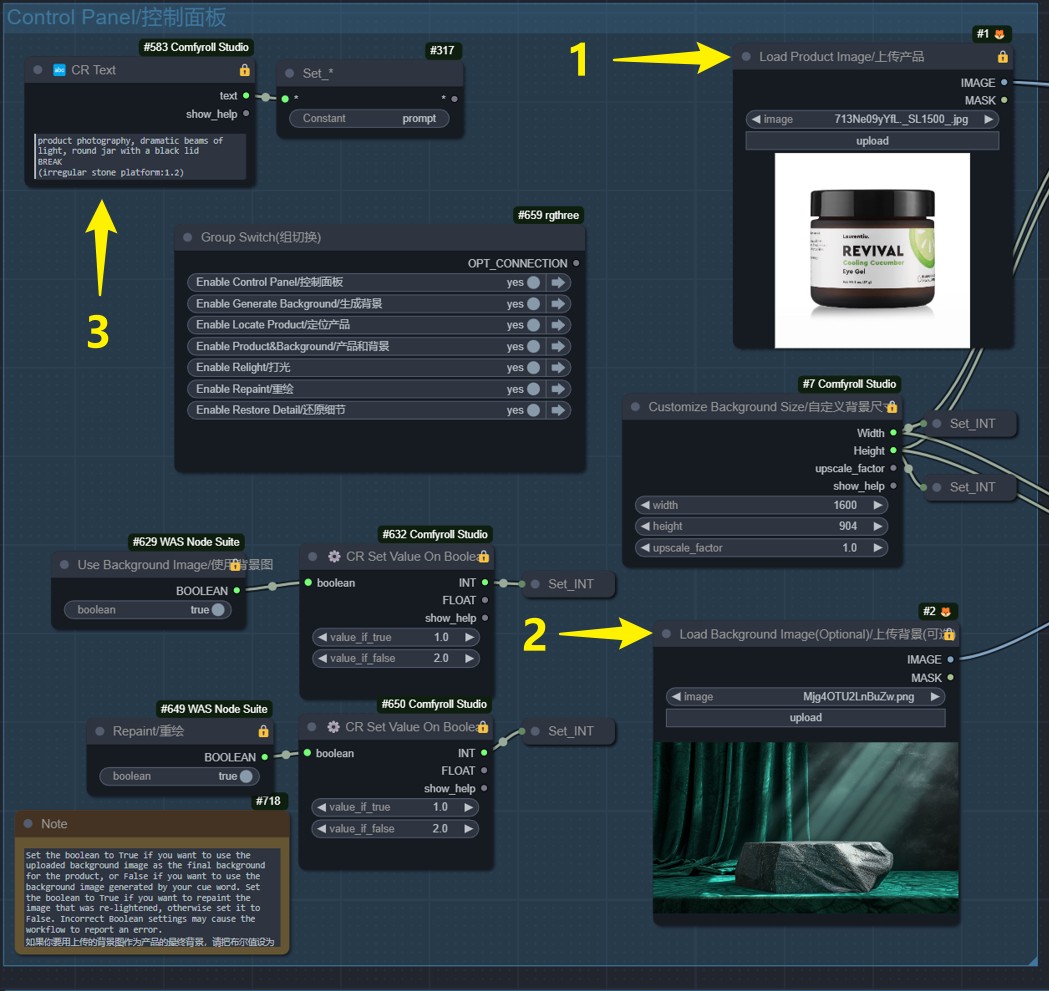
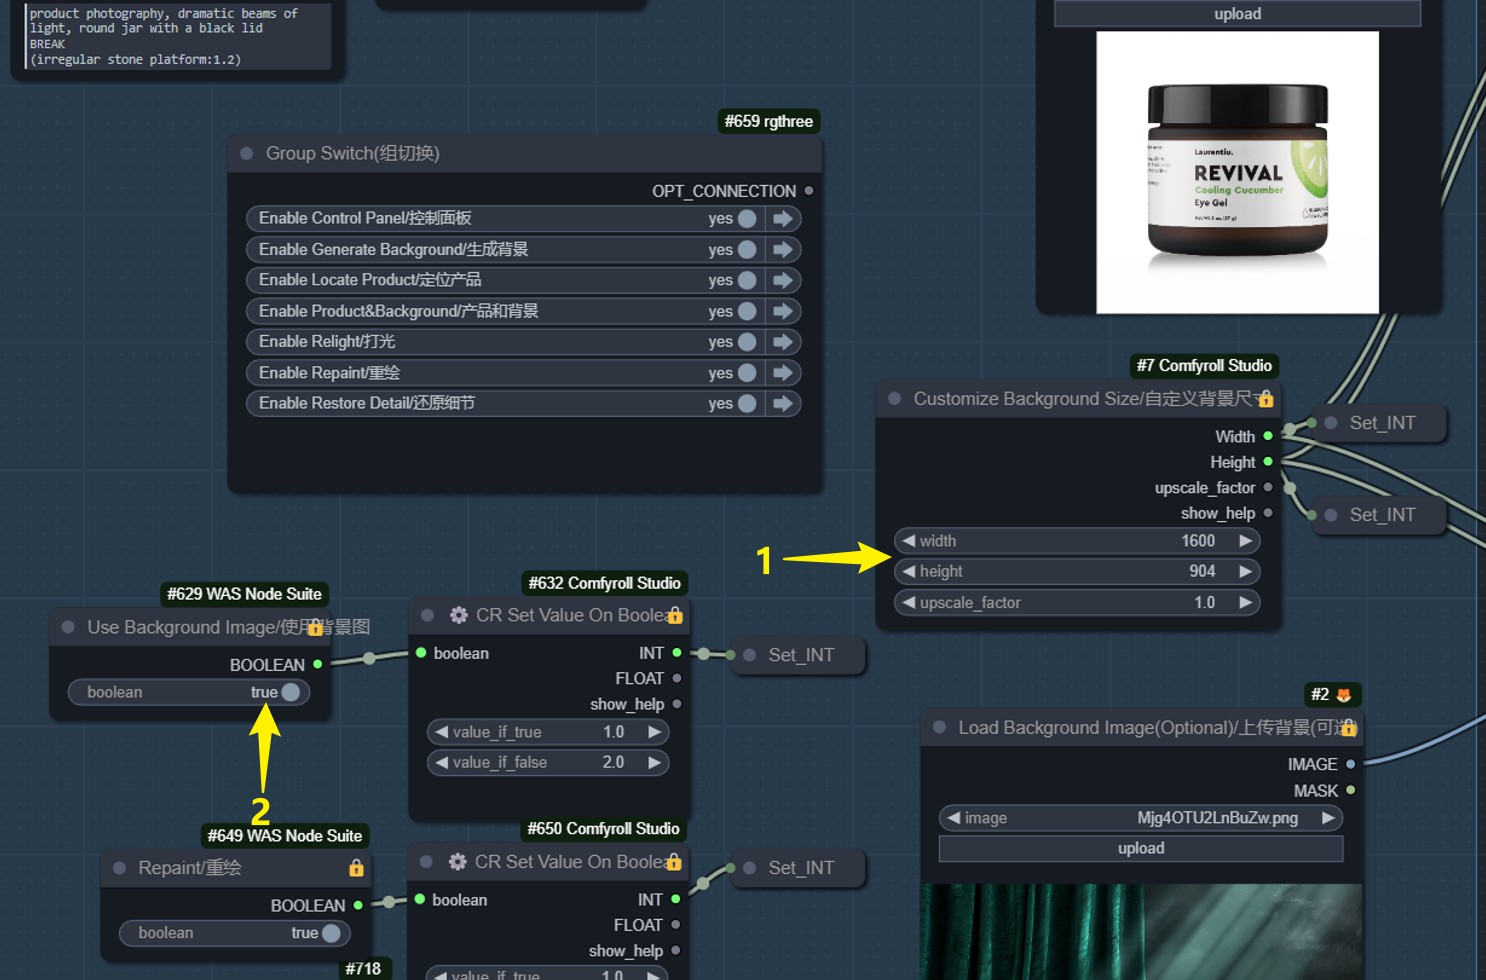
2️⃣ Set the Size of the Background Image
- Adjust the size as needed.
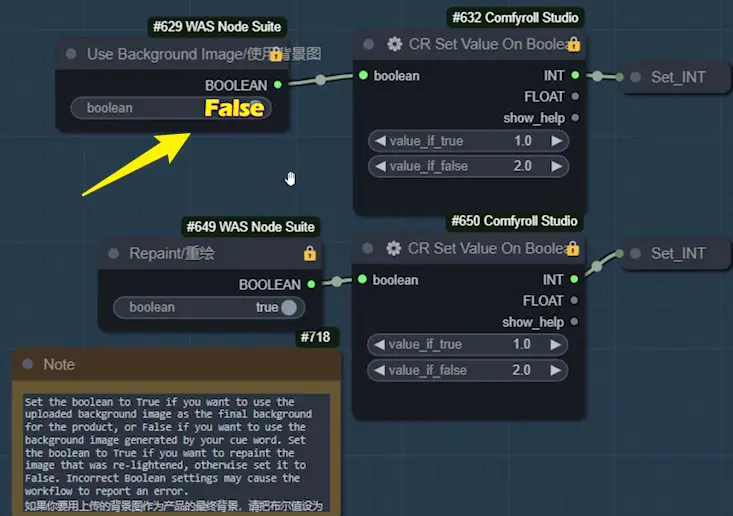
- Set the boolean value to “True” to temporarily use the uploaded background image for the final image.
2. Basic Adjustment
1️⃣ Basic Adjustments for Products and Backgrounds
- Open the “Products and Backgrounds” group to adjust both elements.
2️⃣ Adjust Product Image Size
- Use the “Image Resize” node to adjust the width and height of the product image according to the control panel settings.
- Use the “Image Remove Bg” node to remove the product image’s white background.
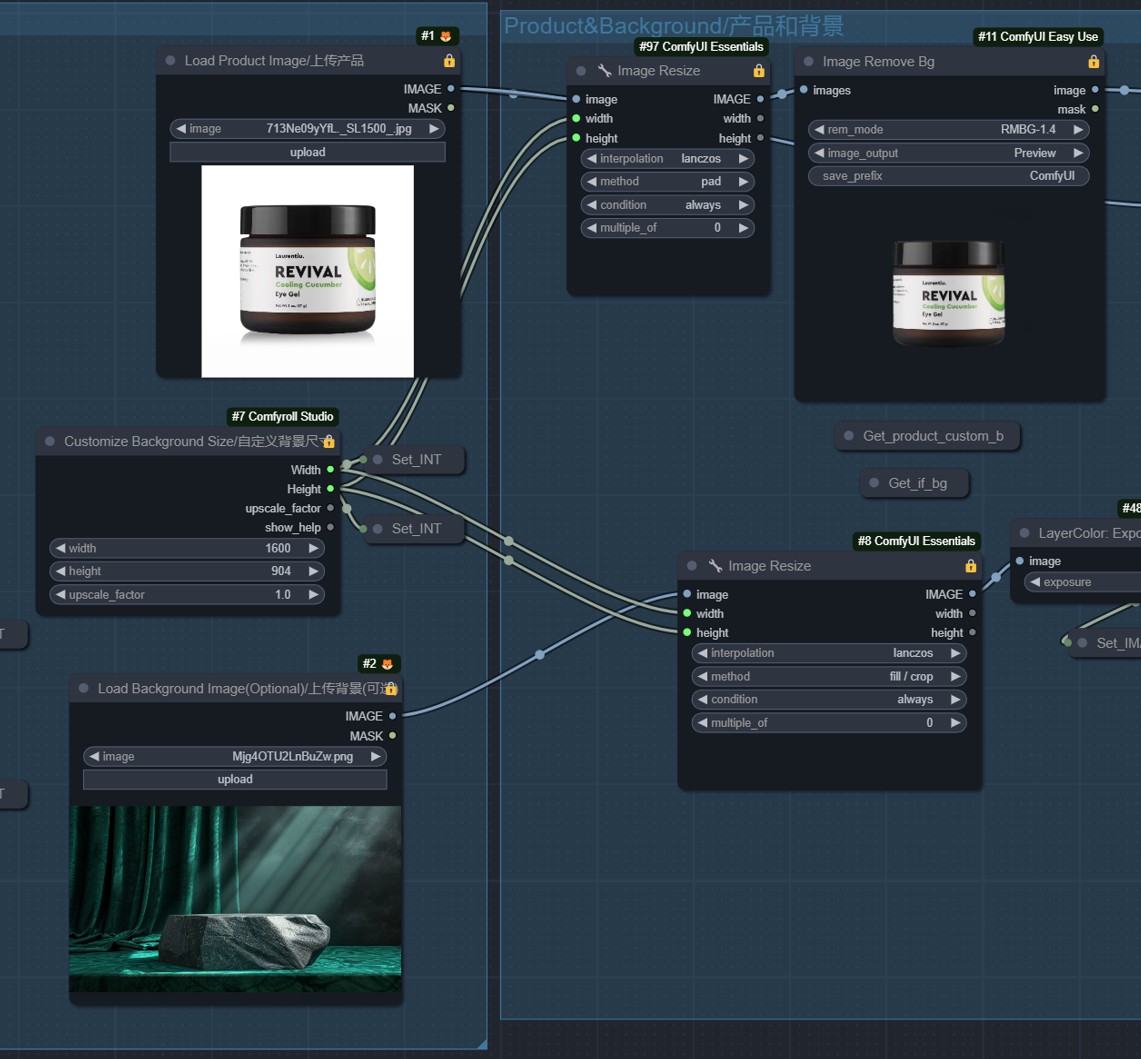
3️⃣ Address Background Issues
- If the “Image Remove Bg” node doesn’t perfectly remove the background, you can use other tools beforehand to place the product on a black background. Then, use the “Image Remove Bg” node again for better results. Avoid uploading PNG images with transparent backgrounds, as this method won’t work well.
4️⃣ Adjust Brightness
- Use the “Exposure” node to adjust the brightness of the product image. Set it to a negative value to make the image darker. Do the same for the background image.
3. Product Positioning
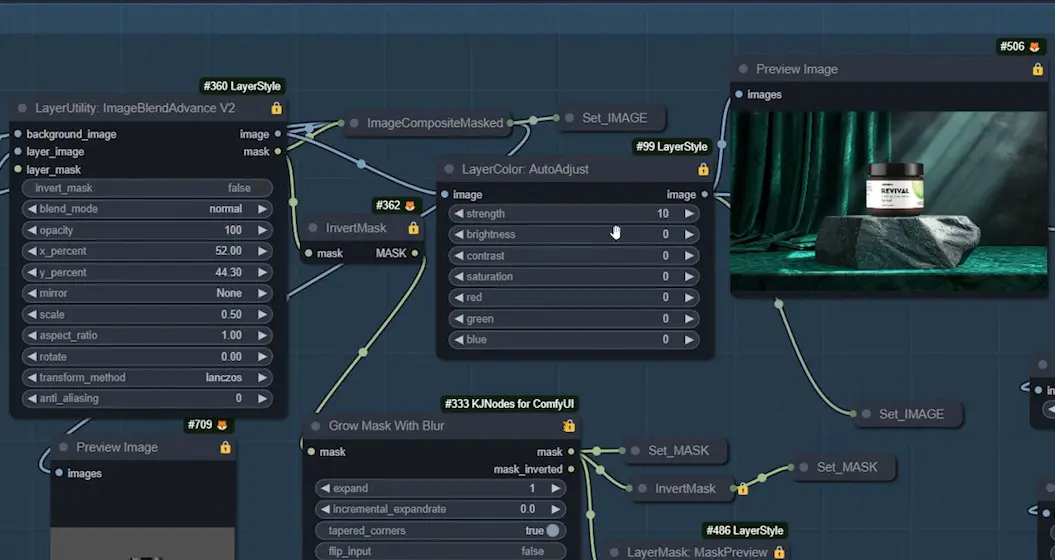
1️⃣ Locate Product
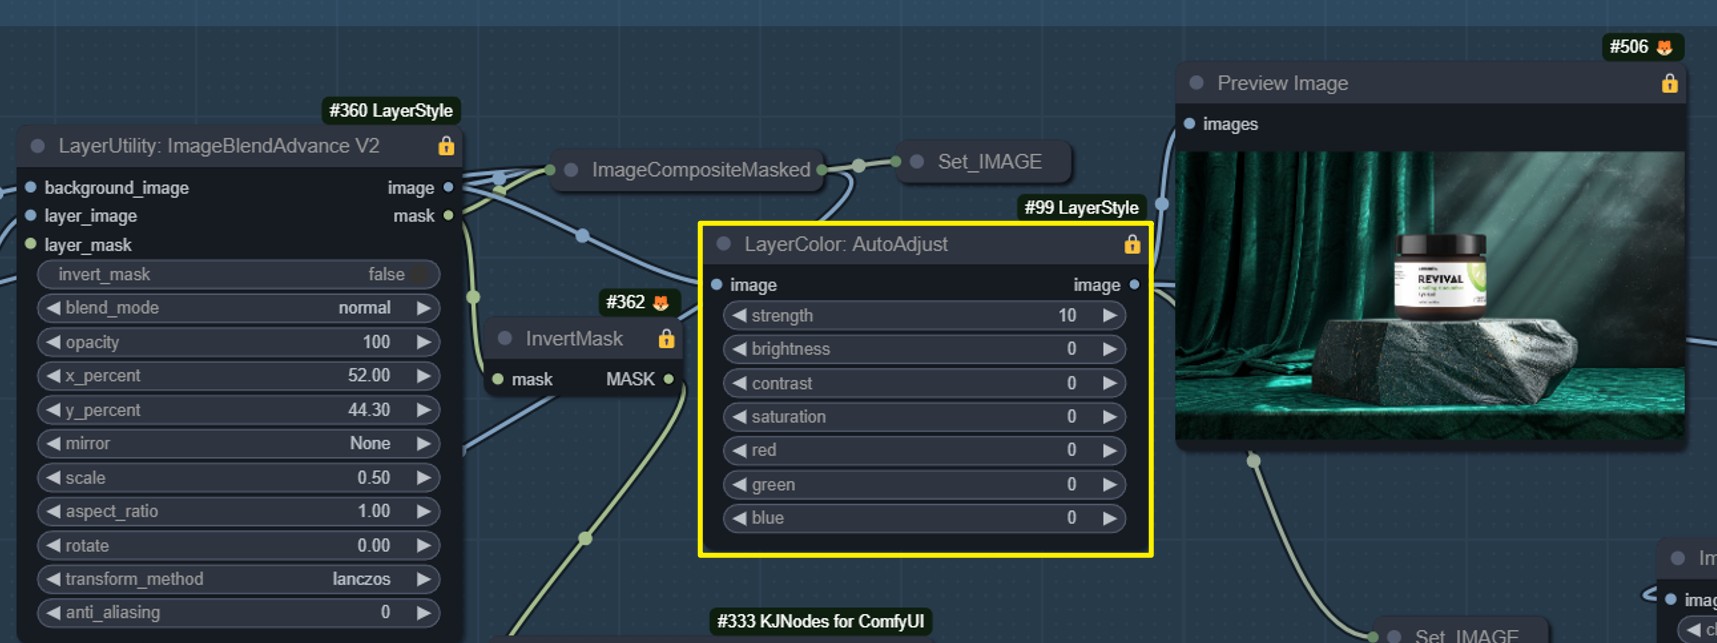
- Open the “Locate Product” group, use the “ImageBlend” node to place the product into the background, and adjust its size and position.
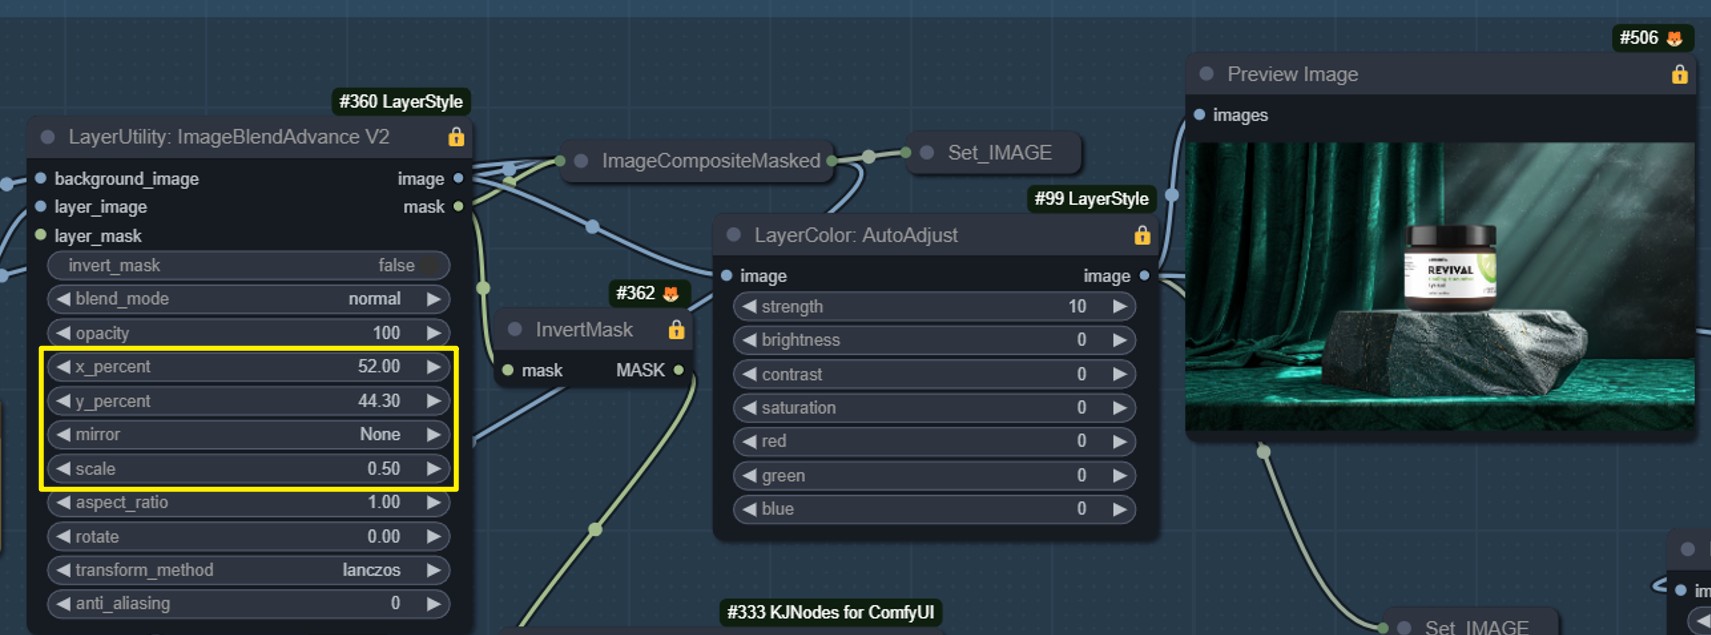
- Parameter settings:
- “x_percent” controls the horizontal position.
- “y_percent” controls the vertical position.
- “scale” controls the product’s size.
- “mirror” for mirroring
- “rotate” for rotation
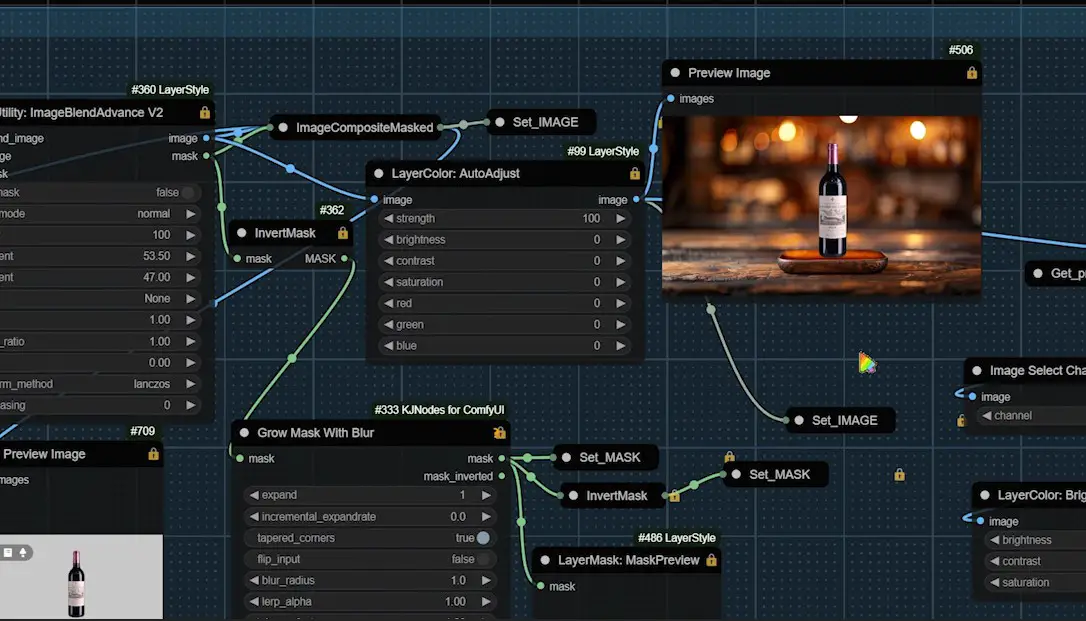
2️⃣ Image Blend
- The “ImageBlend” node has two outputs: the blended image and the mask.
- Use the “AutoAdjust” node to adjust the color, contrast, saturation, etc., of the blended image.
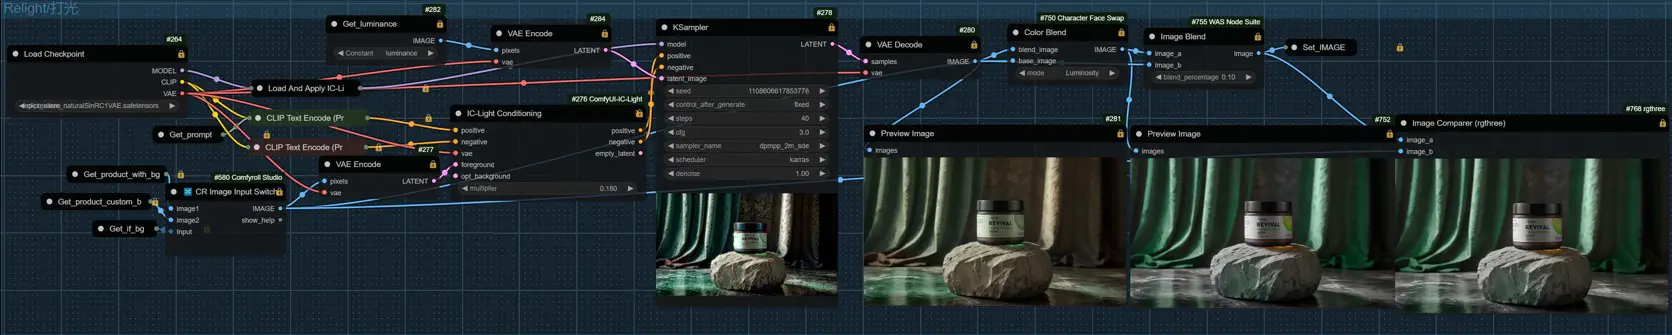
4. Relighting Settings
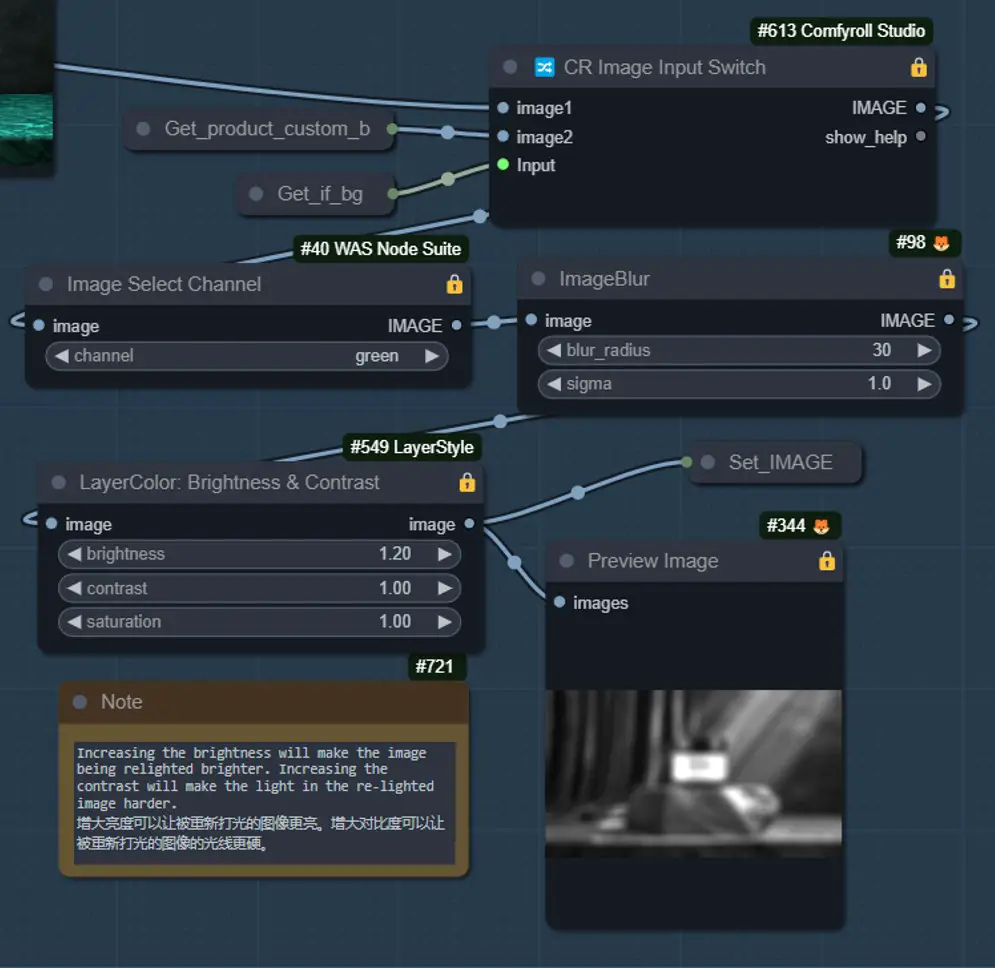
1️⃣ Generate Luminance Image
- The right set of nodes generates a relighting image as a reference for relighting.
- The relighting is handled by the “Relight” group in the upper right corner.
2️⃣ Adjust Brightness & Contrast
- Use the “Brightness&Contrast” node to adjust the brightness and contrast. Increase the brightness to make the image brighter and the contrast to make the light harder.
- Use the “ImageBlur” node to blur the brightness map. Increase the blur when the light is uneven.
5. Generate Background
1️⃣ Prompt to Generate Background
- Open the “Generate Background” group and use a prompt to generate a background image. The effect may be better than the uploaded background.
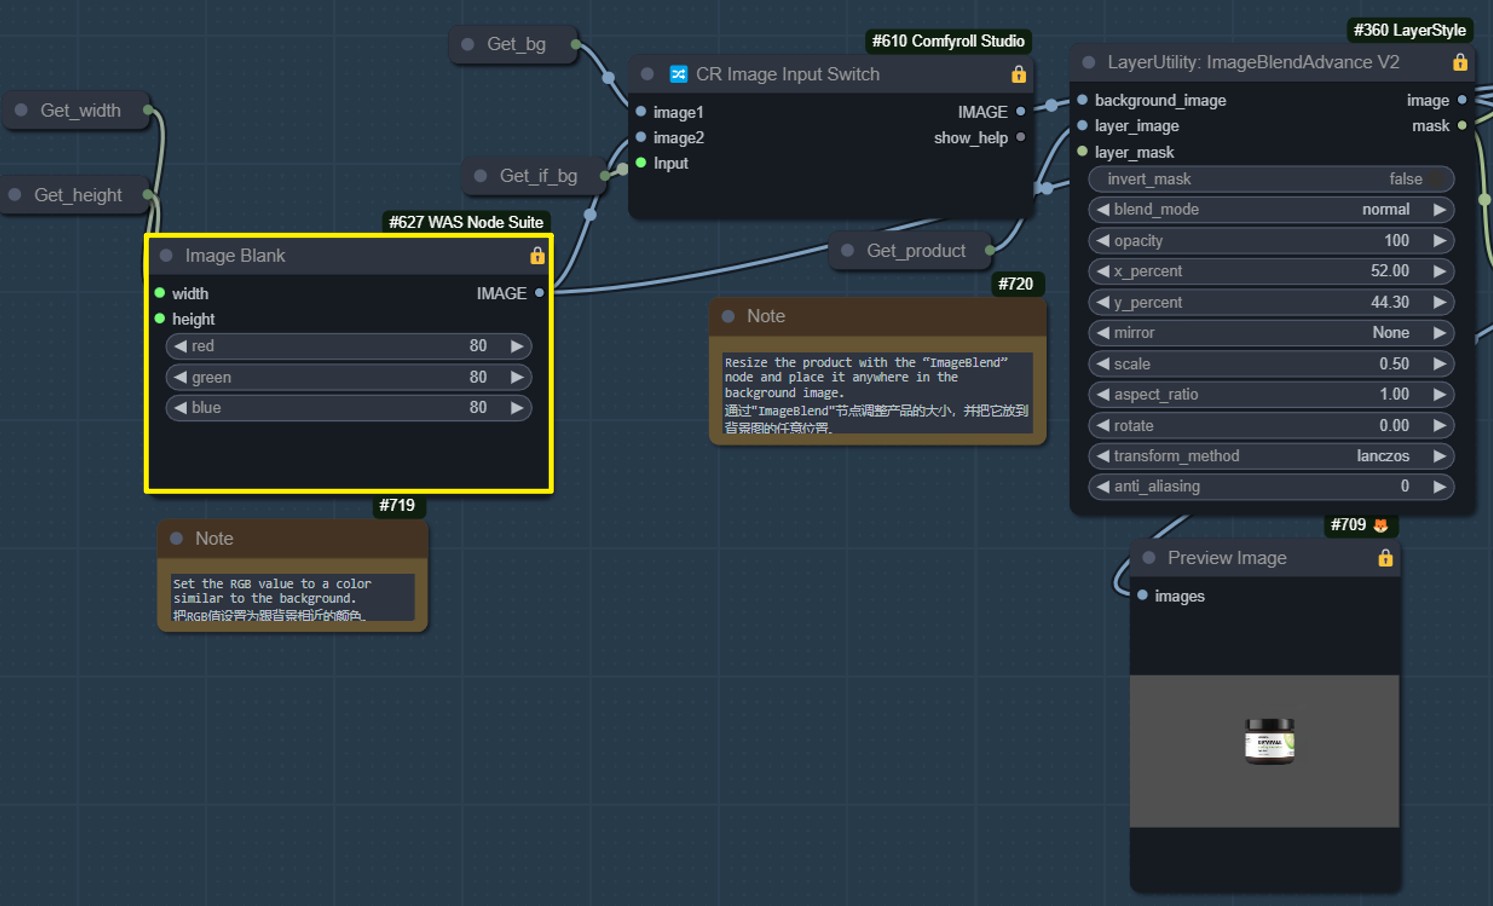
- Use the lightning version of the checkpoint to quickly generate a product image with a solid color background defined by RGB values using “product_rgb_bg” for the K sampler.
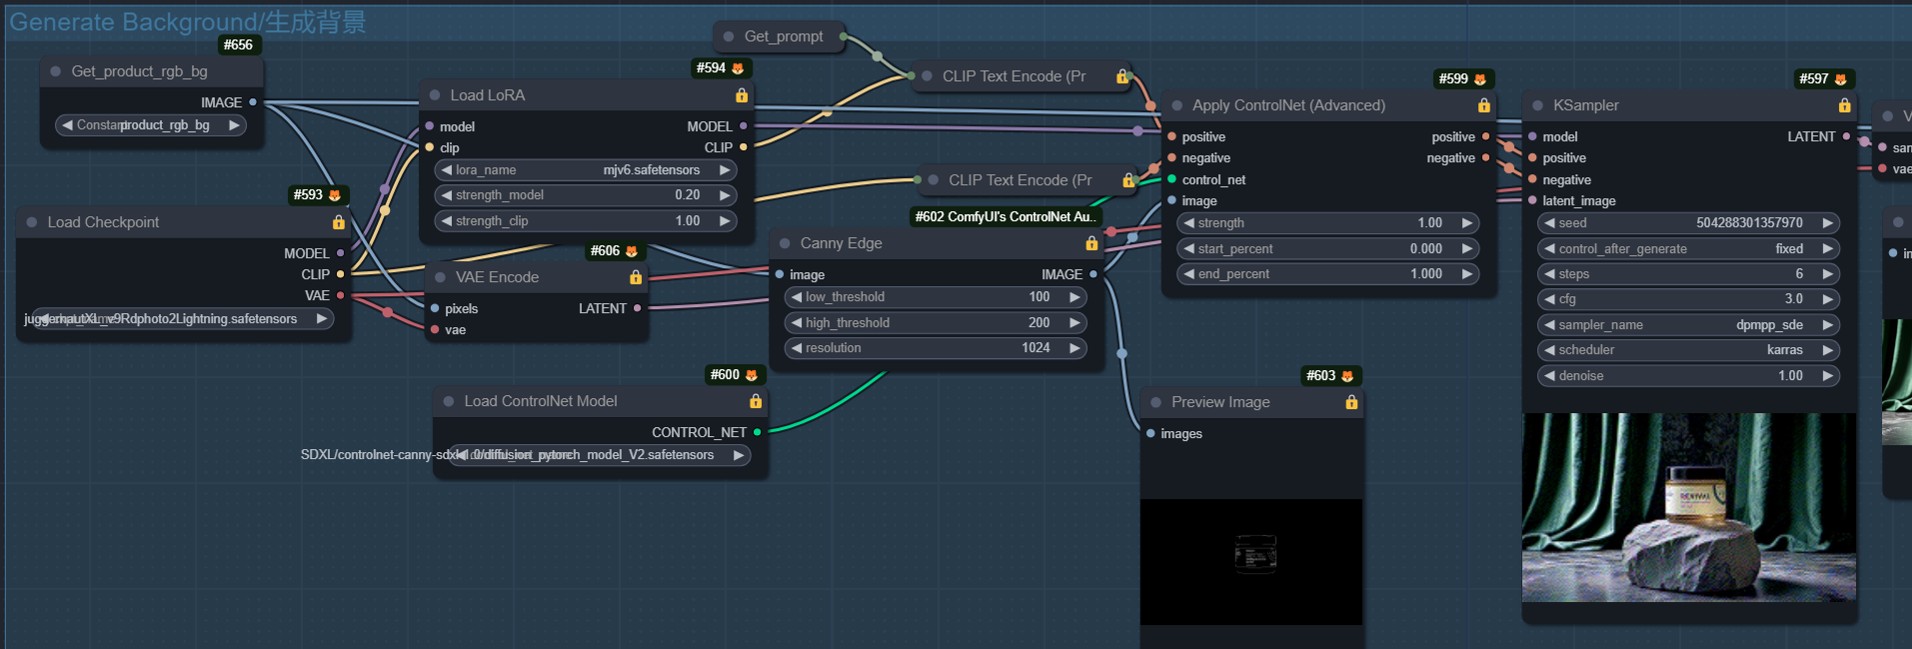
- Set the RGB value close to the desired background image color and use LoRA to mimic the Midjourney style for a better-lit background image.
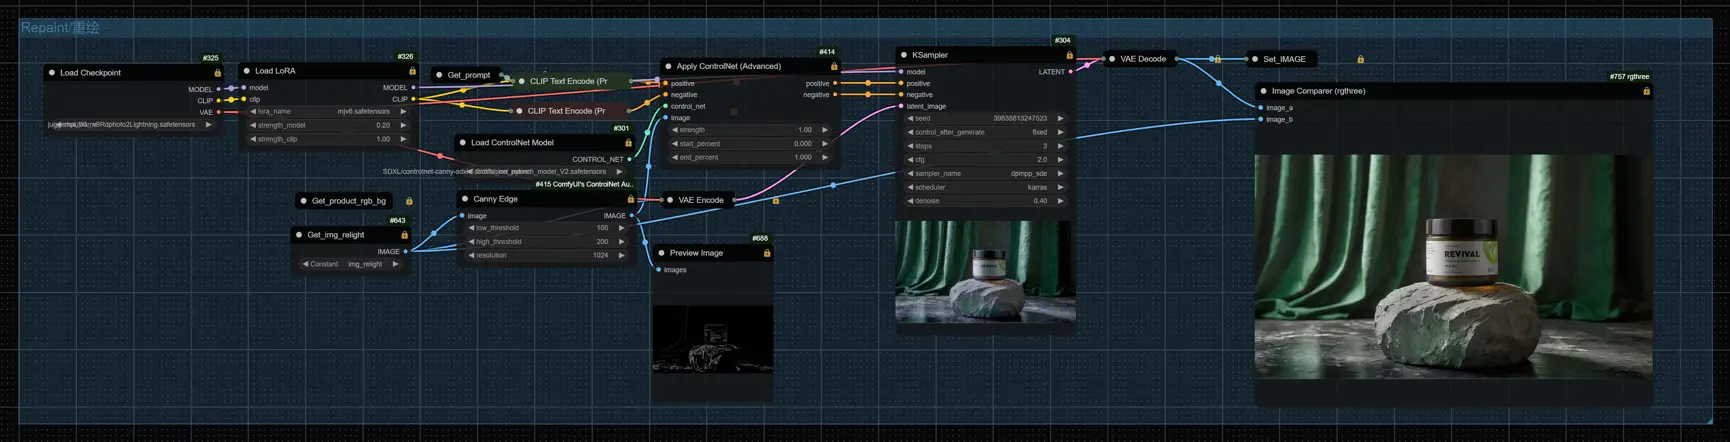
2️⃣ ControlNet
- ControlNet helps locate the product. The product details in the generated background image may differ from the actual product, but their locations will match, making detail recovery easier.
- If the background generated by the prompt is better, switch the “Use Background Image” boolean to “False” to use the prompt-generated background as the final one.
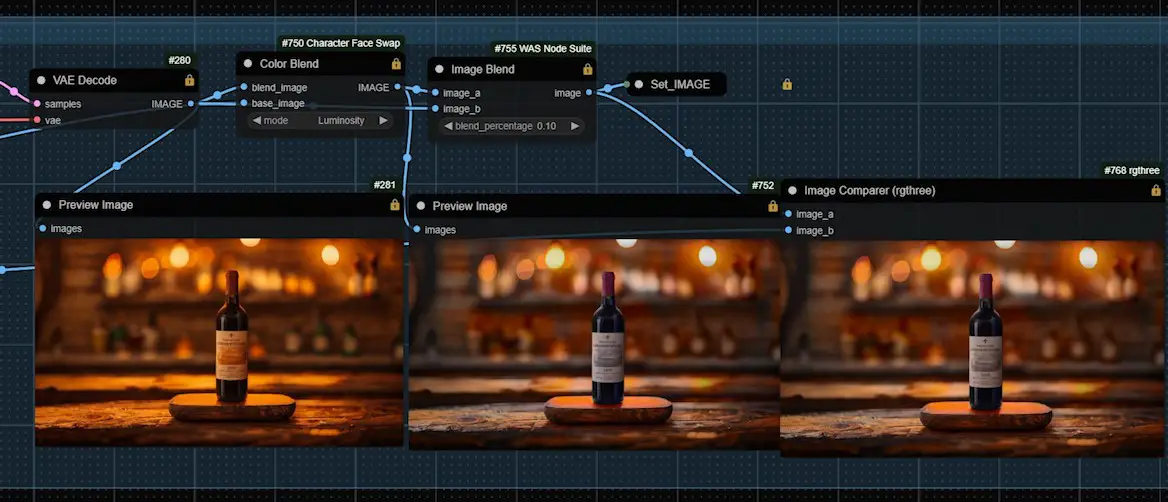
6. Relighting and Repainting
1️⃣ Running the Relighting Workflow
- The core is the IC-Light node. Despite some flaws, it enhances the light and shadow effects and adds depth to the product.
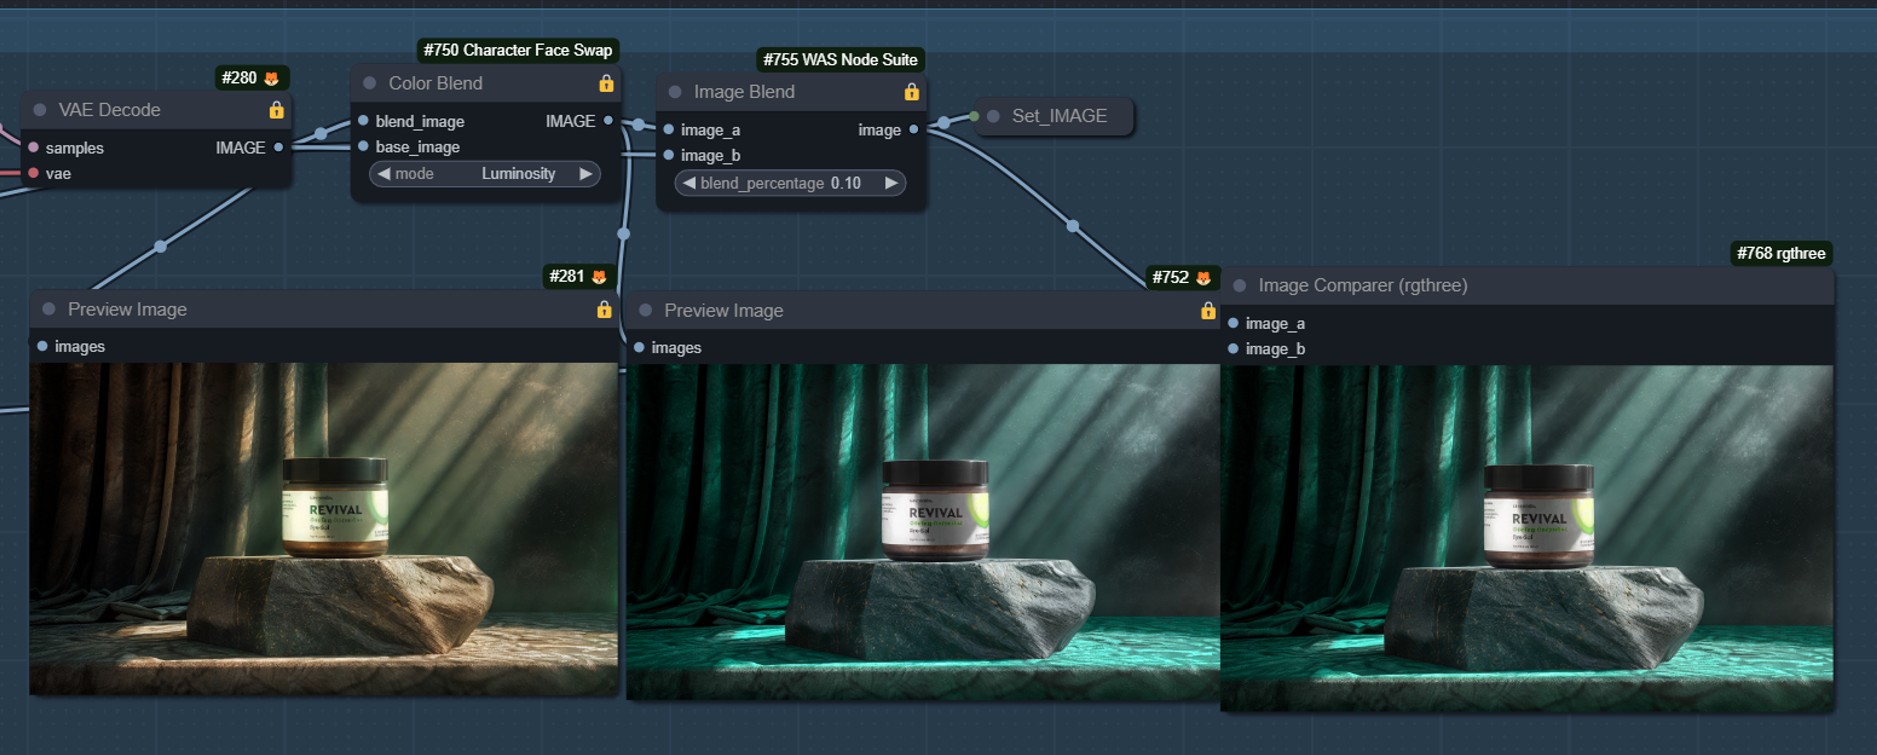
- Use the “ColorBlend” node to restore the original color while retaining the light and shadow effects.
2️⃣ Adjust the Relighting Parameters
- If the lighting effect isn’t satisfactory, adjust the parameters of the node on the right side of the “Locate Product” group and modify the brightness image to enhance the lighting effect.
3️⃣ Repaint Image
- If relighting results are unsatisfactory, return to the control panel and open the “Repaint” group.
- Repainting restores the detail lost during the relighting workflow.
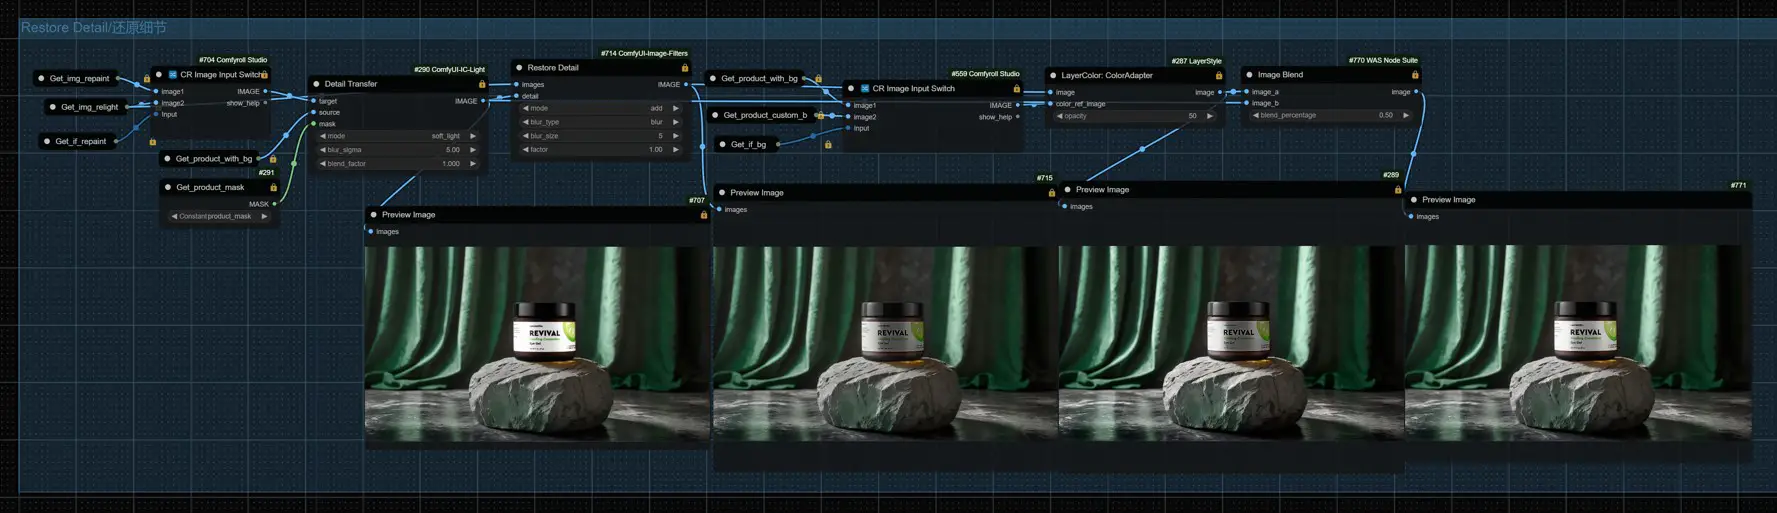
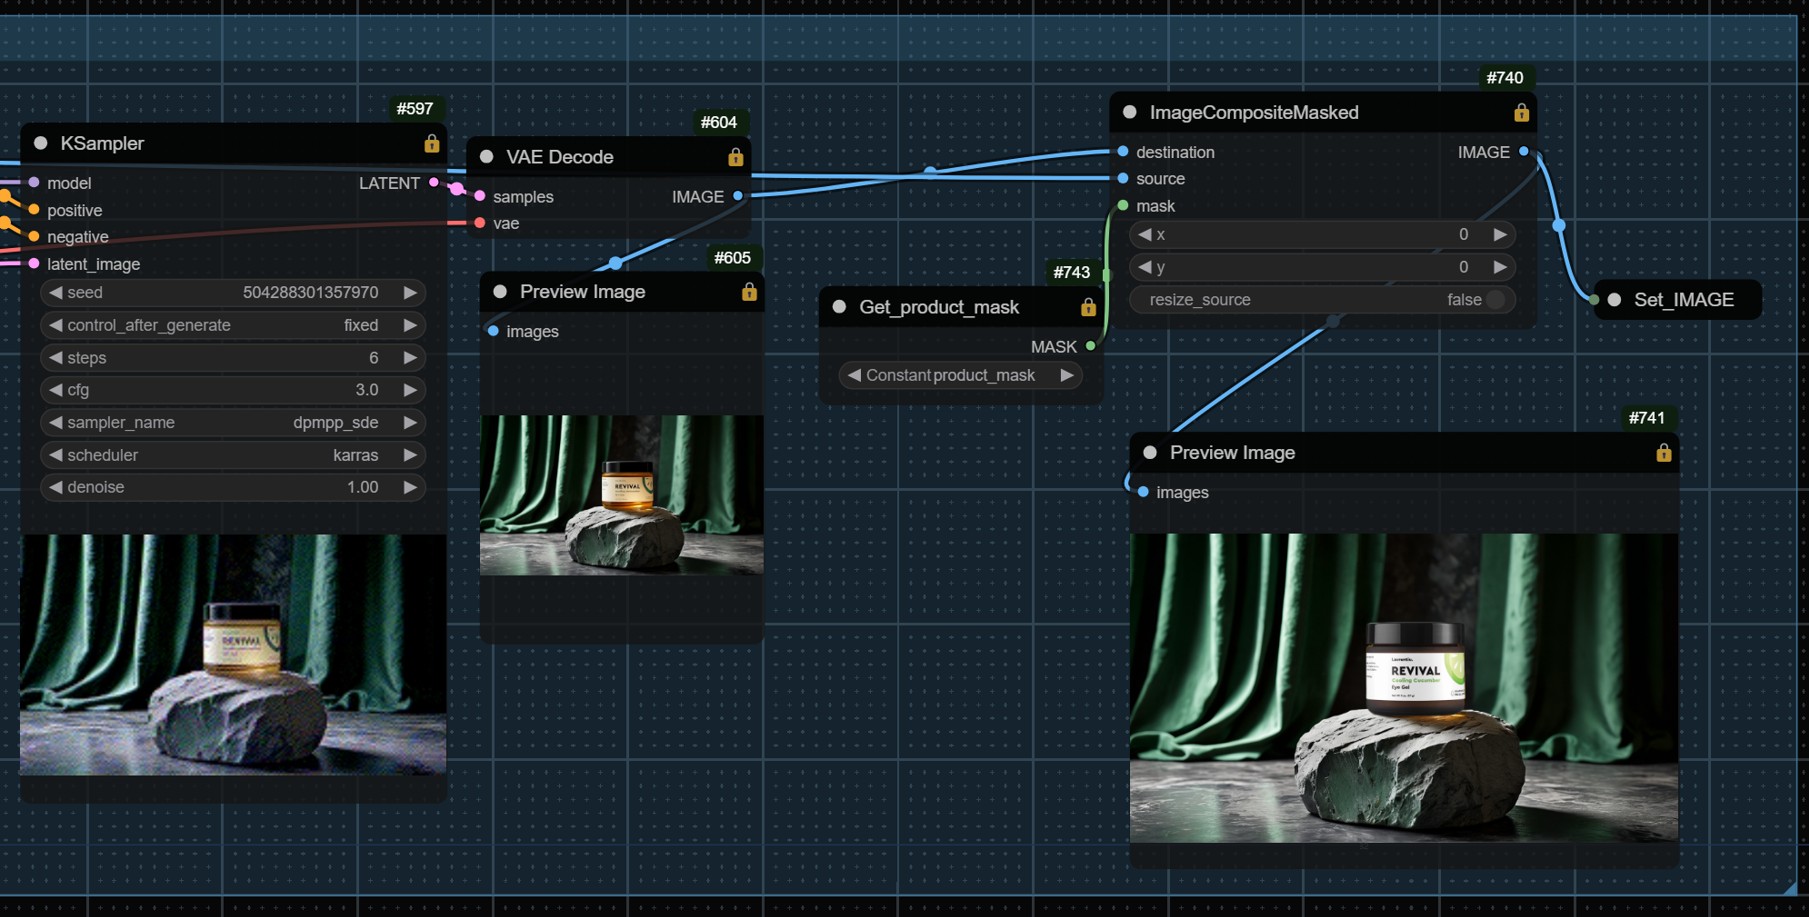
7. Restore Details and Colors
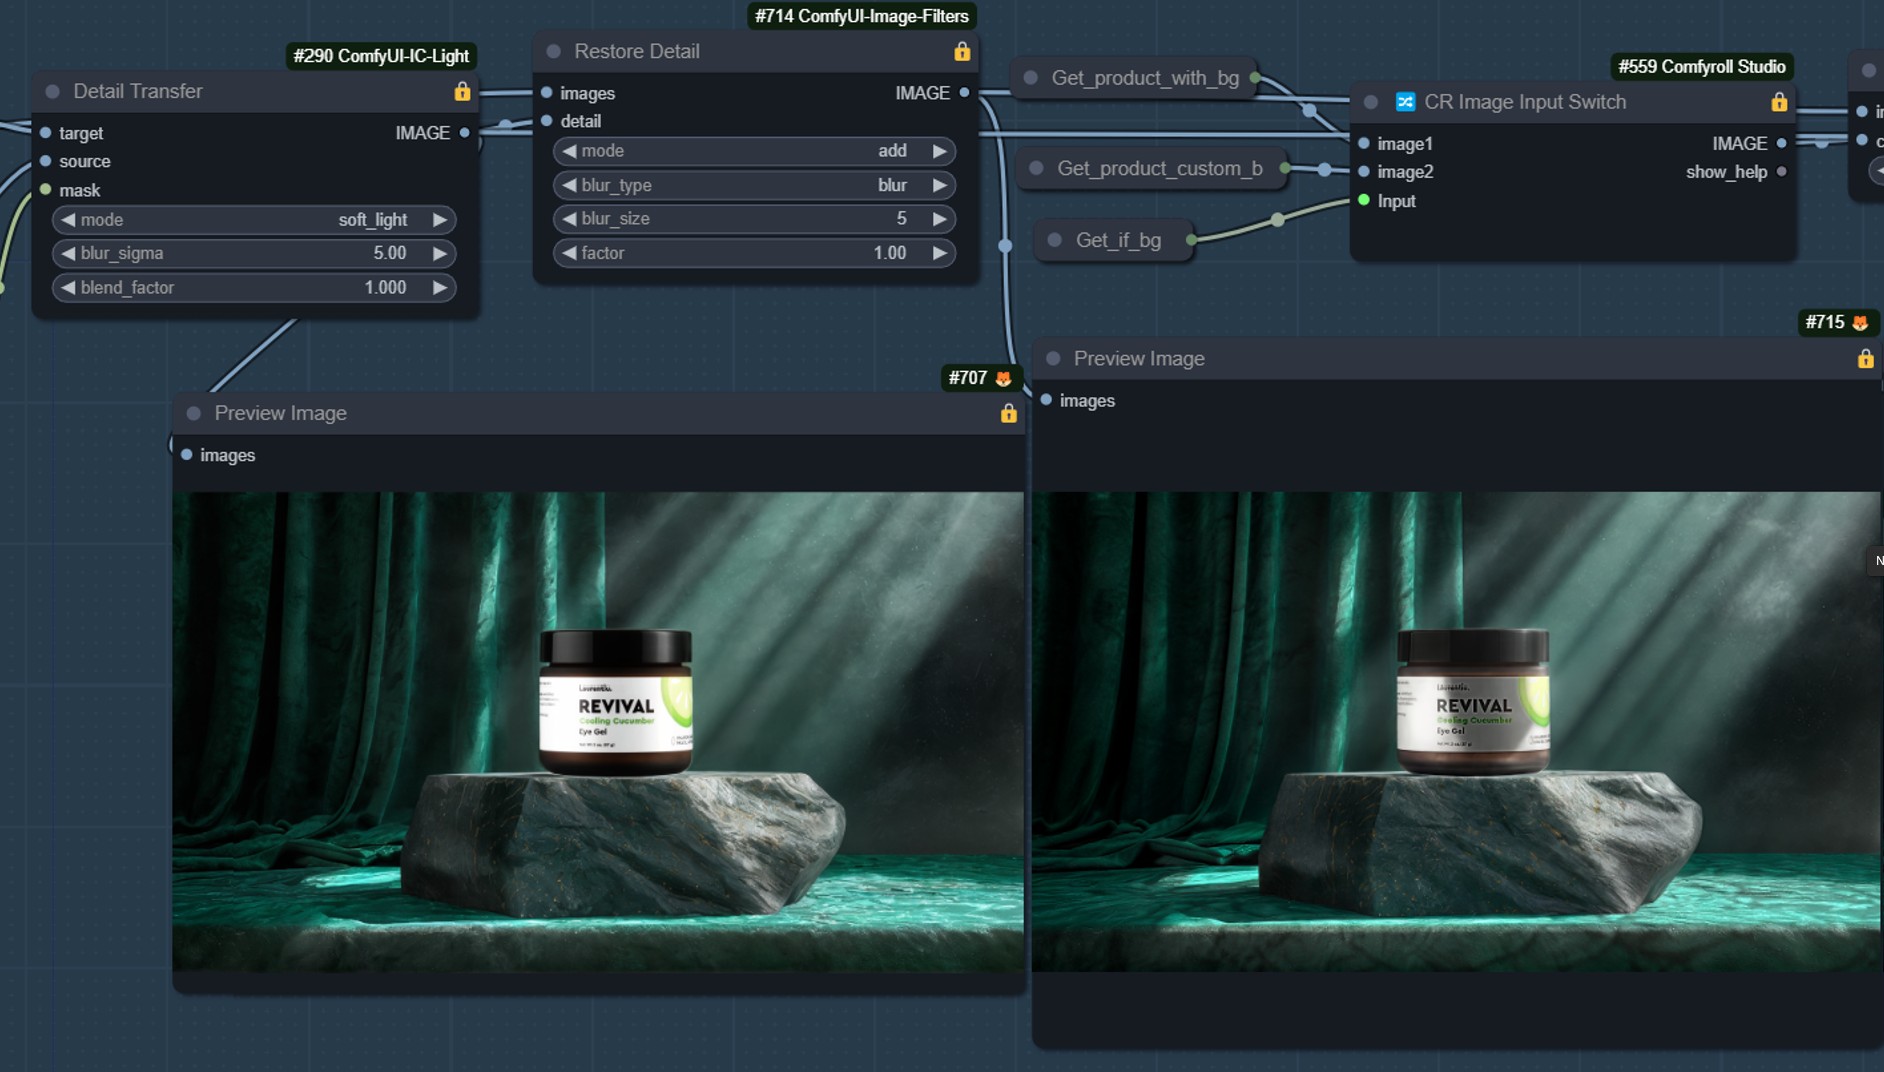
1️⃣ Restore Details
- Return to the control panel and open the “Restore Detail” group. If repainting isn’t effective, switch the “Repaint” boolean to “False.”
- The “Detail Transfer” node restores the product text. Adjust the “blend_factor” to regain depth, and use the “Restore Detail” node to further restore highlights and shadows.
2️⃣ Restore Colors
- Use the “ColorAdapter” node to restore colors, referring to the image in the “Locate Product” group or the prompt-generated image, depending on the boolean value in control panel.
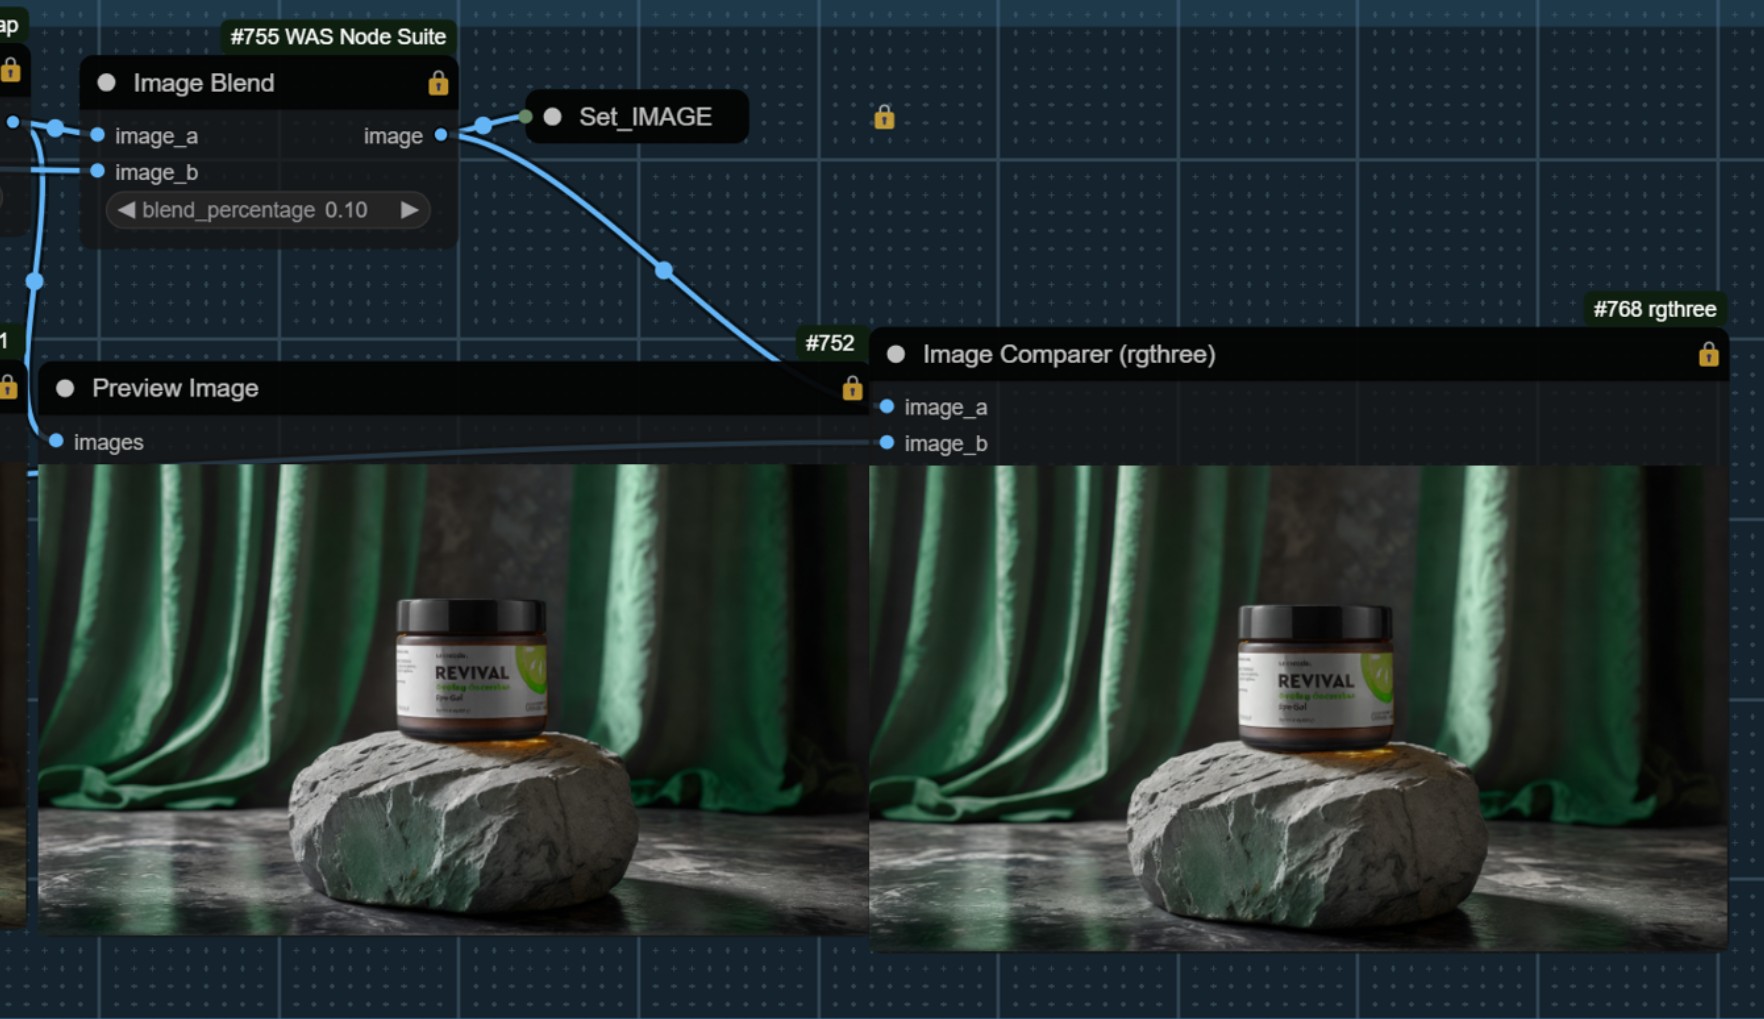
- Finally, use the “ImageBlend” node to balance the effect, adjusting the “blend_percentage” parameter to achieve the desired final result.
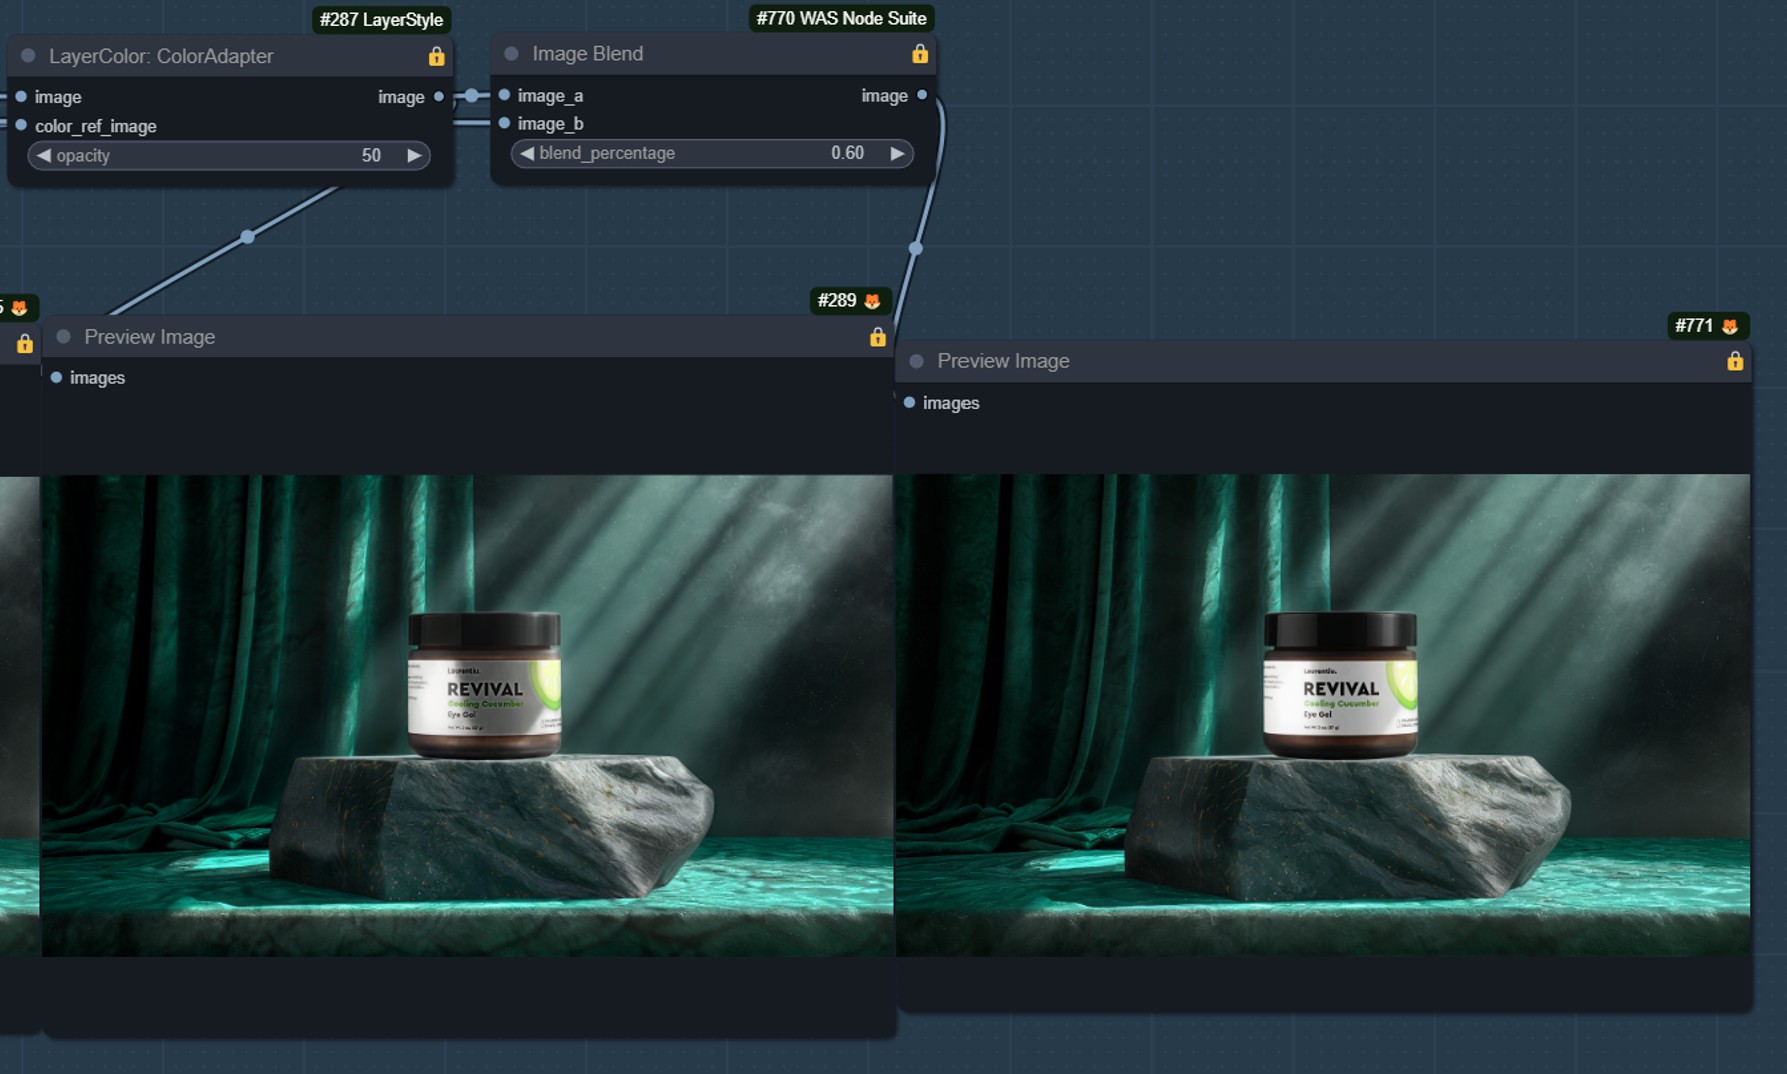
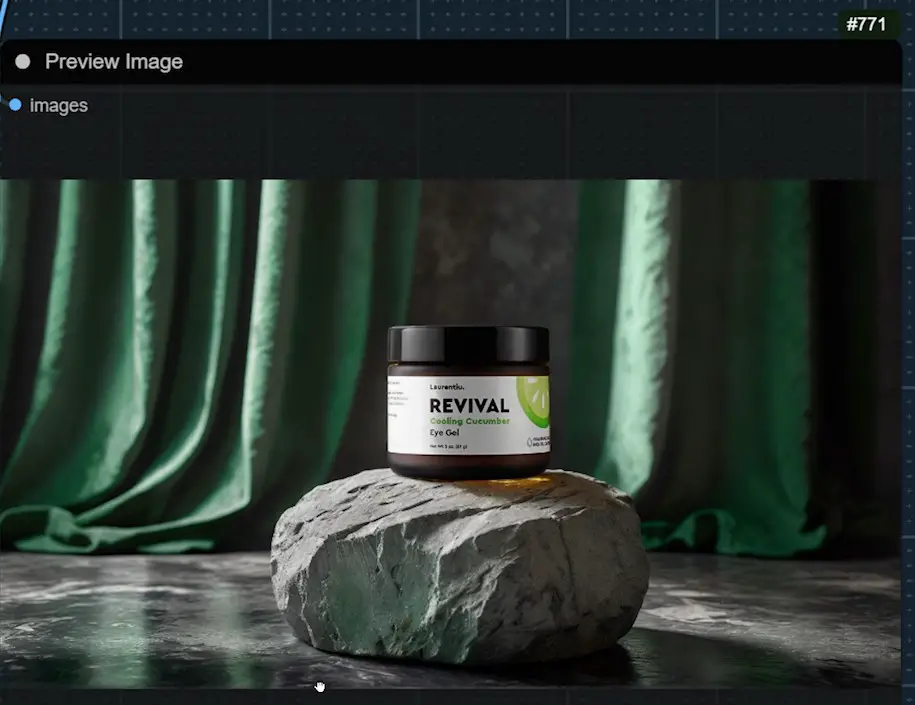
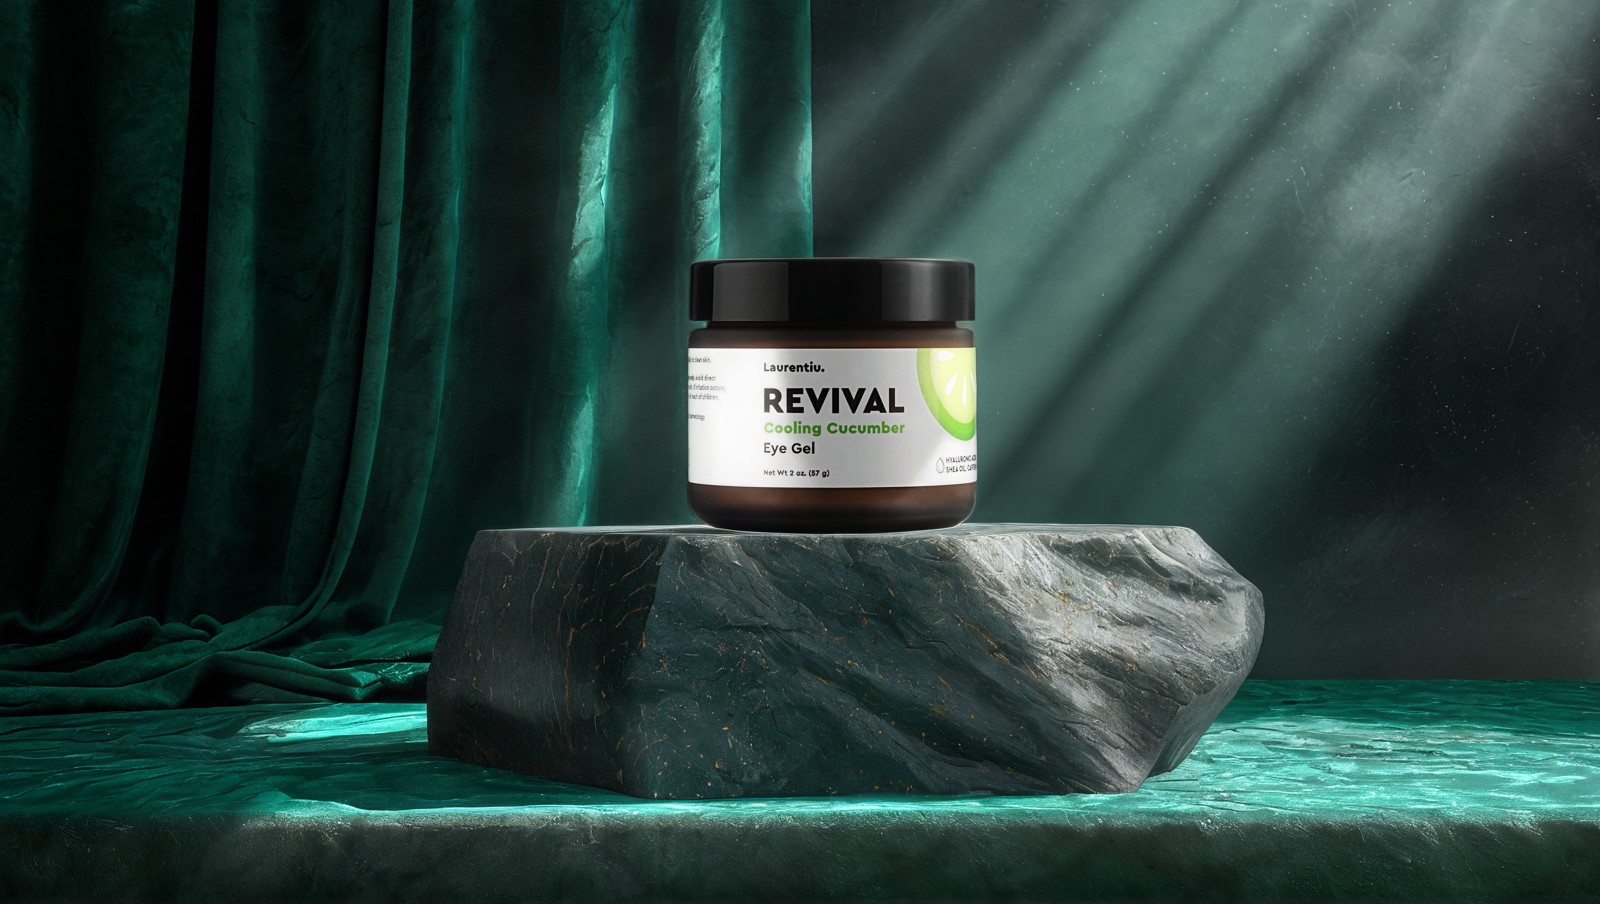
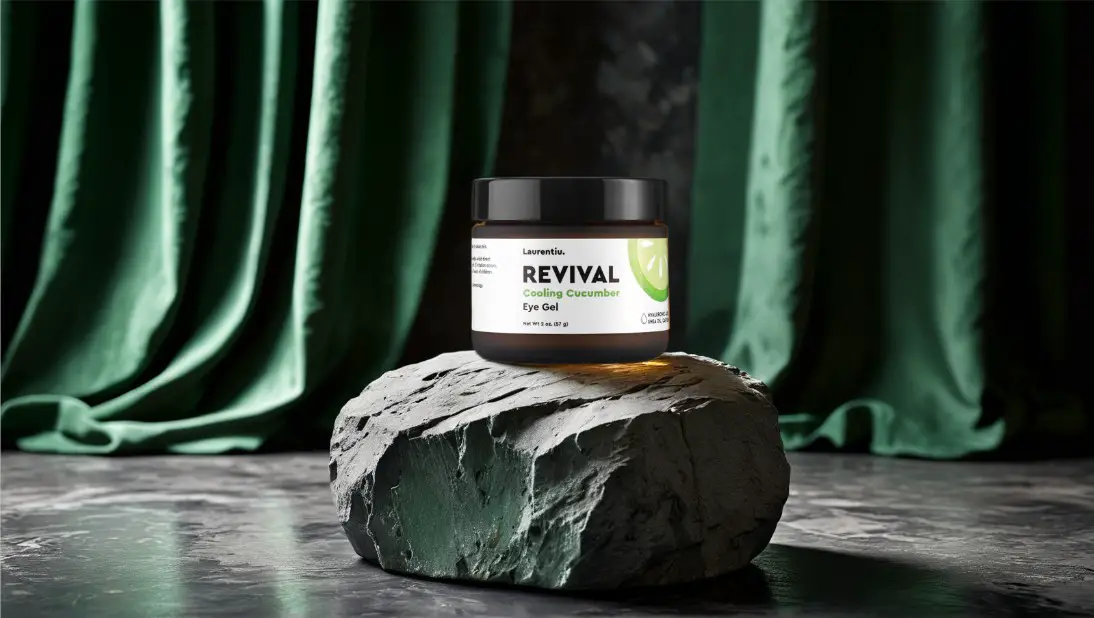
Final Image
Following these steps, the final image will naturally blend the product and the background, showcasing rich details and excellent light and shadow effects. Here’s an example of the final image:
Workflow Details (Prompt to Generate Background)
In the previous steps, we used an uploaded background image to allow the AI to blend the product naturally. Now, let’s see the effect of generating a background with a prompt.
1. Setting Up the Control Panel
1️⃣ Select Uploaded Product Image
- Return to the control panel and select the uploaded product image used for the background. This prevents workflow errors.
2️⃣ Toggle Boolean Value
- Set the “Use Background Image” boolean to “False” so the workflow won’t use the previously uploaded background image.
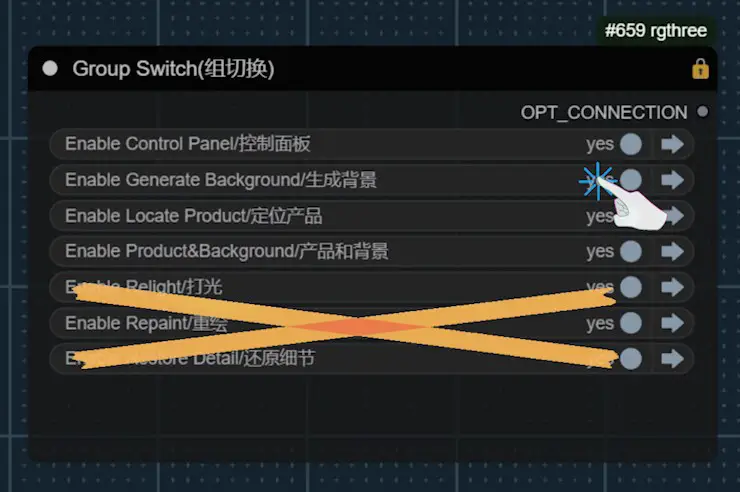
2. Turn Off Unrelated Groups
1️⃣ Disable Irrelevant Groups
- Close the “Relight,” “Repaint,” and “Restore Detail” groups to focus on generating background images.
3. Generate Background Image
1️⃣ Open the Generate Backgrounds Group
- Open the “Generate Background” group to create a background image using a prompt.
2️⃣ Generate Effect
- The generated background image looks good, but it may have some extra pixels not present in the original product. Even with “Canny” control, it’s recommended to create the background image first before uploading.
4. Relighting
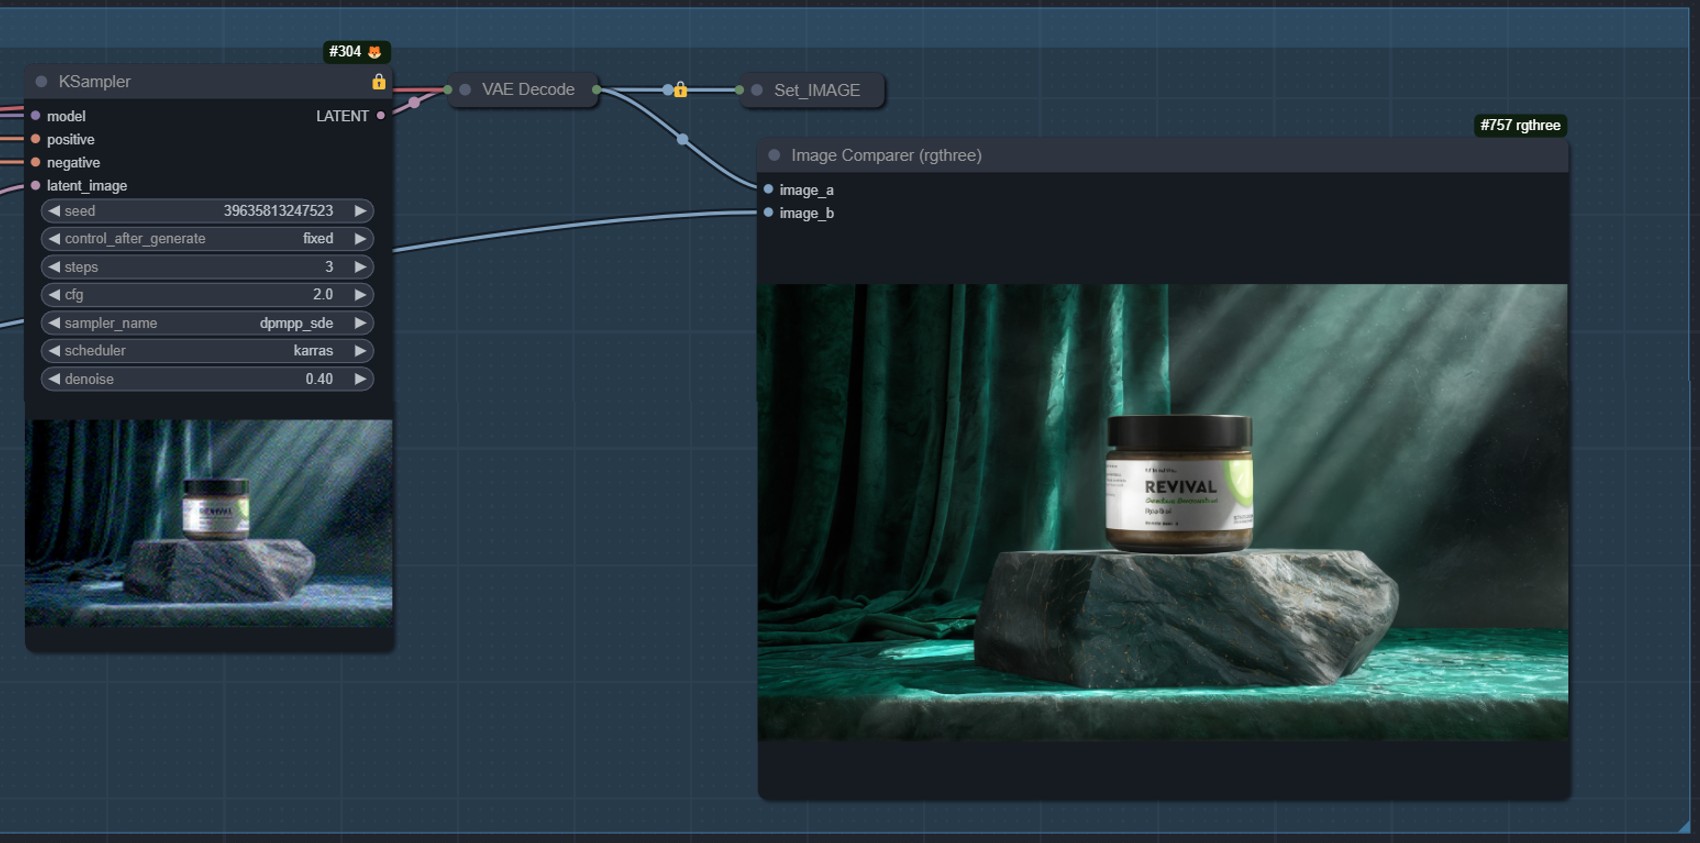
1️⃣ Relighting Effect
- After relighting, the product appears more three-dimensional.
5. Repaint
- Repainting makes the product’s light and shadow effects more natural.
6. Restore Details
- This results in the final image.
The Final Image
Following these steps, we achieve the final effect after generating the background image with a prompt. Here’s an example of the final image:
Summary
This detailed introduction covers the ComfyUI workflow. If you have suggestions for improvements, please share them in the comments. I’ll continue to optimize this workflow based on your feedback.
Nodes used in the workflow:
- ComfyUI LayerStyle: https://github.com/chflame163/ComfyUI_LayerStyle
- ComfyUI IC-Light: https://github.com/kijai/ComfyUI-IC-Light
- ControlNet Auxiliary Preprocessors: https://github.com/Fannovel16/comfyui_controlnet_aux
- ComfyUI Image Filters: https://github.com/spacepxl/ComfyUI-Image-Filters
- rgthree: https://github.com/rgthree/rgthree-comfy
- CharacterFaceSwap: https://github.com/ArtBot2023/CharacterFaceSwap
- Comfyroll Studio: https://github.com/Suzie1/ComfyUI_Comfyroll_CustomNodes
- ComfyUI Easy Use: https://github.com/yolain/ComfyUI-Easy-Use
- ComfyUI Essentials: https://github.com/cubiq/ComfyUI_essentials
- WAS Node Suite: https://github.com/WASasquatch/was-node-suite-comfyui
Checkpoints:
- Juggernaut XL Lightning: https://civitai.com/models/133005?modelVersionId=357609
- epiCRealism: https://civitai.com/models/25694/epicrealism
LoRA:
- Midjourney mimic: https://civitai.com/models/251417/midjourney-mimic