Achieve Perfect Inpainting with ComfyUI: Leveraging the Flux Fill Model for Exceptional Results
Welcome, creators! In this article, we’ll dive into an advanced ComfyUI inpainting workflow designed for flexibility and efficiency. In my previous article, I covered outpainting and inpainting results using different versions of the Fill model, alongside a practical outpainting workflow.
Today, we’re focusing on inpainting, with a special look at how to swap items, fix distorted faces, and even repair those tricky AI-generated hands.
For those who love diving into ComfyUI with video content, you’re invited to check out the engaging video tutorial that complements this article:
Let’s get started!
The Importance of a Solid Inpainting Workflow
The workflow I’ve developed is highly versatile and works well with quantized models, making it much more memory-efficient. Whether you’re altering small details or making larger changes like replacing a hat or fixing a hand, this method will help you achieve quality results with minimal hassle.
Let me show you exactly how to use this setup.
1. Setting Up the Workflow
Step 1: Loading Models
First, bypass the other node groups and activate the first one, which is responsible for loading the models. I’ve pre-configured this section for you, so we’re ready to run the workflow.
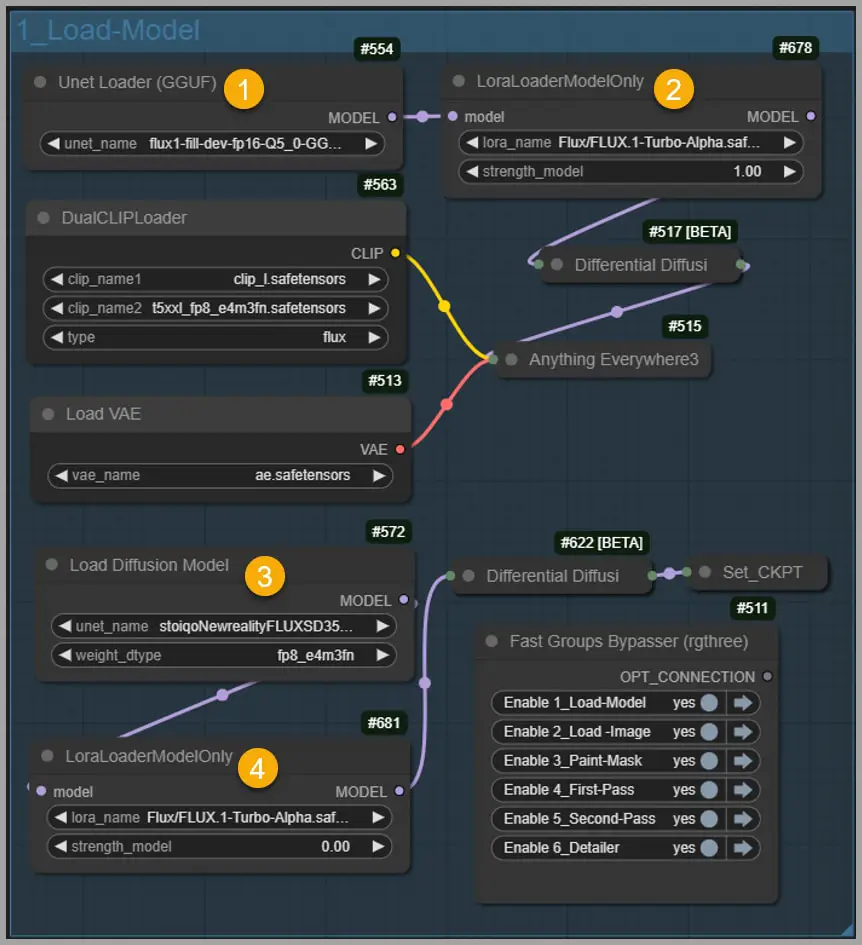
The first node in the group loads the Fill model, which is versatile enough for both outpainting and inpainting tasks. For this demonstration, I’m using the quantized Q5 version of the model [1]. It only takes up 8 GB of VRAM, which is much more manageable. If you’re low on video memory, you can opt for the Q4 version, which uses just 6.8 GB.
The difference in results between the Q5 and the Black Forest Labs’ 20 GB model is actually minimal, as verified in my previous article. You can confidently use these smaller versions for the first round of inpainting. For speed and efficiency, I’ve added a Turbo LoRA [2] to speed up image generation in the node on the right.
The node below the Fill model [3] loads a checkpoint to determine the final quality of the image. This step is crucial, as it allows the workflow to work smoothly even with low VRAM. If needed, you can load a quantized checkpoint like FluxRealistic, which only requires 6.8 GB of VRAM but still delivers good quality.
There’s another Turbo LoRA node [4] here, but I’ve set its strength to zero because it’s not very useful at this stage. You can come back to it later for tasks like fixing faces or hands.
Step 2: Constraining Image Size
Activate the second node group, which is responsible for loading the image and limiting its size with the “Constrain Image” node.
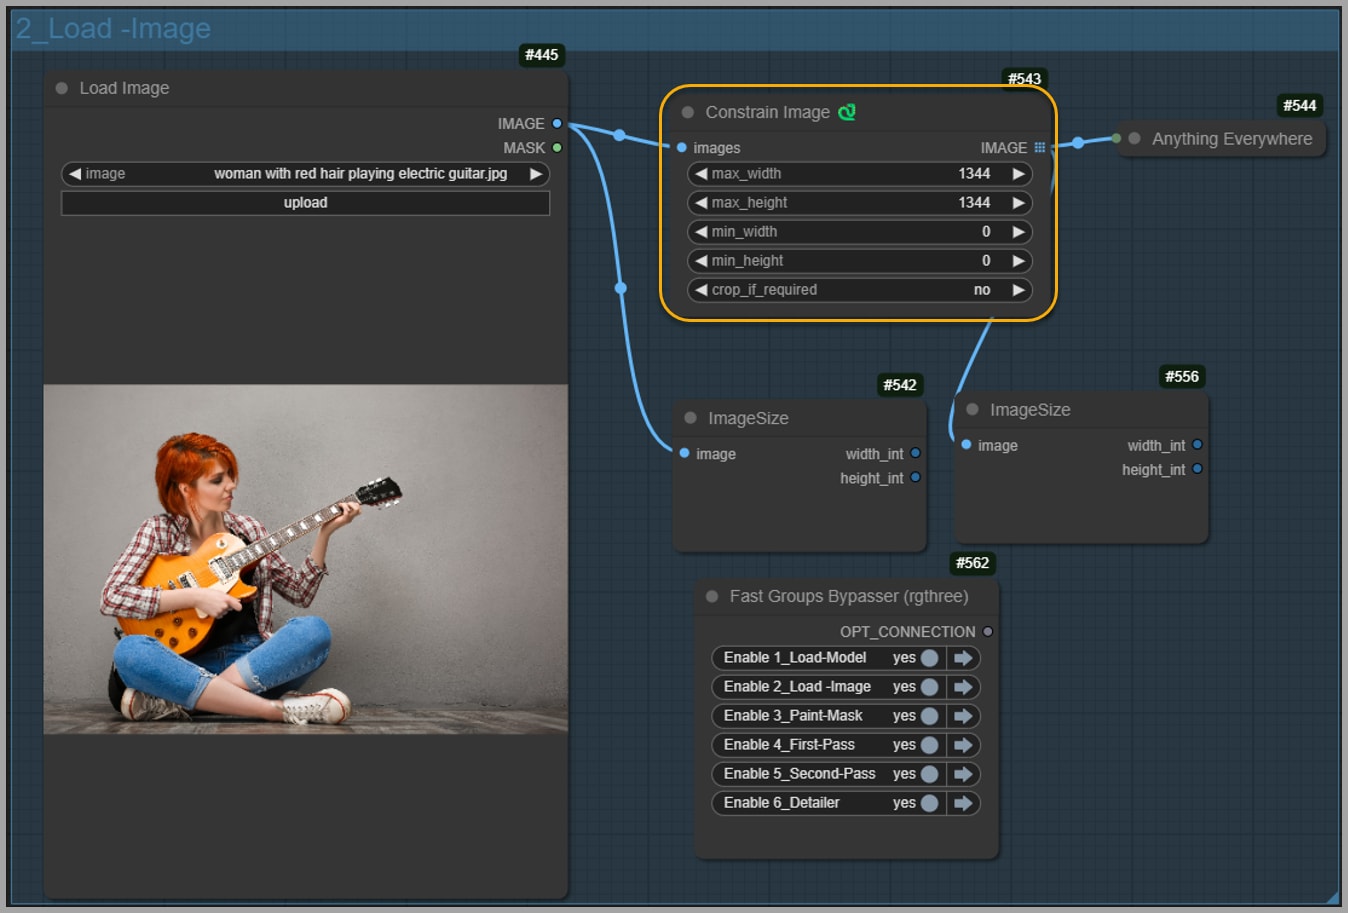
This step is essential to prevent video memory overload. If your image is large but the inpainting area is small, you won’t need to resize the entire image. We’ll crop the inpainting area later, and this step is primarily aimed at managing the size of that area.
2. Creating the Inpainting Mask
Step 3: Generating the Mask
Next, we activate the third node group, where we’ll create the mask for inpainting. This is where you have three options: generate the mask automatically, adjust it manually, or paint it from scratch.
For large images—especially ones like 4K—if your VRAM is limited, I recommend manually painting the mask. The automatic generation using the “SegmentAnything” node works well for smaller images, but it might be slow or imprecise with larger ones.
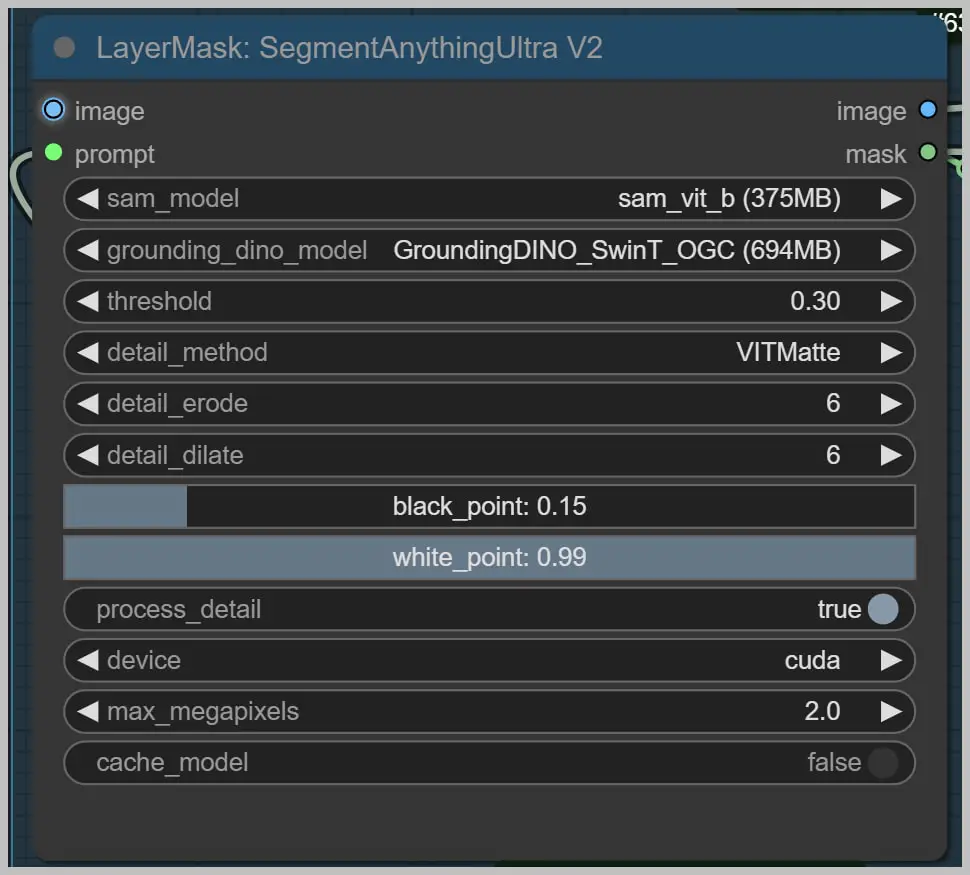
To generate an automatic mask, just enter the object you want the node to identify, such as “hair,” “shirt,” or “jeans.” The node will segment these areas for you.
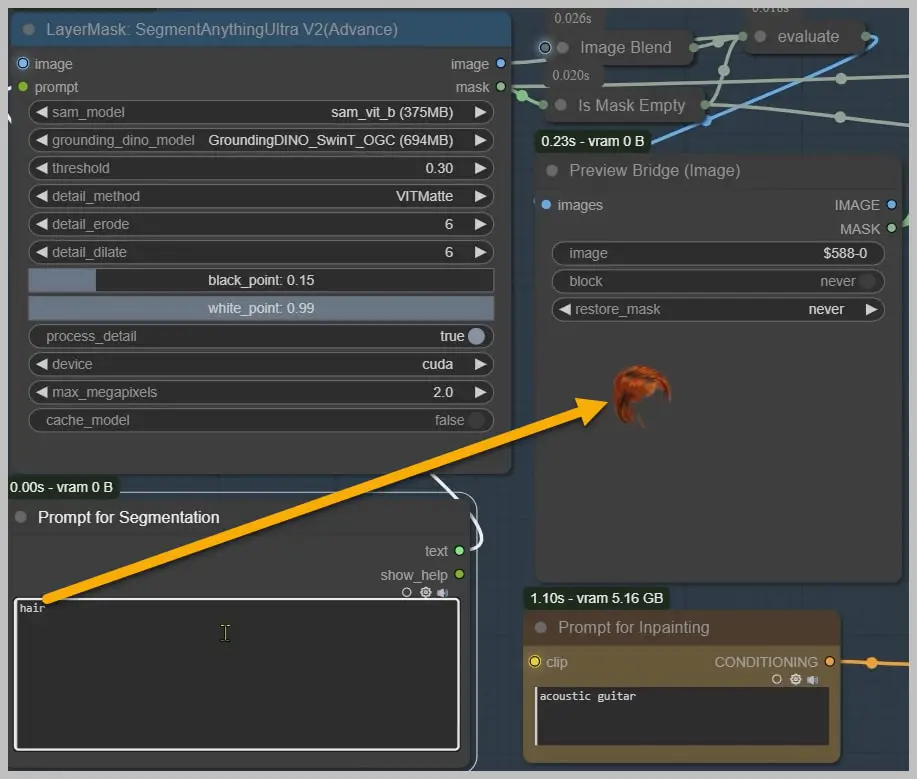
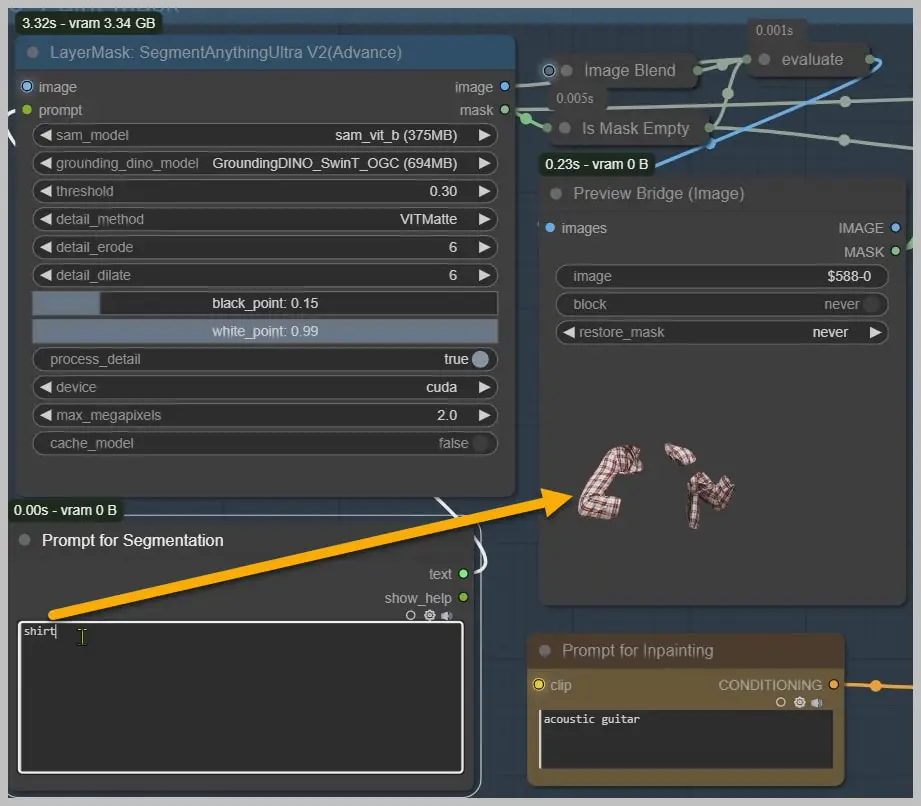
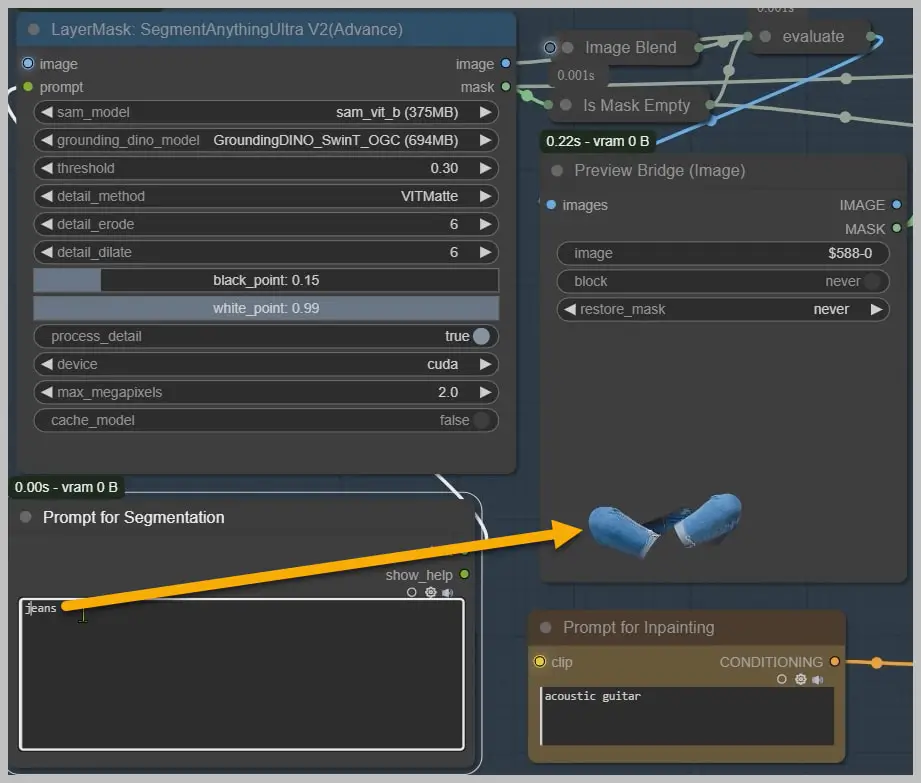
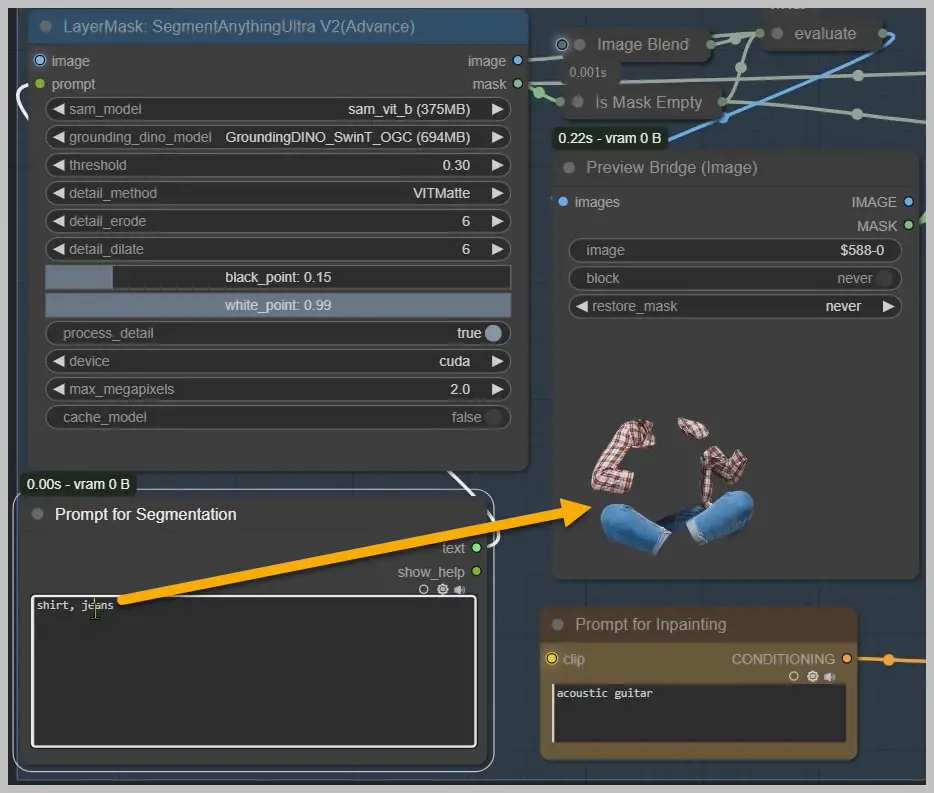
However, if it struggles to identify an item (like a guitar), it’s often best to paint the mask manually.
For example, if we want to change an electric guitar to an acoustic one, the node may not identify it correctly because part of the guitar is obscured by the arm. To fix this, I simply switch to the “Preview Bridge (Image)” node and manually paint over the guitar to ensure I capture the right area for inpainting.
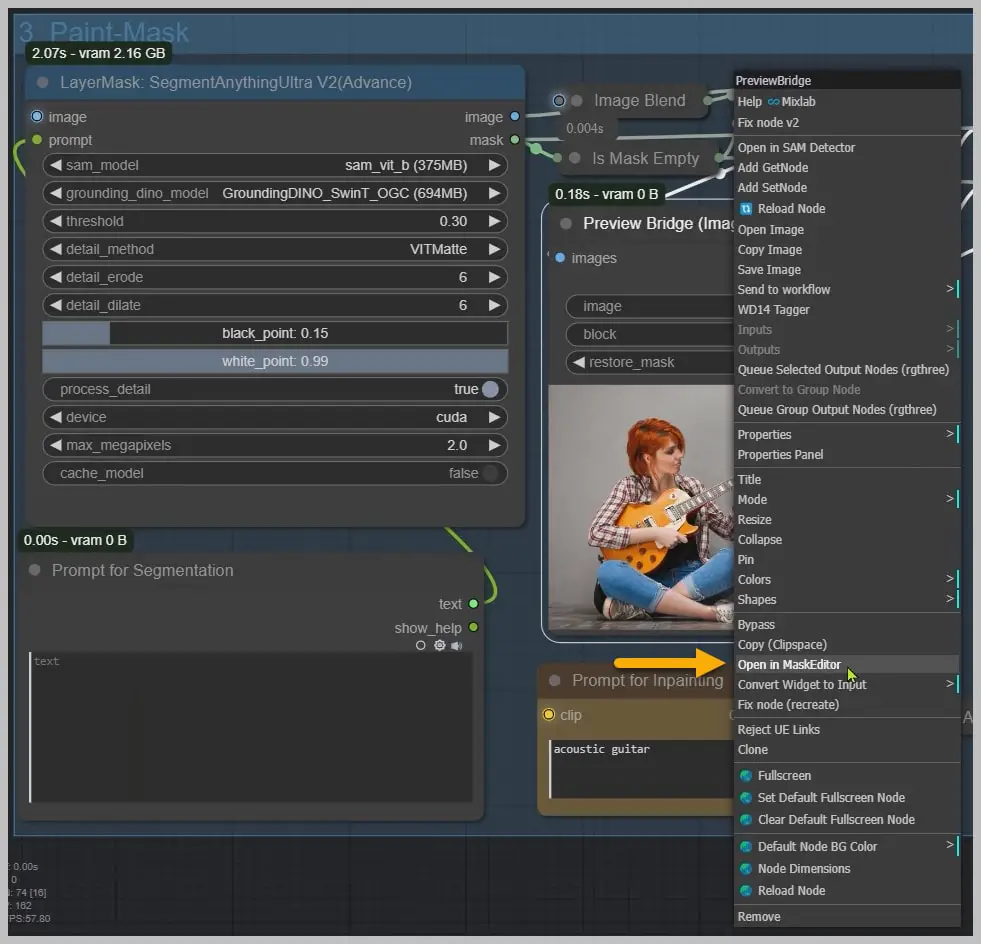
Step 4: Refining the Mask
I’ve made the mask a bit larger than the electric guitar to account for the size difference between electric and acoustic guitars. I also include the woman’s hand because the inpainting process may affect or distort pixels in that area.
Once the mask is ready, save it, and proceed with running the workflow.
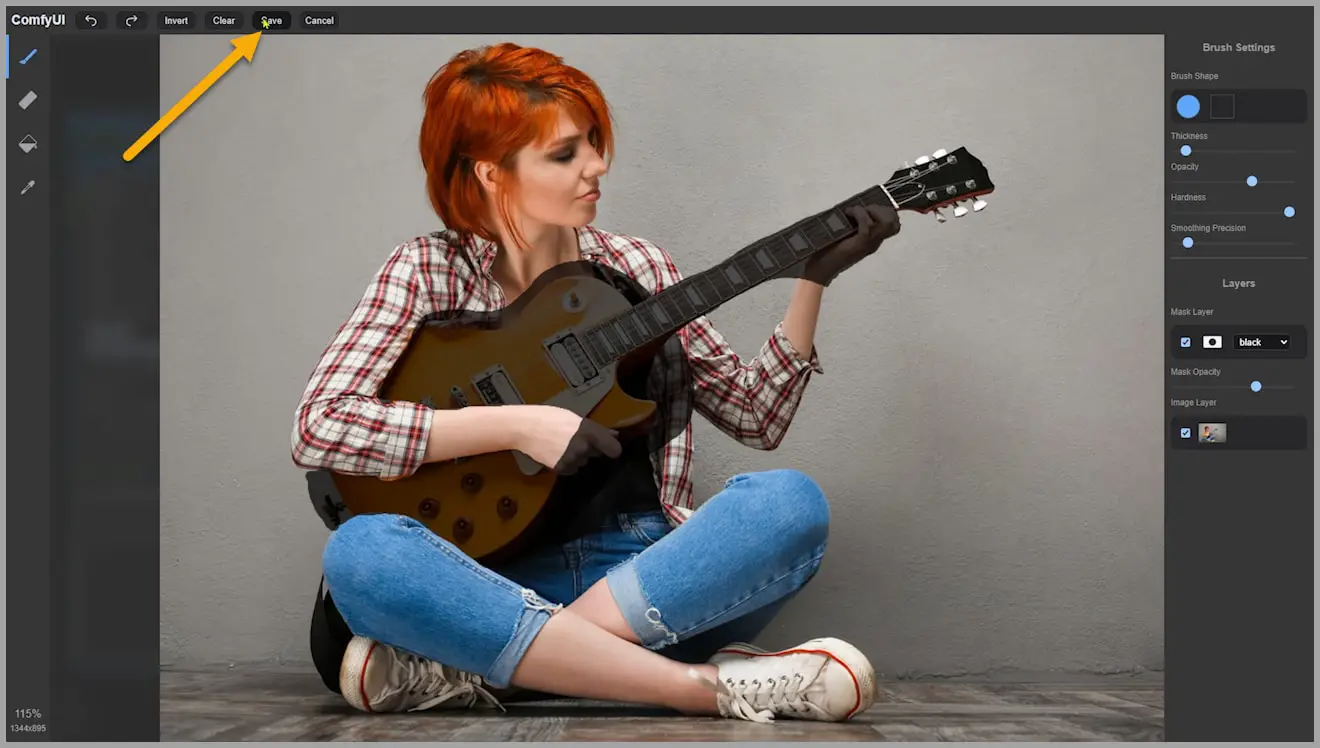
Step 5: Inpainting the Area
In the node below, you’ll enter a description of what you want the inpainted area to become. For example, to change the electric guitar into an acoustic guitar, you’d type “acoustic guitar.” [1] The node on the right, “GrowMask,” [2] slightly expands the inpainting area to ensure the results blend smoothly with the surrounding image.
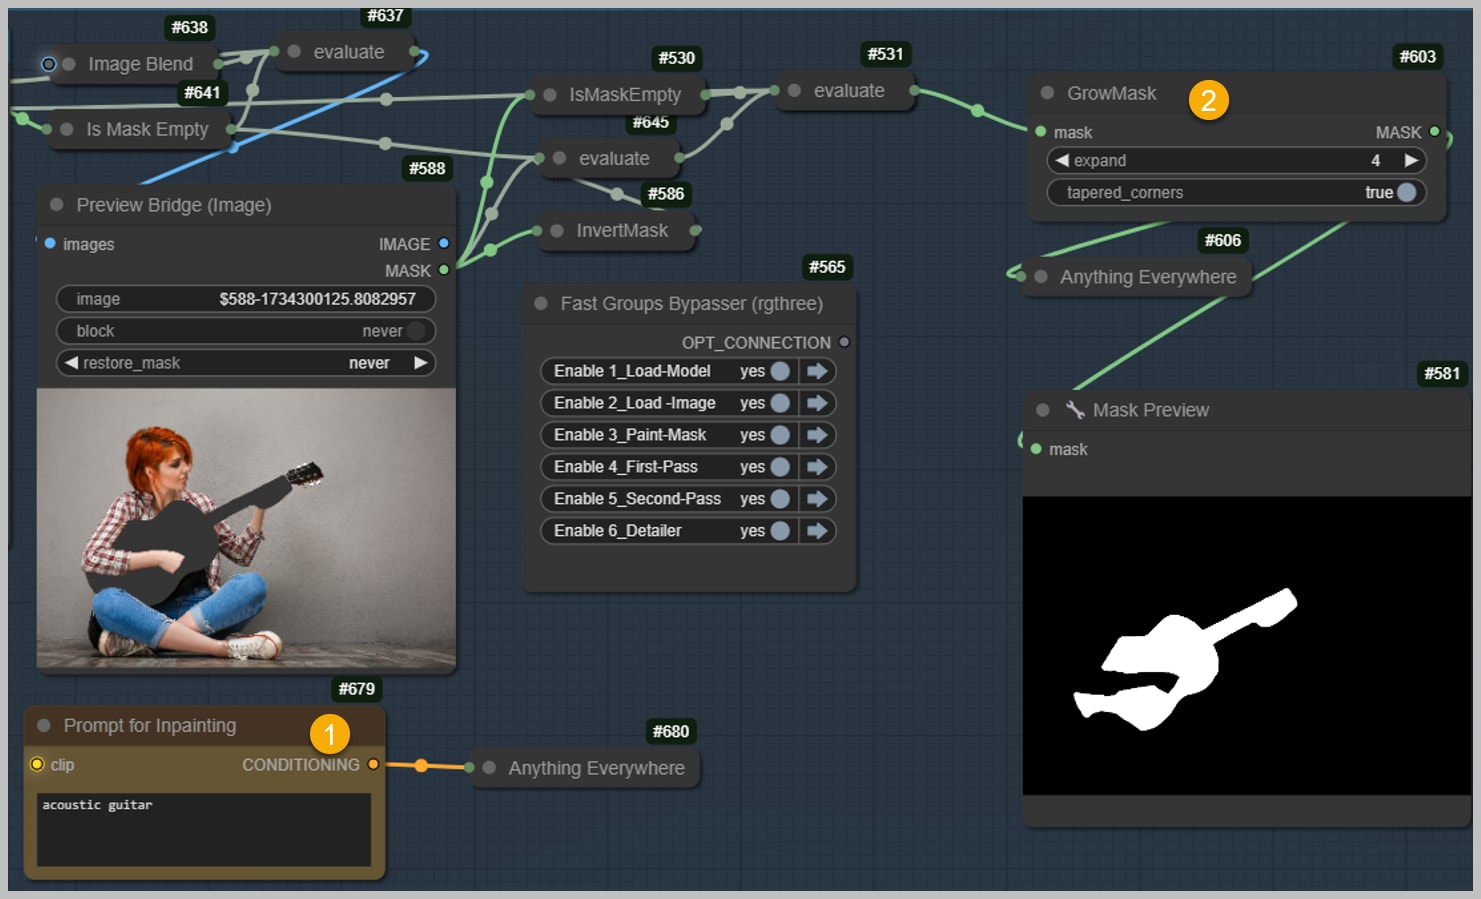
3. Cropping for Better Inpainting
Step 6: Using the “CropByMask” Node
To achieve higher-quality results, the next step is to use the “CropByMask” node. This is especially useful when inpainting smaller areas, like a hand.
When inpainting a small area, like a hand, cropping just the hand alone will not provide sufficient context for detailed, natural-looking results. By cropping around the hand while keeping some of the surrounding space, the AI can reference the light and shadow of nearby areas for a more cohesive look.
Adjust the parameters in this node to reserve the right amount of space around the area you want to inpaint. Try to keep it minimal while ensuring the inpainting blends smoothly with the surroundings.
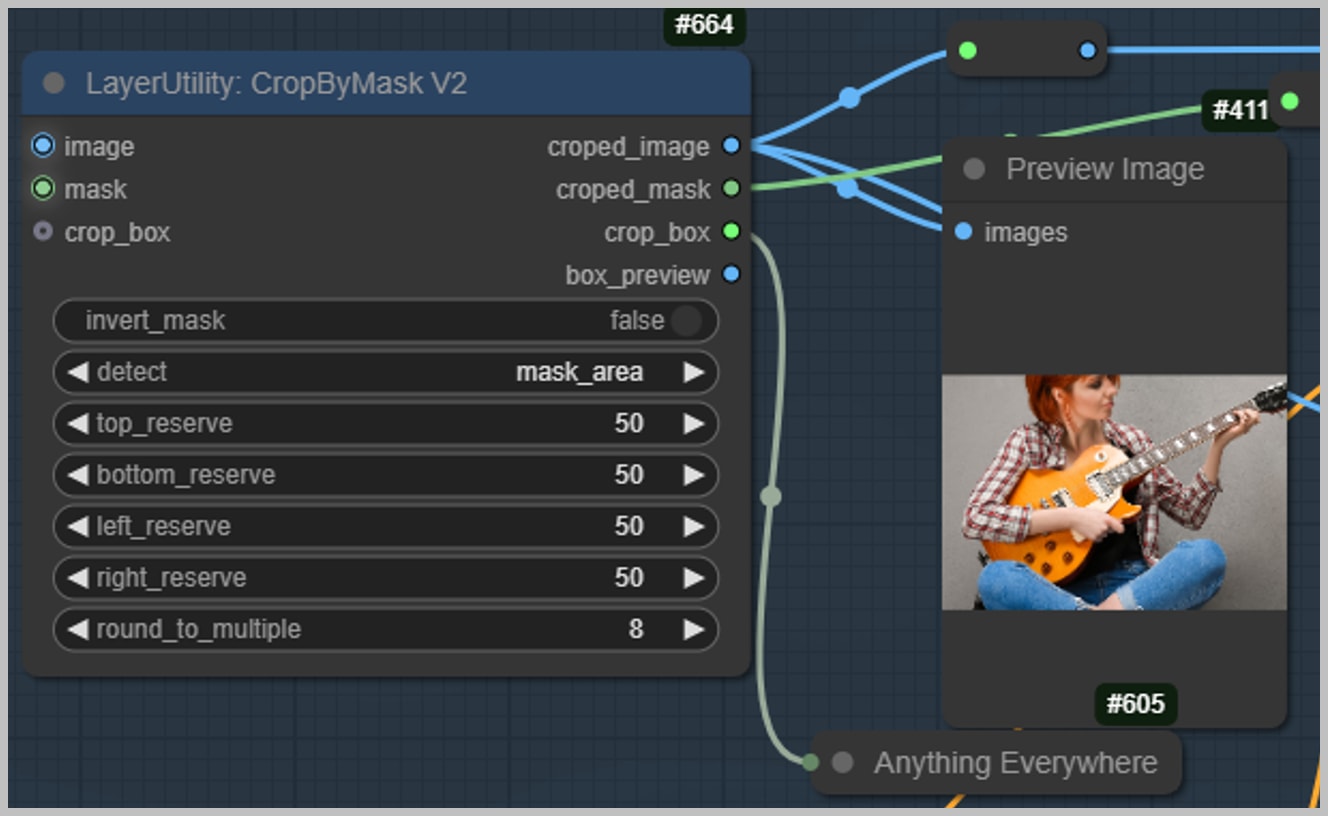
Step 7: Running the First Round of Inpainting
I’ve set the sampler steps to 8, which works well with the Turbo LoRA. Then, I run the workflow.
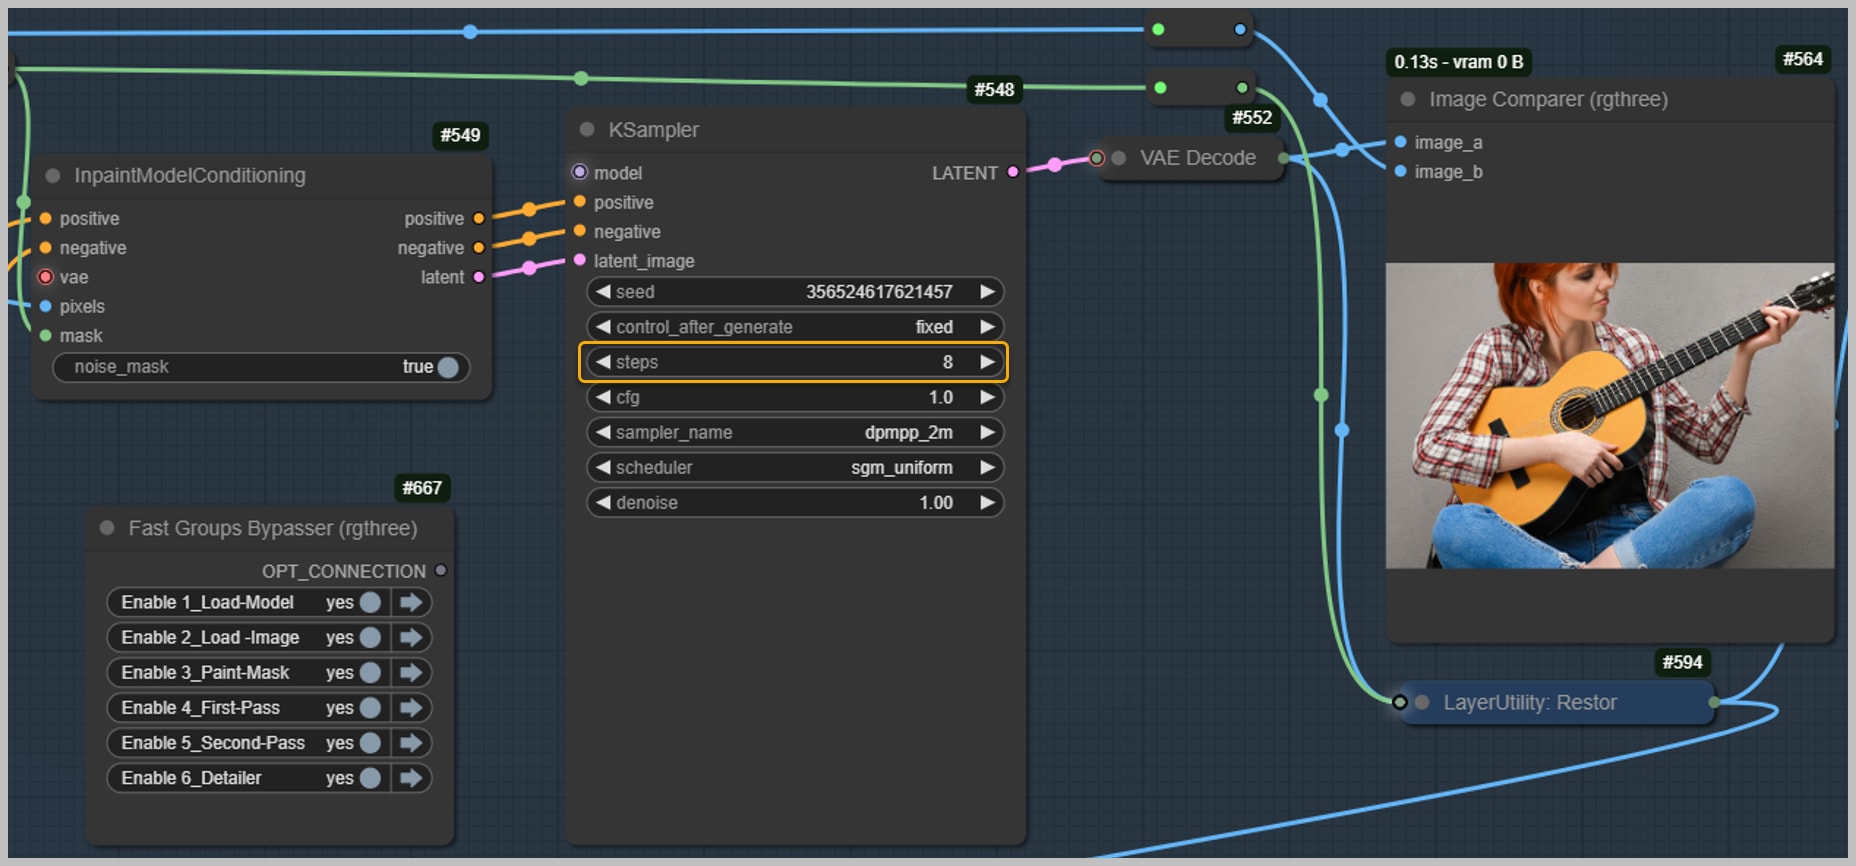
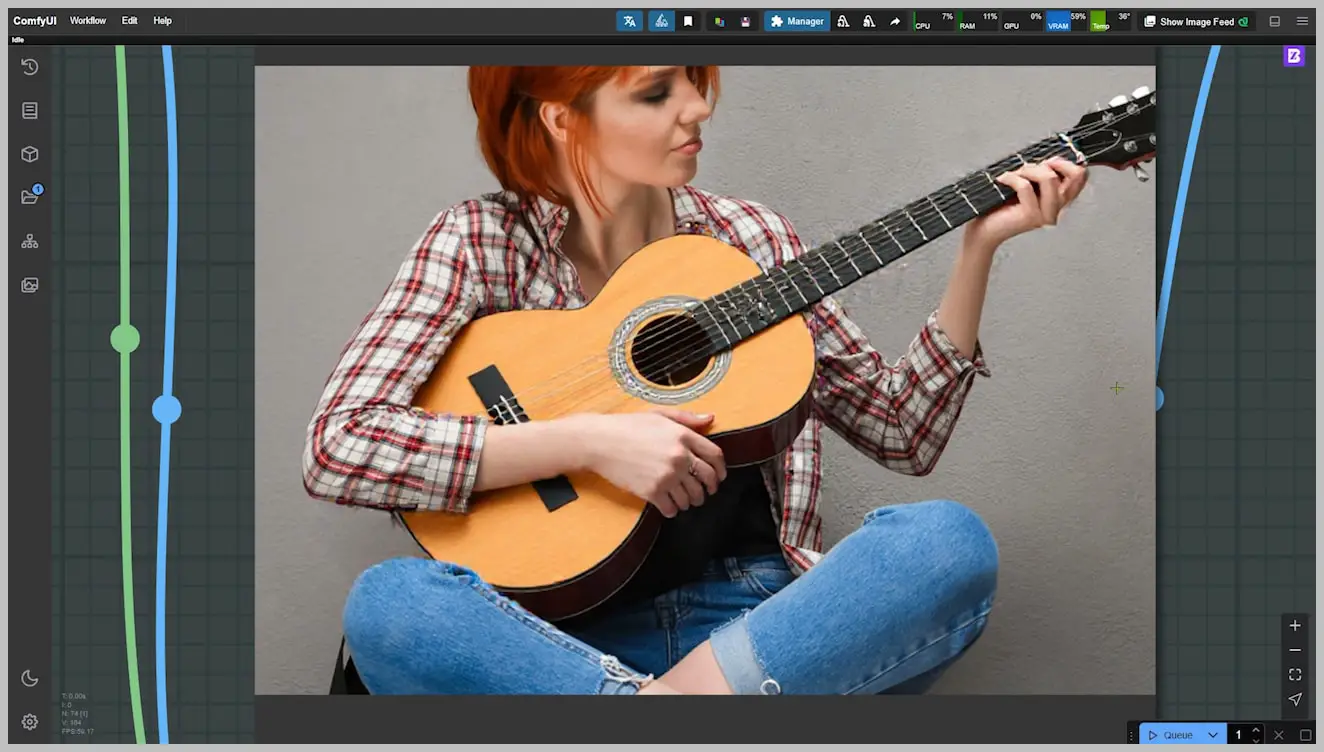
As you can see, the inpainting has some noticeable issues, particularly around the hand area. But don’t worry—we’ll fix these in the next round.
4. Refining with a Second Round of Inpainting
Step 8: Mask Refinement and Fixing Details
After the first round of inpainting, we can move to the second round to fix any imperfections. The “Mask Grow Fast” node expands and blurs the original mask to cover slightly larger areas, helping to smooth out the edges of the inpainted region.
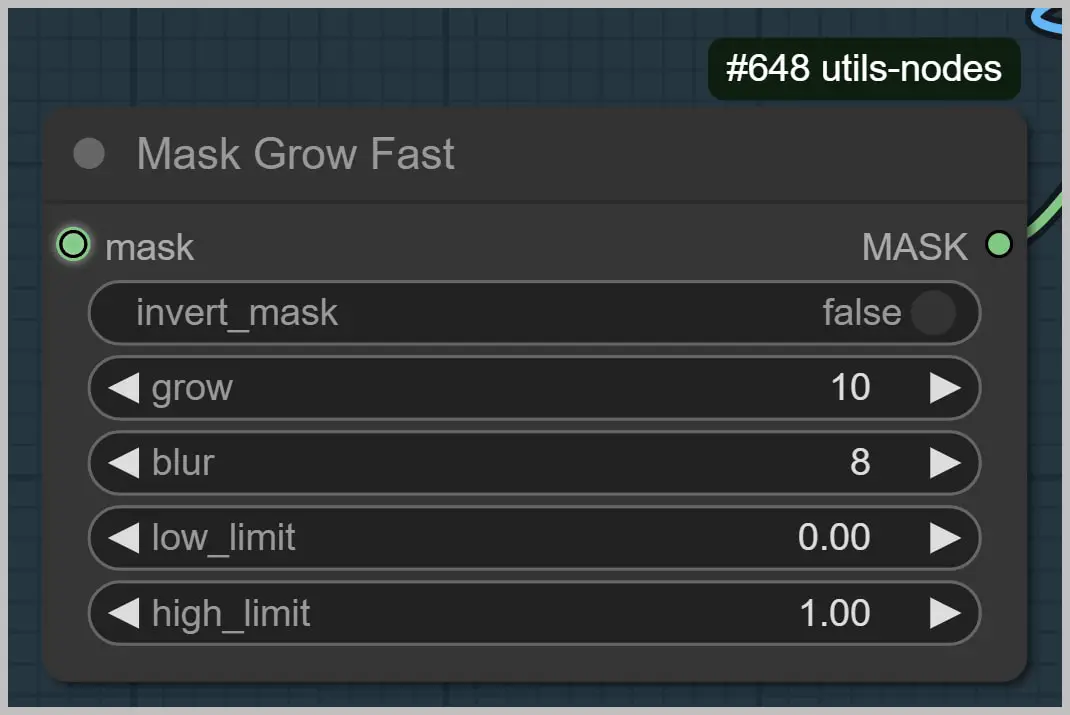
Again, we use the “CropByMask” node to ensure everything stays aligned and the results are precise.
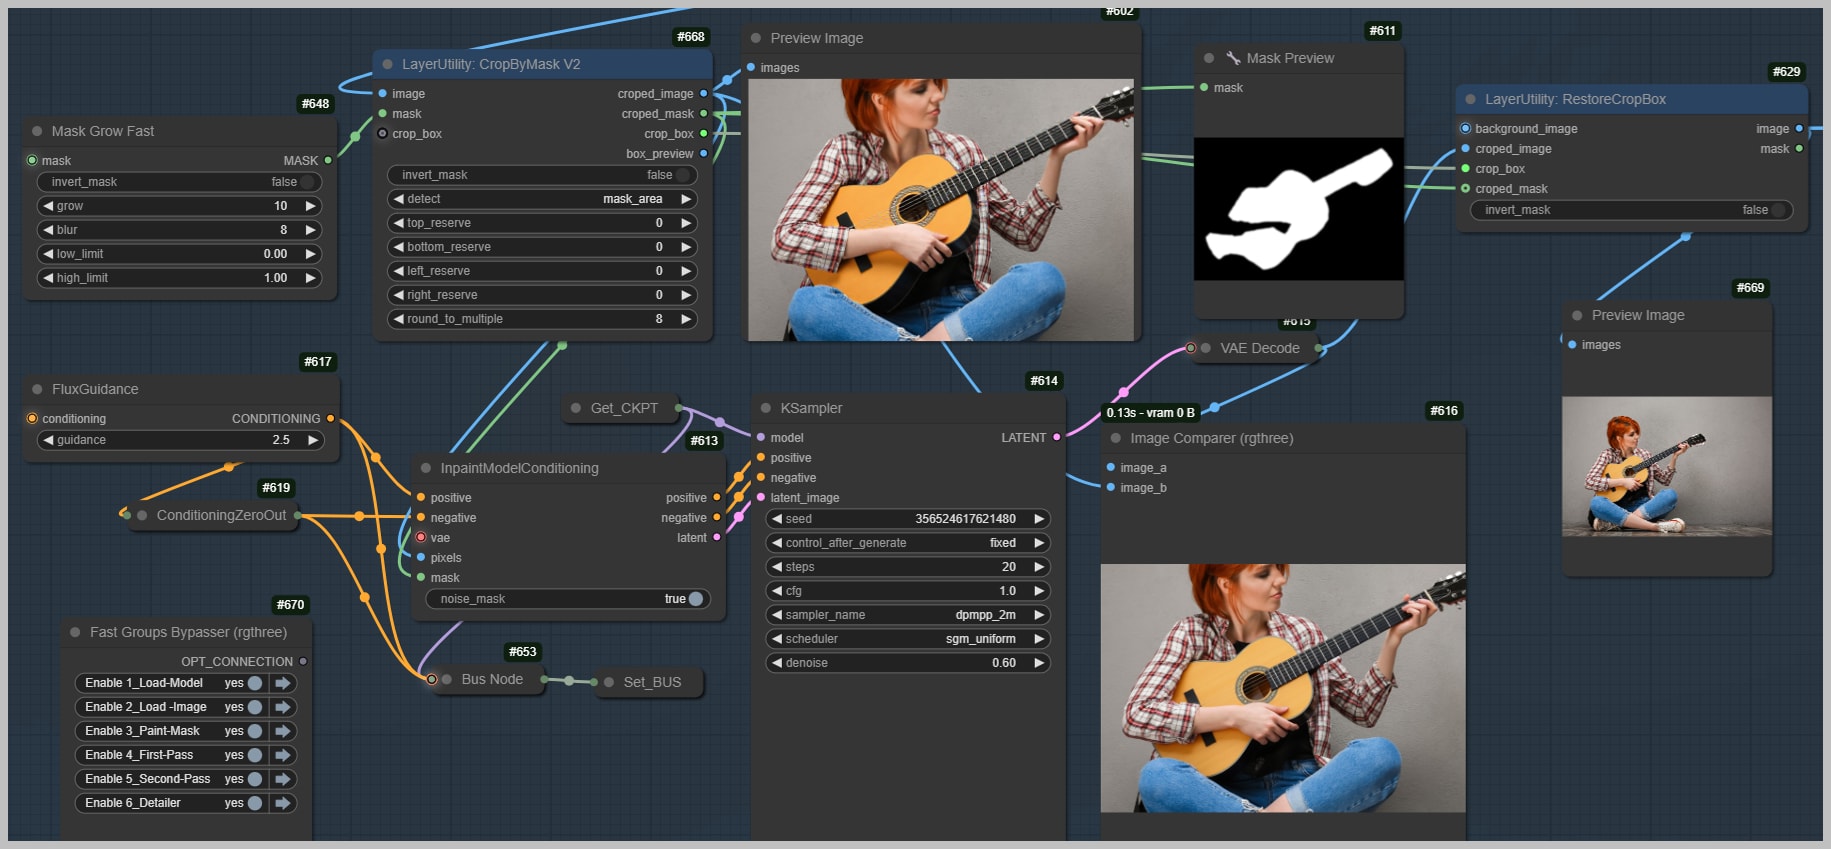
For the guitar, we’re running the second round of inpainting using the Flux fine-tuned model (the stoiqoNewreality checkpoint). Be sure to keep the denoising strength at a moderate level to avoid over-correction.
5. Final Touches: Hand Repair
Step 10: Fixing the Hand
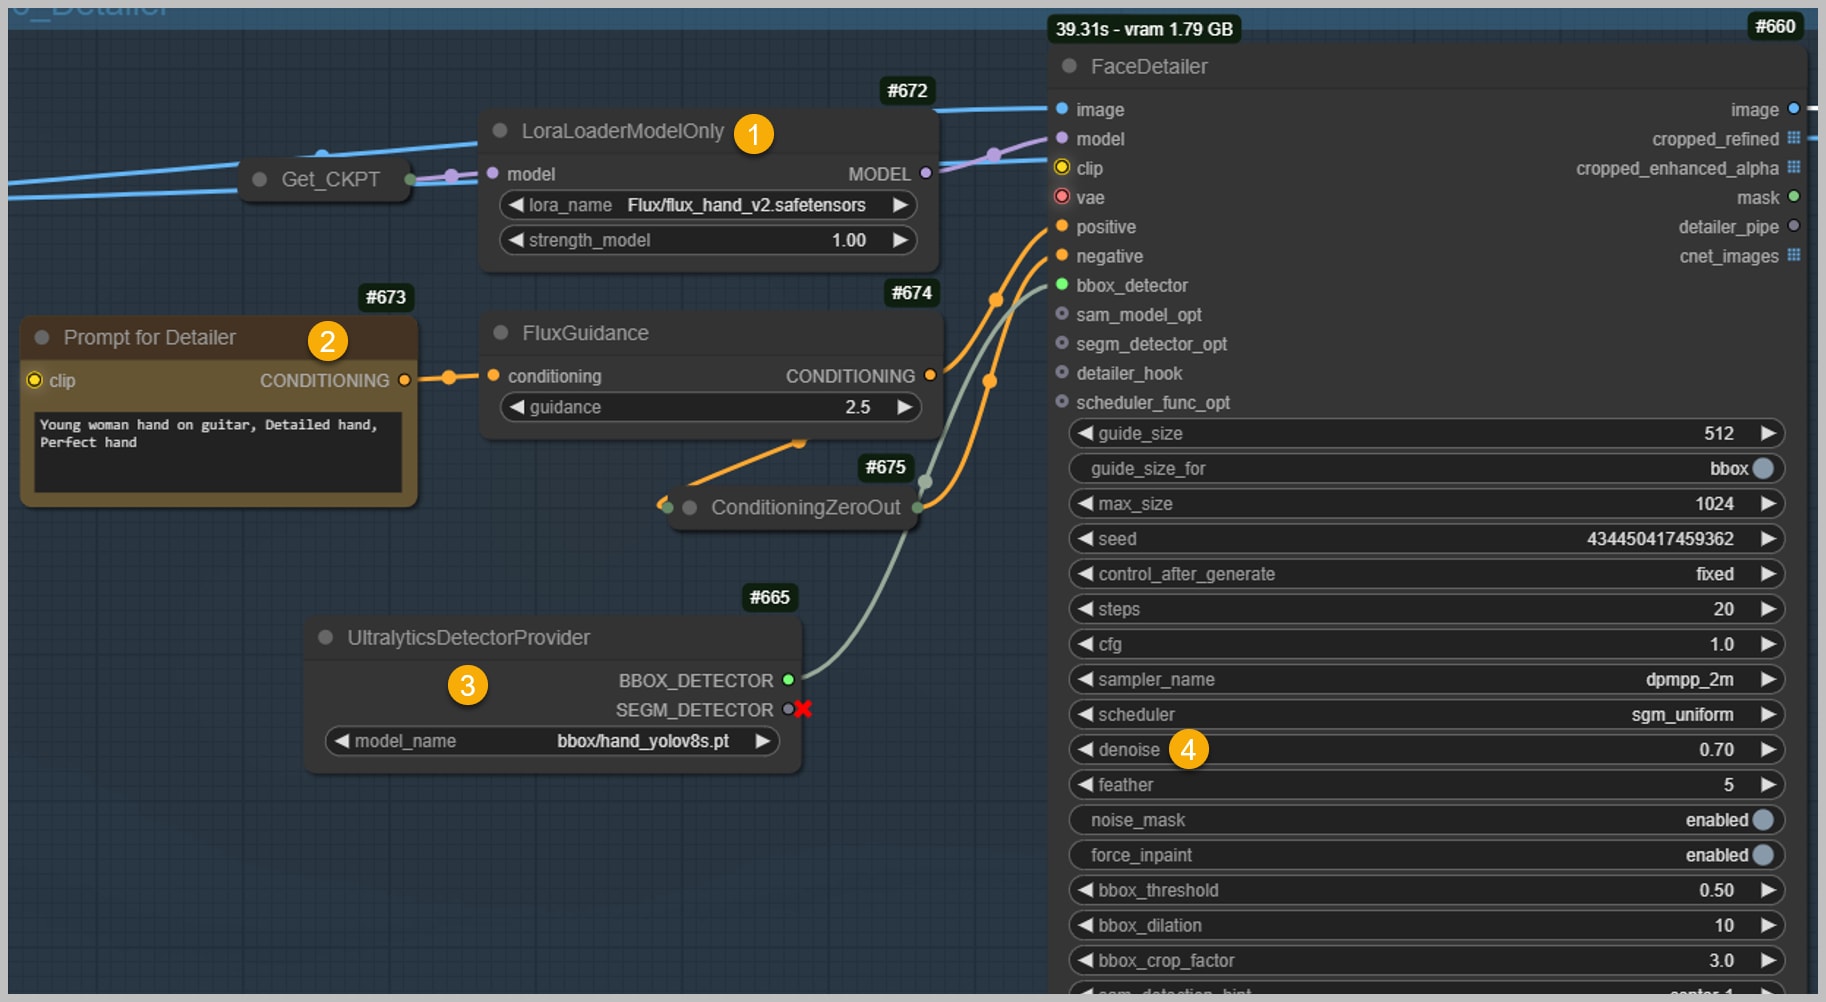
To fix the hand, we use a specialized LoRA designed for hand repair [1]. You can enter a prompt like “detailed hand” or “perfect hand” to trigger this model [2].
In the “UltralyticsDetectorProvider” node [3], select the hand-detection model. If you’re working on faces, choose a model with “face” in its name. The “facedetailer” node can also repair clothing details if needed.
For hands, lower the denoising strength [4] a bit to prevent overprocessing. After running the workflow, the hand should look much more natural. If there are still minor issues, simply rerun the workflow with a focus on the hand area.

Conclusion
With this workflow, you can tackle a wide range of inpainting tasks—from swapping out hats and changing clothing to fixing faces and hands. With the right combination of models, LoRAs, and workflow steps, achieving polished results is easier than ever.
As the holiday season approaches, I want to wish all of you a Merry Christmas and a wonderful holiday!
Basic Workflow: https://openart.ai/workflows/ZxX625DPdQQVZFO9pJTI
⚠️Note: The basic and advanced workflows are very similar and can produce the same results. The main difference is that the advanced workflow allows you to automatically generate the inpainting mask, whereas in the basic workflow, you’ll need to paint the mask manually. Additionally, there are variations that complement the advanced workflow, such as fixing hands, repairing faces, and swapping clothing.
Models:
- GGUF Fill models: https://huggingface.co/SporkySporkness/FLUX.1-Fill-dev-GGUF/tree/main
- Flux turbo LoRA: https://huggingface.co/alimama-creative/FLUX.1-Turbo-Alpha/tree/main
- stoiqoNewreality: https://civitai.com/models/161068?modelVersionId=979329
- Flux hand LoRA: https://civitai.com/models/200255/hands-xl-sd-15-flux1-dev
Gain exclusive access to advanced ComfyUI workflows and resources by joining our community now!
Here’s a mind map illustrating all the premium workflows: https://myaiforce.com/mindmap
Run ComfyUI with Pre-Installed Models and Nodes: https://youtu.be/T4tUheyih5Q

