MOSS in ComfyUI: Best Settings, Image Quality Comparisons, and Speed Optimization
MOSS is a new open-source text-to-image model that has attracted attention in the AI art community. One of its distinctive features is its reportedly uncensored training data, which gives it a broad range of visual knowledge and allows it to generate a wider variety of faces than many competing models, including Krea 2.
Although MOSS does not necessarily surpass Krea 2 in overall image quality, its flexibility and visual diversity make it an interesting alternative for AI image generation.
However, choosing the right settings in ComfyUI can be confusing. The OpenMOSS team and the ComfyUI team recommend different sampling configurations, and MOSS also supports multiple CLIP and VAE versions.
In this article, we’ll compare these configurations, explore several optimization techniques, and identify the best settings for balancing image quality, generation speed, and VRAM usage.
YouTube Tutorial:
Download the Workflow:
https://drive.google.com/drive/folders/1TOcAoamXZGGypWnOewysdvht9Ddh2unc
Gain exclusive access to advanced ComfyUI workflows and resources by joining our community now!
Understanding the MOSS Base and SFT Checkpoints
MOSS comes in two main checkpoint variants: Base and SFT. Understanding their differences is important when choosing a model for image generation or LoRA training.
MOSS Base
The Base checkpoint has not undergone post-training or distillation. It preserves the model in its original trained state.
This makes Base a suitable starting point for training LoRAs, where working with the original model weights is often preferable.
MOSS SFT
SFT stands for Supervised Fine-Tuning. This checkpoint is built on top of Base and has undergone additional supervised fine-tuning.
Its main advantage is improved performance for general image-generation tasks.
Base vs. SFT: Image Quality Comparison
Comparing the two checkpoints reveals noticeable differences.
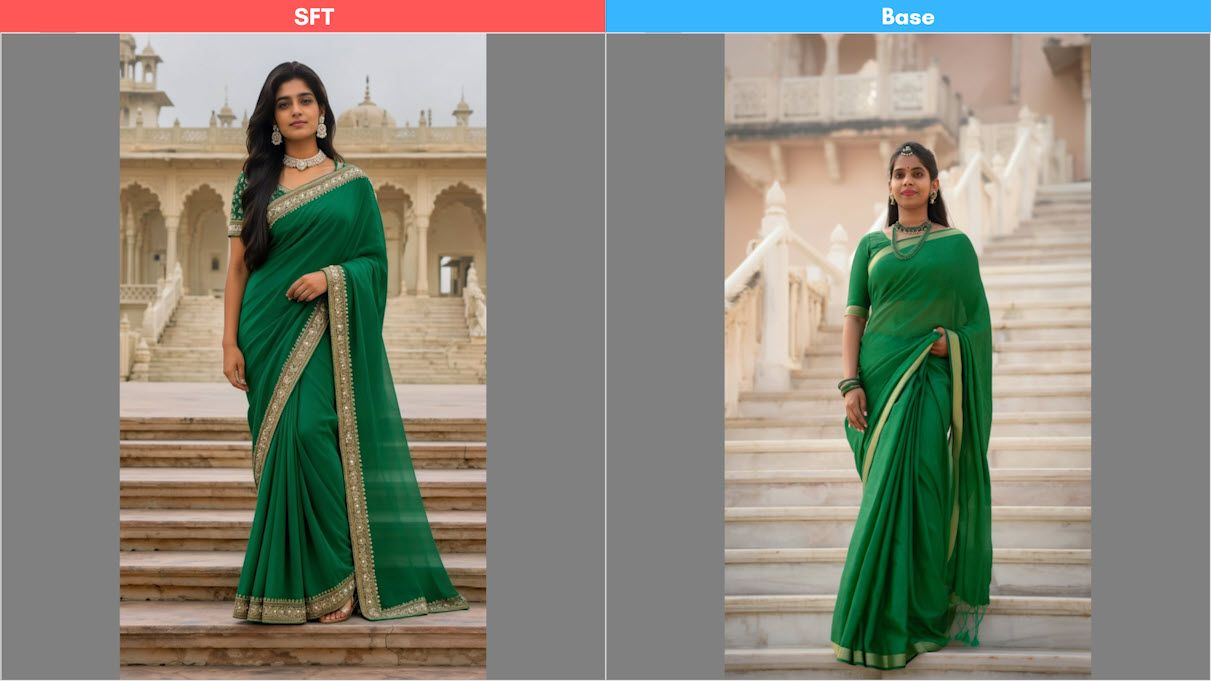
The SFT-generated image generally looks sharper and more polished. Fine details, such as saree embroidery, jewelry, hair, and background architecture, are more clearly defined.
In contrast, the Base-generated image appears softer, with slightly blurred details and less clearly defined textures.
There are also differences in color reproduction:
- SFT: Produces richer, deeper green tones with balanced saturation.
- Base: Produces brighter, slightly washed-out colors with a more muted appearance.
Overall, SFT delivers a more polished, professional-looking portrait, while Base has a softer, less processed appearance.
Which Checkpoint Should You Choose?
My recommendation is straightforward:
- SFT: Best for most image-generation tasks.
- Base: Better suited to LoRA training.
If your primary goal is creating high-quality images, SFT is the checkpoint I’d recommend.
Comparing the Recommended MOSS Sampling Settings
One important difference between the official MOSS workflows is their recommended KSampler configuration.
Let’s examine both approaches.
3.1 ComfyUI Team’s Recommended Settings
The upper KSampler group in the workflow uses:
| Parameter | Setting |
|---|---|
| Sampling Steps | 25 |
| CFG | 2.5 |
| Sampler | ER SD |
This configuration uses fewer sampling steps and a relatively low CFG value.
3.2 OpenMOSS Recommended Settings
The lower KSampler group follows the OpenMOSS recommendations:
| Parameter | Setting |
|---|---|
| Sampling Steps | 50 |
| CFG | 3.5 |
| Sampler | Euler |
| Scheduler | Simple |
Compared with the ComfyUI configuration, this setup doubles the sampling steps and increases CFG from 2.5 to 3.5.
Which Sampler and Scheduler Should You Use?
These configurations are useful starting points, but MOSS supports various sampler and scheduler combinations.
You don’t necessarily have to follow either recommendation exactly. Experimenting with different combinations is a good way to discover which settings produce the visual results you prefer.
Choosing the Right CLIP and VAE Models
The two recommended workflows also use different CLIP and VAE versions.
The upper workflow uses the W4A8 CLIP model and the full-size Flux 2 VAE. The lower workflow uses the INT8 CLIP model and a smaller Flux 2 VAE.
Let’s examine these components separately.
Comparing CLIP Model Versions
The workflow includes two CLIP versions:
- W4A8
- INT8
Both can be used for prompt enhancement, allowing the system to improve your original prompt before generating an image.
The choice of CLIP version depends on the workflow configuration you’re using.
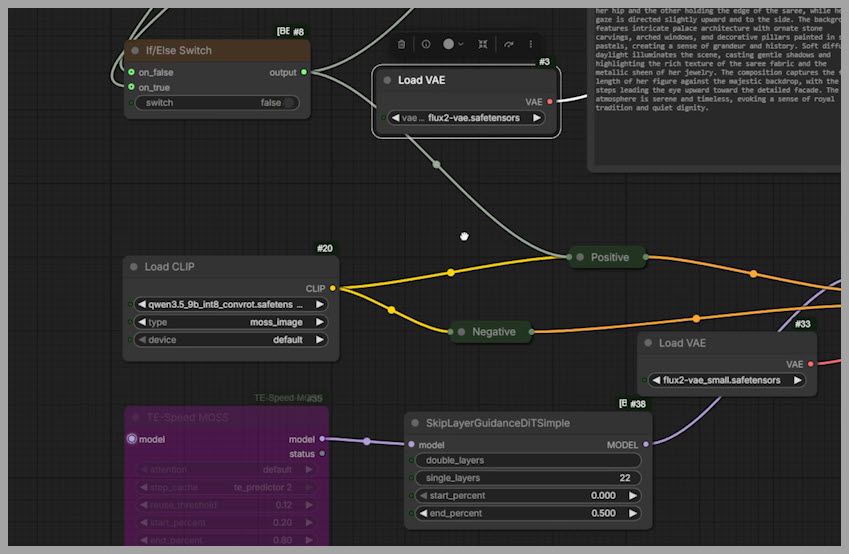
Full-Size vs. Smaller Flux 2 VAE
To compare the two VAE versions fairly, I created a separate workflow in which the VAE was the only component changed.
At first glance, the resulting images look almost identical. Even when zooming in, facial details remain very similar.
However, there is a small difference: the image generated with the smaller VAE contains slightly more fabric detail in this particular example.
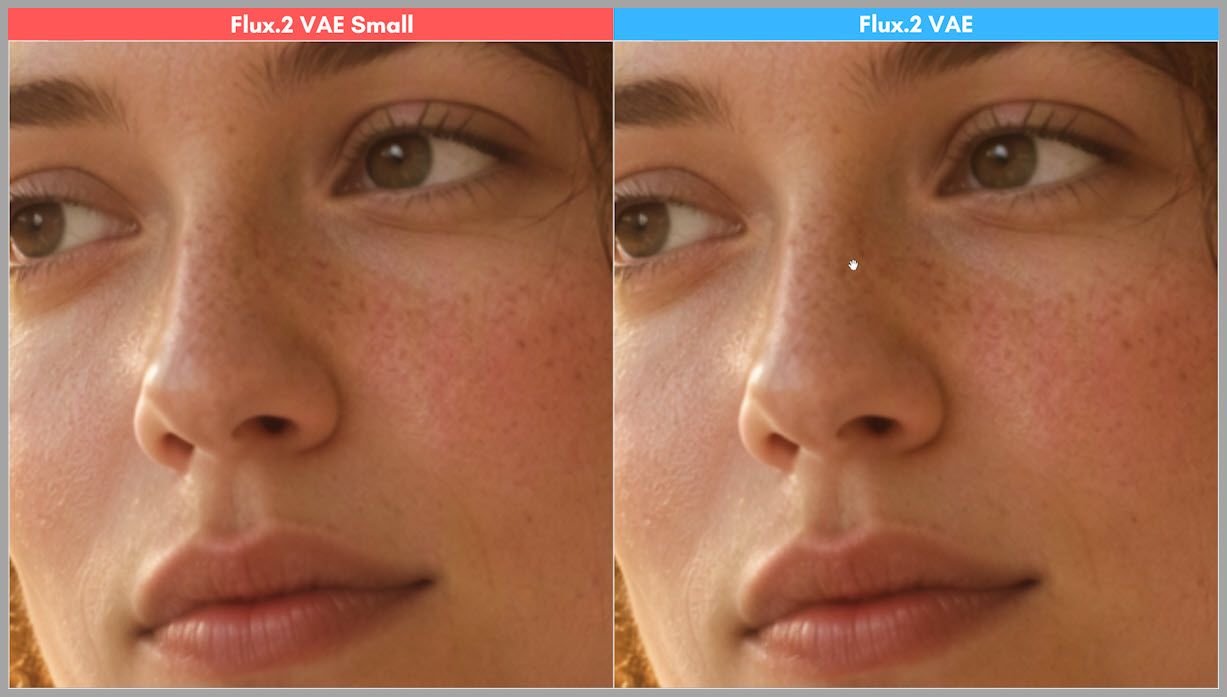
More importantly, the smaller VAE offers two practical advantages:
- Faster image decoding.
- Lower VRAM consumption.
Since it delivers very similar visual quality while requiring fewer resources, I recommend using the smaller Flux 2 VAE.
Using CLIP to Enhance Prompts
The workflow also includes a prompt-enhancement feature.
To use it:
- Enter your original prompt into the designated prompt input.
- Enter your system prompt into the corresponding input.
- Let the CLIP-based enhancement process generate an improved prompt.
- Preview the enhanced prompt in the workflow.
If you prefer your original prompt, simply set the node’s toggle to True.
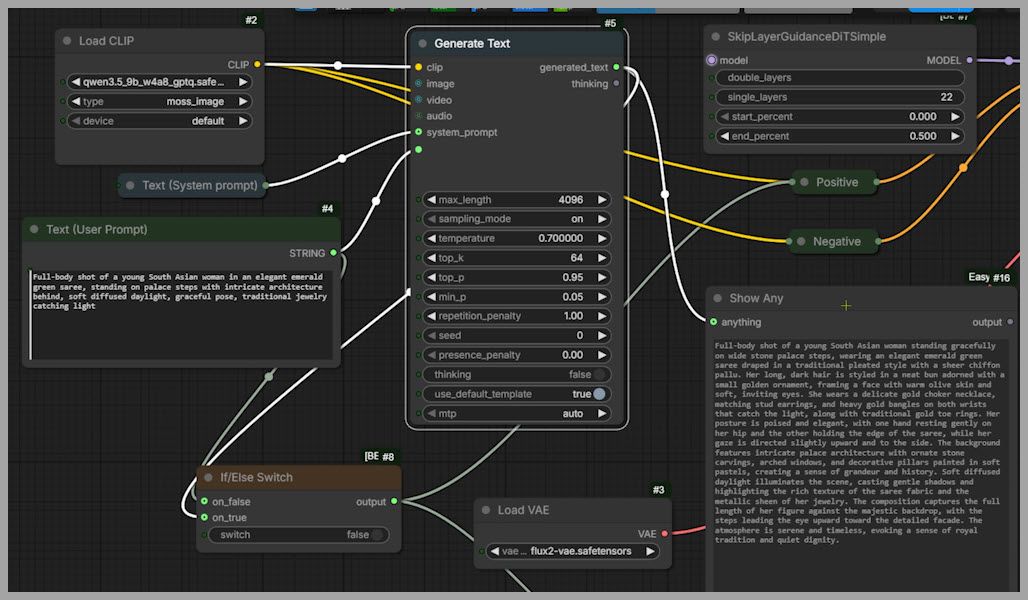
The workflow will then use the prompt you wrote instead of the AI-enhanced version.
This gives you the flexibility to experiment with enhanced prompts while retaining control over your original instructions.
Comparing the Two Recommended Sampling Configurations
Now let’s examine how the two sampling configurations perform in actual image generation.
Sampling Speed Comparison
In my tests, the generation times were:
| Configuration | Sampling Time |
|---|---|
| ComfyUI (25 steps) | 107 seconds |
| OpenMOSS (50 steps) | 211 seconds |
As expected, the OpenMOSS configuration takes considerably longer because it uses twice as many sampling steps.
But does that extra time produce noticeably better images?
Image Quality and Fine Details
When comparing the generated images, the OpenMOSS configuration produces slightly stronger lighting, particularly in the backlighting around the subject’s hair.
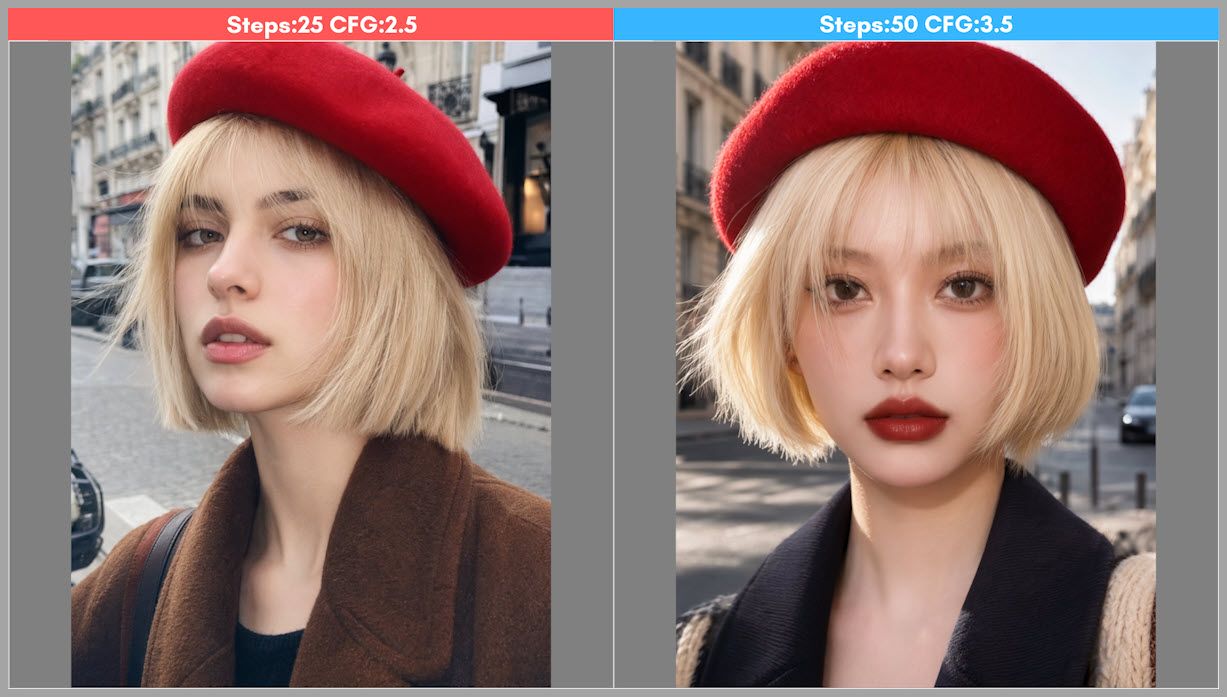
Looking more closely at facial details, both images are very similar.
However, the hair in the OpenMOSS result appears more refined. Individual strands look smoother and more evenly layered, with richer fine textures.
The ComfyUI result contains more loose strands and flyaway hairs.
Additional Image Comparisons
Looking at several additional examples reveals a similar pattern.
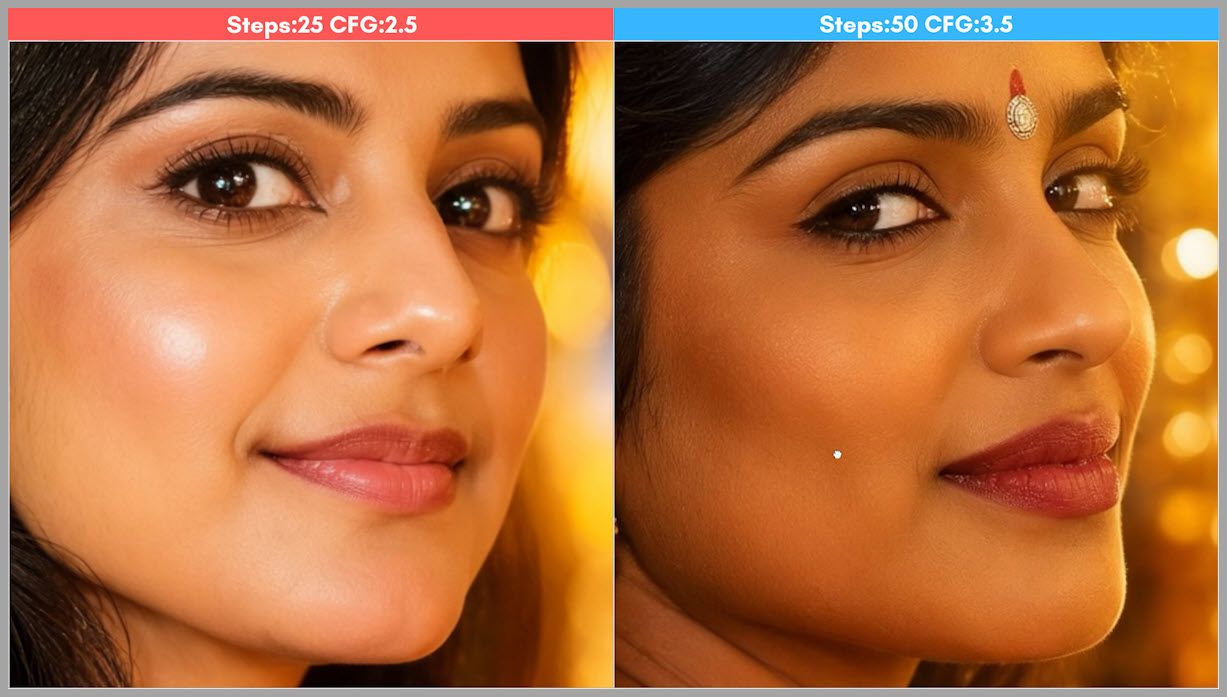
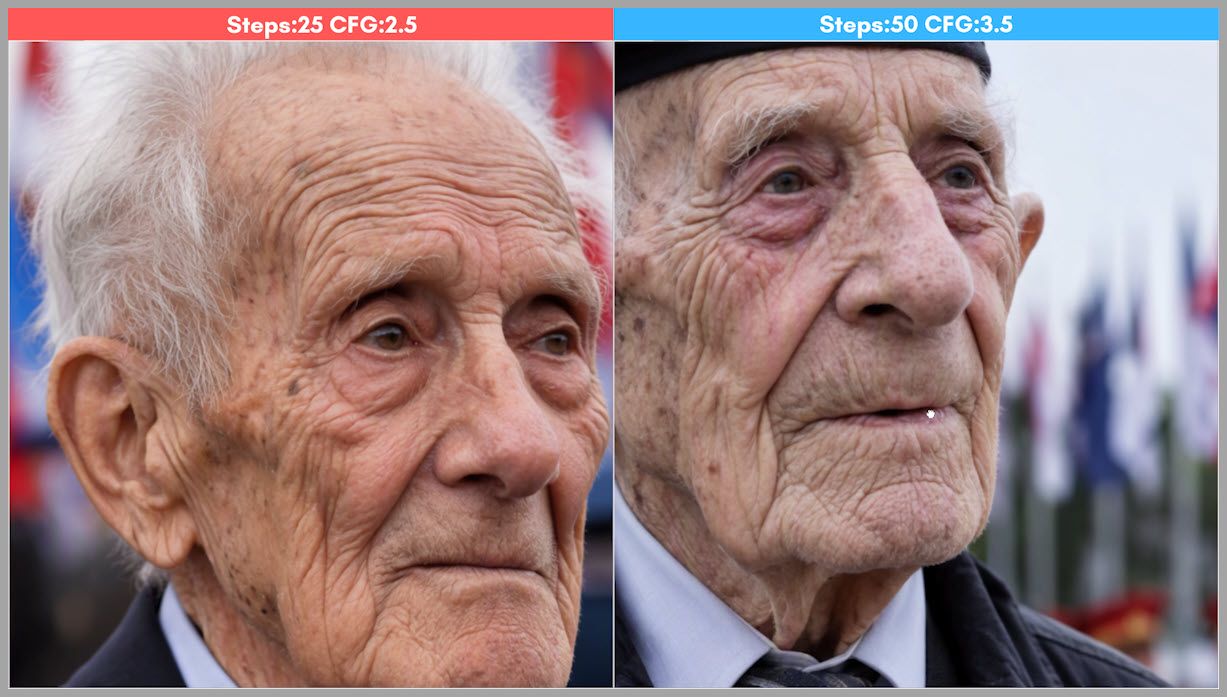
The OpenMOSS configuration sometimes produces slightly better lighting and fine details. However, the overall differences are relatively small.
This means that doubling the sampling steps does not necessarily result in a dramatic improvement in image quality.
For many applications, the faster ComfyUI configuration may already deliver satisfactory results.
Increasing Image Resolution
Both official workflows use a default resolution of approximately 1 megapixel.
However, you can experiment with higher resolutions, such as:
- 1.5 megapixels.
- 2 megapixels.
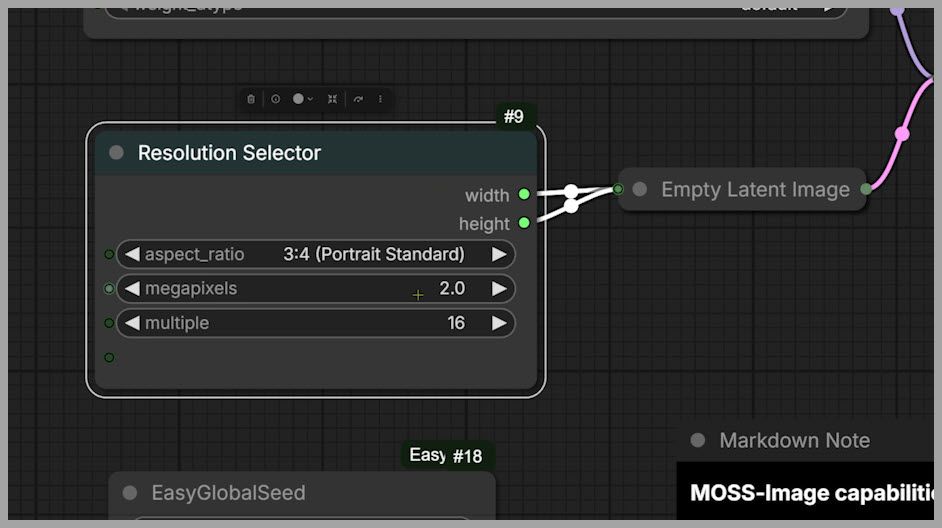
Increasing the resolution can improve image quality and provide more room for fine details.
Of course, higher resolutions also require more computational resources, so choose a setting that works well with your hardware.
Understanding Skip Layer Guidance (SLG)
Another interesting component in the MOSS workflow is the Skip Layer Guidance DiT Simple node, which we’ll refer to as SLG.
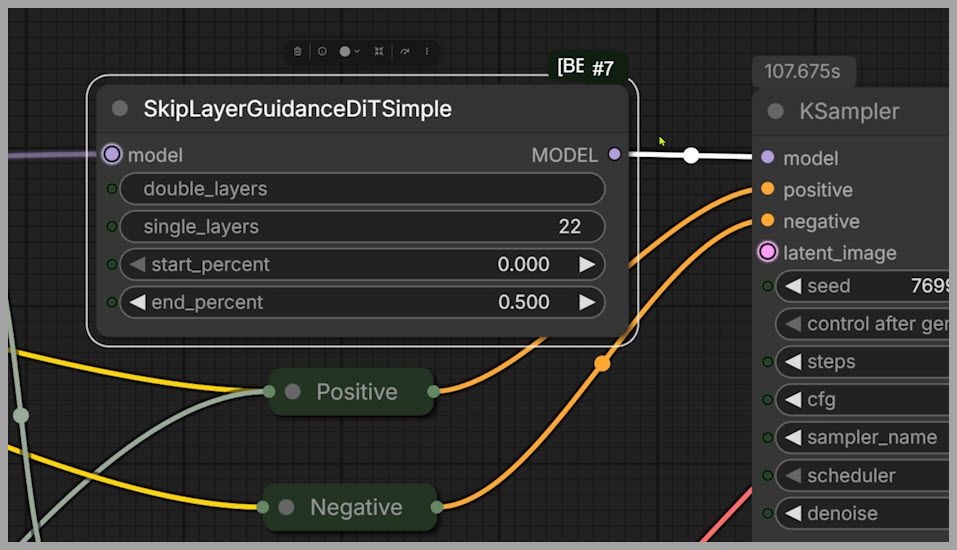
This node applies skip layer guidance to selected transformer layers in the model.
But what difference does it actually make?
Comparing Images With and Without SLG
The easiest way to understand SLG is to generate two images using identical settings, with the only difference being whether the SLG node is enabled.
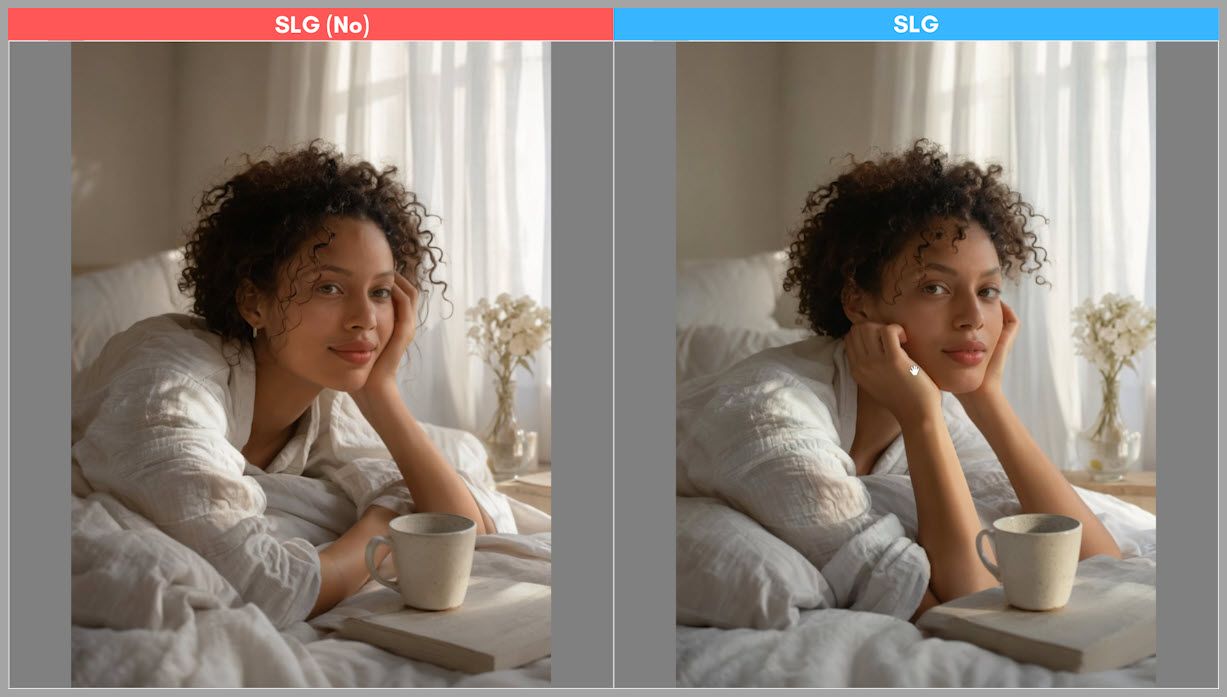
In the comparison, the two images look quite similar. Neither is clearly superior.
However, SLG can influence the resulting image and sometimes produce a different visual style.
Experimenting With Different Transformer Blocks
The workflow example uses block 22, but you can also experiment with blocks 24 and 26.
You can even select multiple blocks simultaneously.
For example, compare these three configurations:
- Skip block 22.
- Skip blocks 22 and 24.
- Skip blocks 22, 24, and 26.
The resulting images show noticeable visual differences.
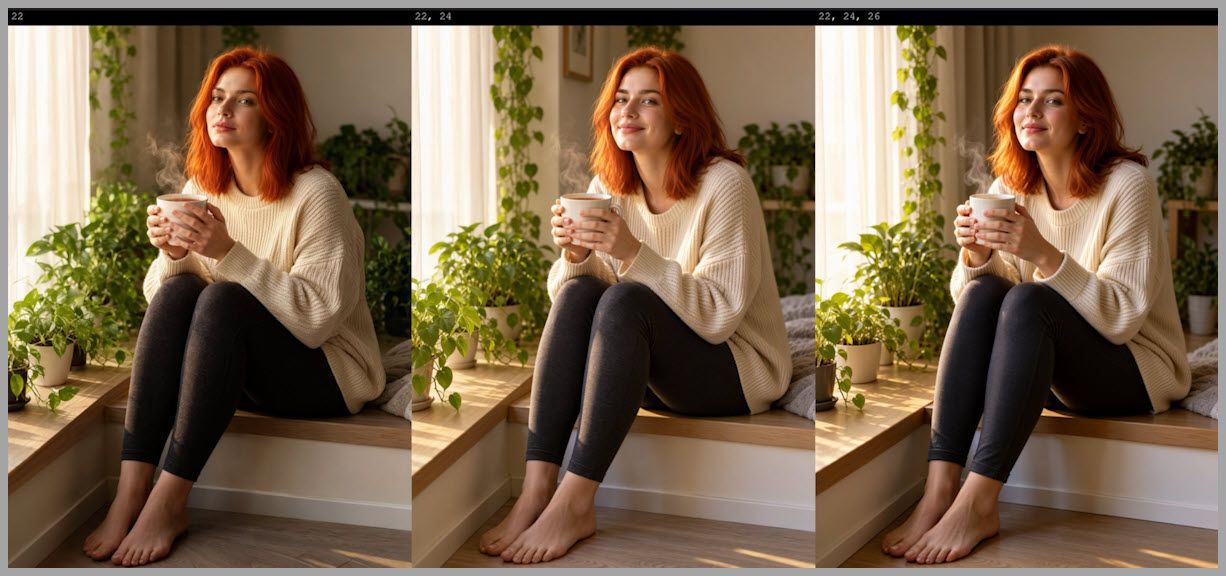
Therefore, SLG is worth experimenting with if you want to explore different visual styles or variations.
There isn’t necessarily one universally best configuration. The results depend on the image and the appearance you’re trying to achieve.
Speeding Up MOSS Image Generation
Generating images with 50 sampling steps can take more than three minutes in some configurations.
Fortunately, there are several ways to accelerate MOSS generation.
In my tests, I compared three approaches:
- Spectrum.
- TE Speed.
- Turbo LoRA.
Using Spectrum
Spectrum is one of the acceleration methods available for MOSS workflows.
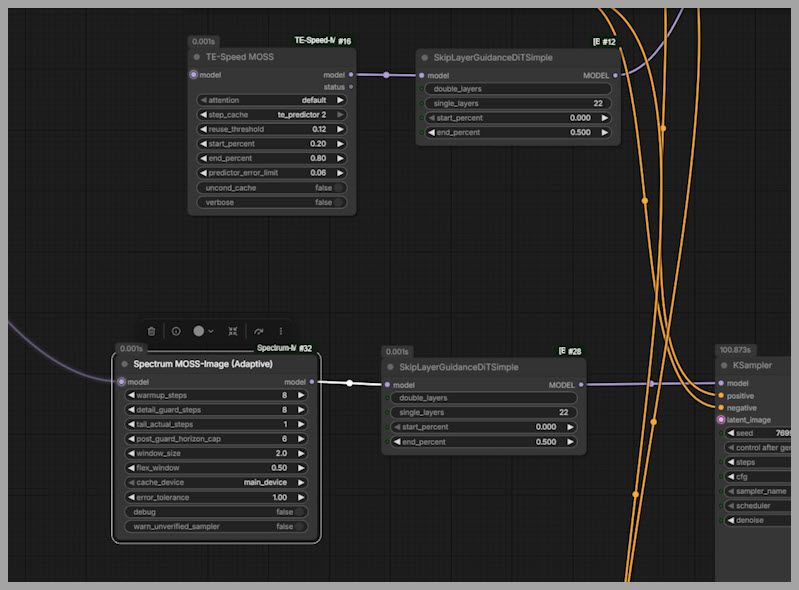
You can use it with either 25 or 50 sampling steps, adjusting CFG to match your selected configuration.
In my test, the Spectrum setup completed sampling in approximately 100 seconds.
Compared with the standard 50-step configuration, this represents a substantial reduction in generation time.
Using TE Speed
TE Speed provides another way to accelerate image generation.
Like Spectrum, it supports different sampling configurations, allowing you to adjust the sampling steps and CFG according to your needs.
In my test, TE Speed took approximately 127 seconds.
Although slightly slower than Spectrum, its image quality turned out to be closer to standard sampling.
Using Turbo LoRA
The third approach uses a turbo LoRA specifically designed for faster image generation.
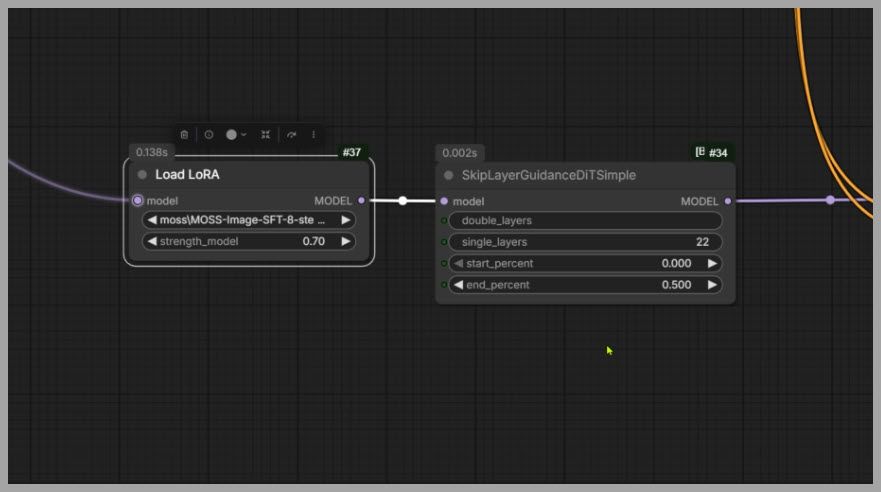
Unlike the previous methods, this configuration uses only eight sampling steps.
The recommended settings are:
| Parameter | Setting |
|---|---|
| Sampling Steps | 8 |
| CFG | 1 |
With these settings, the sampling process took only 20 seconds in my test.
This is an impressive reduction compared with the standard 50-step configuration.
However, such a dramatic speed improvement naturally raises an important question: how much image quality do we lose?
Comparing Image Quality Across Acceleration Methods
Faster generation is useful, but image quality remains an important consideration.
Let’s compare the three acceleration methods with standard sampling.
Standard Sampling vs. Spectrum vs. TE Speed
The comparison includes three images:
- Left: Standard sampling without acceleration.
- Middle: Spectrum acceleration.
- Right: TE Speed acceleration.
When zooming in, the Spectrum image appears noticeably softer than the other two.
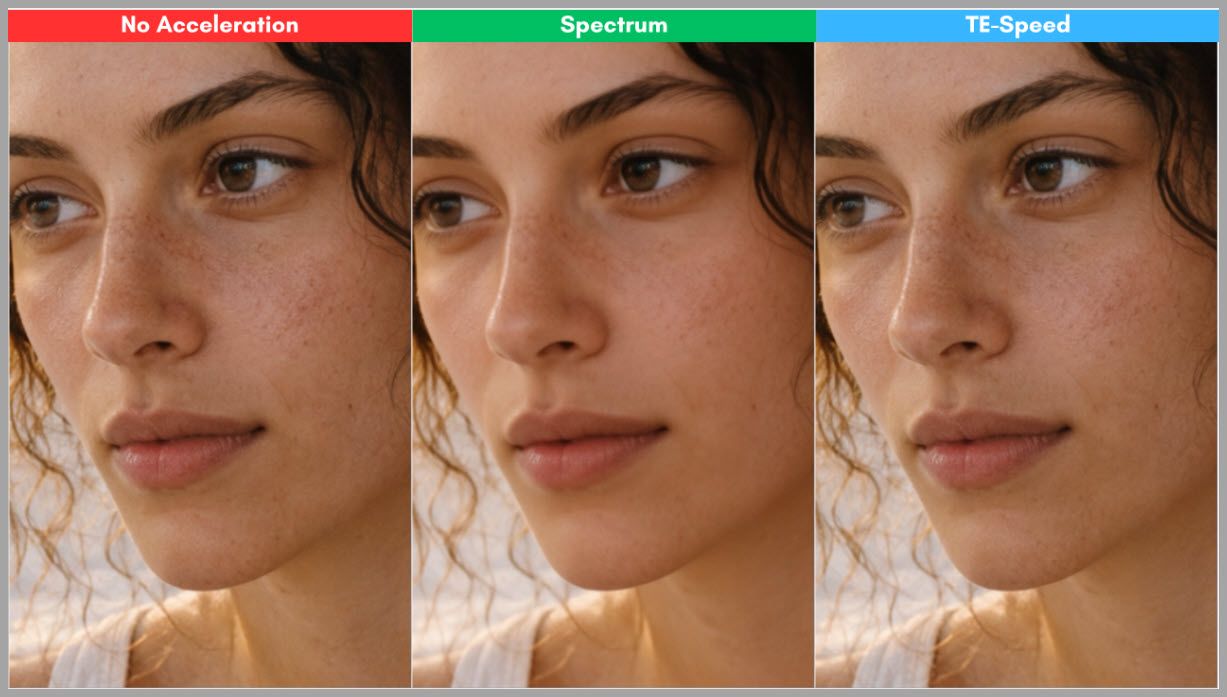
The standard sampling result is the sharpest, while TE Speed produces slightly less detail.
However, the difference between standard sampling and TE Speed is very small.
This makes TE Speed particularly interesting because it reduces generation time while preserving most of the original image quality.
Why TE Speed Is My Recommended Option
Based on these comparisons, I recommend TE Speed when you want to accelerate MOSS generation without sacrificing too much image quality.
Although Spectrum is slightly faster in my tests, its results appear softer.
TE Speed offers a better balance between generation speed and visual fidelity.
Evaluating Turbo LoRA Image Quality
Turbo LoRA is a different story.
In the comparison, the two images have different compositions, so it’s better to focus on facial details rather than their overall appearance.
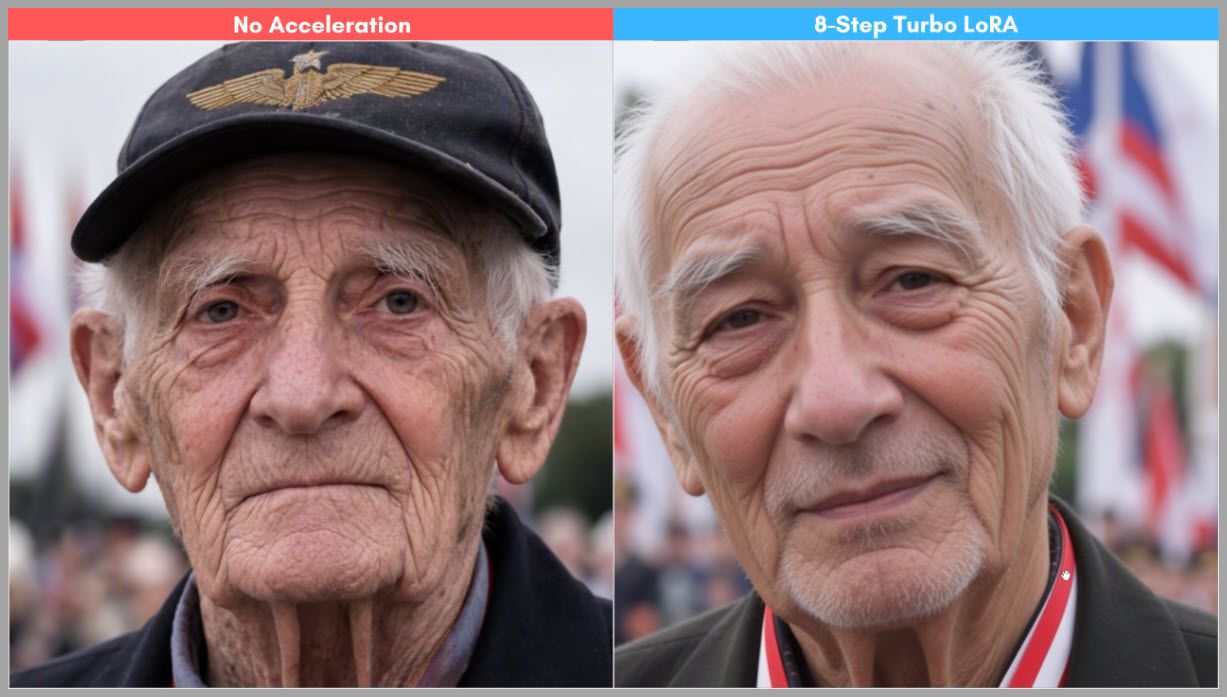
The Turbo LoRA result looks slightly washed out, and some facial details are less clearly defined.
Nevertheless, the result is impressive considering that it uses only eight sampling steps and takes approximately 20 seconds to generate.
Improving Turbo LoRA Results Through Upscaling
If you want to use Turbo LoRA but need more detail, you can try upscaling the generated image afterward.
This provides an additional opportunity to improve the final result without spending much time on the initial generation.
Turbo LoRA is therefore worth considering when generation speed is your highest priority.
Conclusion and Workflow Resources
MOSS offers several interesting possibilities for AI image generation in ComfyUI.
The SFT checkpoint is generally the better choice for generating images, while Base is more suitable for LoRA training. The smaller Flux 2 VAE is also a practical choice because it provides similar visual quality with faster decoding and lower VRAM consumption.
When it comes to sampling, the OpenMOSS configuration can sometimes produce slightly better lighting and details, but the improvements are relatively small compared with the additional generation time.
For acceleration, TE Speed provides the best balance in my tests, while Turbo LoRA is an excellent alternative when speed is the priority.
Most importantly, don’t be afraid to experiment. Different samplers, schedulers, SLG configurations, and acceleration methods can produce different results depending on your prompts and desired visual style.
I hope this guide helps you get better results with MOSS in ComfyUI. Happy creating!
Gain exclusive access to advanced ComfyUI workflows and resources by joining our community now!