Fix Plastic-Like Skin and Fake Details in ComfyUI
Hi, creators! Welcome back to this guide on improving AI-generated portraits. If you’ve been experimenting with generative AI for creating portraits, you’ve likely encountered a common issue: the skin often looks unnaturally smooth, almost plastic-like.
This lack of fine details can make it obvious that the image was generated by AI, detracting from its realism.
In this article, we’ll explore how to address this problem using a custom ComfyUI workflow I developed. By the end, you’ll have a powerful tool to transform those overly smooth, artificial-looking skin textures into something far more natural and lifelike. Let’s dive in!
Comparing AI-Generated Skin Textures
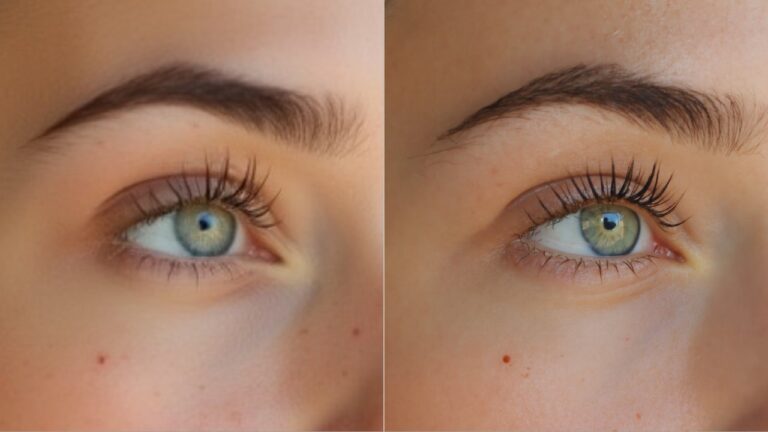
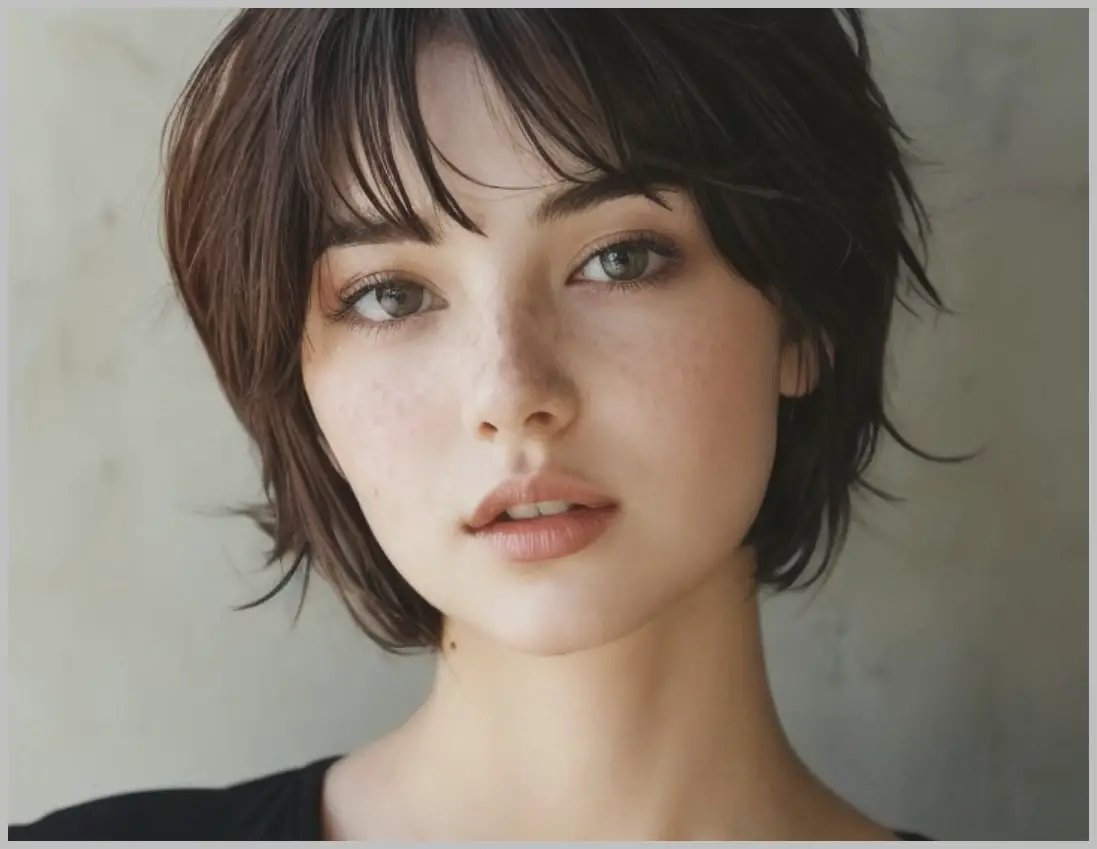
To understand the problem better, let’s examine a few examples of AI-generated portraits. In the first example, if we zoom in on the subject’s face, we can see that her skin lacks fine details. This gives the image an artificial, plastic-like appearance, which is a telltale sign of AI generation.
Here’s another example, created using the fp8 version of the Flux model. While this version does include some skin details, they still feel unnatural and don’t quite capture the complexity of real human skin.
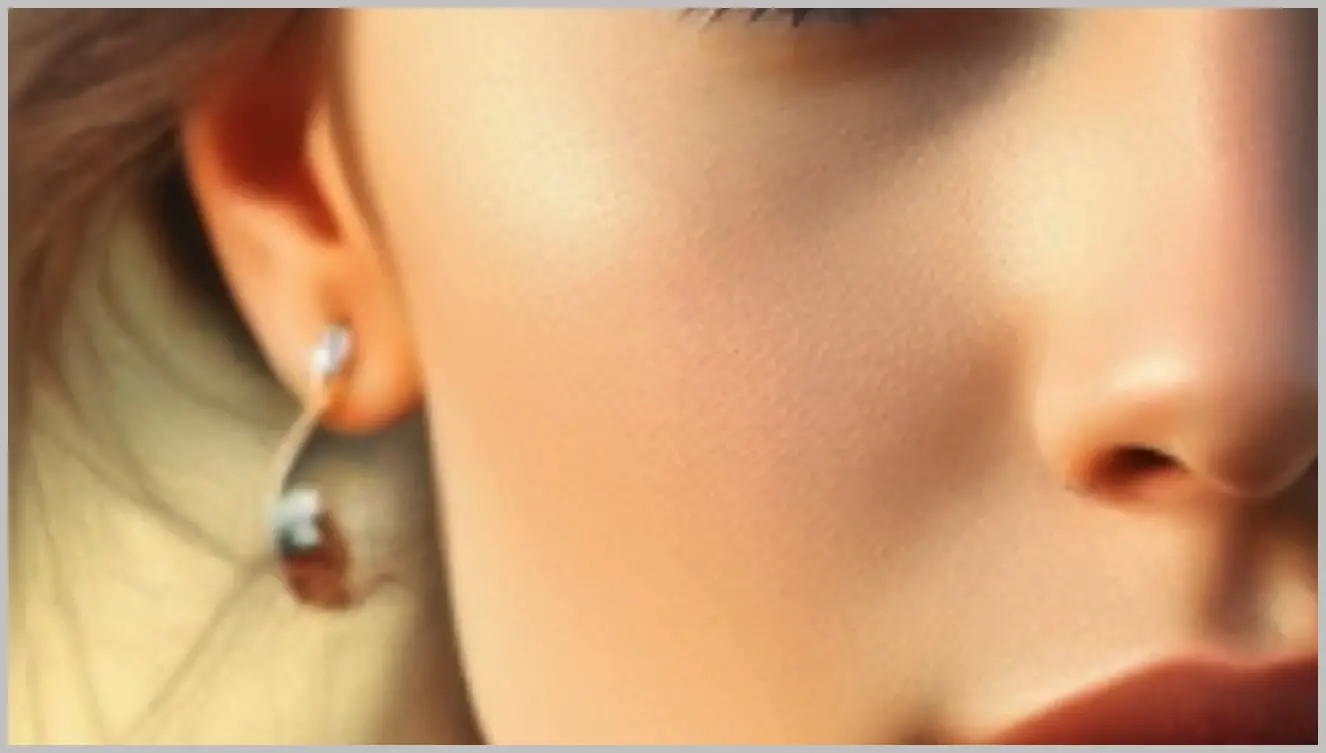
Even with advanced models like PixelWave, the skin texture can still appear slightly off, leaving room for improvement.
These examples highlight a key limitation of current AI models: they often struggle to produce truly realistic skin textures. While models like Flux and PixelWave are impressive, they aren’t enough on their own to solve this problem. That’s where the ComfyUI workflow comes in.
Introducing the ComfyUI Workflow
The ComfyUI workflow we’ll be using is designed to address the shortcomings of existing AI models. Built on an SD1.5 model, this workflow is not only efficient in terms of GPU resources but also produces skin textures that feel far more natural and lifelike.
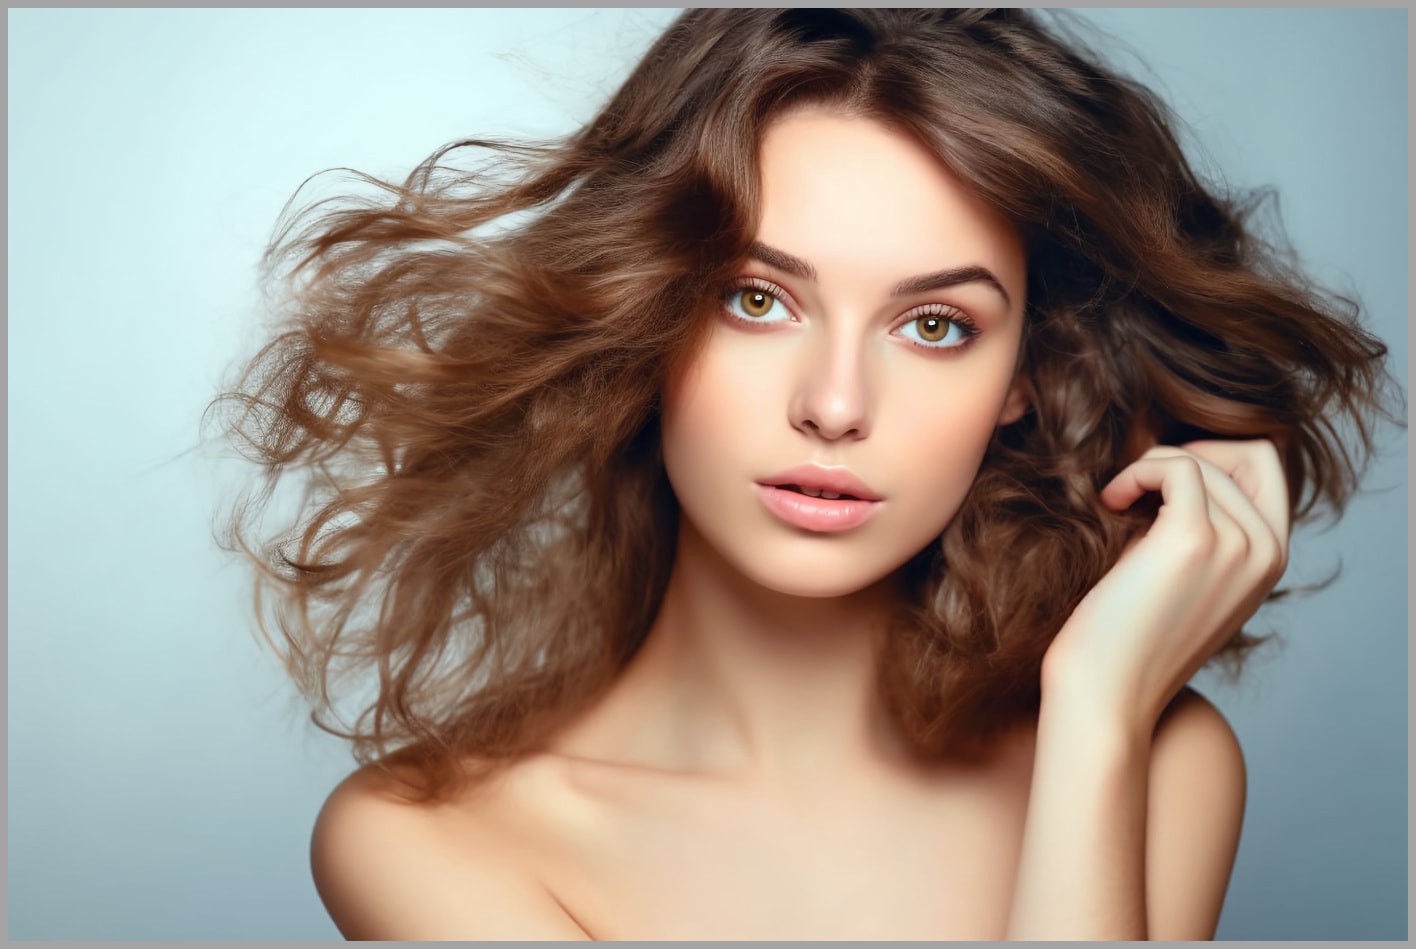
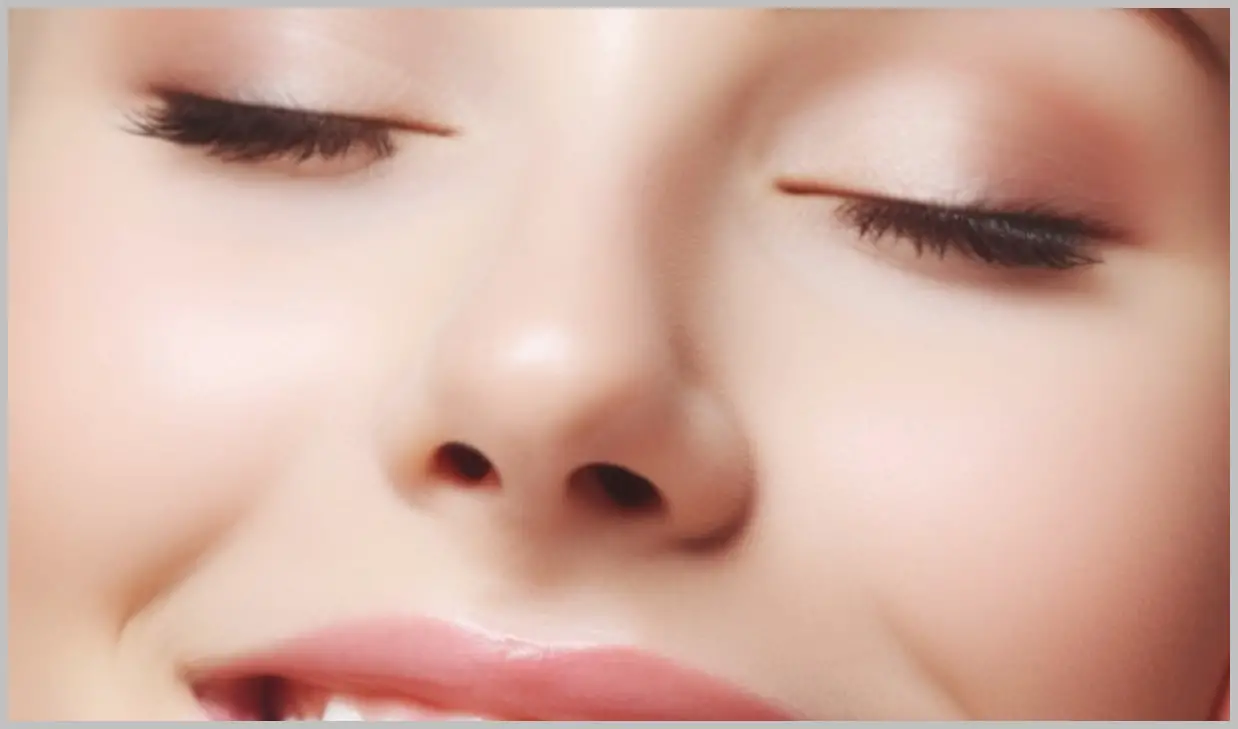
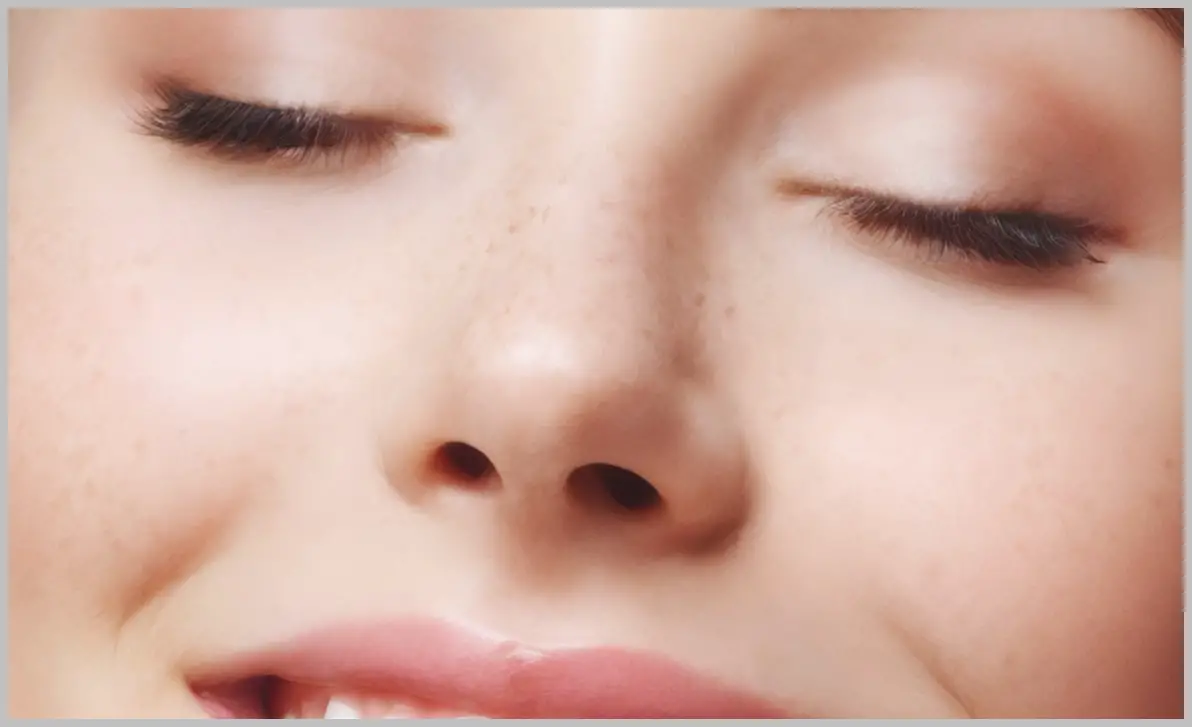
Let’s take a look at some before-and-after examples to see the difference this workflow can make. In the first example, we start with an image that has the typical overly smooth, plastic-like skin.
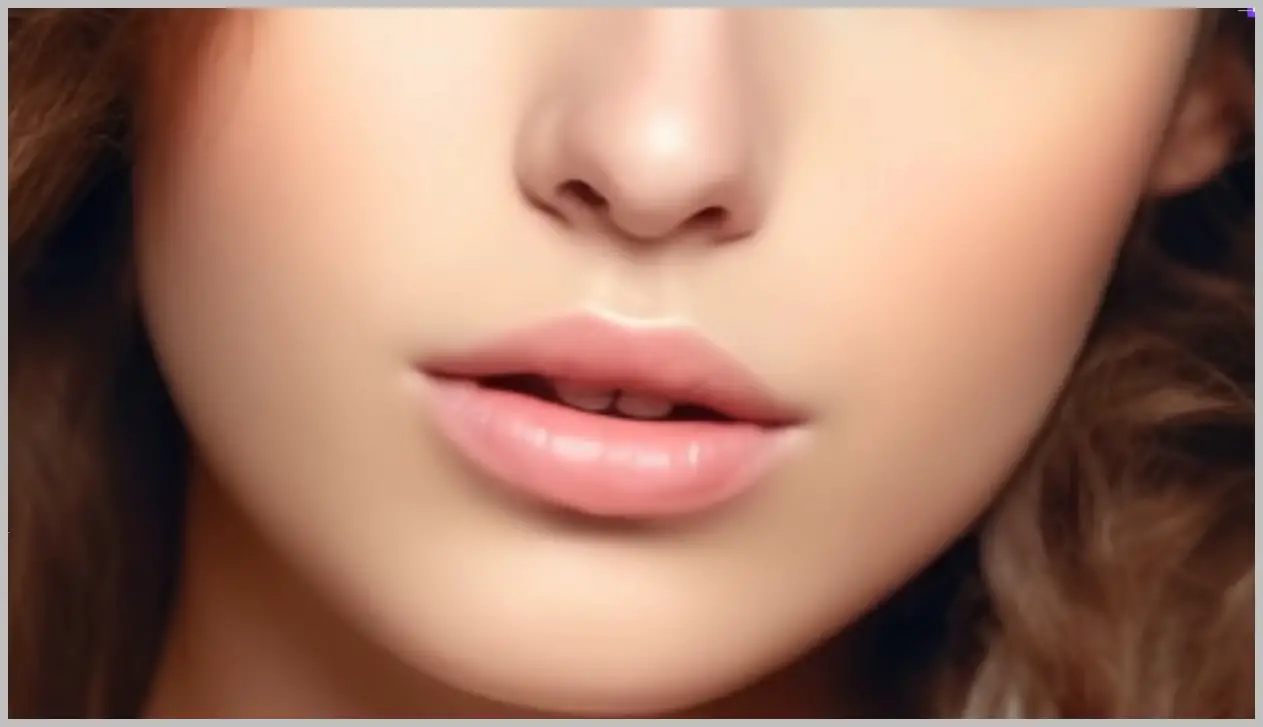
After processing it through the workflow, the skin texture becomes rougher and more natural. To further enhance realism, I used a LoRA to add freckles, which adds an extra layer of authenticity to the image.
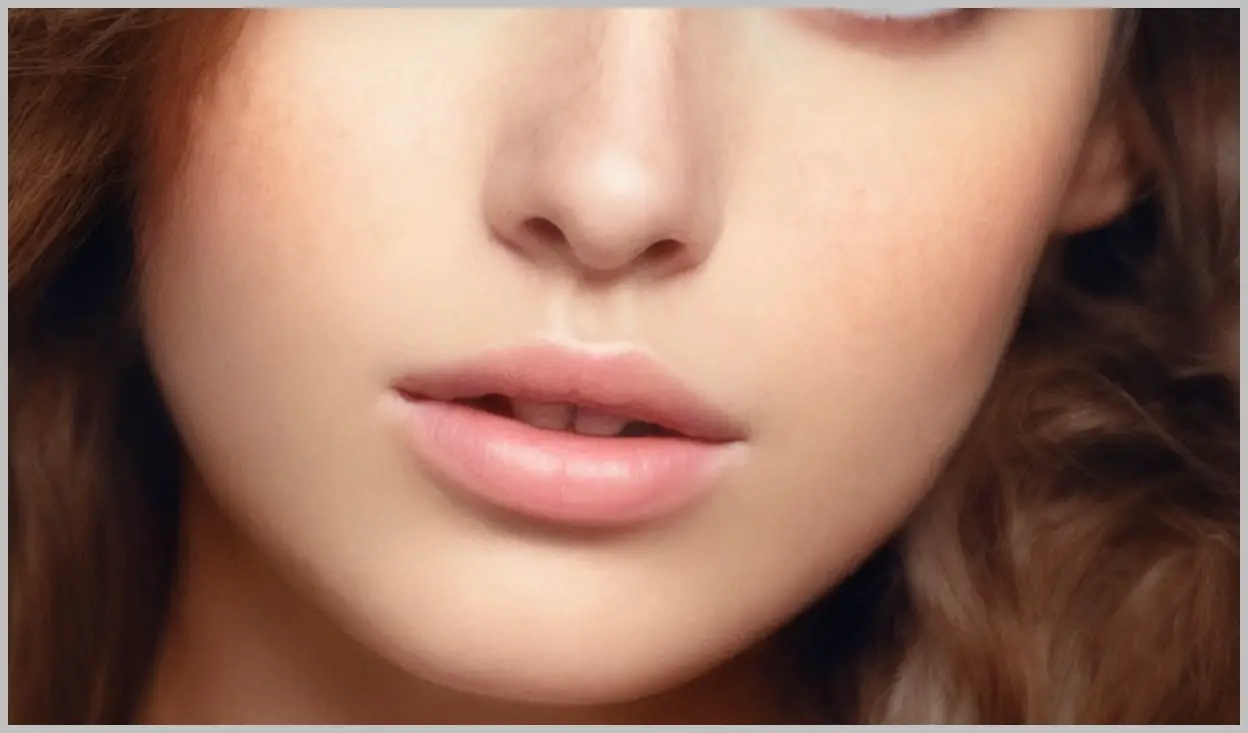
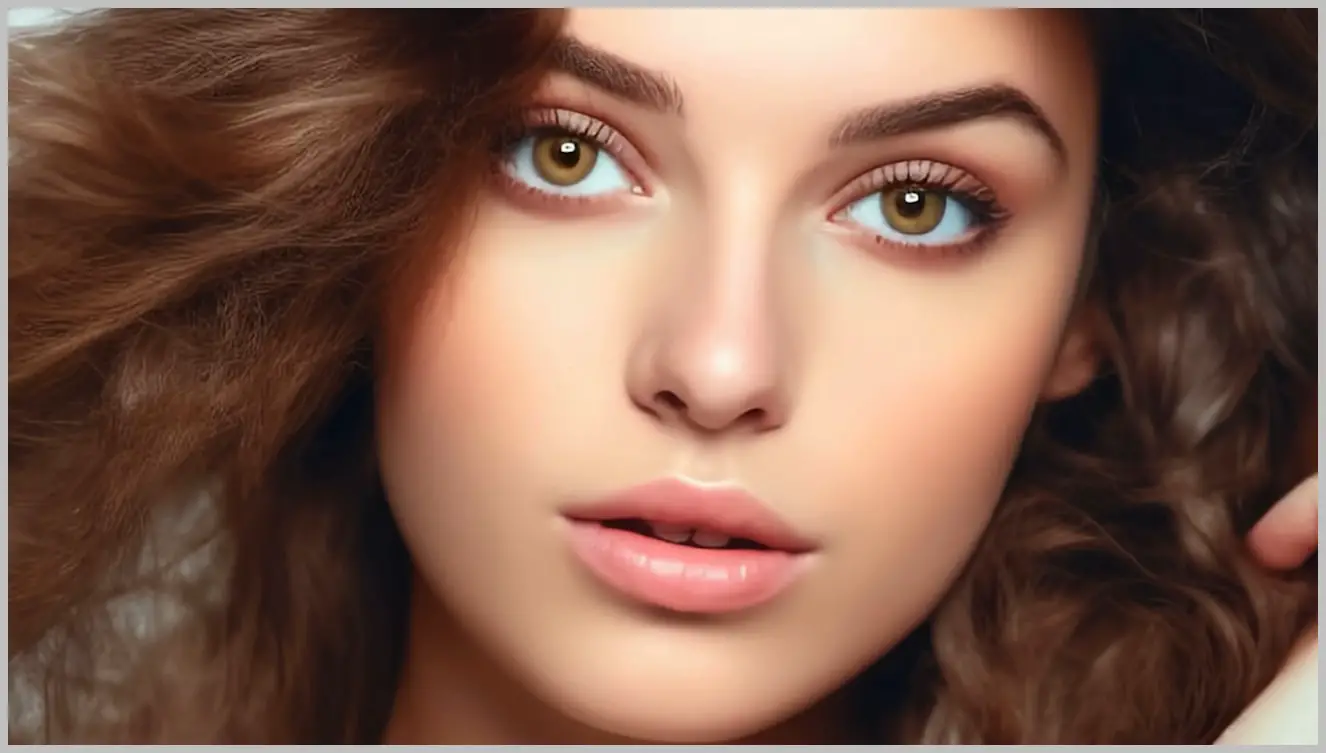
In another example, zooming in on the subject’s eyes reveals fine details in the eyelashes, which contribute to the overall realism.

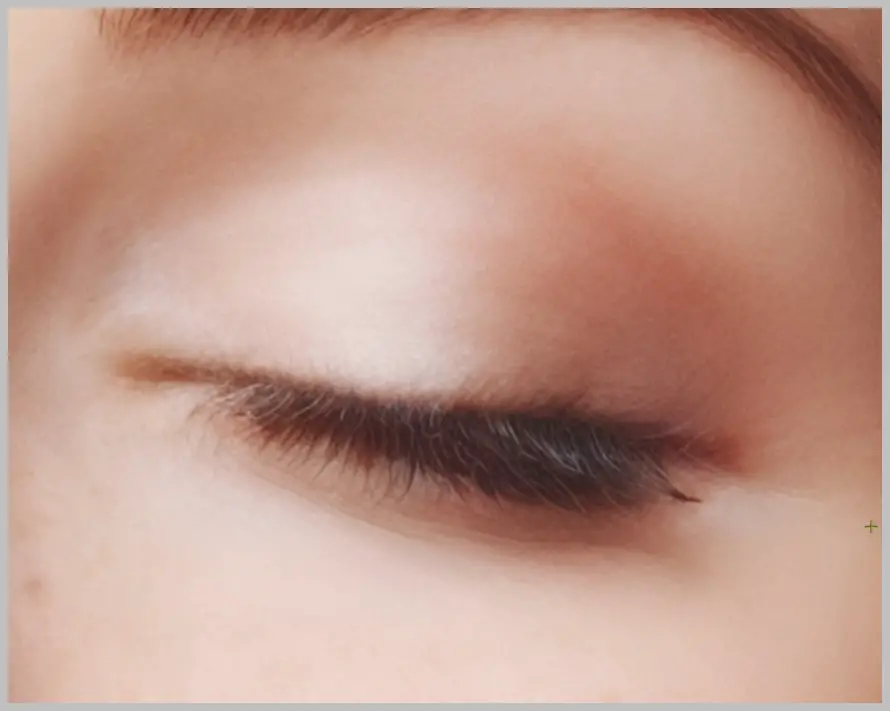
Freckles on the nose also enhance the authenticity of the image.
The best part? This workflow allows you to customize the number of freckles to suit your preferences.
Now that you’ve seen what this workflow can achieve, let’s walk through how to use it step by step. By the end of this guide, you’ll be able to apply these techniques to your own projects and create stunning, realistic portraits.
- Download this workflow: https://openart.ai/workflows/LlsZgG62LWa9J3R5CB9j
Model installation and video tutorial:
Gain exclusive access to advanced ComfyUI workflows and resources by joining our community now!
Here’s a mind map illustrating all the premium workflows: https://myaiforce.com/mindmap
Run ComfyUI with Pre-Installed Models and Nodes: https://youtu.be/T4tUheyih5Q
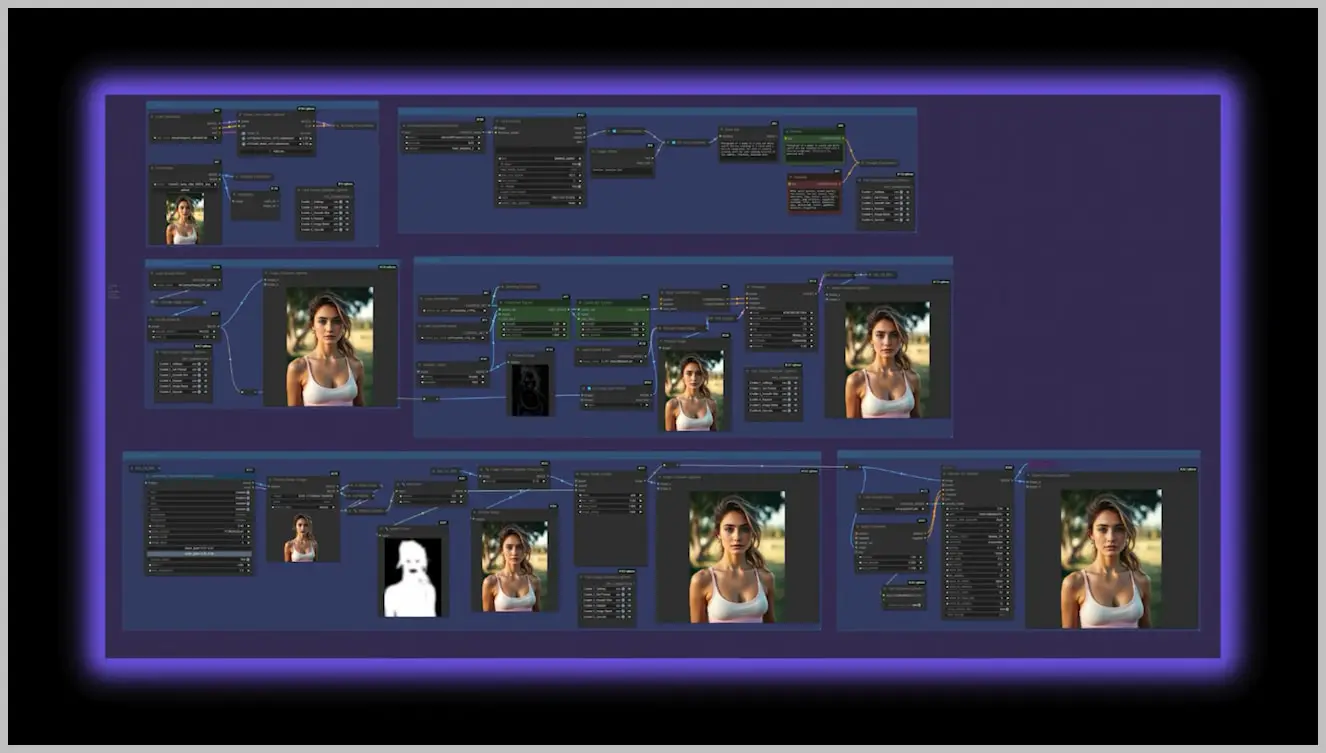
4. Node Group 1: Setting Up the Workflow
To begin using the ComfyUI workflow, we’ll start by focusing on the first node group. This step is all about setting up the foundation for generating realistic skin textures. Here’s how to get started:
- Run the Workflow to Load Models:
Once the first node group is active, run the workflow to load the required models. This setup is highly efficient because it relies on just one checkpoint model: epicphotogasm. This model is based on SD1.5 and is specifically designed for creating realistic skin textures. If you’re aware of other models that might work even better, feel free to share your suggestions in the comments! - Introducing the LoRAs:
On the right side of the workflow, you’ll notice two LoRAs (Low-Rank Adaptations) loaded into the system. These LoRAs play a crucial role in enhancing skin realism:- First LoRA: This one is responsible for generating freckles, which add a natural, human-like touch to the skin.
- Second LoRA: This LoRA focuses on adding extra fine details to the image, further enhancing its realism.
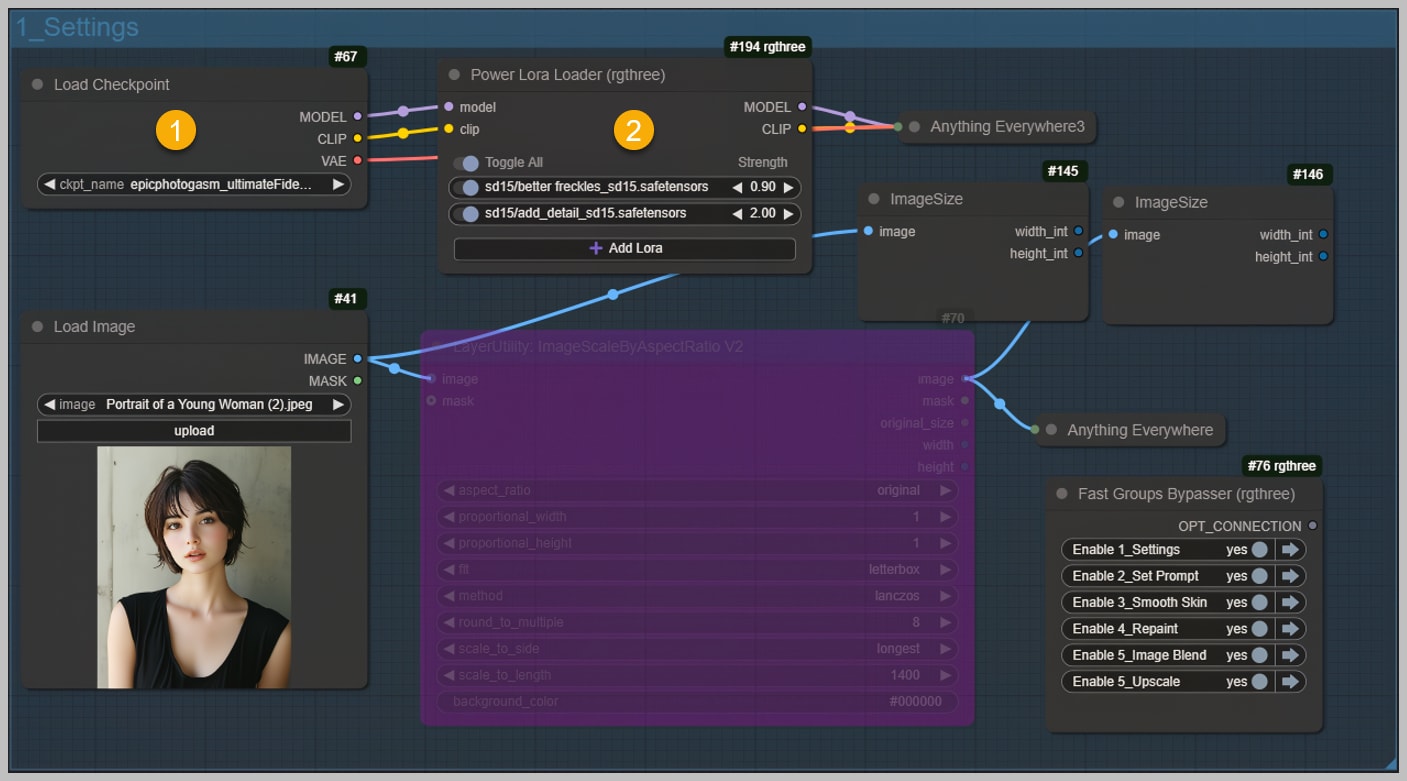
With the models and LoRAs loaded, the first node group is now fully configured. This sets the stage for the next steps, where we’ll fine-tune the prompts and refine the image further. Let’s move on to the second node group!
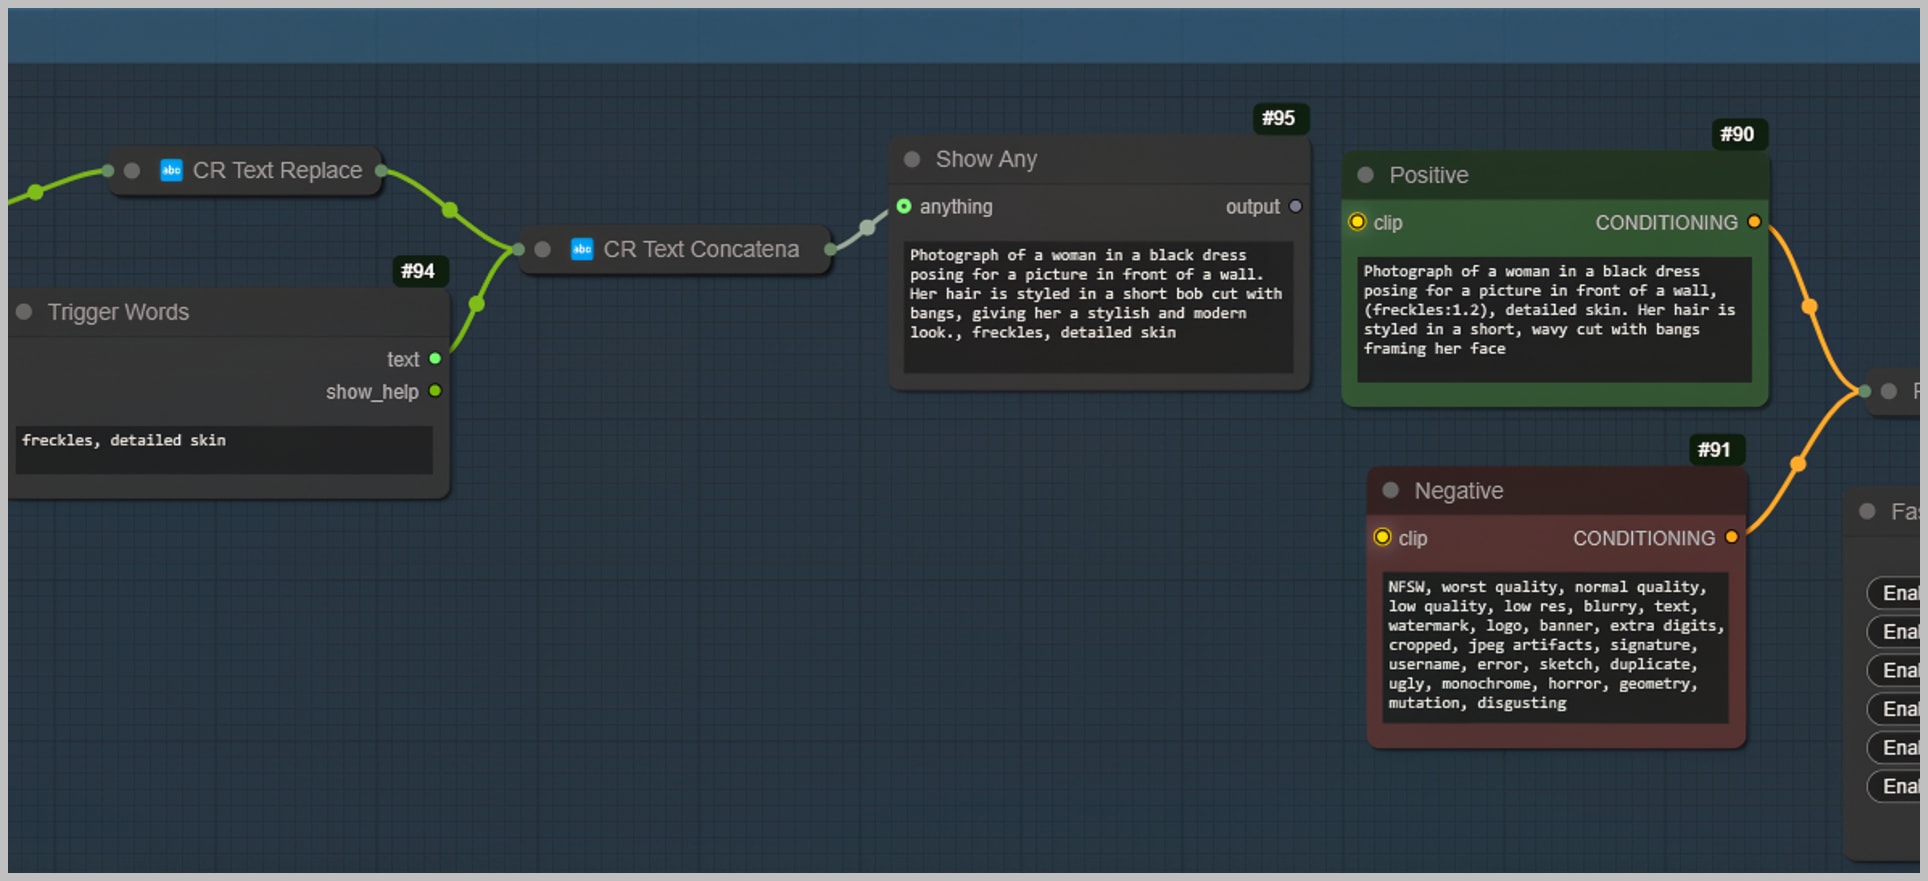
Node Group 2: Configuring the Prompt
The second node group is all about setting up the prompt for the sampling process. This step ensures that the generated images align closely with your vision and the original portrait. Here’s how to configure the prompt effectively:
- Run the Workflow to Generate Prompts:
Start by running the workflow within the second node group. This activates two nodes that automatically generate prompts based on the uploaded portrait. These prompts include specific trigger words that correspond to the LoRAs loaded earlier. For example, you might see words like “freckles” or “fine details,” which are essential for guiding the AI to produce realistic skin textures.
- Refine the Positive Prompt:
While the negative prompt is already pre-configured, the positive prompt needs some fine-tuning to ensure the generated images match the original portrait as closely as possible. Here’s how to do it:- Copy the text from the ‘Show Any’ node.
- Paste it into the ‘Positive’ node.
- Make adjustments to the prompt to emphasize specific features. For instance, place your cursor at the end of the word “freckles,” hold down the Control key, and press the up arrow key to increase its weight. This adjustment makes the generation of freckles more effective and prominent in the final image.
- Review and Finalize the Prompt:
Once the prompt is refined, take a moment to review it. Ensure that the trigger words and their weights are correctly set to achieve the desired level of detail and realism. With the prompt ready, you’re all set to move on to the next step in the workflow.
This configuration ensures that the AI understands exactly what you’re aiming for, resulting in images that are both realistic and aligned with your creative vision. Let’s proceed to the next node group!
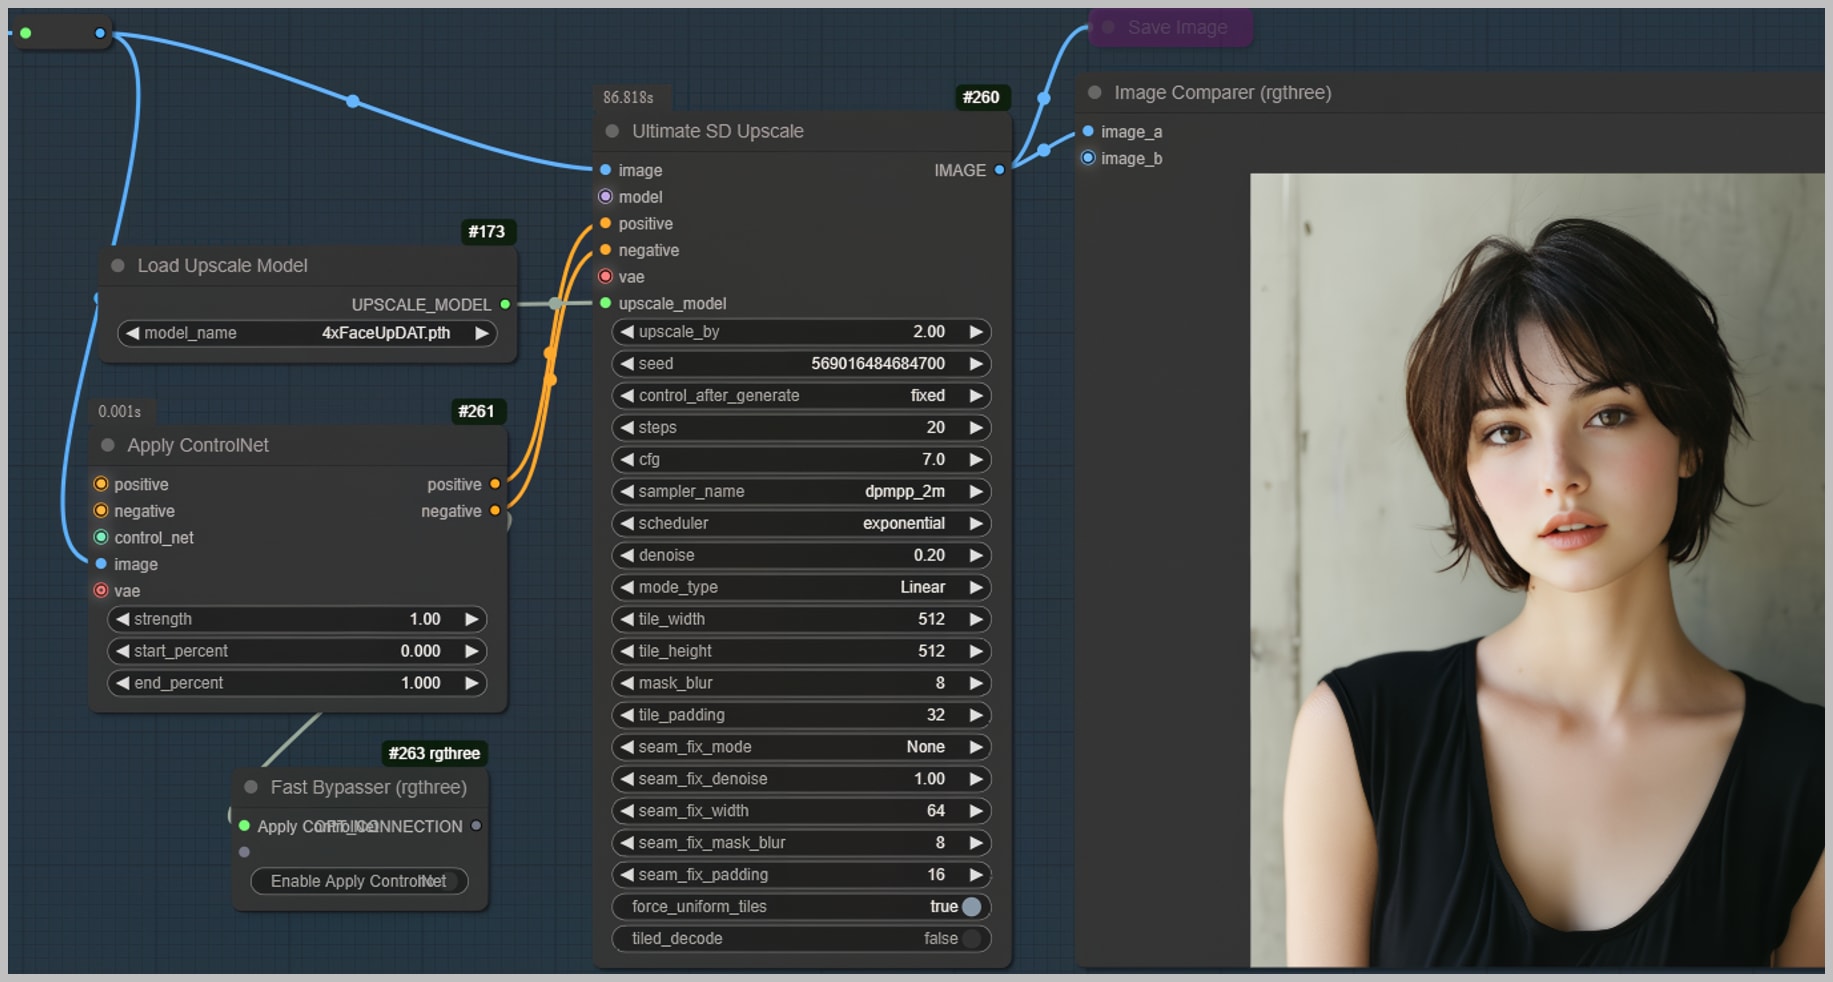
Node Group 4: Repainting the Portrait for Realistic Details
The fourth node group is where the magic happens—repainting the uploaded portrait to enhance its realistic details. This step focuses on refining the skin texture and ensuring the facial features remain intact. Here’s how to make the most of this node group:
- Set Up the Input Parameter:
Before running the workflow, ensure the ‘input’ parameter is set to 2. This ensures that your original portrait is correctly configured for further processing. A quick note: Image 1 comes from the third node group, which we skipped earlier, so keep this in mind for context.
- Run the Workflow and Evaluate Skin Texture:
Once the input is set, run the workflow to see how the skin texture turns out. This group includes two ControlNet nodes to maintain the integrity of the facial features:- The first ControlNet is initially set to Canny, but it should be changed to LineArt for better results. Let’s fix that.
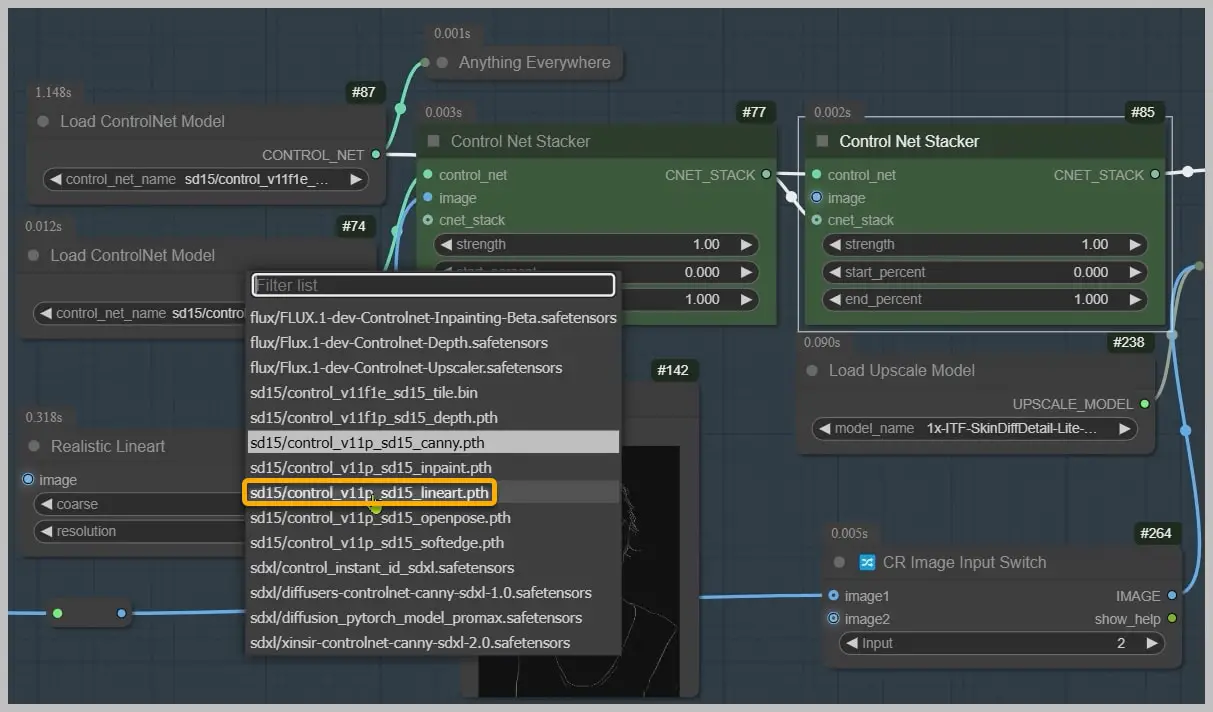
- The second ControlNet is set to Tile, which helps preserve the overall structure of the image.
After updating the settings, rerun the workflow to apply the adjustments.
- The first ControlNet is initially set to Canny, but it should be changed to LineArt for better results. Let’s fix that.
- Incorporate the Upscale Model:
In this step, I’ve loaded an upscale model to enhance the image quality. While the SkinDiffDetail model won’t upscale the image, it excels at adding intricate skin textures. This creates a strong foundation for generating highly realistic skin during the repainting process.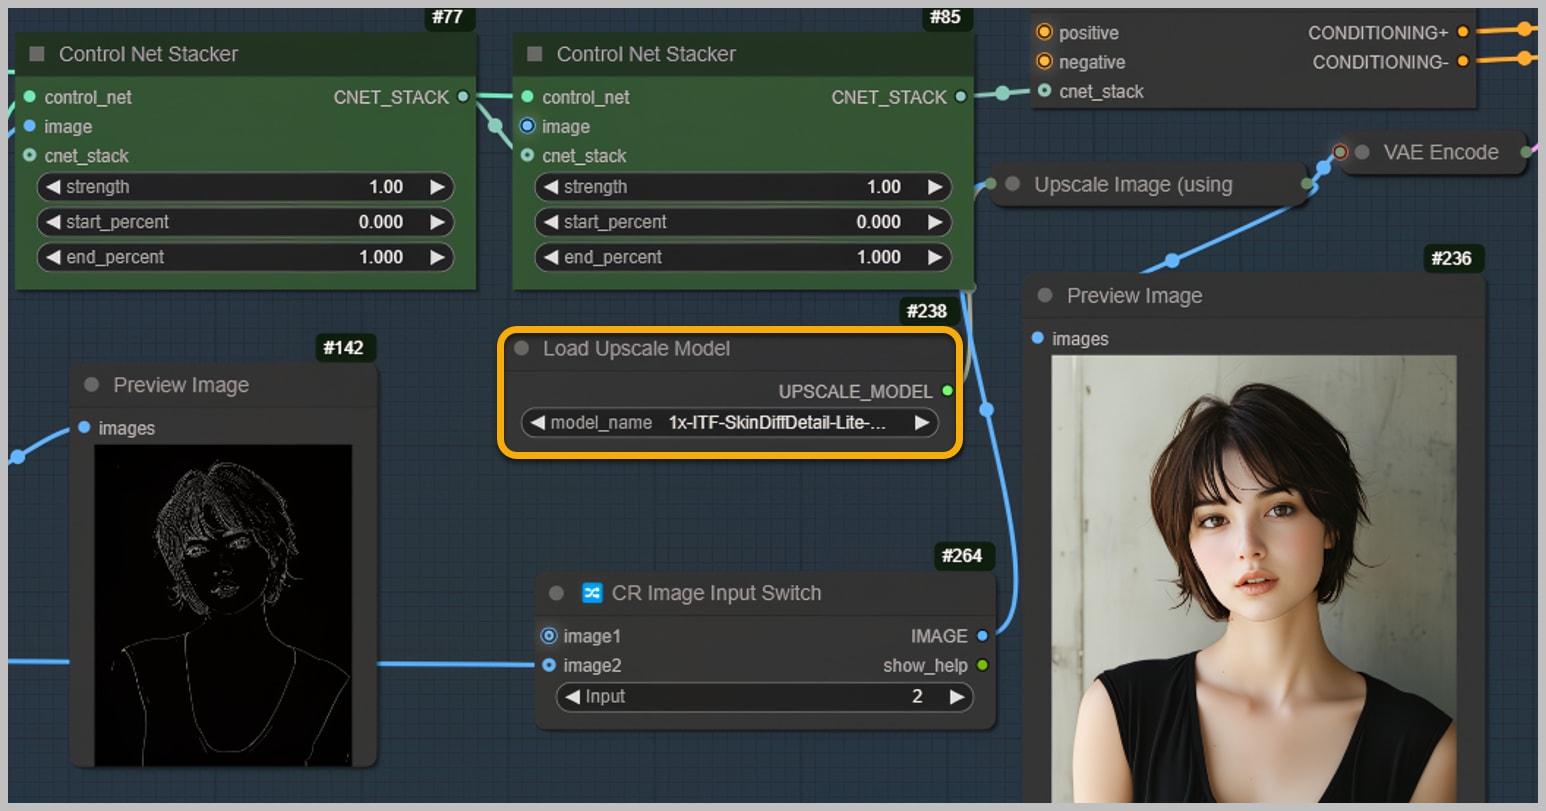
- Evaluate the Results:
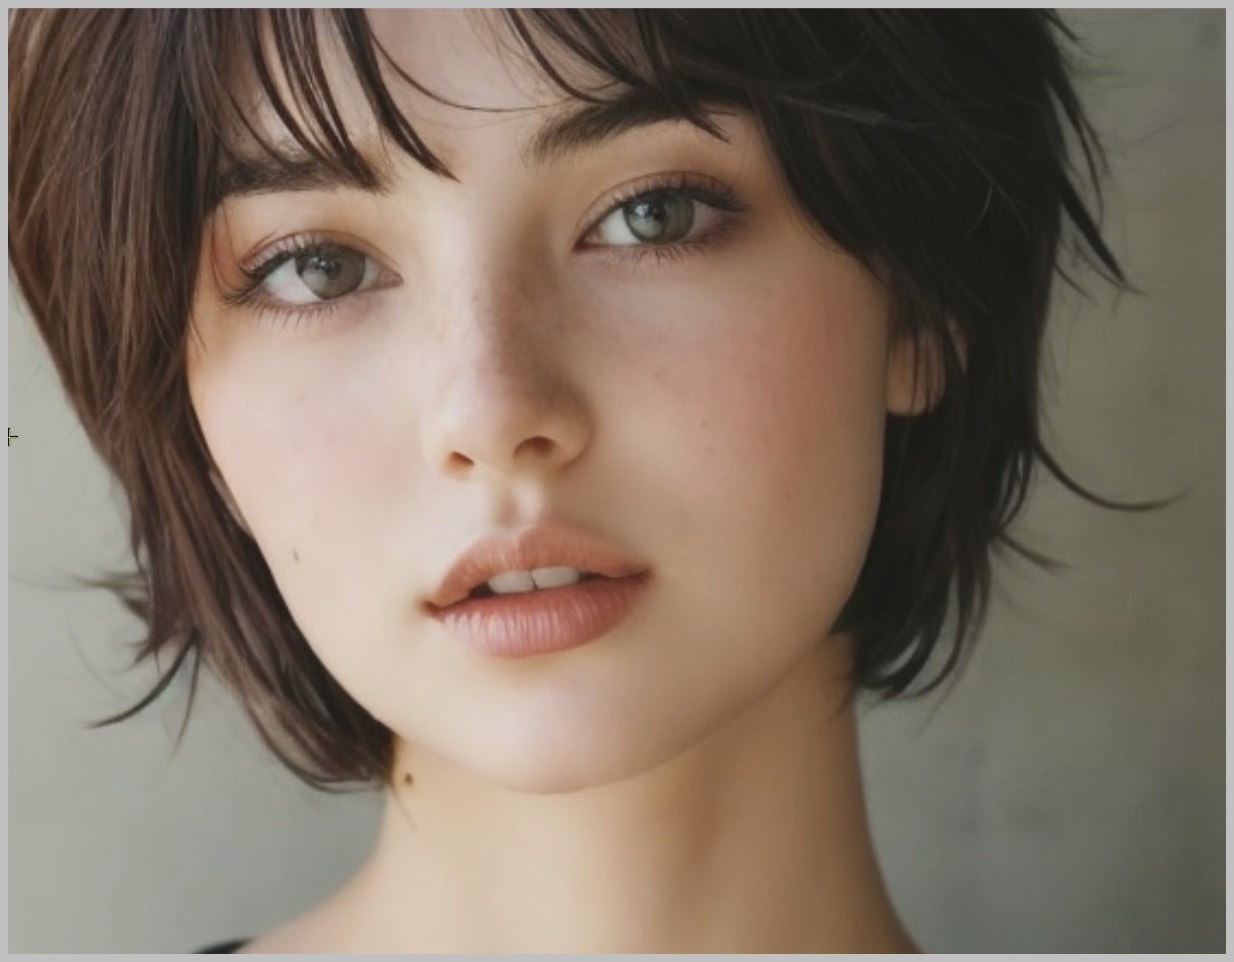
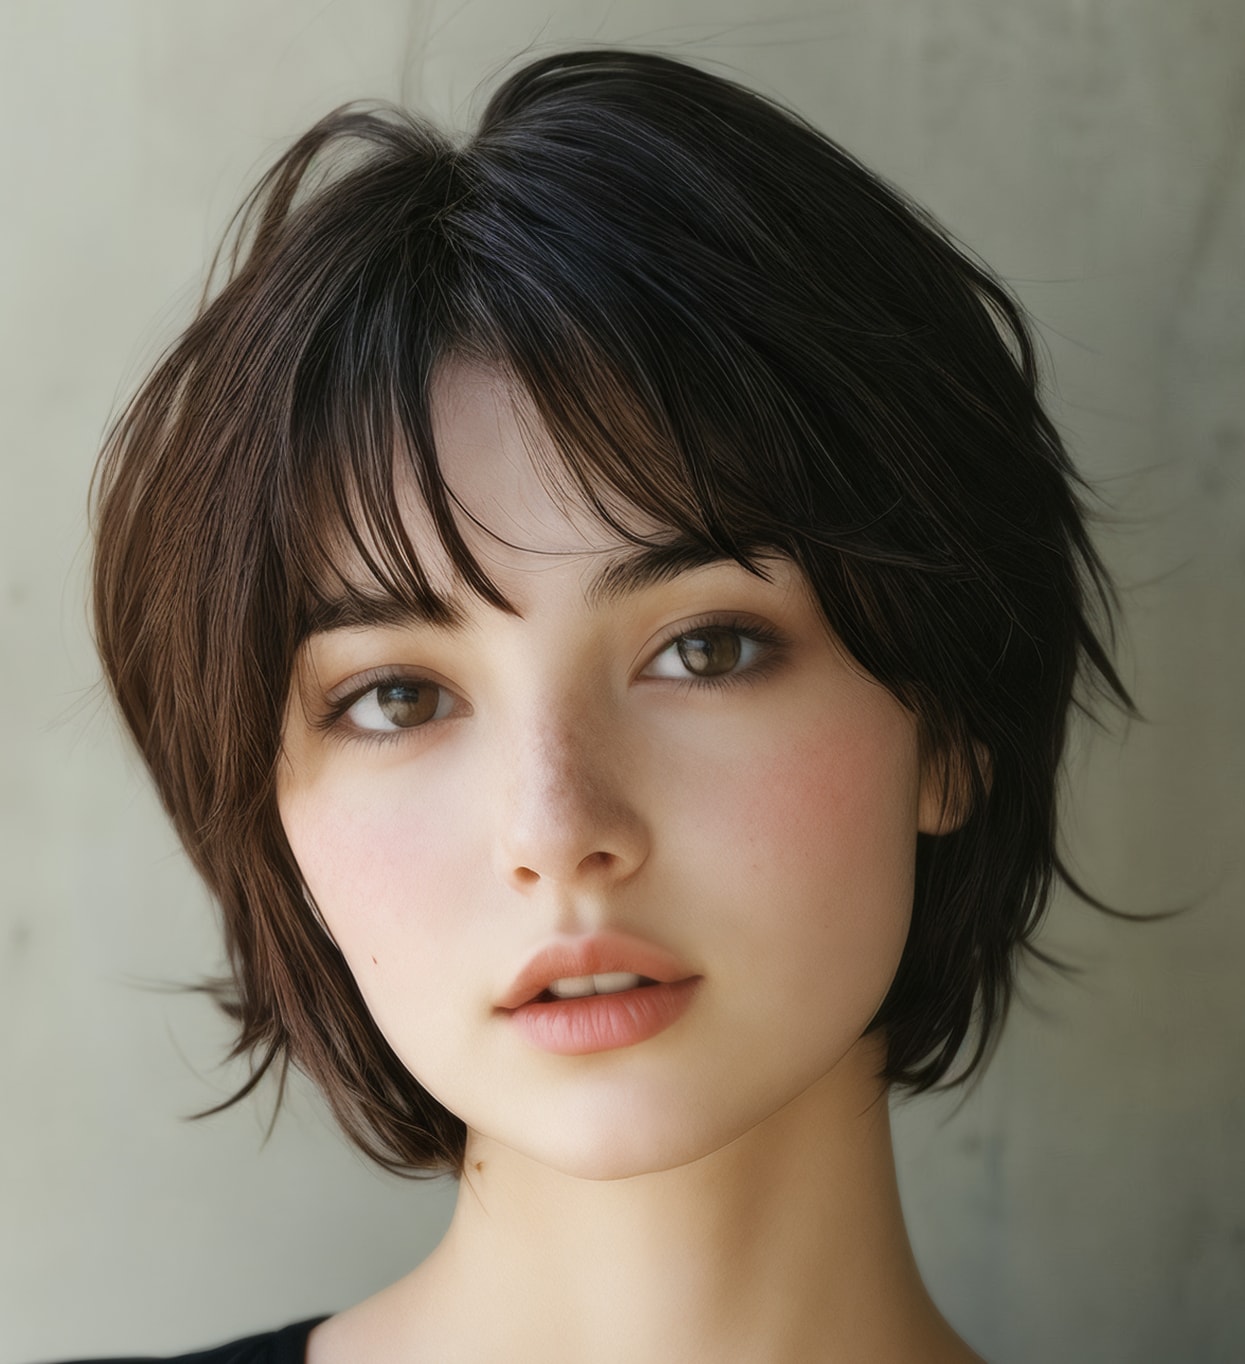
Take a moment to assess the quality of the skin texture. The addition of freckles and fine details significantly enhances the realism of the portrait. However, to understand the impact of the SkinDiffDetail model, let’s temporarily bypass the ‘Upscale Image’ node.- Without the SkinDiffDetail model, the skin appears smoother but lacks the fine details that make it look natural.
- Reactivate the ‘Upscale Image’ node and rerun the workflow to compare the difference.
- Without the SkinDiffDetail model, the skin appears smoother but lacks the fine details that make it look natural.
- Addressing Unnatural Artifacts:
Upon zooming in, you might notice some vertical fine lines on the subject’s face. These lines can feel unnatural and distracting. To identify the cause, let’s examine the original image.
- In the original, these vertical lines are present but far less pronounced. This is a common issue with AI-generated images, where the model can exaggerate or introduce unnatural artifacts.
- Even if vertical lines aren’t present, other imperfections, such as fake skin textures from models like Flux, can still appear.
- Refining the Original Image:
To address these issues, we’ll refine the original image using the third node group. Activate this group and run the workflow to smooth out the skin and remove any lingering artifacts. This step ensures a cleaner, more natural base for further enhancements.
Node Group 3: Skin Smoothing
The third node group is dedicated to smoothing the skin and eliminating any unnatural artifacts that may have appeared during earlier processing steps. This step ensures a clean and natural base for further refinements. Here’s how it works:
- Run the Workflow and Evaluate Results:
Start by running the workflow within the third node group. As the process completes, you’ll notice how effectively it smooths the skin and removes any lingering artifacts, such as unnatural lines or textures. This step is crucial for achieving a more polished and realistic appearance.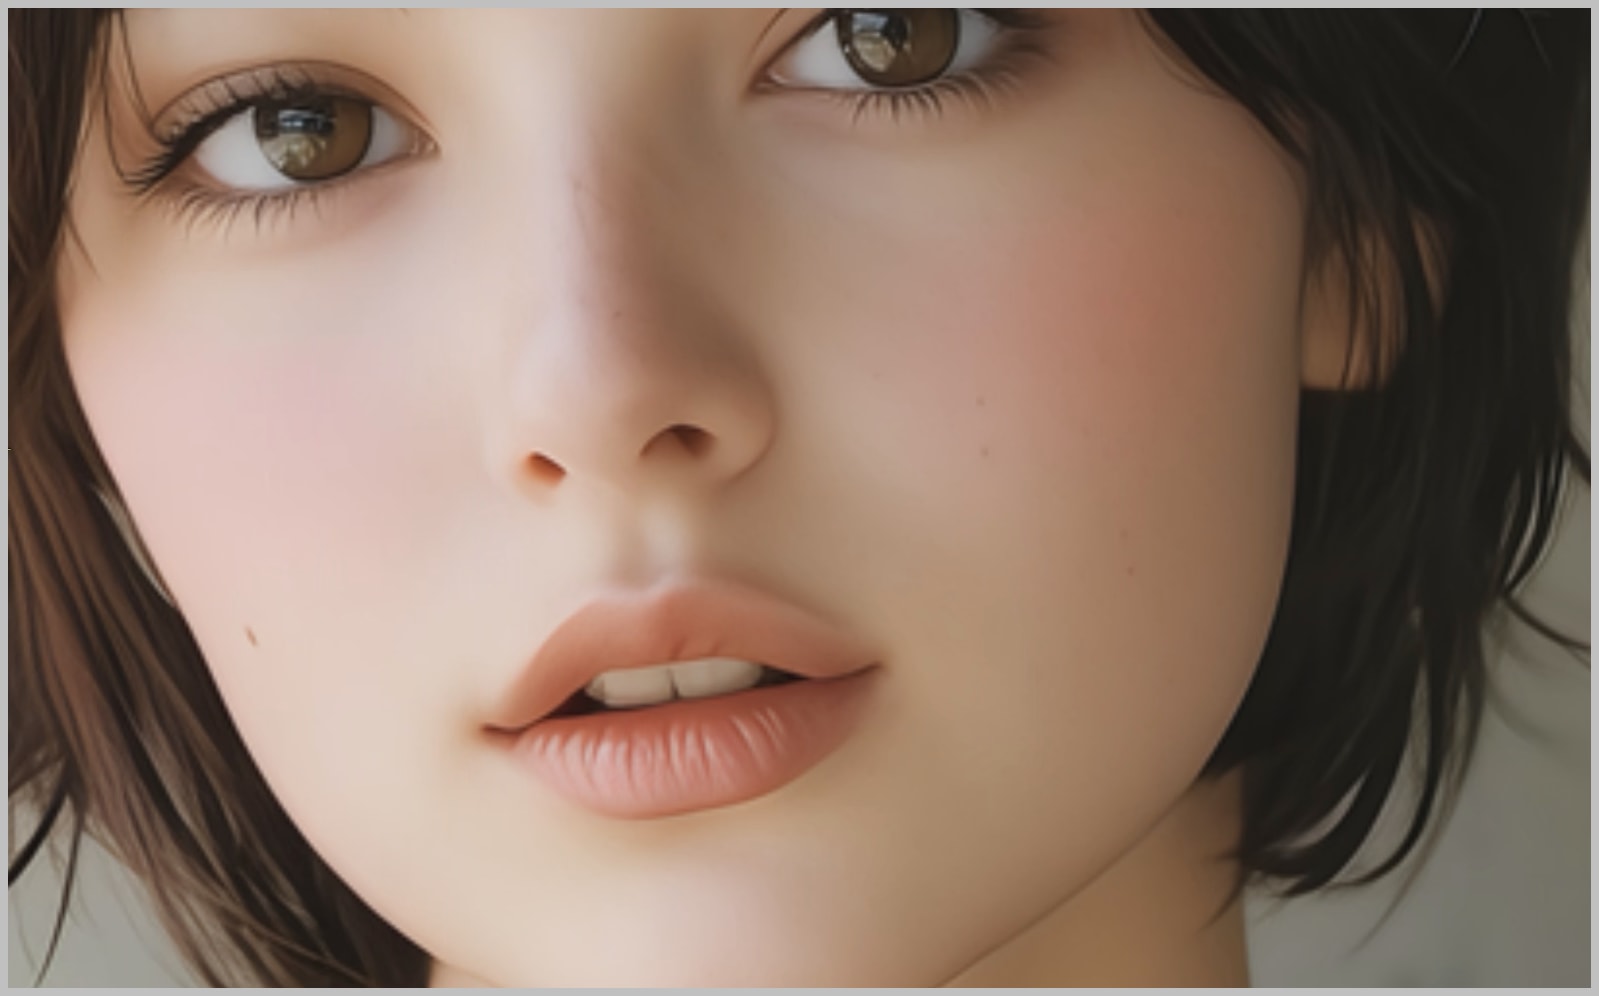
- Set the Input Parameter:
Now that the skin has been smoothed, it’s time to go to the fourth group. Before doing so, ensure the ‘Input’ parameter is set to 1 in the ‘Image Input Switch’ node. This ensures the workflow processes the correct image for the next steps. Once this is done, run the workflow again to apply the changes.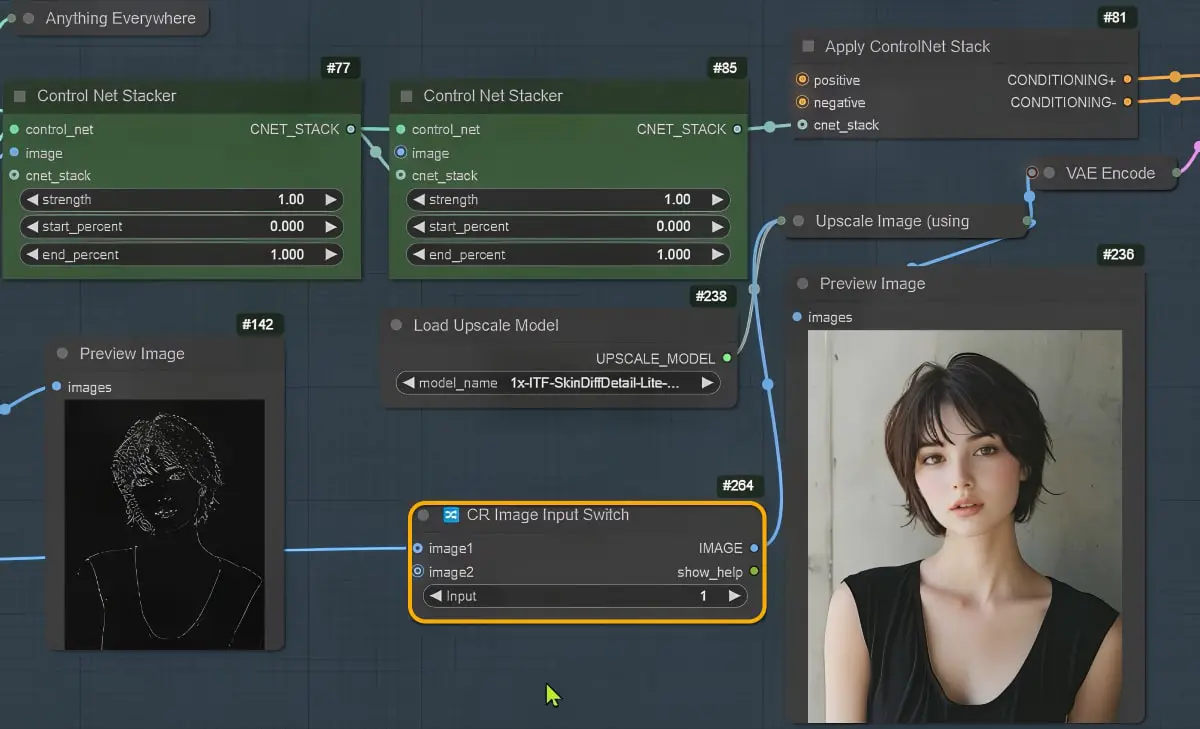
- Assess the Improvements:
After running the workflow, you’ll see a significant improvement in the skin texture. The vertical lines that were previously noticeable are now completely gone, resulting in a much cleaner and more natural look. This is a big step forward in enhancing the realism of the portrait.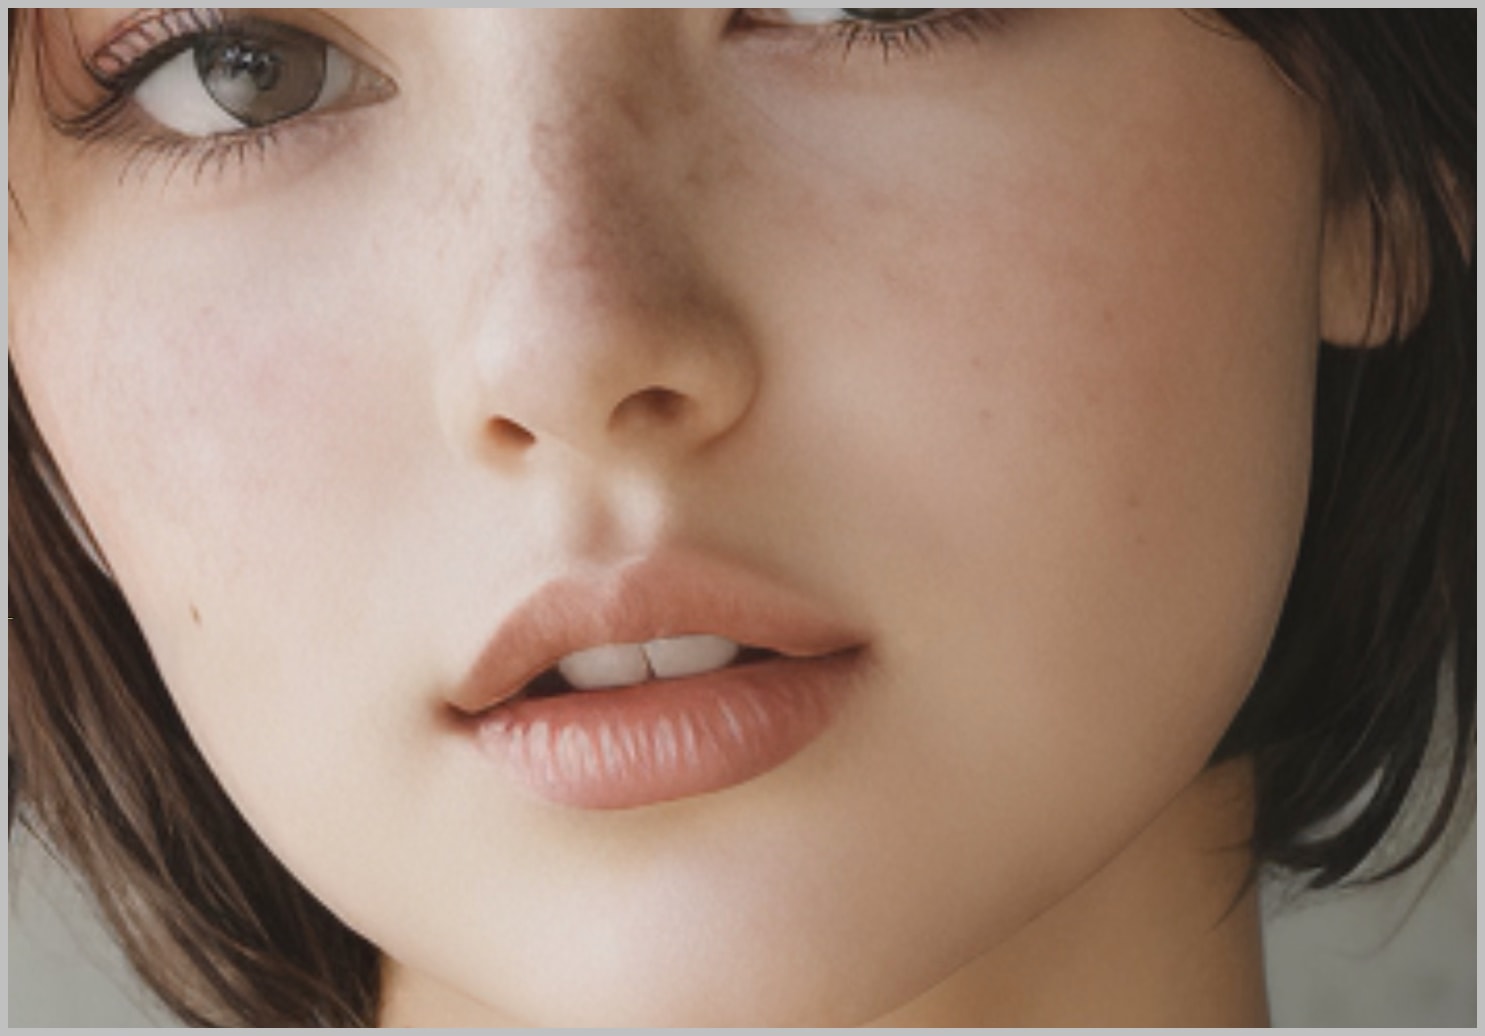
- Identify Remaining Issues:
While the skin looks great, there’s still one minor issue to address: the pupils of the subject’s eyes aren’t as round as they were in the original image.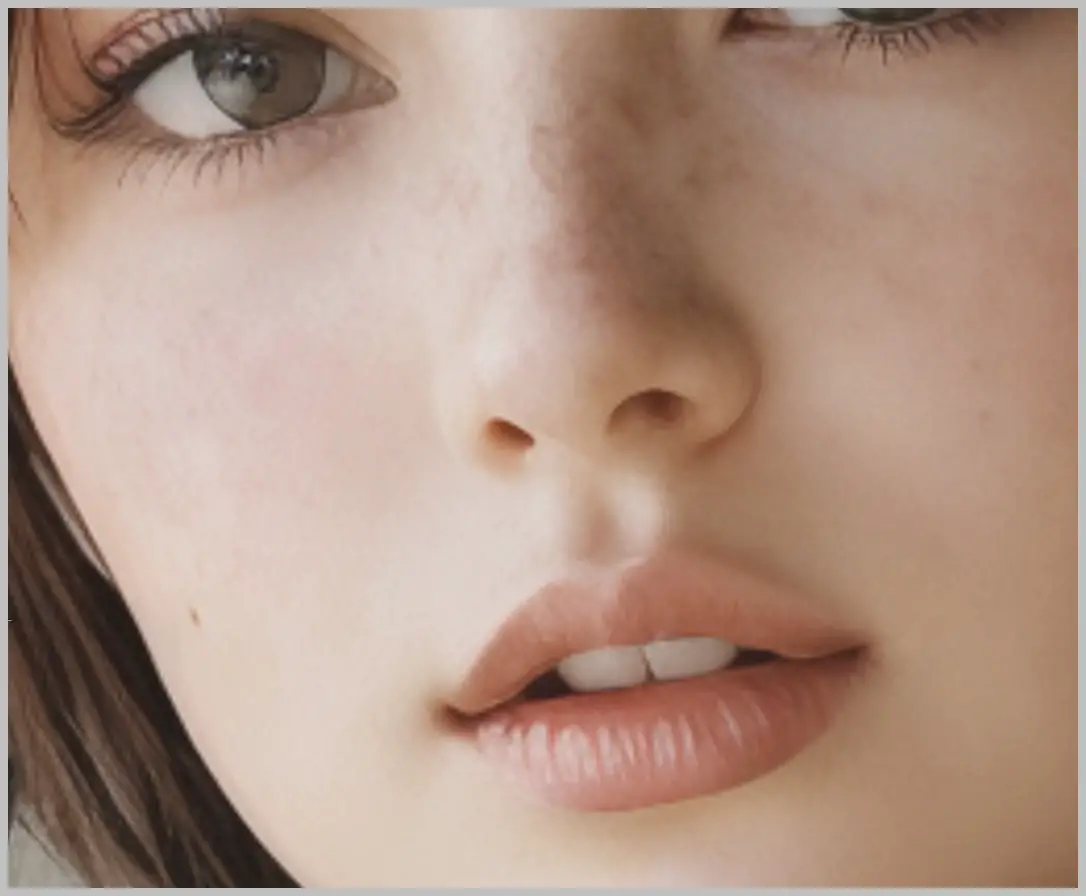 This slight discrepancy can detract from the overall realism of the portrait. Don’t worry—this issue will be resolved in the next node group, where we’ll focus on refining specific facial features.
Node Group 5: Enhancing Facial Features and Final Touches
The fifth node group is where we refine specific facial features and apply the final touches to ensure the portrait looks as realistic as possible. This step focuses on preserving the integrity of key areas like the eyes and mouth while enhancing overall details. Here’s how to navigate this process:
- Run the Workflow and Generate the Mask:
Start by running the workflow. In the ‘Preview Bridge’ node, you’ll see that the ‘PersonMask’ node has generated a mask. This mask defines the areas of the image that will be refined, acting as the source for transferring details.
- Customize the Mask Settings:
To ensure the mask focuses on the right areas, I’ve disabled the ‘background’ option, which excludes the background entirely. Additionally, I’ve enabled options for ‘face,’ ‘body,’ ‘hair,’ and ‘clothes’ to enhance details in these areas. You can customize these settings based on your preferences and the specific needs of your portrait. - Exclude Problematic Areas:
If you noticed any issues with the eyes or mouth in the results from the previous group, you can exclude these areas by painting over them in the ‘Preview Bridge’ node. This ensures that these features remain true to the original image while other areas are refined.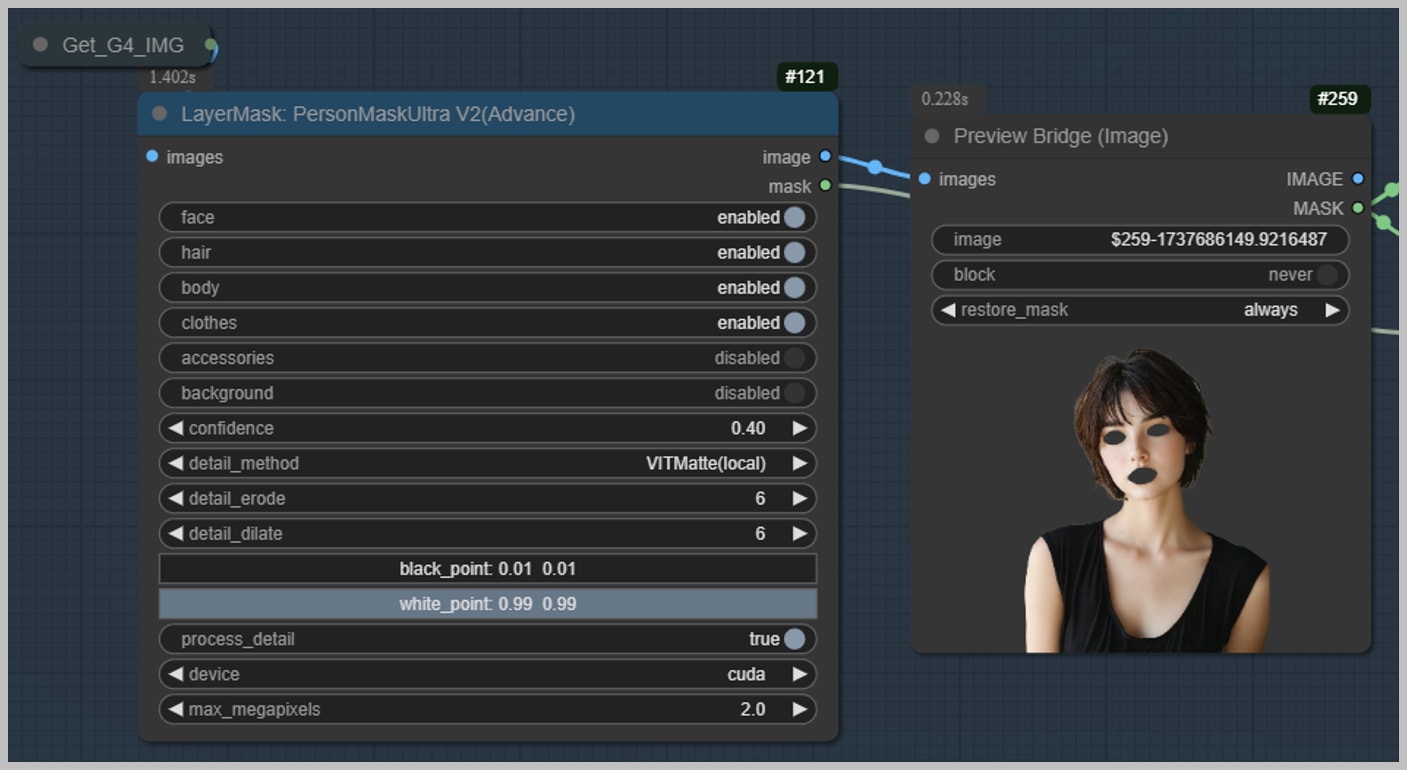
- Run the Workflow Again:
After adjusting the mask, run the workflow again to apply the changes. A key component of this group is the “Image Detail Transfer” node, which transfers skin details from the image generated in the previous group back to the original image. Here’s how it works:- The image from the previous group is sharpened using the “Image Contrast Adaptive Sharpening” node and then imported into the “source” port of the “Image Detail Transfer” node.
- The mask is brought into the “mask” port, indicating the areas where details should be transferred.
- To create a seamless transition between the eyes and the rest of the image, a blur is applied using the “Mask Blur” node.
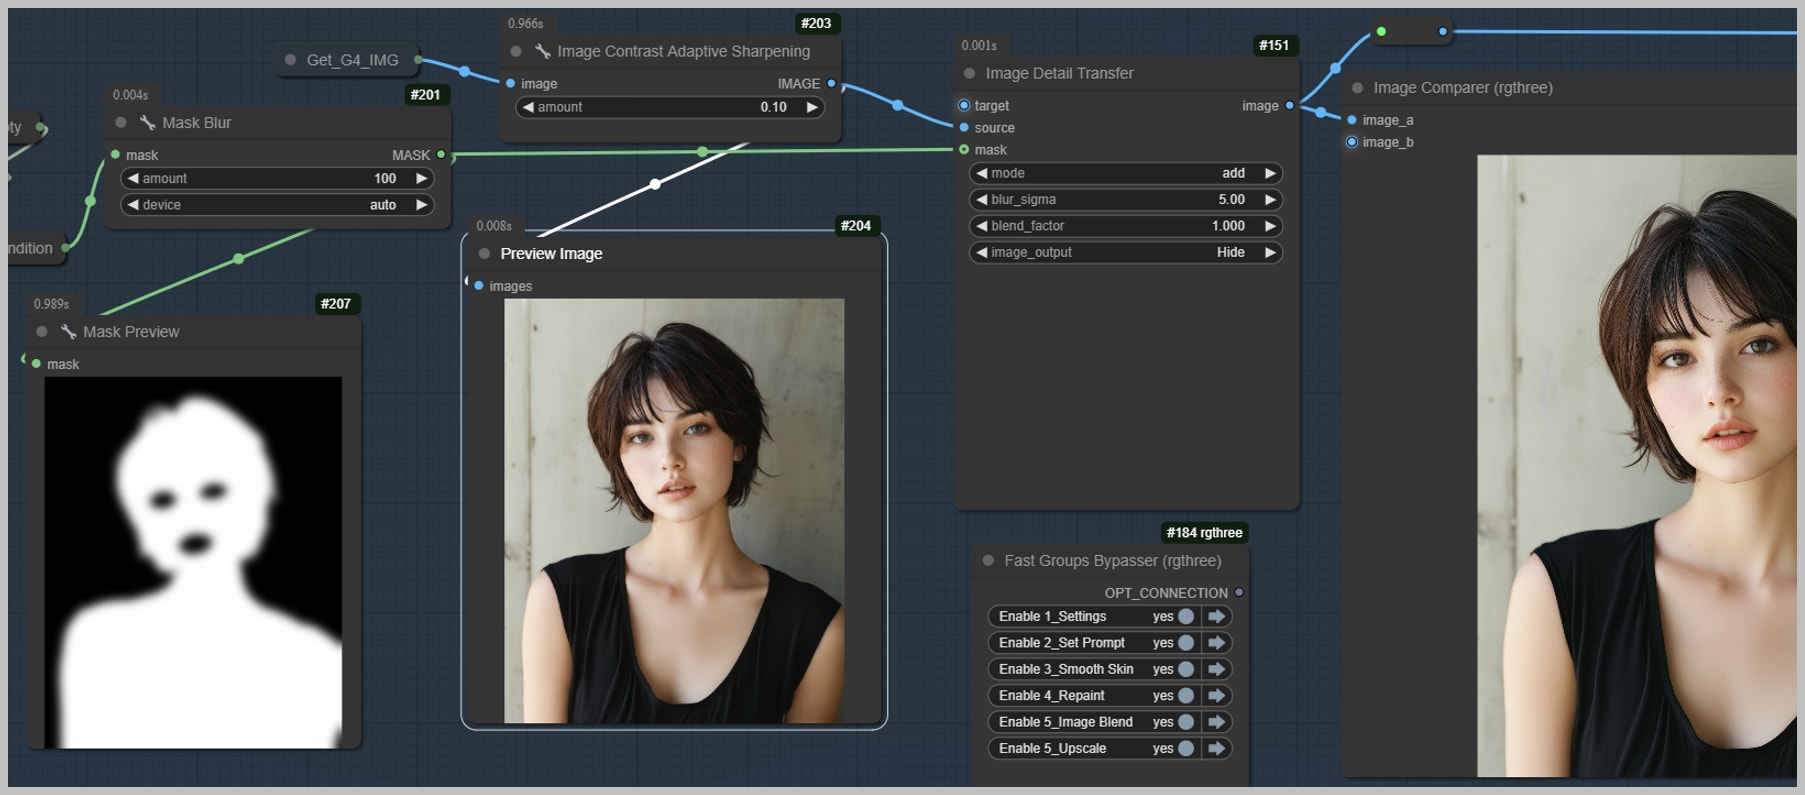
- Evaluate the Final Result:
Check the final result in the “Image Comparer” node. You’ll notice that most areas of the skin now have realistic details, while the eyes and other excluded areas remain mostly unchanged. This ensures the facial features stay true to the original, maintaining the portrait’s integrity.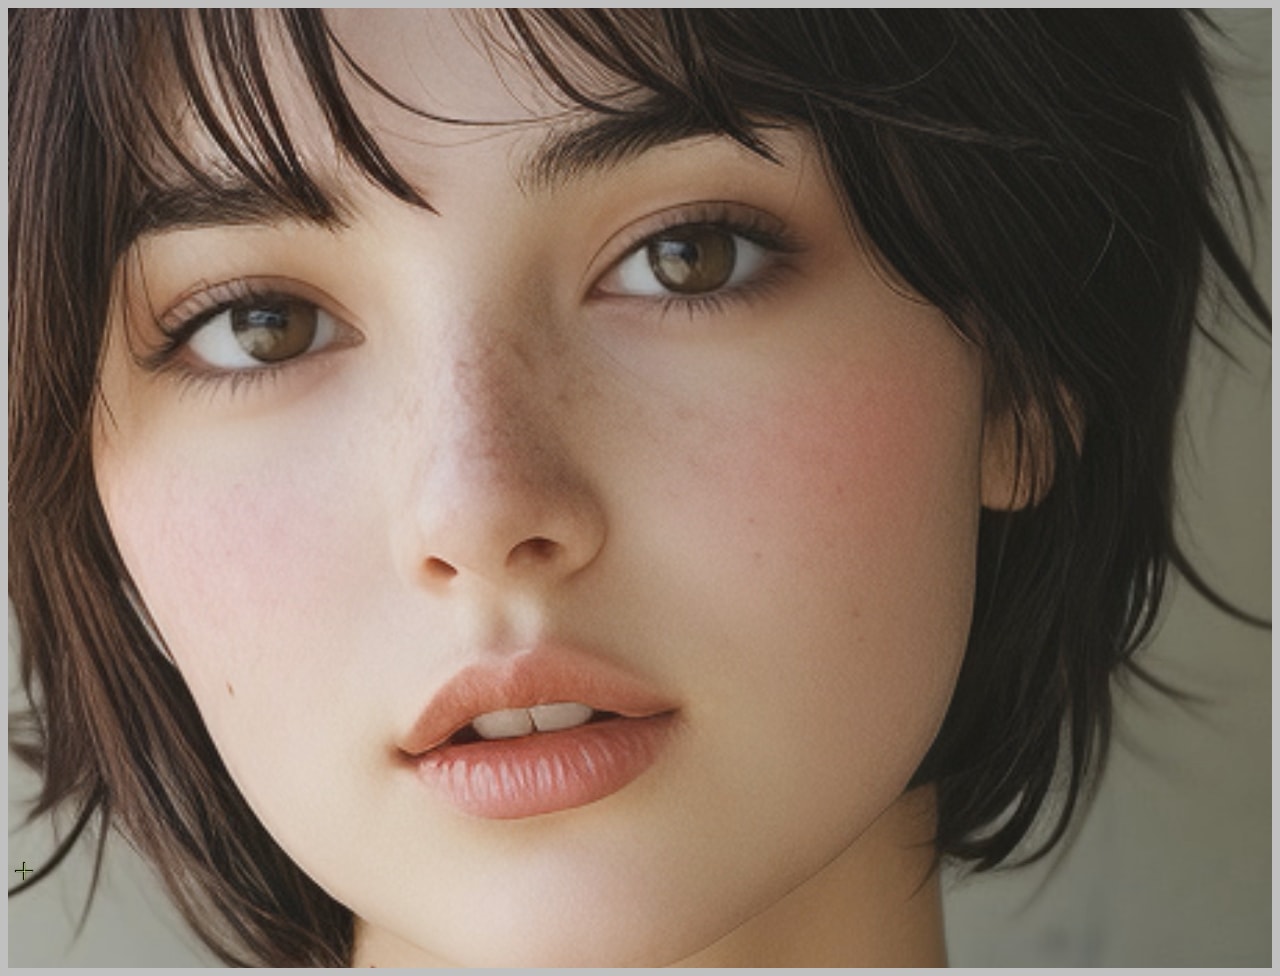
- Addressing Remaining Issues:
While the results are significantly improved, it’s not uncommon for the eyes to still show some unrealistic details. Don’t worry—this will be addressed in the next group, where we’ll use upscaling to further enhance these areas.
Final Words
I encourage you to download the workflow, experiment with its settings, and see how it can elevate your AI-generated portraits.
Thank you for following along with this guide! I hope this workflow brings great value to your creative process.