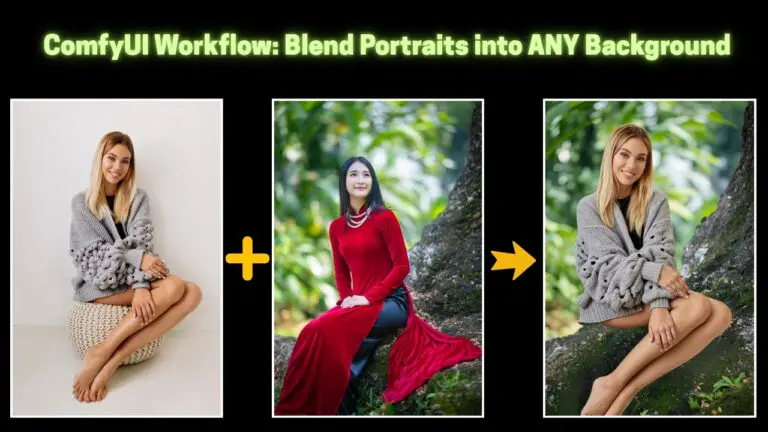
Background Replacement Workflow V4: Versatile for Products & Portraits, Lighting Adjustment & Detail Preservation
In this article, we’re diving into my latest and greatest improvements to the ComfyUI background replacement workflow.
Over the past few months, I’ve released several updates that introduced advanced features like IC-Light for more natural subject integration and Flux-based ControlNet for better results. But now, we’re moving beyond those iterations, bringing you a streamlined, more powerful approach.
This workflow aims for flawless background replacements. By the end of this guide, you’ll have a solid understanding of how to integrate subjects seamlessly into new environments, while preserving all the important details.
So, let’s get started!
Overview and New Features
In previous versions of ComfyUI, IC-Light and Flux-based ControlNet were used to help subjects blend into their new backgrounds. While effective, these methods could be slow and resource-heavy. The updated workflow improves both efficiency and realism, offering faster processing and more natural results.
Key Improvements:
- Speed and Efficiency The updated workflow uses SDXL checkpoints with 10 sampling steps, which requires about 6GB of VRAM for basic tasks. However, to achieve enhanced effects, additional VRAM is needed when using Flux-based checkpoints. This balance of efficiency and power ensures quicker results while maintaining high quality.
- Seamless Subject Integration By utilizing the lightning version of SDXL to relight subjects, we achieve a more natural blend between the subject and the new background, preserving important details like lighting and textures.
- Shift from Flux-based ControlNet Unlike earlier versions, the new workflow doesn’t rely on Flux-based ControlNet. Instead, it uses SDXL Canny ControlNet for edge refinement and subject separation, improving the overall efficiency.
- Improved Masking and Detail Transfer With better masking tools and the ability to transfer details effectively, even complex subject features (like hair and clothing) are preserved while ensuring smooth integration into the new background.
Workflow Example 1: Portrait Background Replacement
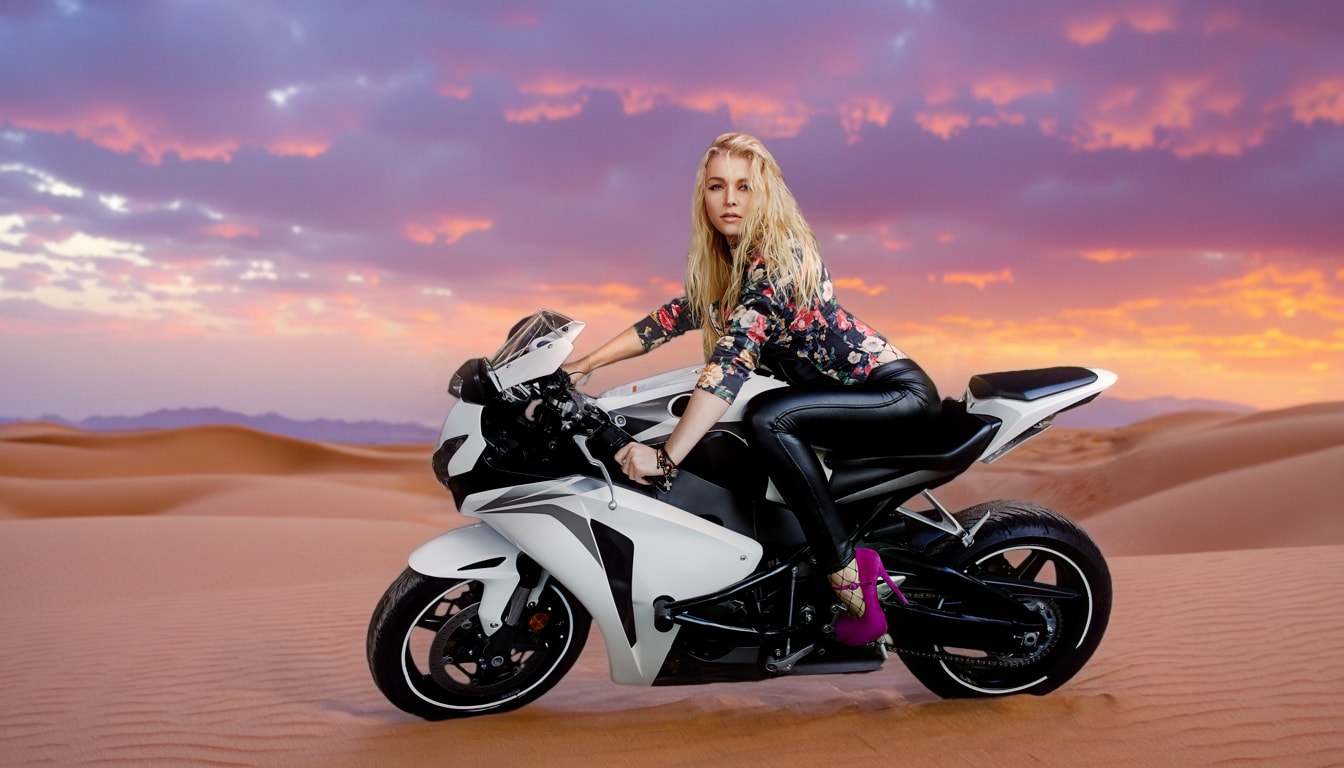
Let’s begin by looking at a portrait background replacement. This is the uploaded image.
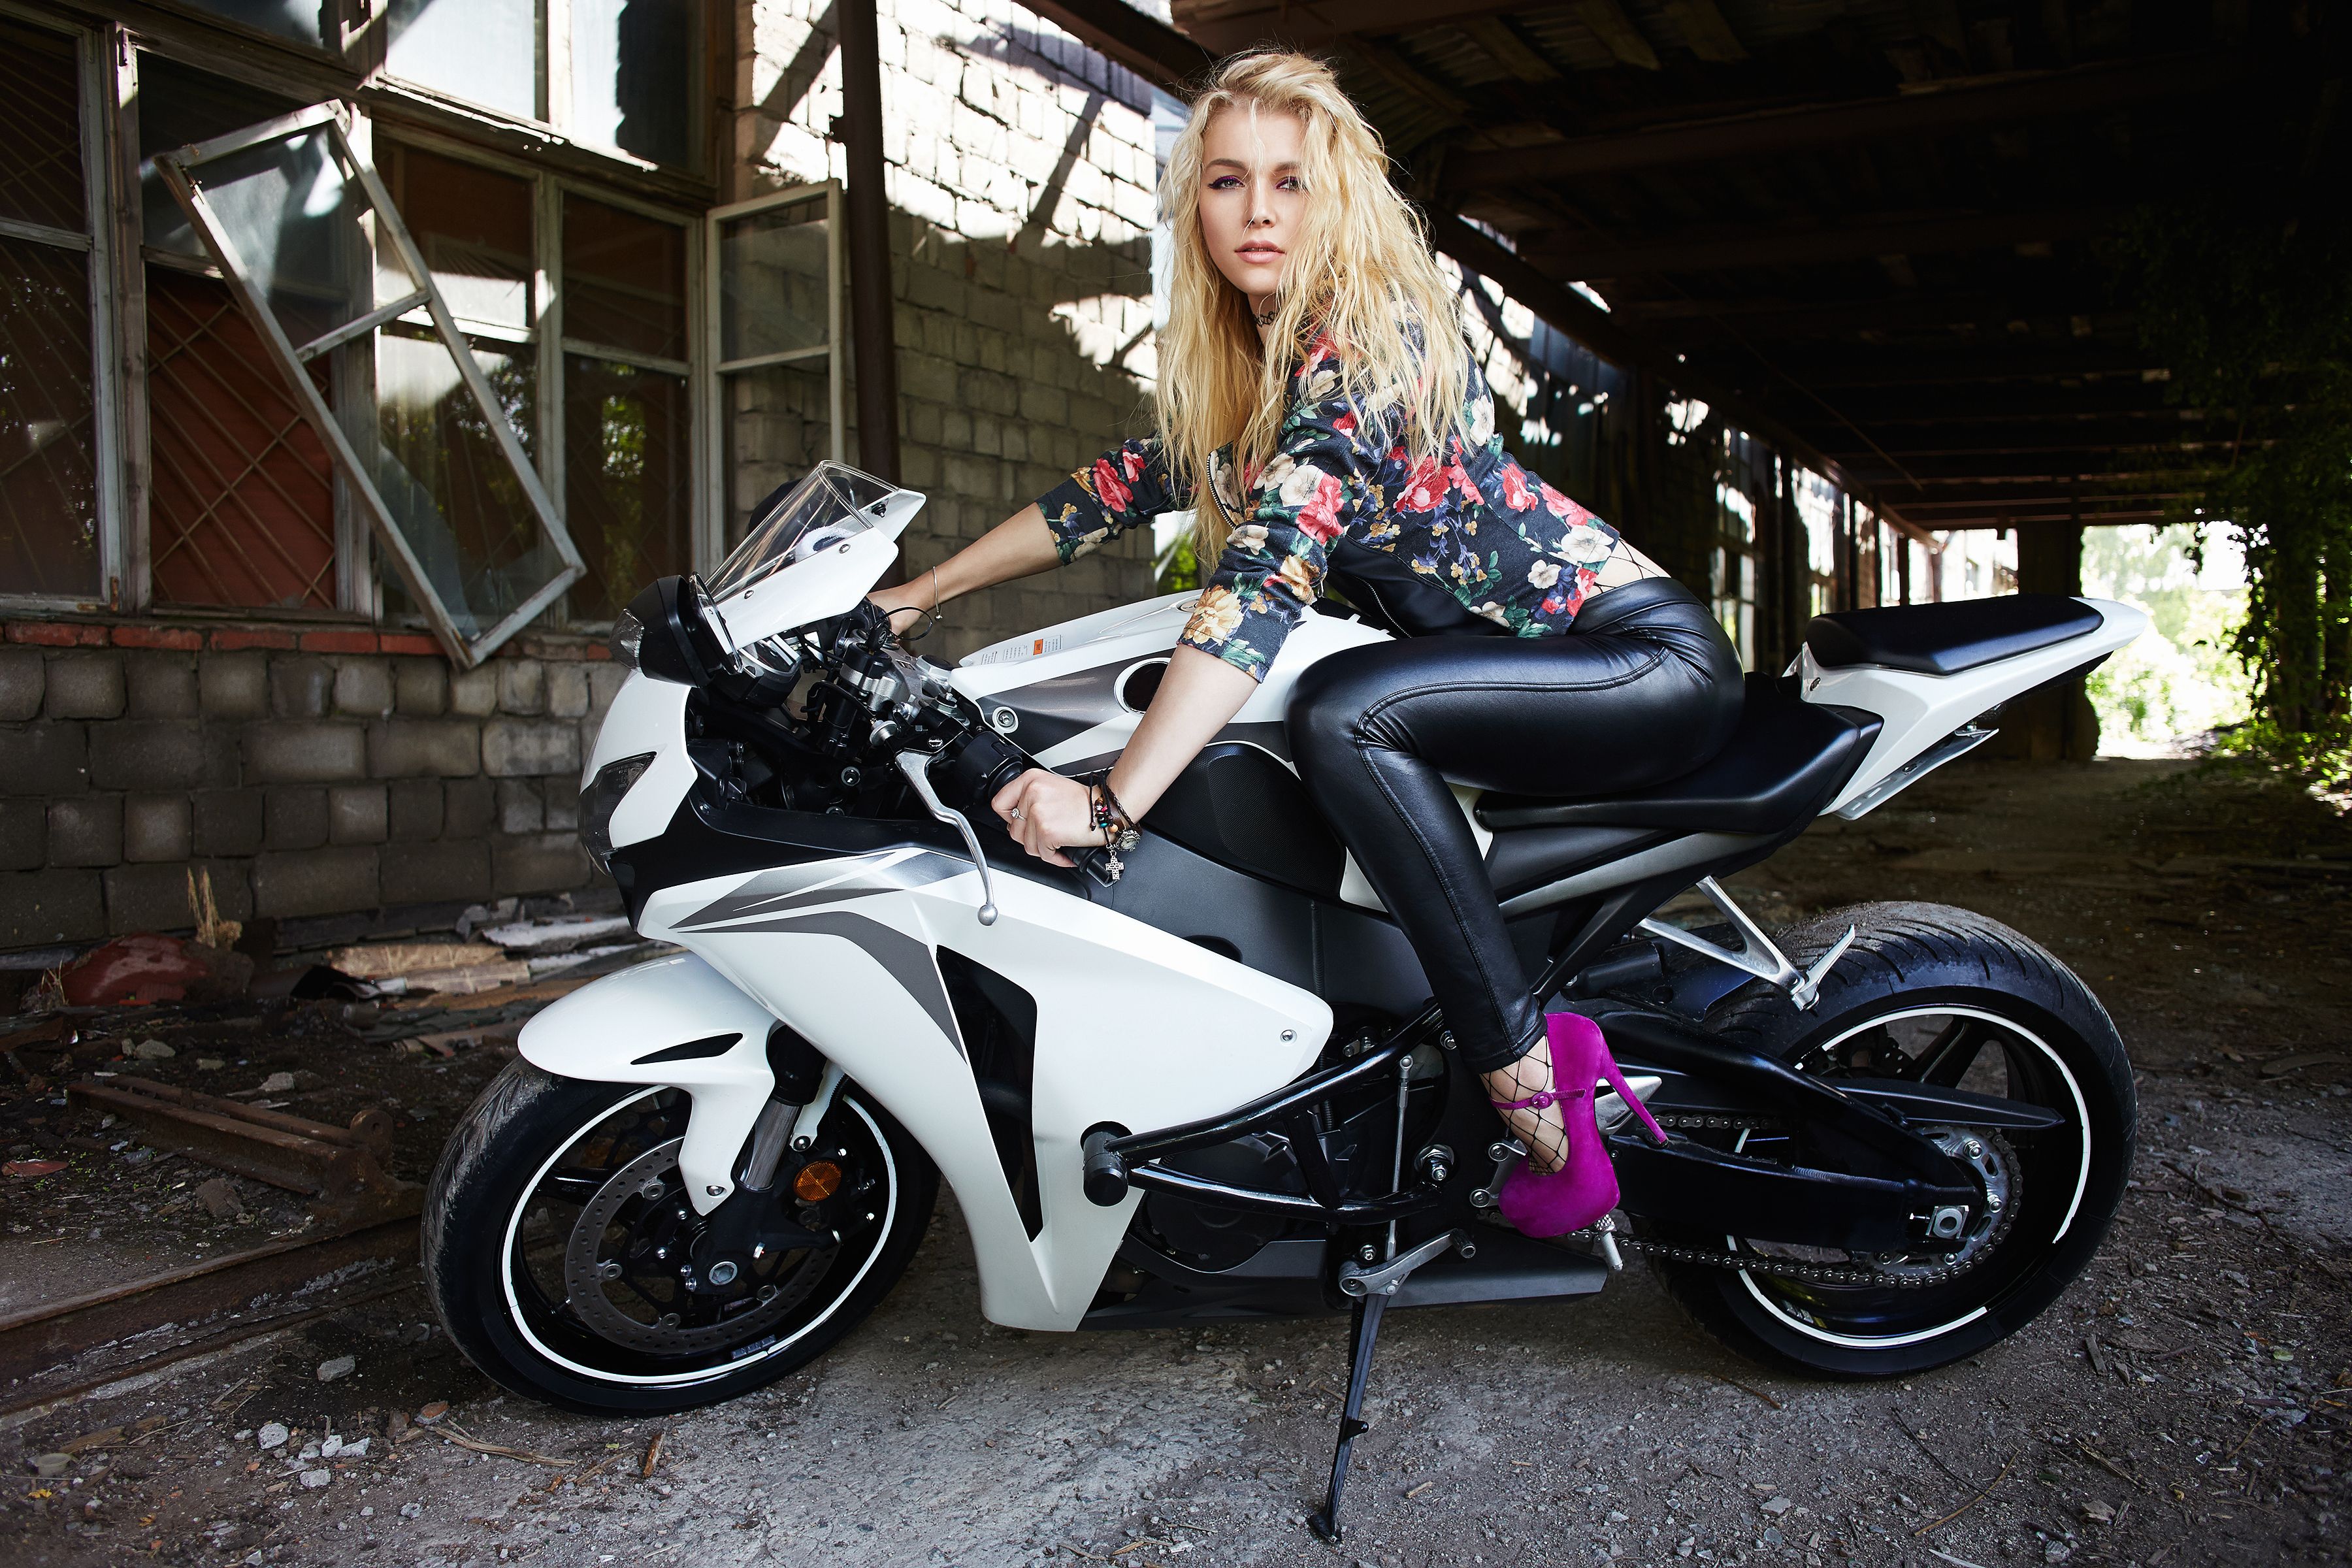
First, I use this workflow to remove the background and reposition the subjects on a new canvas that we define.
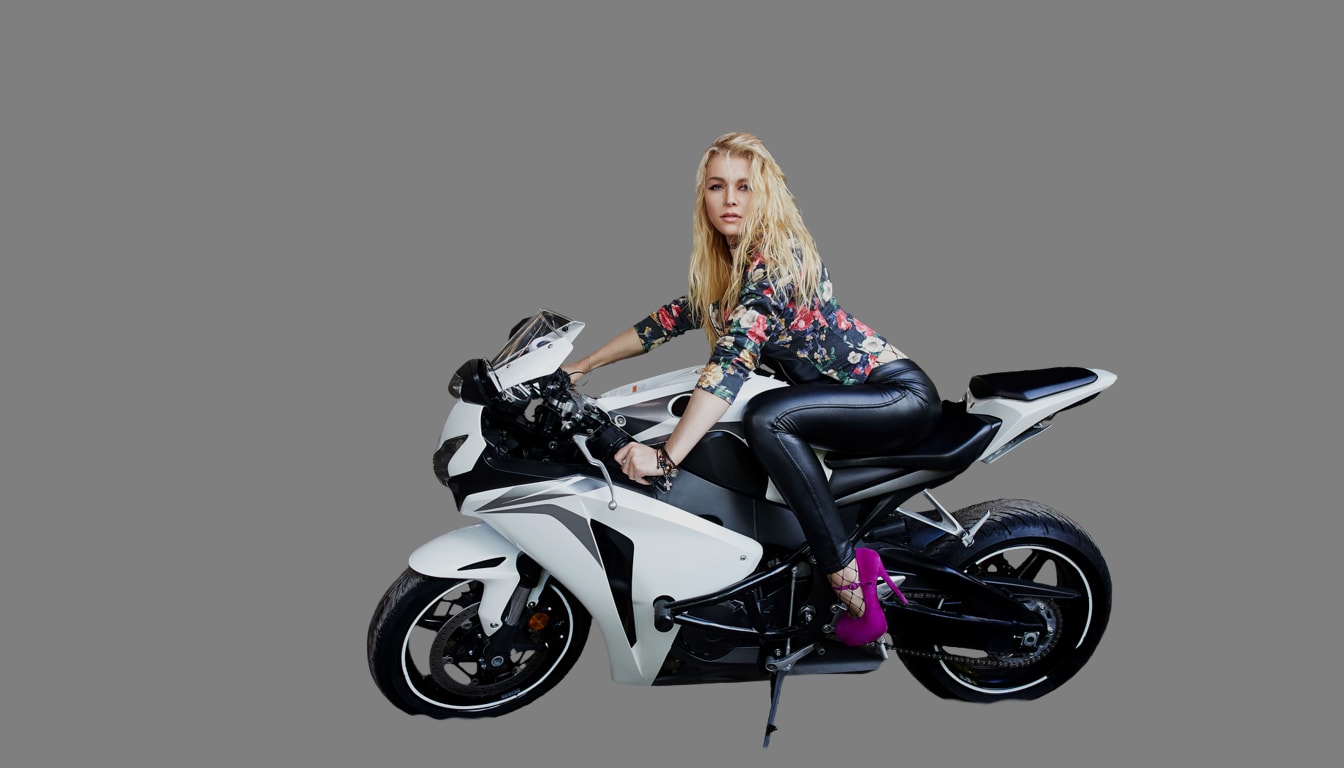
Some parts of the tire and the kickstand are removed because they’ll be filled with sand, as the new background is set in a desert.
Next, by using a lightning version of an SDXL checkpoint with 10 sampling steps, we can relight the subjects and blend them into the new background. Most of the details on the subjects are retained during this process, and it only requires about 6GB of VRAM.
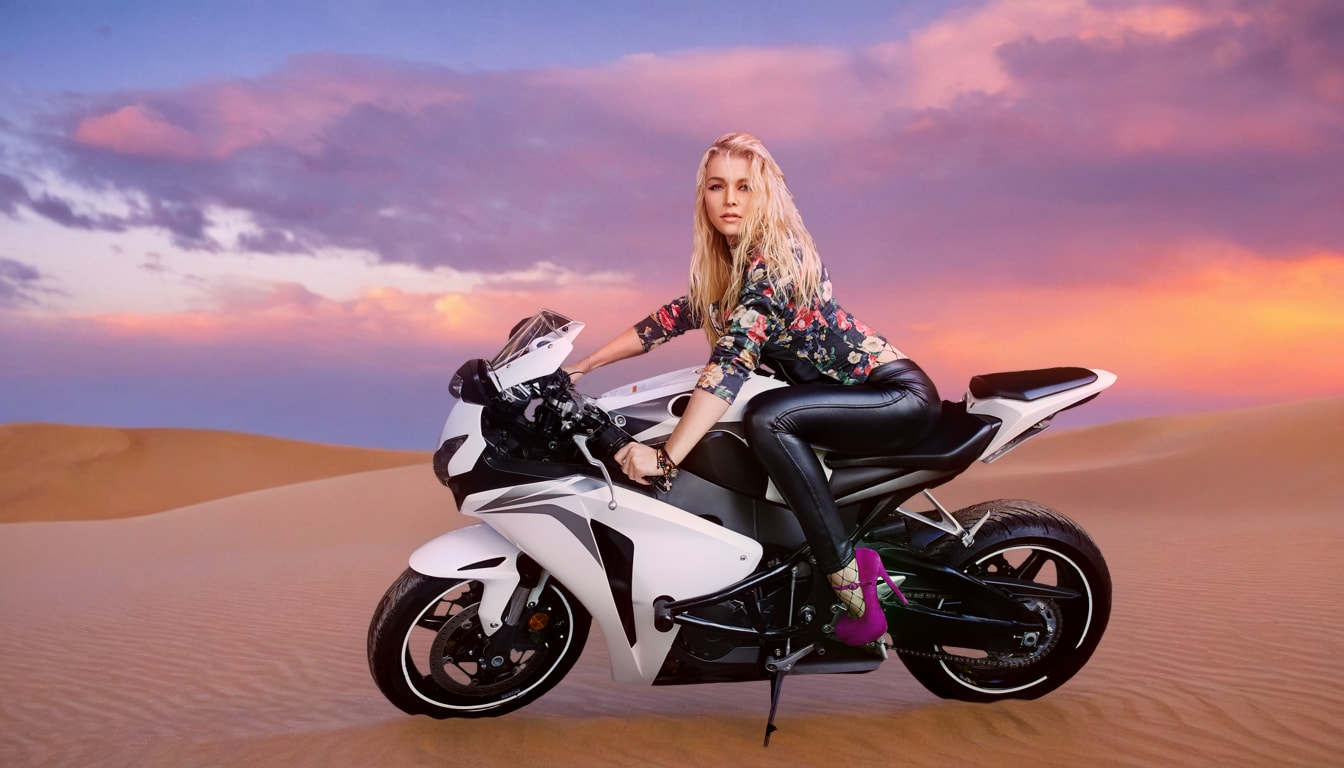
The remaining three node groups utilize a quantized version of the Flux-based checkpoint along with the same SDXL to enhance the results even further.
Workflow Example 2: Product Photography Background Replacement (Dr Pepper)
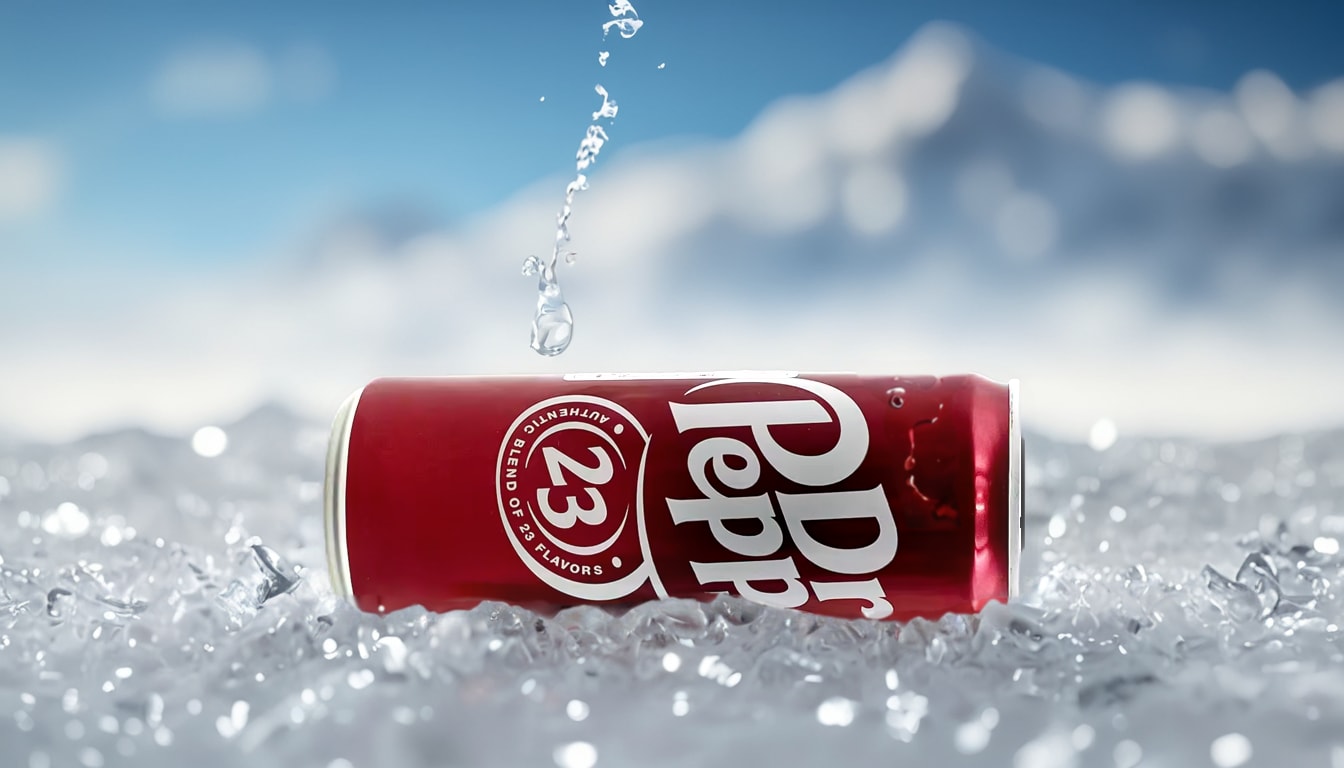
Now, let’s look at a different example: product photography, specifically replacing the background for a Dr Pepper soft drink can. The goal here is to integrate the product into a new environment, like a frosty ice setting, while maintaining its original lighting and reflections.
Here’s the uploaded image for background replacement.
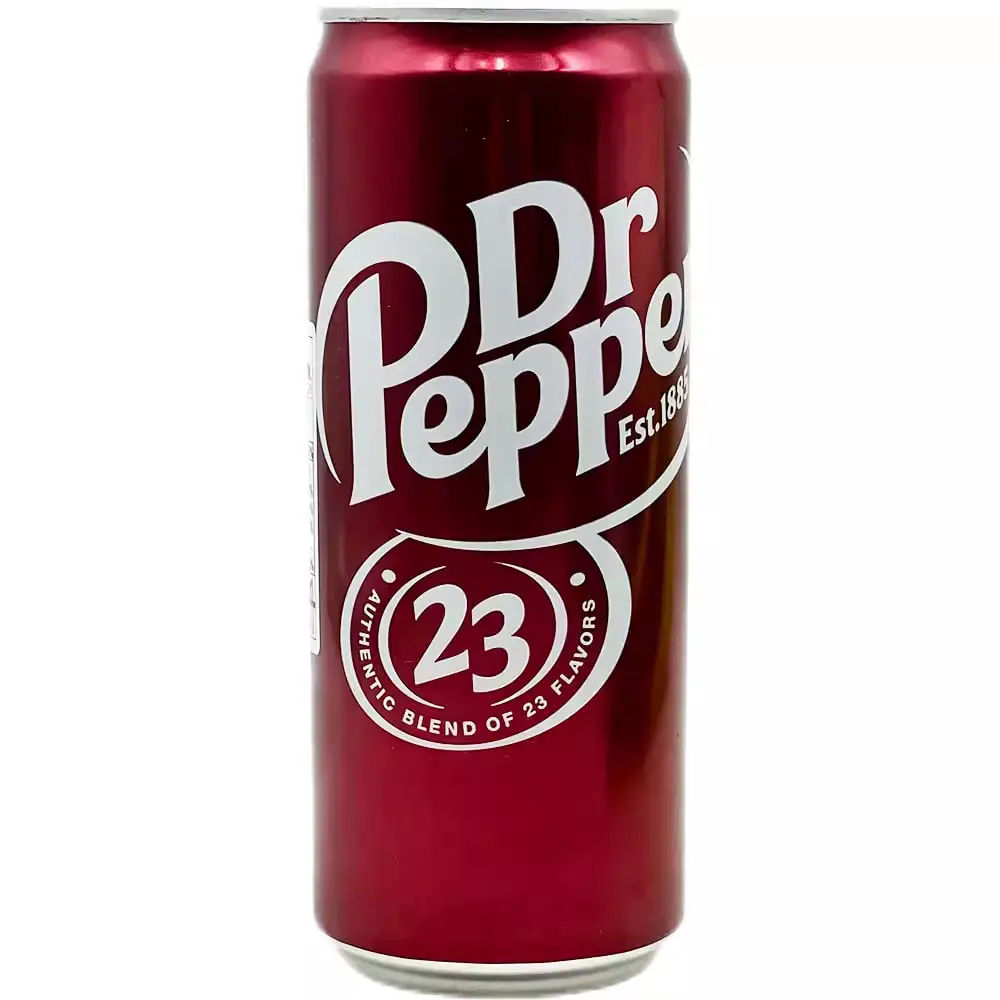
I removed the background and some parts of the cans because I want those sections to appear buried in the ice in the new background.
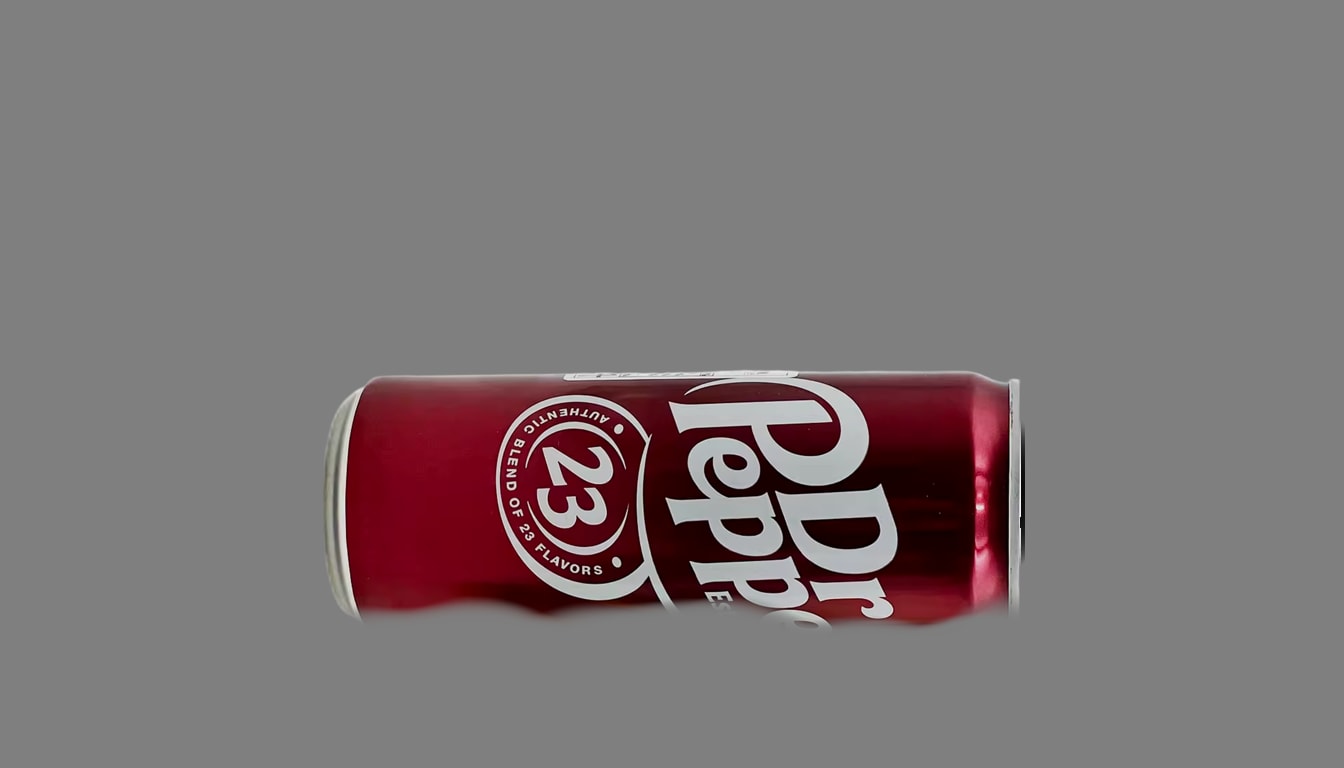
I repositioned the product to lie flat and then relit it using only the lightning version of the SDXL model.
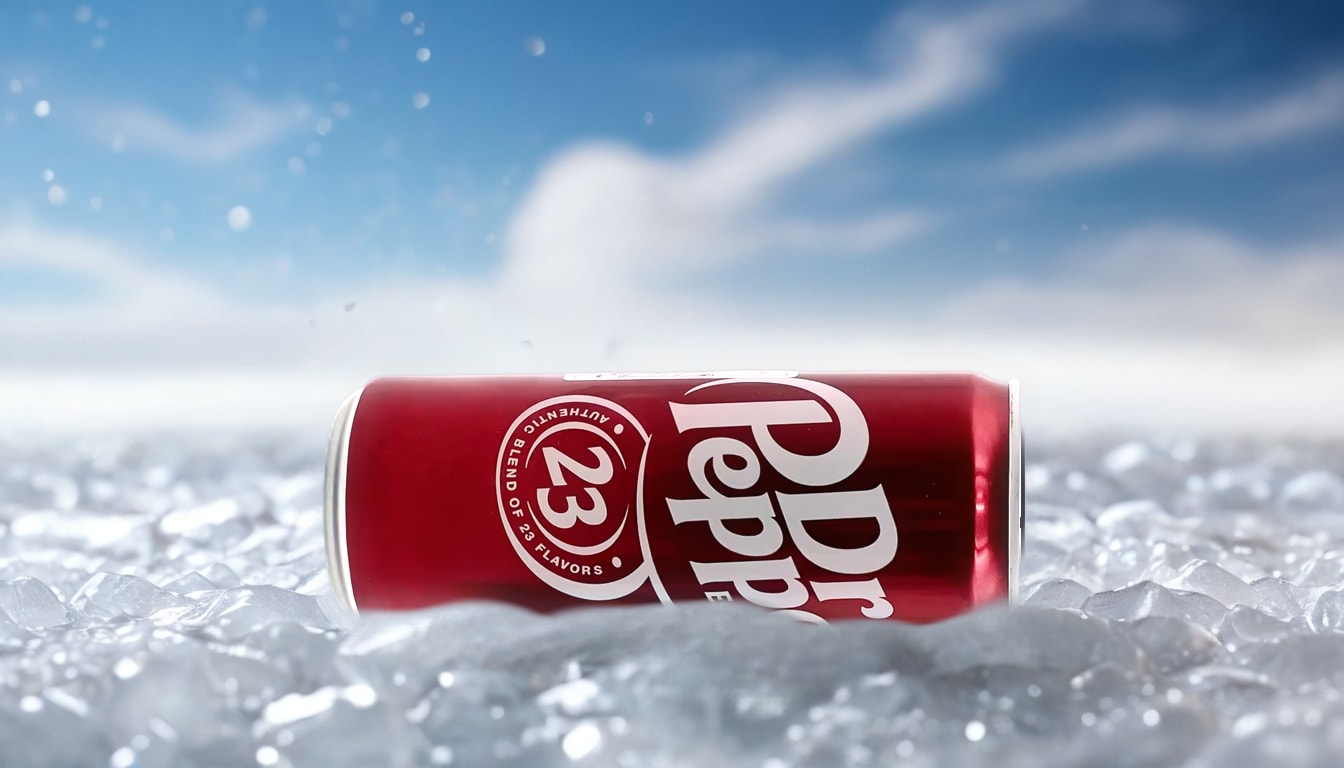
Finally, the last three groups utilized the Flux model for an even better result. Now, let’s see more example images!
Workflow Download and Model Installation
Models:
- realvisxlV50_v50LightningBakedvae: https://civitai.com/models/139562/realvisxl-v50
- diffusion_pytorch_model_promax: https://huggingface.co/xinsir/controlnet-union-sdxl-1.0/tree/main
- BiRefNet: https://drive.google.com/drive/folders/1YidZChNHJxPZUUBHtzOefE9sbclr8646?usp=sharing
- big-lama: https://github.com/Sanster/models/releases/download/add_big_lama/big-lama.pt
You can download the basic version of this workflow which includes the first seven node groups here: https://openart.ai/workflows/UdbHePrLFEP9WzdrmmFj
Gain exclusive access to advanced ComfyUI workflows and resources by joining our community now!
Here’s a mind map illustrating all the premium workflows: https://myaiforce.com/mindmap
Run ComfyUI with Pre-Installed Models and Nodes: https://youtu.be/T4tUheyih5Q
For those who love diving into ComfyUI with video content, you’re invited to check out the engaging video tutorial that complements this article:
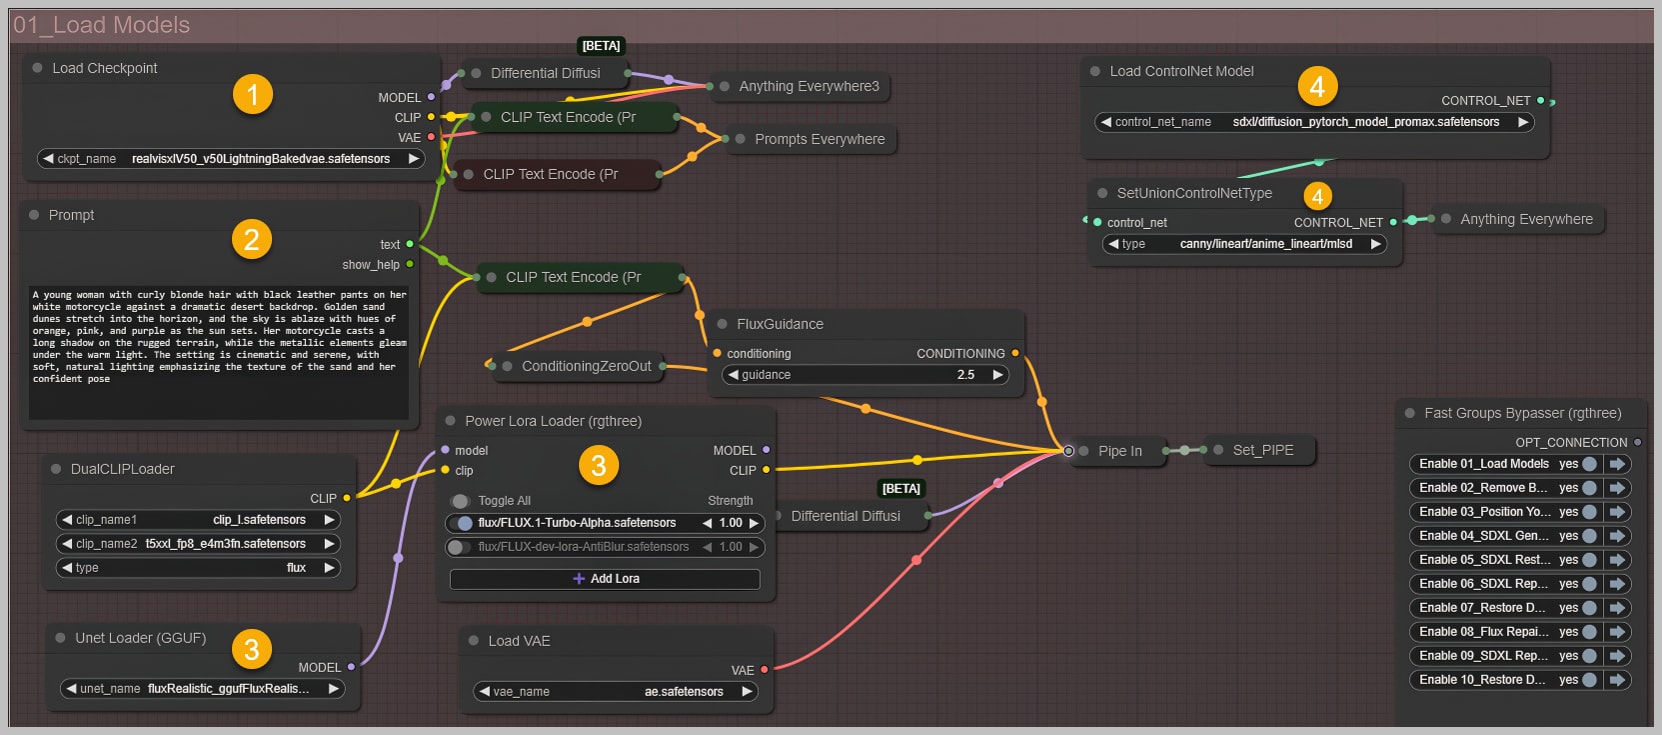
Node Group 1: Loading Models and Setting Parameters
The first step in the workflow involves setting up the foundational models and parameters. This is where we prepare everything for the background removal process and ensure compatibility between the various nodes used throughout the workflow.
Steps Involved:
- Loading the SDXL Checkpoint: We begin by loading the lightning version of SDXL. This model is optimized for lighting tasks and makes sure the subject can be relit according to the new environment.
- Setting up the Prompt: The prompt is a critical step. In the case of the portrait, details like “blonde hair,” “black leather pants,” and “white motorcycle” must be explicitly mentioned. The more detailed the prompt, the better the model can understand the specific requirements of the subject.
- Loading Flux Checkpoints: In this group, we also load the Flux-based fine-tuned checkpoint (such as fluxRealistic), which helps generate the perfect background. We pair this model with two LoRAs: one for speeding up image generation and another for enhancing background sharpness.
- Loading ControlNet: I’ve picked the latest all-in-one ControlNet, and you can set the type of ControlNet using the node right below it.
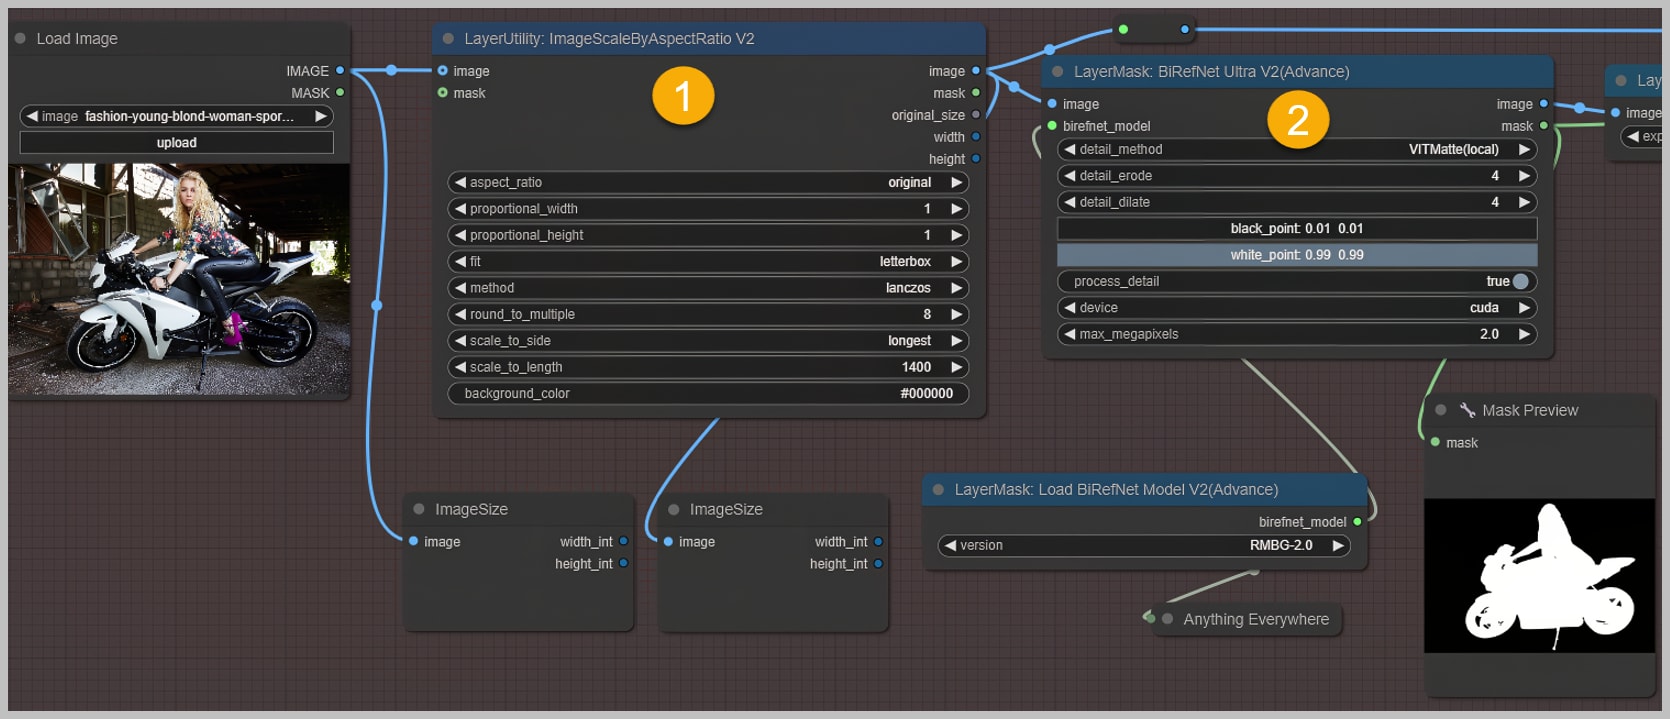
Node Group 2: Background Removal and Mask Refinement
Once the models and parameters are set up, we move on to background removal. The aim here is to remove the original background while preserving as much detail as possible, especially around complex areas like hair.
Steps Involved:
- Resizing the Image: First, we limit the image size using the “scale_to_side” parameter to ensure that our graphics card is not overwhelmed. The “scale_to_length” parameter can be adjusted if needed for specific resolutions.
- Background Removal: The “BiRefNet” node is employed to separate the subject from its background. For subjects with complex edges (like messy hair), the “process_detail” option is turned on to avoid losing important details.
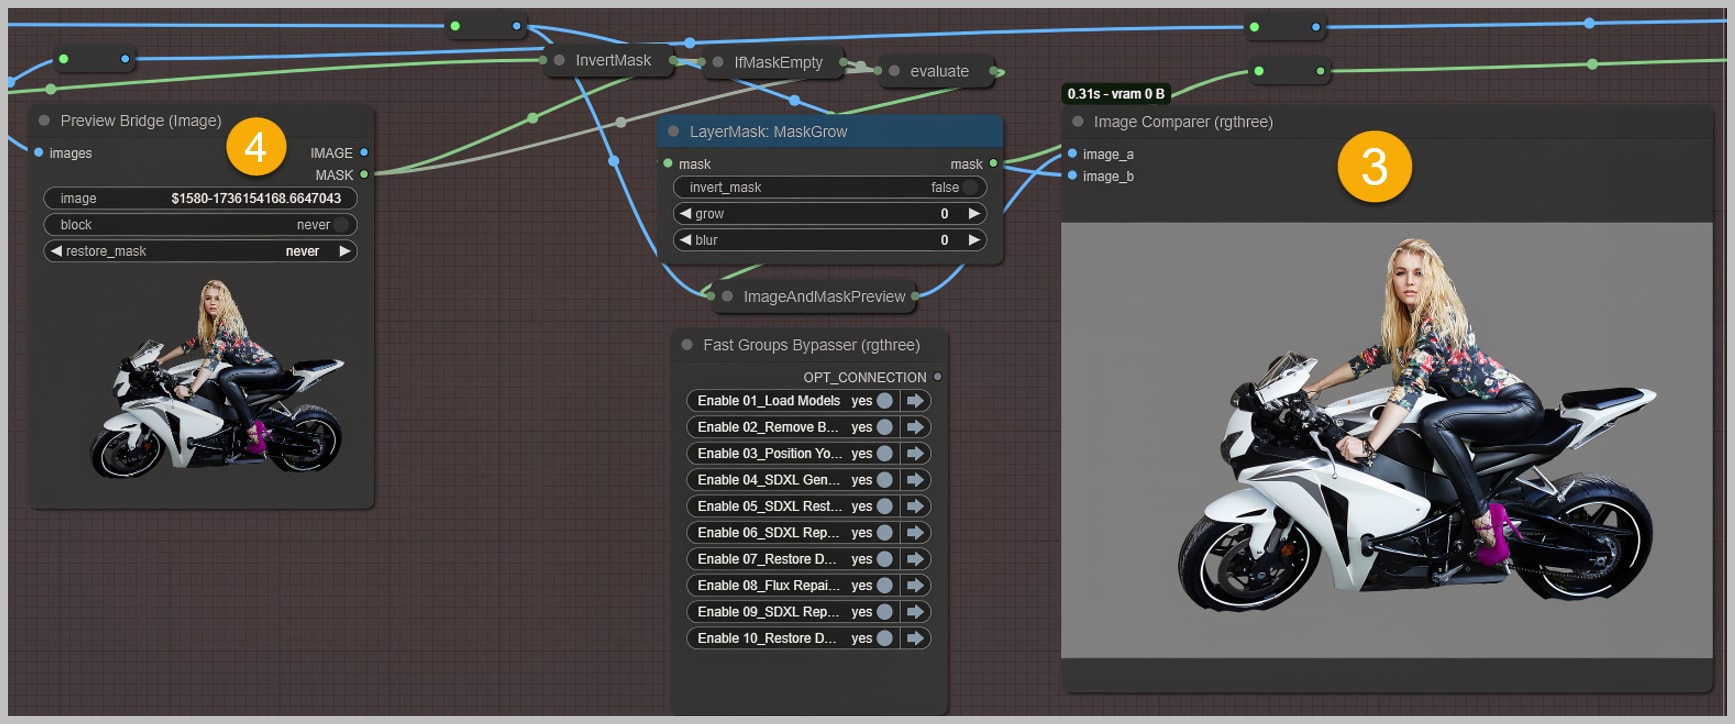
- Mask Refinement: Once the background is removed, we use nodes like “Image Comparer” and “Preview Bridge” to fine-tune the edges and make sure there’s no visible seam between the subject and the new background.
Node Group 3: Subject Positioning and Canvas Definition
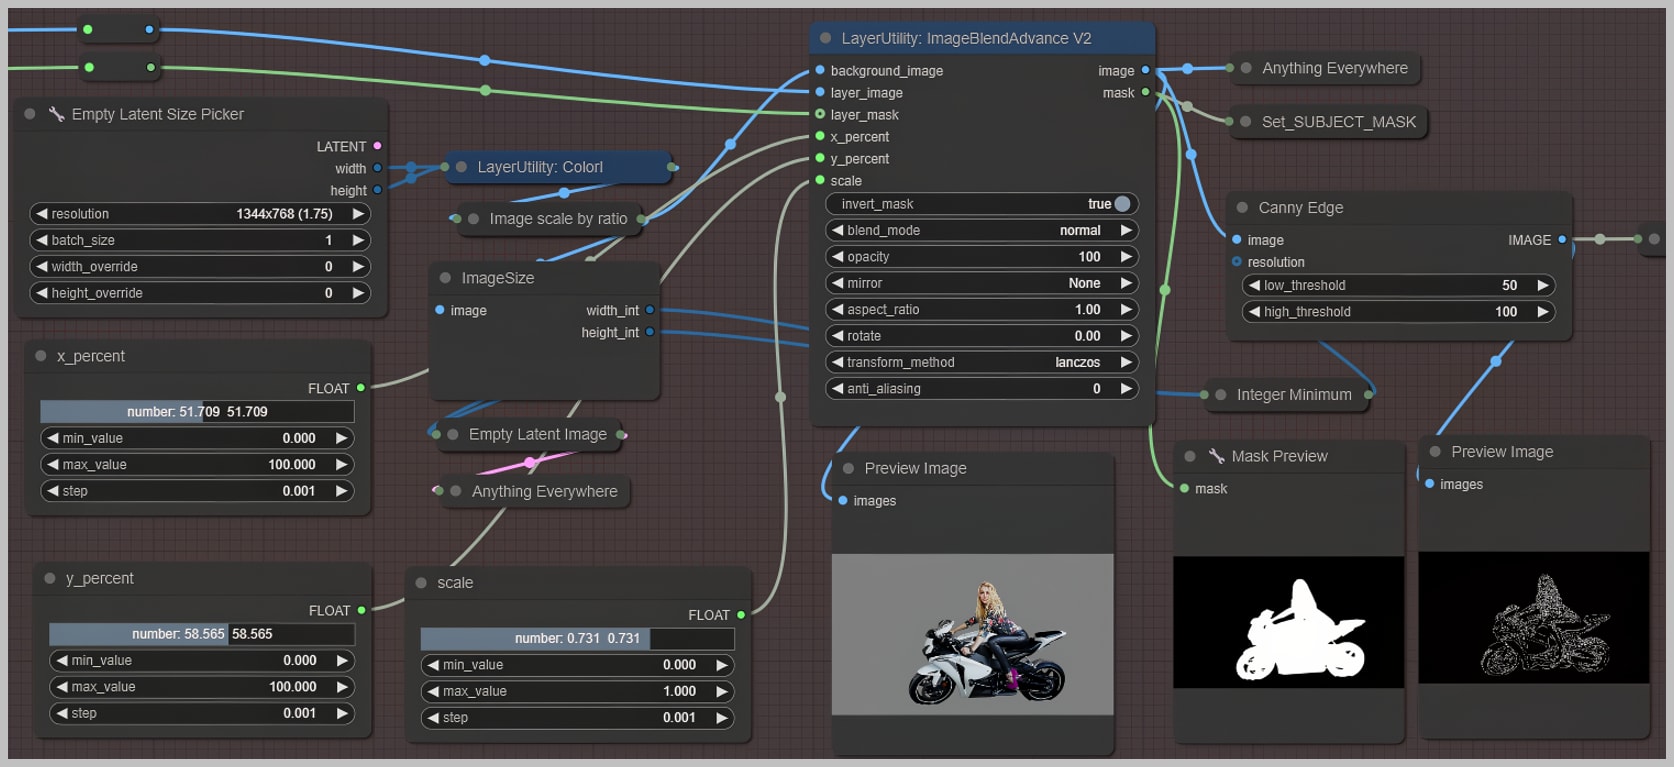
Now that the background has been removed, we move on to positioning the subject on the new canvas. This group defines how the subject will be placed within the scene.
Steps Involved:
- Canvas Setup: The canvas is defined based on the “ImageBlend” node. The subject is resized, and its position on the canvas is adjusted using a series of sliders.
- Final Adjustments: The subject is now positioned in the scene, ensuring that it fits proportionally with the new background. We can tweak its size, horizontal position, and vertical position using the appropriate sliders.
Node Group 4: New Background Generation with SDXL
In this group, we generate a new background using SDXL ControlNet. The new background is tailored to fit the subject and blend seamlessly with it.
This step is where the dpmpp_sde sampler is recommended for the lightning version of RealvisXL to achieve high-quality results quickly.
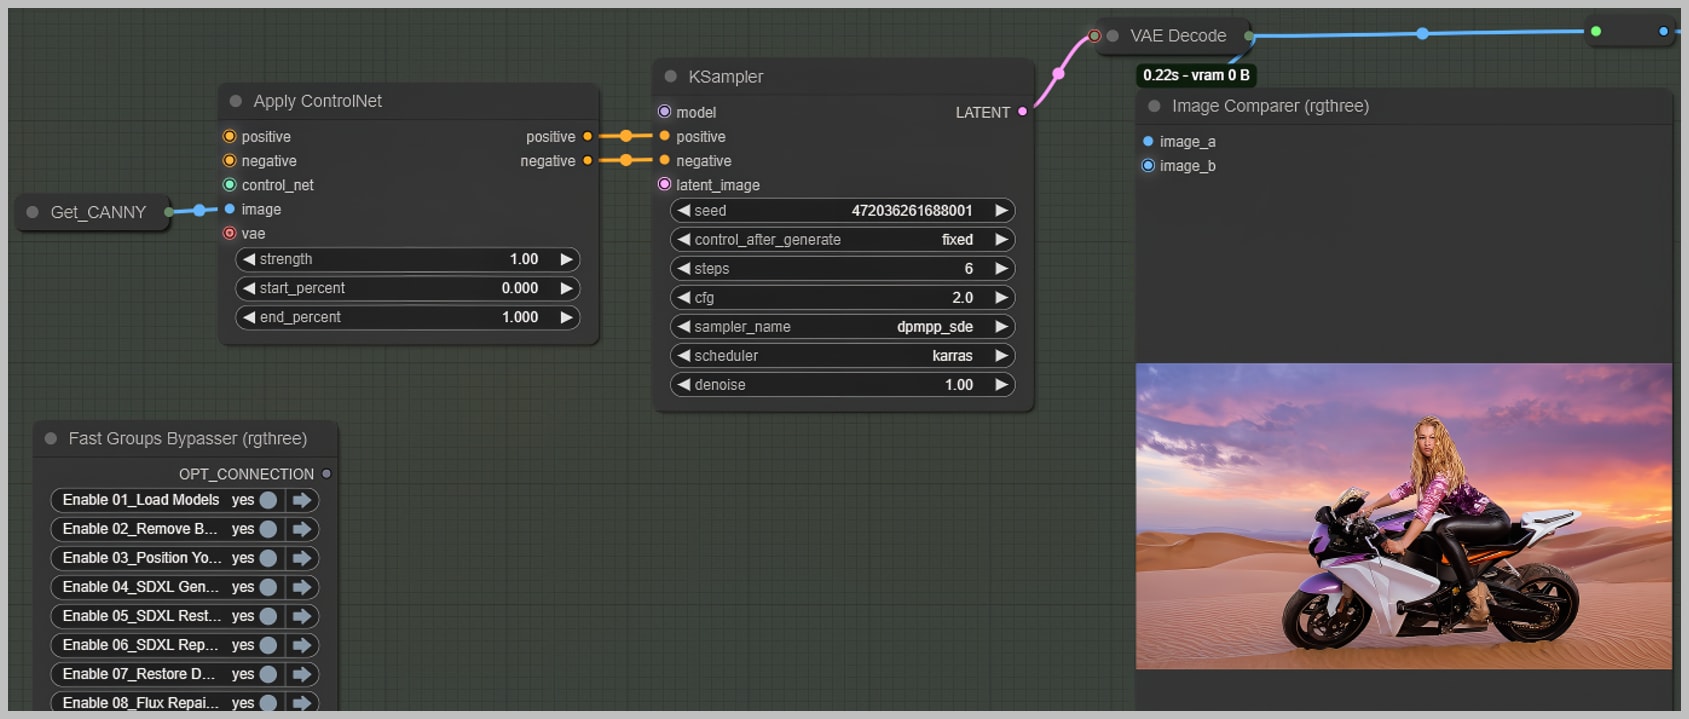
The background looks good, but the subjects are filled with artifacts. Luckily, they’re still usable because we can restore the details and keep some of the light and shadow effects. This will help seamlessly integrate the original subjects into the new background. Let’s do that in the next group.
Node Group 5: Detail Transfer
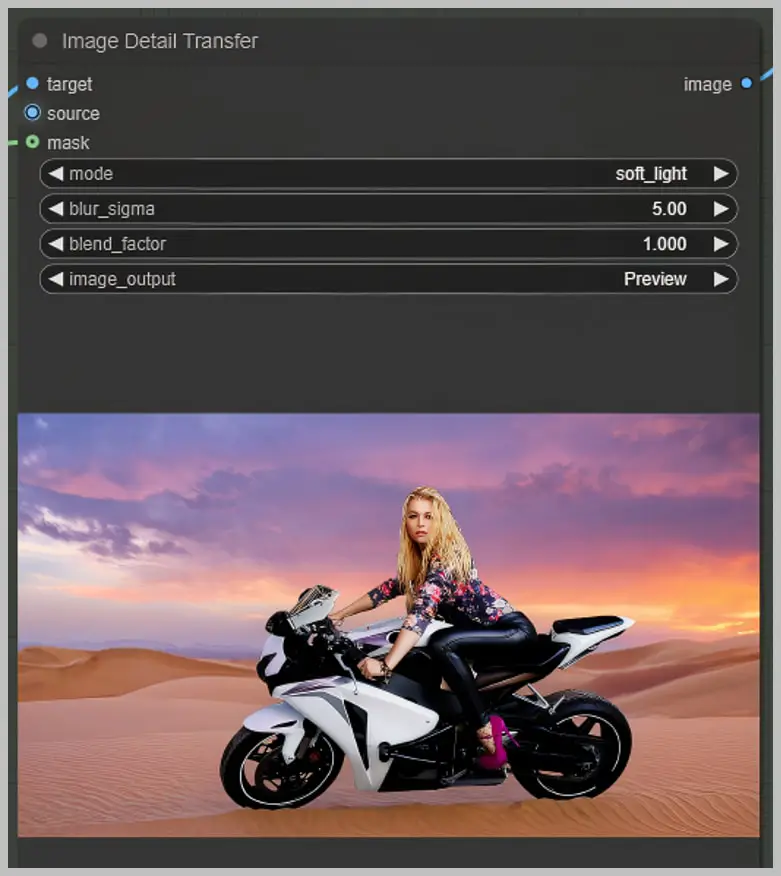
Restoring the fine details of the subject after background removal is an essential step to ensure the subject seamlessly blends into the new environment. The Detail Transfer node in ComfyUI is designed to transfer important subject details from one image to another, and it’s the key to preserving textures, edges, and other intricate features. Let’s break down the process in greater detail:
Steps Involved:
- Setting Up the Target and Source Images
- The Detail Transfer node requires two key inputs: the target image and the source image. The target image is the one that you want to enhance or restore, and the source image contains the details you wish to transfer.
- The source image for this step is typically the image with the gray background from Node Group 3. This is the image where the subject has been separated from its original background, but it might still contain important visual details (such as hair, texture, and edges) that are needed for the final output.
- Masking Out Unwanted Details
- Since we want to transfer only the subject’s details and not any of the original background (in this case, the gray background), a mask is necessary. The mask serves to focus the detail transfer on the subject itself, excluding any unwanted background information.
- This mask is typically created during the background removal process and is then input into the mask port of the Detail Transfer node. The mask ensures that the detail restoration is limited to the subject’s edges and surface textures.
- Choosing the Right Target Image
- Now, you may be wondering, “Which image should we use for the target?”
- A natural choice might be the image generated in Node Group 4, where we have the subject positioned on the new background. However, there’s a slight issue: even though we used Canny ControlNet to detect and preserve the subject’s edges during generation, ControlNet isn’t perfect. Sometimes, there will be slight discrepancies, leaving extra pixels outside of the subject’s original edges. This is where things get a little tricky.
- To address this, think of it like cutting a subject out with scissors. We need to refine the edges of the subject and remove those unwanted extra pixels.
- Trimming the Subject Edges
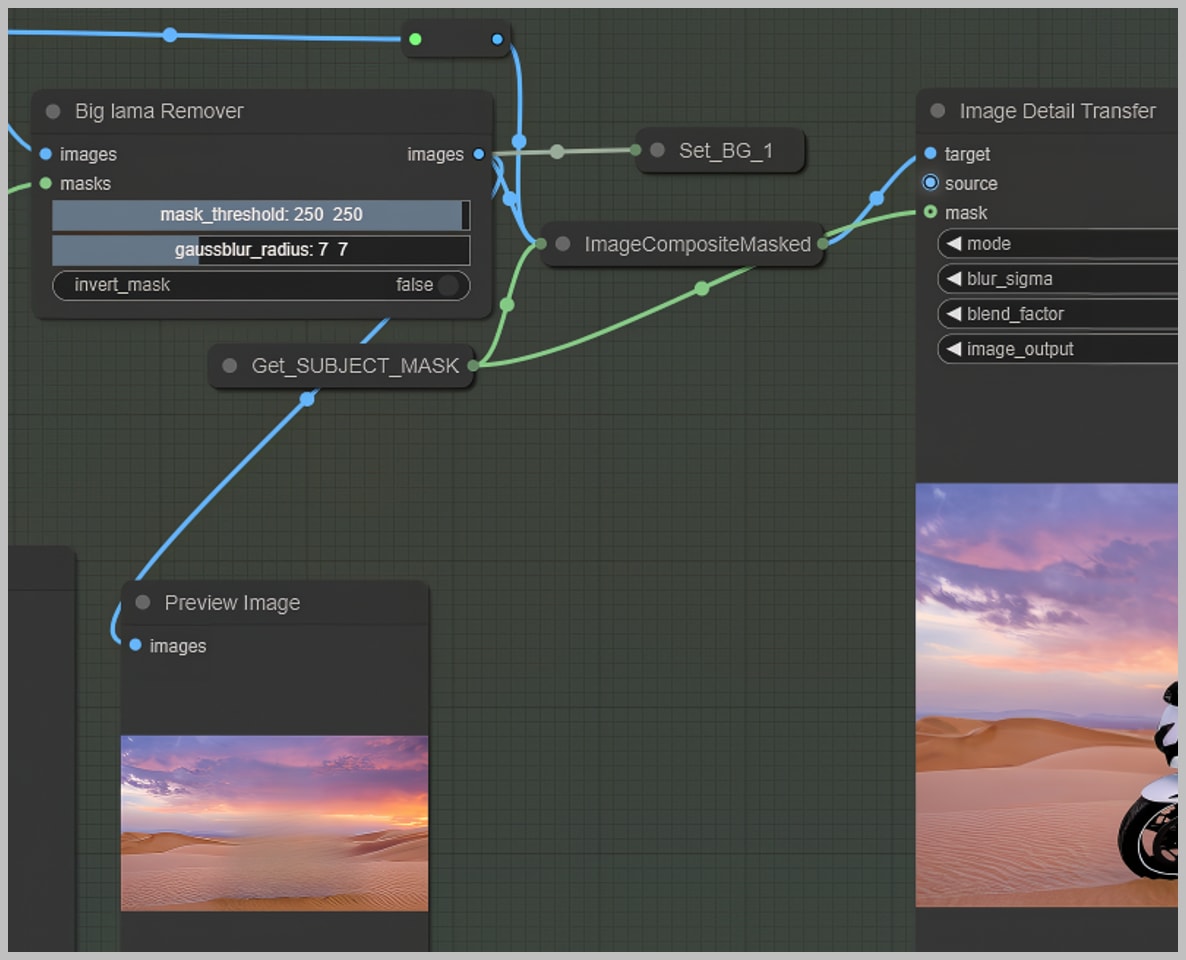
- To trim those extra pixels around the subject’s edges, we use the Big Lama Remover node. This node helps by further separating the subject from its background, ensuring that only the subject’s pixels are left intact.
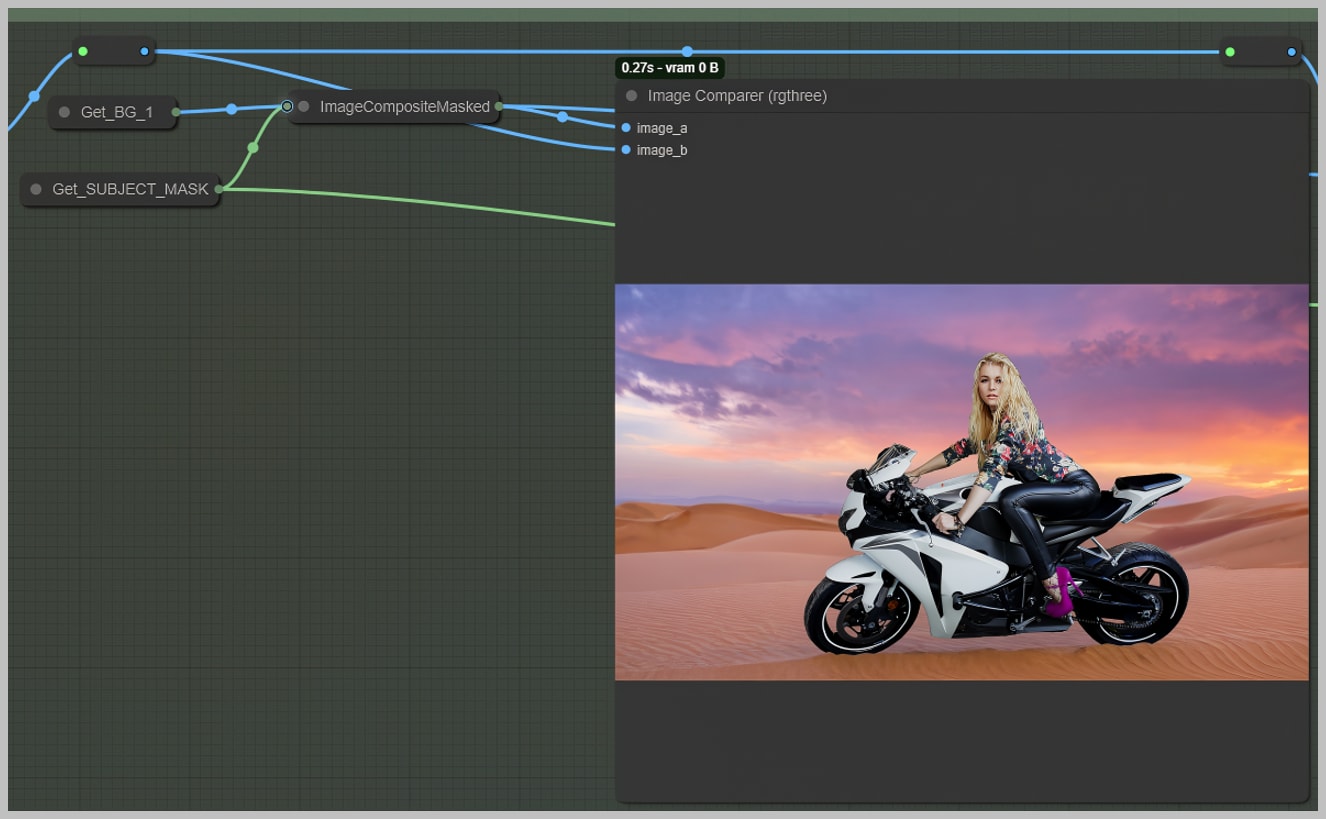
- After the subject is cleanly separated, we use the ImageCompositeMasked node. This node allows us to paste the subject back into the new background while trimming away any unnecessary pixels that were previously left outside the Canny edges.
- This newly cleaned image—now without the extra pixels—becomes the target image for the Detail Transfer process.
- Transferring the Details
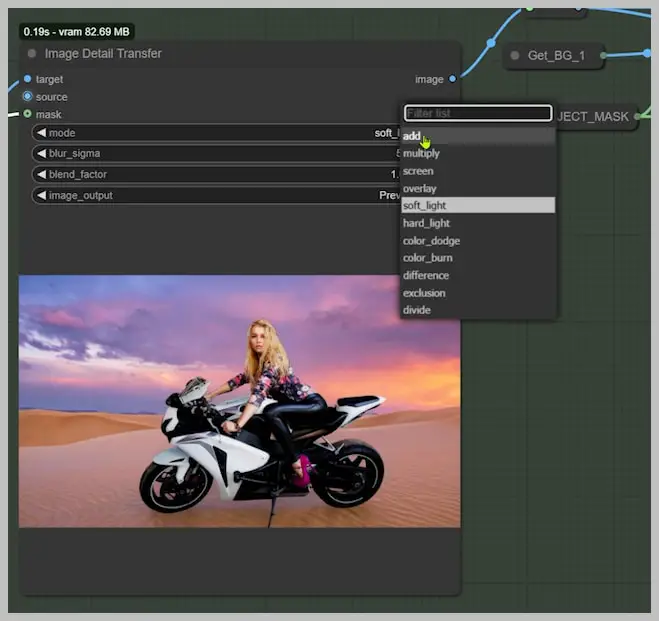
- With the target image now cleaned up and ready, we can proceed with the Detail Transfer. The node will transfer the fine details (such as textures, highlights, and shadows) from the source image (the one with the gray background) to the target image (the one with the cleaned edges).
- There are three primary modes for how the details are transferred:
- Add Mode: This mode adds the details from the source to the target, enhancing the lighting and texture.
- Overlay Mode: This mode overlays the source details on top of the target, often resulting in more dramatic highlights and shadows.
- Soft Light Mode: This mode provides a softer effect, blending the source details with the target in a more subtle way.
- You can experiment with these modes to find the one that best suits your project, depending on how much emphasis you want to place on the shadows and highlights of the subject.
- Adjusting the Detail Transfer
- The “blur_sigma” parameter allows you to fine-tune the amount of detail transferred. Increasing the blur can soften the details, while reducing it can preserve more texture. Keep in mind that this step may lead to some loss of fine details due to the adjustments in lighting and shadowing that occur during relighting.
- However, the result should still retain the core details necessary for a seamless integration of the subject into the new background.
- Alternative Method: Pasting the Original Subject onto the New Background
- If you prefer to keep all the details intact without any relighting adjustments, there is an alternative method. Instead of using the Detail Transfer node, you can directly use the ImageCompositeMasked node to paste the original subject onto the new background.
- This approach keeps all the original details exactly as they were, but it doesn’t adjust the subject’s lighting to match the new background.
- While this method may preserve the details more accurately, it might not always give the best results if the lighting in the original image is different from that of the new background.
- Choosing the Best Version: Image Input Switch
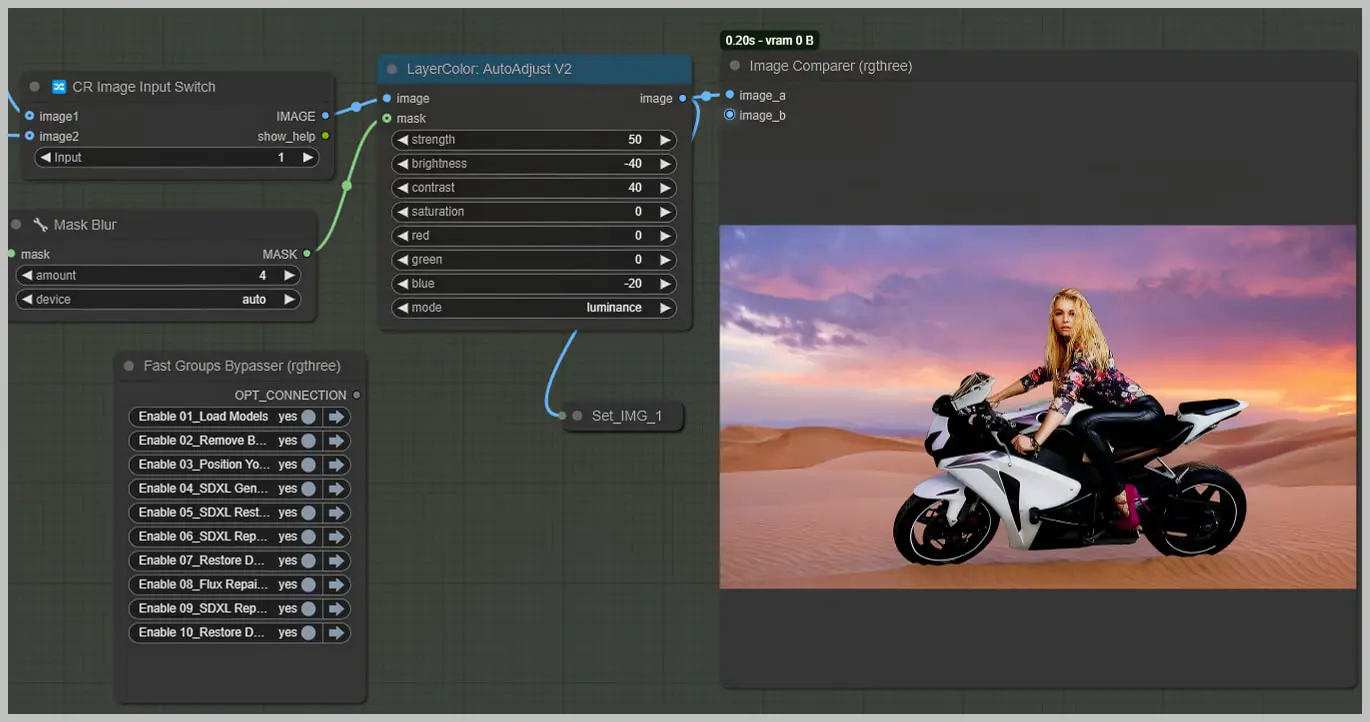
- After generating both versions—one with the relit subject and one with the original subject pasted onto the background—you can use the Image Input Switch node. This node lets you compare the two versions and choose which one works best for your scene.
- The AutoAdjust node can then be used to tweak the selected version’s color, brightness, and contrast. This adjustment helps to ensure that the subject blends seamlessly into the background, regardless of the method you chose.
Node Group 6: Repaint Subject to Adjust Lighting with SDXL
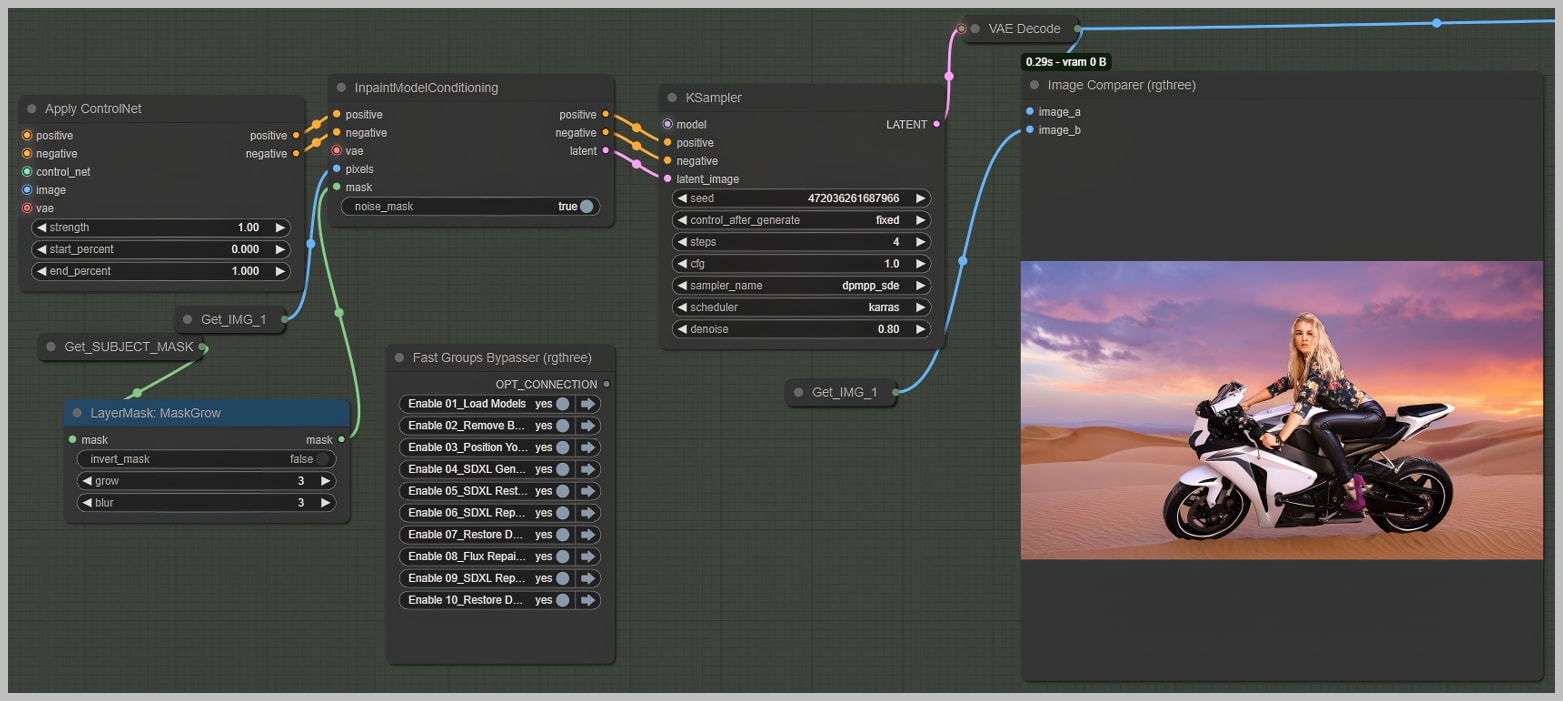
In this node group, we adjust the subject’s lighting to blend it seamlessly with the new background.
- Expand the Subject Mask: Slightly grow the subject mask for smooth blending with the background.
- Canny ControlNet: Use it to maintain the subject’s edges while adjusting lighting.
- SDXL Repainting: Repaint the subject to match the lighting of the new background.
- Detail Loss: Some details may be softened during repainting, but they’ll be restored in the next group.
This node prepares the subject to better integrate with the background, with final details restored later.
Node Group 7: Detail Transfer (Refined)
This node group revisits the Detail Transfer process, fine-tuning the results to ensure the subject integrates smoothly into the new background. The method to restore the details will be similar to what we did in the fifth group.

Here’s the revised and more detailed version of Node Group 8: Flux-Based Background Repainting:
Node Group 8: Flux-Based Background Repainting
In this group, we use the Flux-based checkpoint from the first group to repaint the background, ensuring a seamless integration of the subject and its surroundings.
- Select Base Image: The “Image Input Switch” node lets you choose between two base images:
- Image 1: Result from the fifth group.
- Image 2: Result from the most recent group. Choose the one that will serve as the background for repainting.
- Mask Definition for Repainting:
- Invert Subject Mask: The subject mask from Group 3 is inverted to create the area that will be repainted.
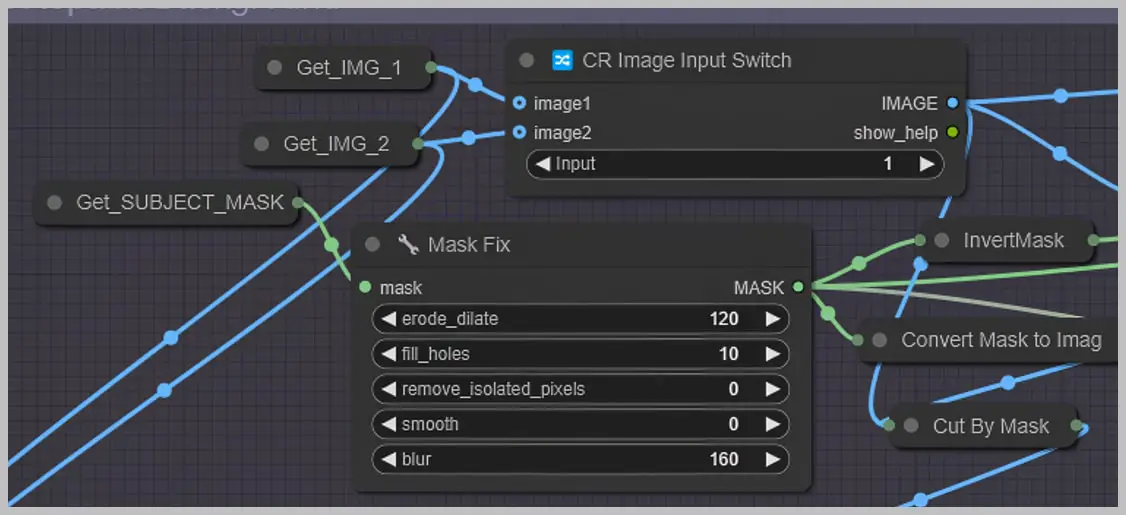
- Expand Mask: Use the “Mask Fix” node to slightly expand the subject mask, ensuring the repaint area doesn’t overlap with the subject. This can be done by adjusting the “erode_dilate” parameter.
- Adjust Mask and Smooth Transition:
- Preview the Mask: The “Mask Fix” node allows you to preview the mask and adjust the area to be protected (the area that won’t be repainted).
- Adjust Parameters: Modify the “fill_holes” (set it to 0 to see any gaps) and “blur” values to smoothen the transition between repainted and protected areas, ensuring a natural blend.
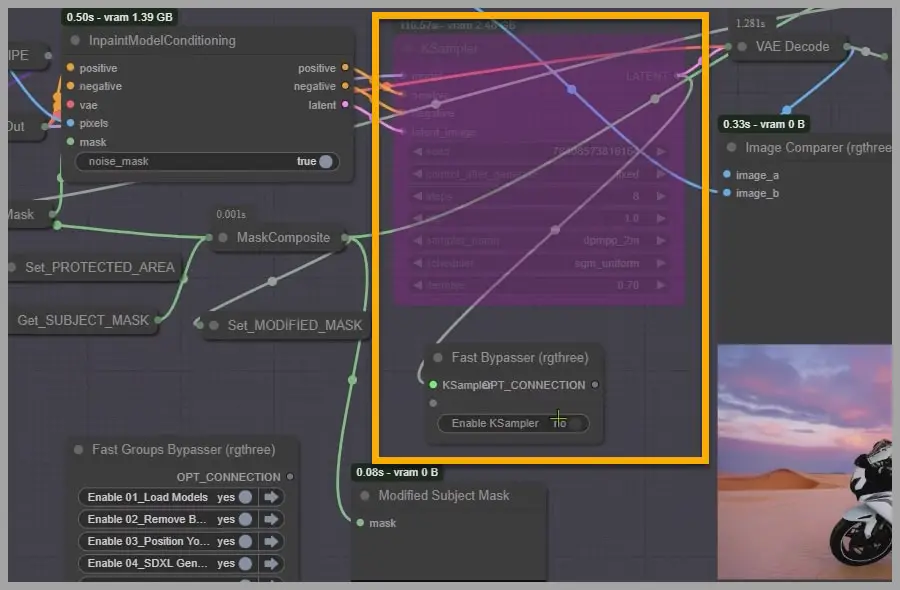
- Bypass KSampler: Before proceeding, bypass the KSampler using the “Fast Bypasser” node to prevent interference with the repainting process.
- Refine Mask with the Preview Bridge:
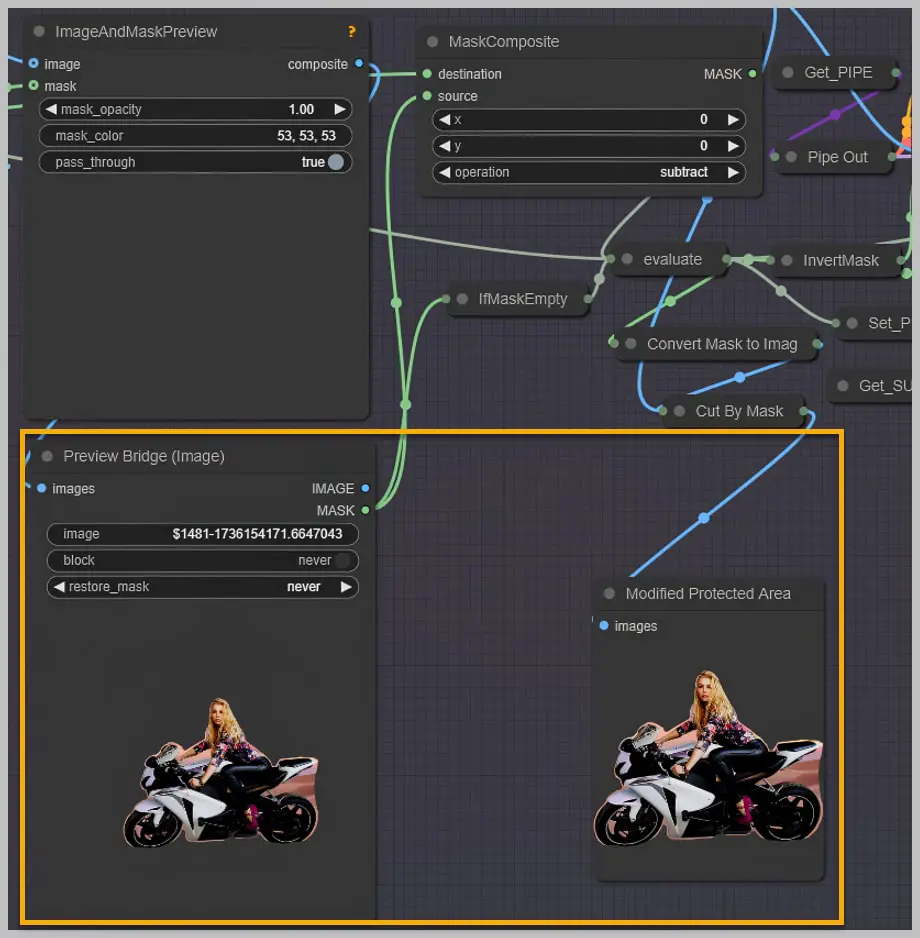
- Preview Bridge (Image) node further refines the mask. Ensure that the “restore_mask” option is set to “always” to keep the mask active during editing.
- Manual Adjustments: Use the mask editor to paint and refine areas:
- Focus on outer areas (e.g., around hair and tires) to avoid disturbing critical edges.
- Paint over elements like the kickstand to remove them or refine the background integration.
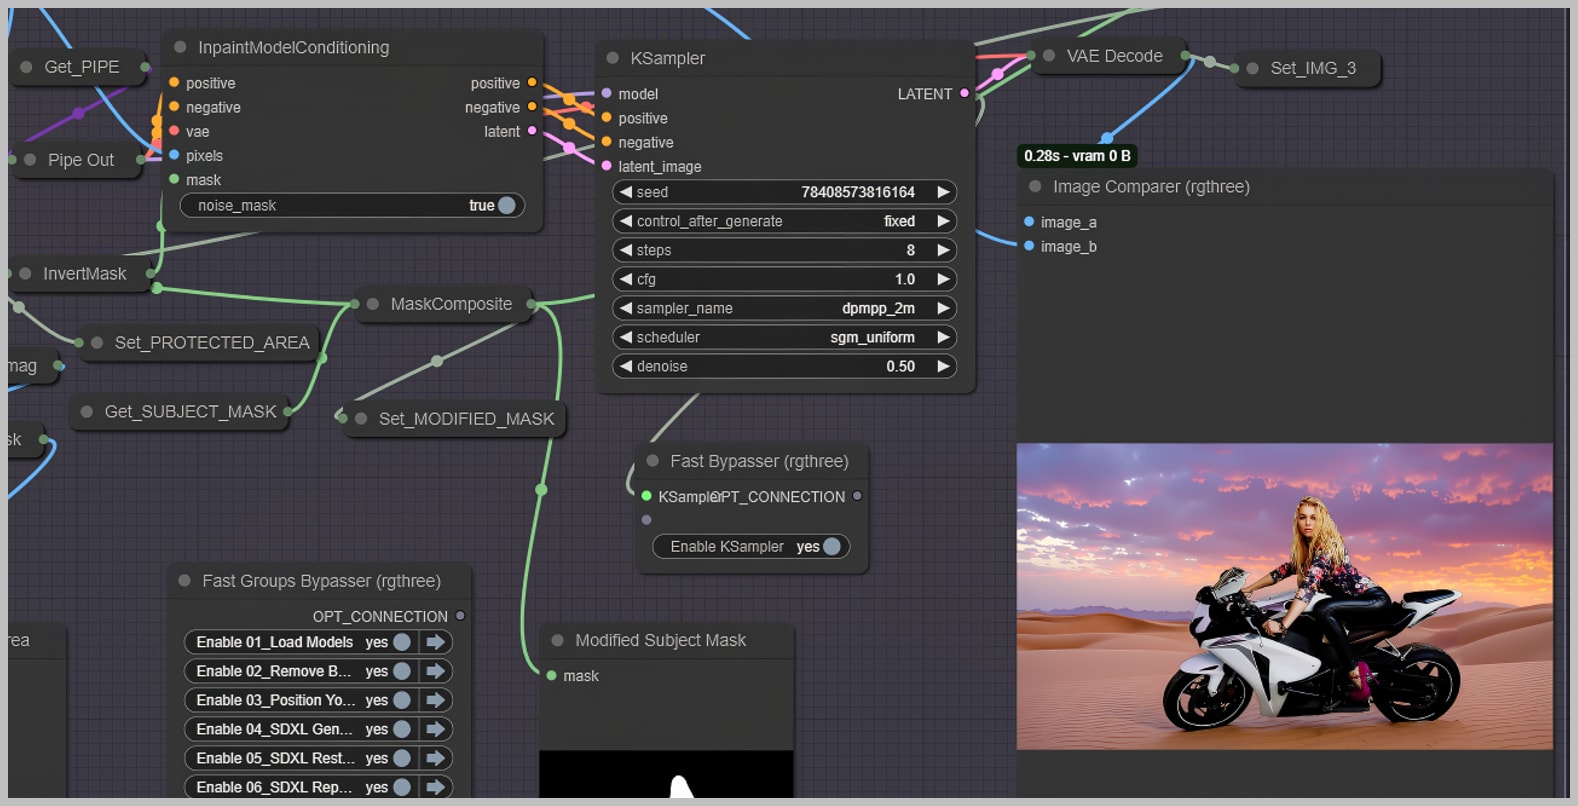
- Final Adjustments: After refining the mask, activate the KSampler and run the workflow again.
- Check the result and adjust if needed, such as making the tires sink into the sand for a more realistic effect.
This step ensures that the background is repainted to match the new context while maintaining smooth transitions between the subject and its environment.
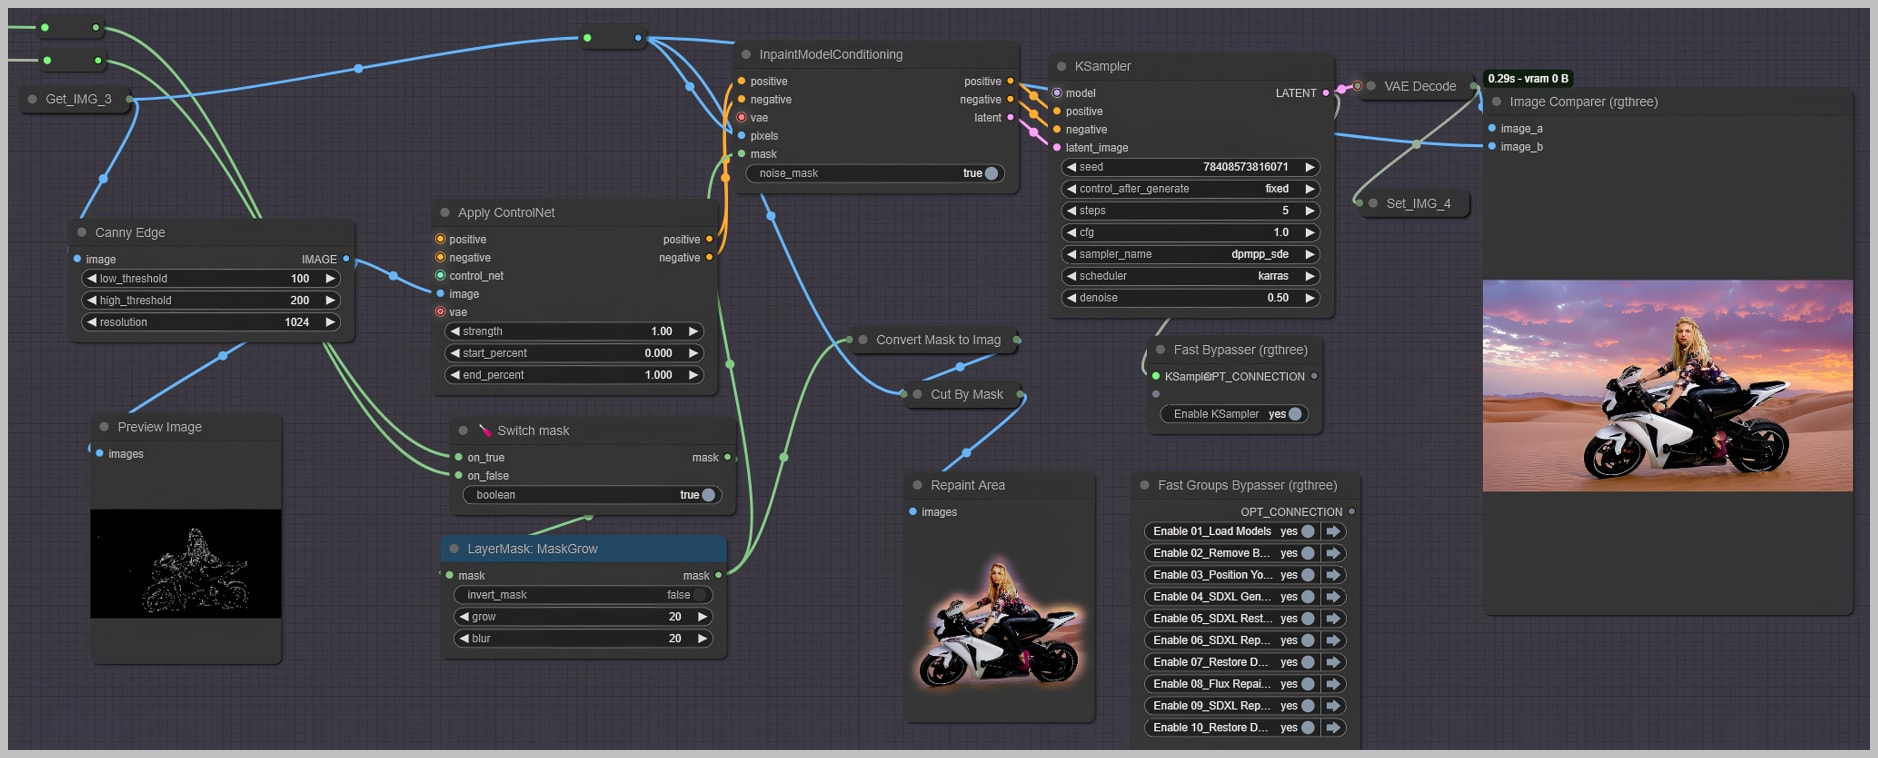
Node Group 9: Repaint Subject to Adjust Lighting with SDXL
In this group, we repaint the subjects using SDXL to adjust lighting and blend them with the background. SDXL is preferred over Flux for more control over the subject outlines.
- Repainting the Subjects: Use the image from the previous group (Group 5) with the modified subjects to guide the repainting process.
- Mask Selection: Choose between two repaint masks. Set it to “True” if you want the mask to match the modified subject mask. If no modification is made in the “Preview Bridge” node, set it to “False.”
- Refining the Mask: Slightly expand and blur the mask to ensure a smooth transition along the subject’s edges.
- Lighting Adjustments: SDXL adjusts the lighting to ensure the subjects blend naturally into the new background with consistent highlights and shadows.
Node Group 10: Final Detail and Color Restoration
In this final step, we focus on restoring both the details and color of the subjects to achieve a polished, realistic result.
- Choosing the Target Image for Detail Restoration: We now have two potential images to use as the base for detail restoration:
- Image 3: Comes from Group 8 (flux-based repaint).
- Image 4: Comes from Group 9 (subject repaint with SDXL).
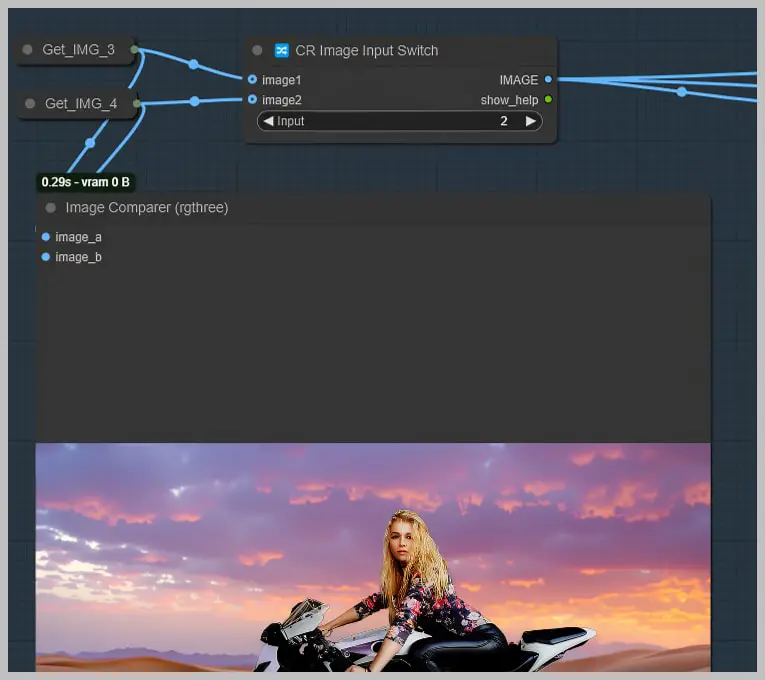
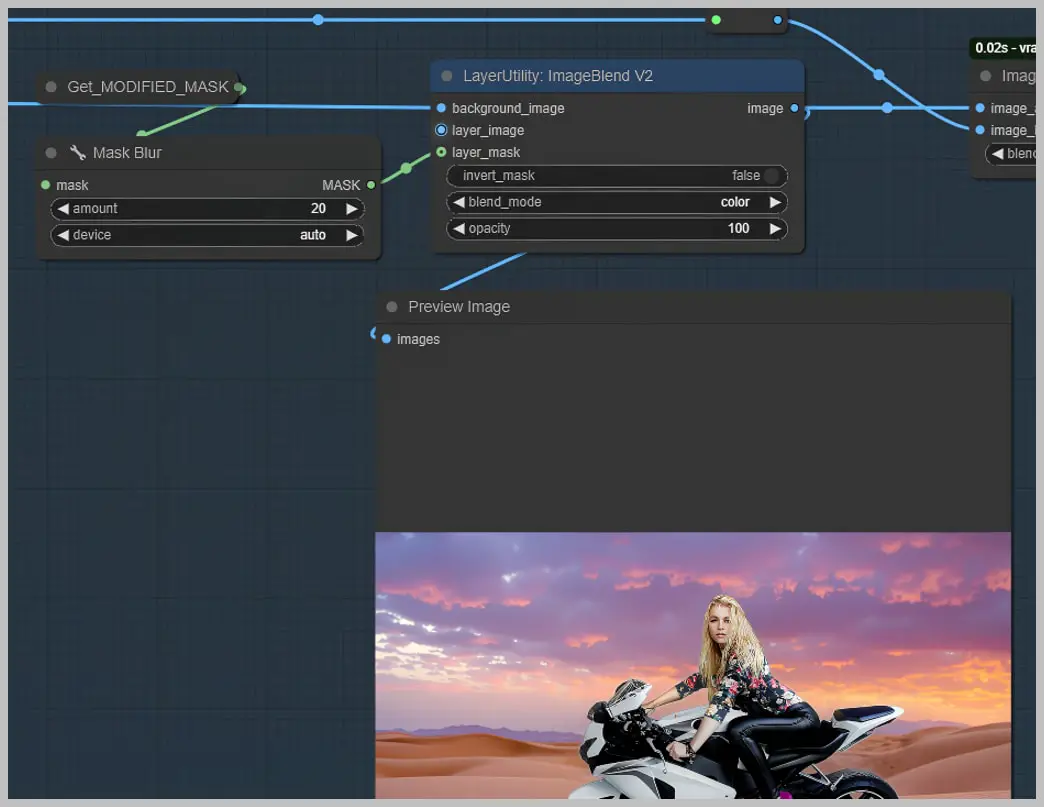
- Restoring Color: We use the “Image Blend” node to adjust the color. The restoration is limited by the mask passed through the “layer_mask” port, which in this case, is the modified subject mask from earlier groups. To ensure smooth blending, we slightly blur this mask to avoid harsh lines between the restored color and the background.
- Controlling Opacity: Keep the opacity at 100%. Reducing opacity here could lead to issues, so it’s best to leave it at full strength for the most accurate color restoration.
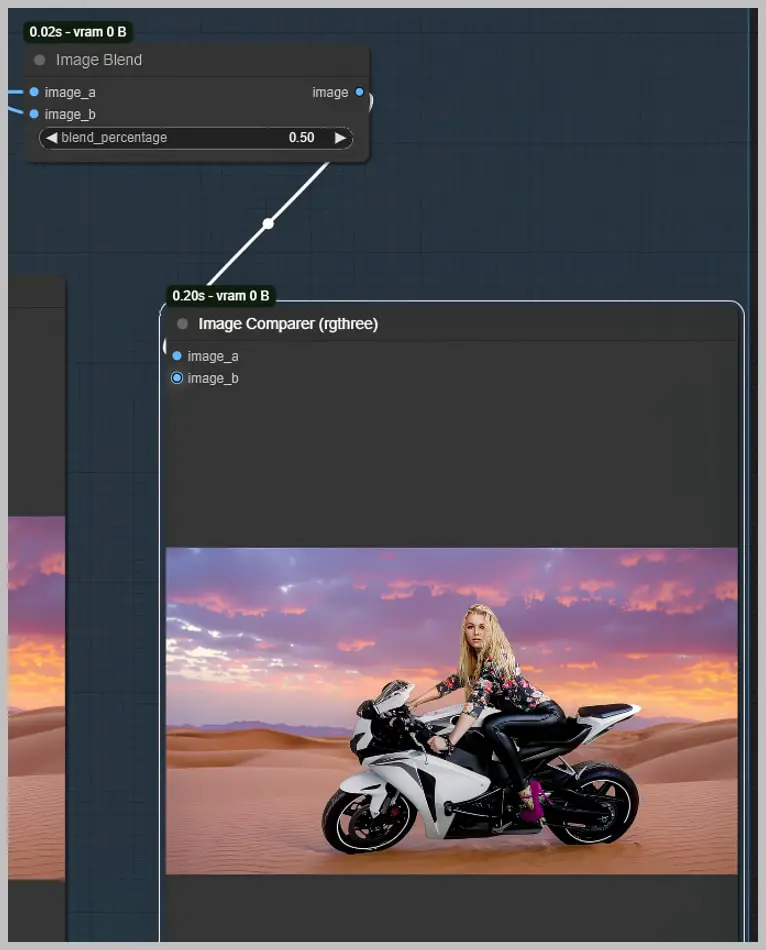
- Blending for Natural Look: To prevent over-saturation or color imbalance, we blend the color-restored image with the original unaltered image. The “blend_percentage” parameter allows you to control how much the final image relies on the restored colors versus the original image. Adjusting this lets you fine-tune the final look for a natural, cohesive result.
Conclusion
The updated background replacement workflow in ComfyUI is not only faster and more efficient, but it also provides more control over the integration of subjects into new environments. By leveraging SDXL checkpoints, Flux-based nodes, and detailed background and subject refinement techniques, this workflow delivers high-quality, natural-looking results with minimal effort.
I hope this guide inspires you to try out these new techniques. Share your results and let’s continue to refine our workflows together. Happy creating!

