Inpainting, Outpainting, and Style Transfer in One Workflow: Flux Meets ControlNet
Black Forest Lab, the mastermind behind the revolutionary Flux model, has recently introduced a suite of powerful new tools that promise to redefine how we approach image generation and editing in ComfyUI. These cutting-edge models—Fill, Canny, Depth, and Redux—bring advanced capabilities like seamless inpainting and outpainting, precision edge detection, depth mapping, and creative style transfer to your workflows.
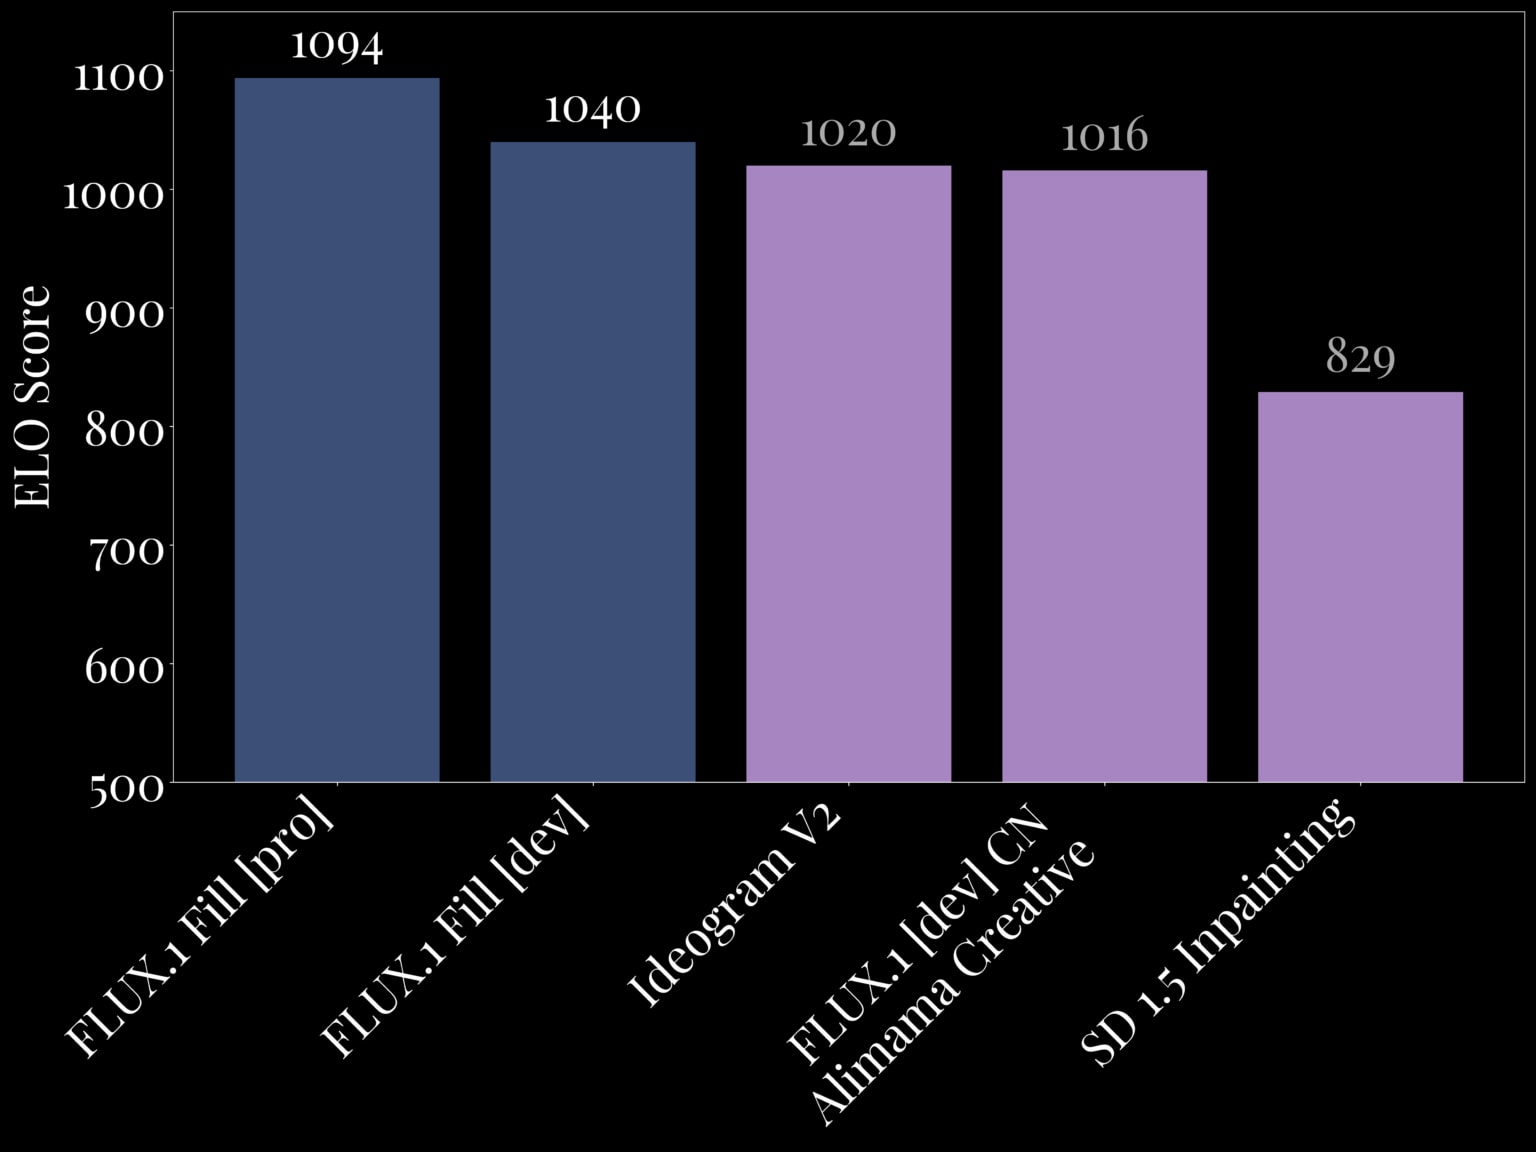
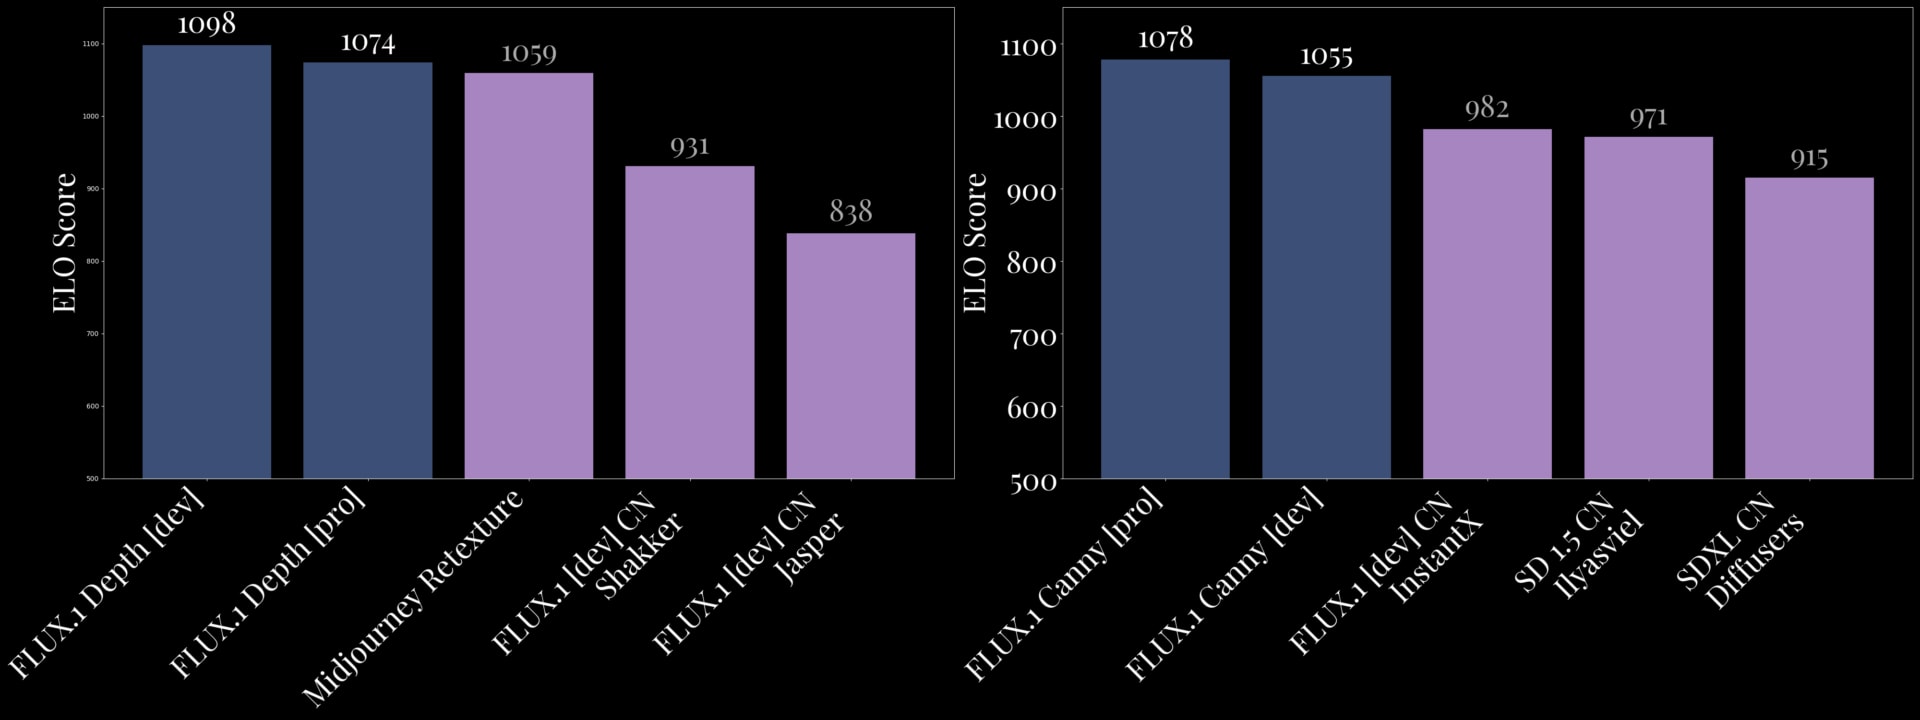
But what truly sets Flux tools apart is their performance. In head-to-head benchmarks, Flux models consistently outperform proprietary solutions like Midjourney ReTexture and Ideogram V2. The Flux.1 Fill [pro] model, for example, currently holds the title of the state-of-the-art inpainting model, delivering unmatched quality and efficiency. Meanwhile, the Flux.1 Depth [pro] model surpasses Midjourney ReTexture in output diversity and reliability in depth-aware tasks.
In this article, we’ll break down everything you need to know about these models, explore their unique features, and guide you through an efficient workflow to help you get started.
Overview of Features and Tools
The new suite of Flux models—Fill, Canny, Depth, and Redux—delivers top-tier performance and versatility. Let’s explore what each model offers and how they outperform competing solutions.
1. Fill Model: The Inpainting and Outpainting Powerhouse
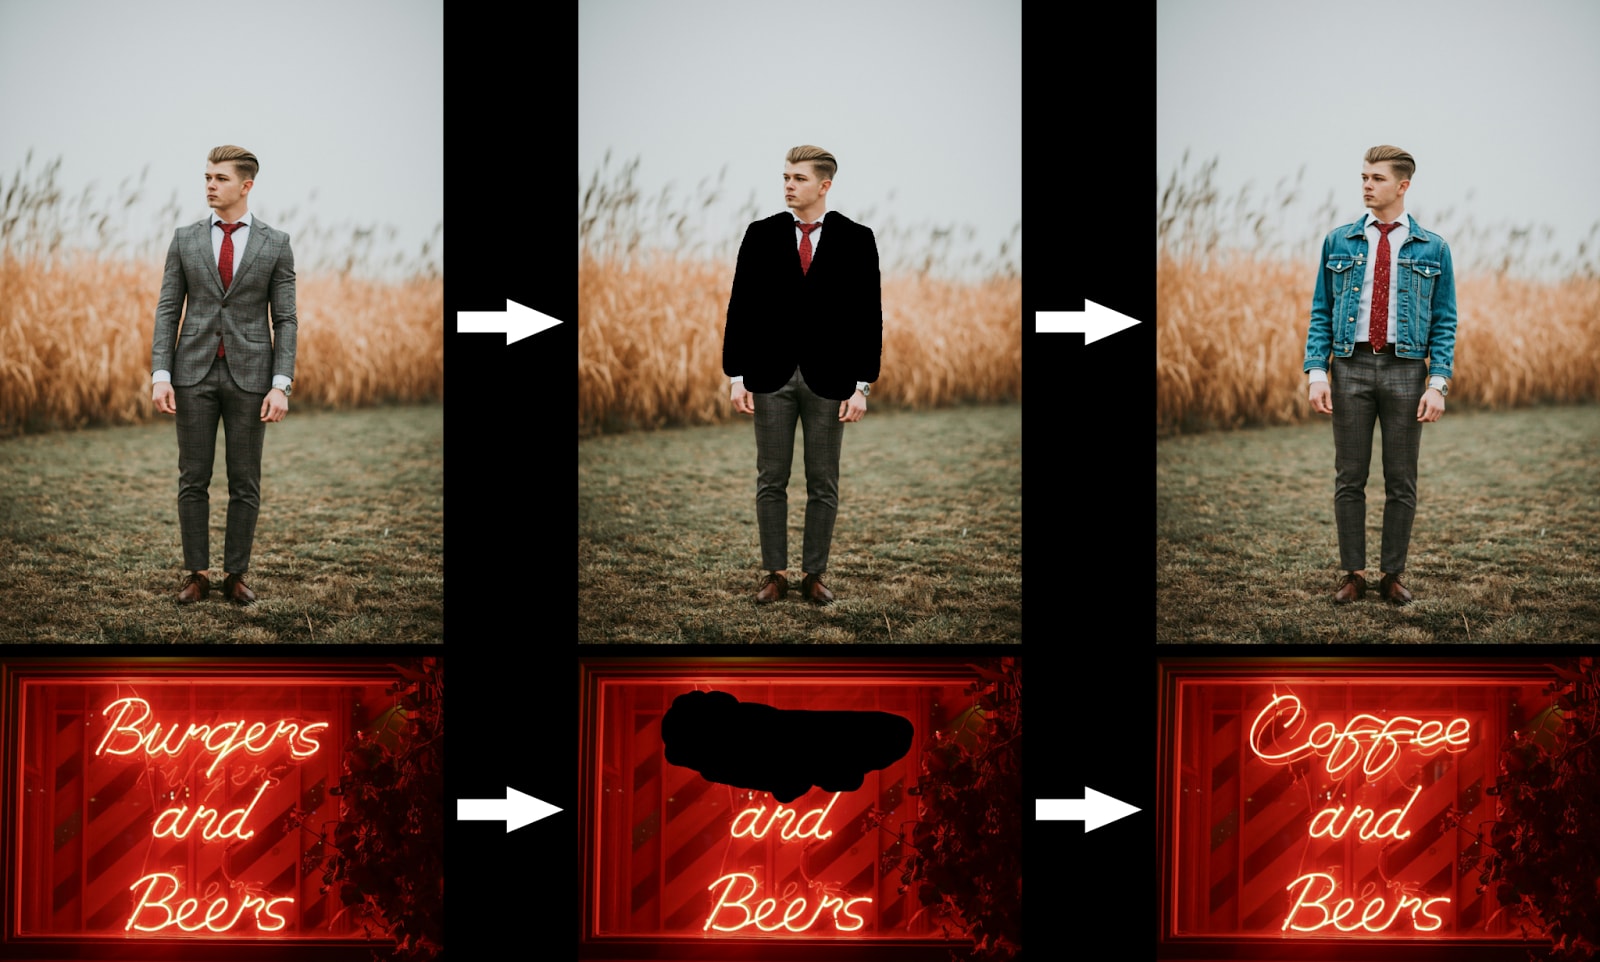
The Fill model sets a new benchmark for inpainting and outpainting, delivering exceptional detail and seamless transitions.
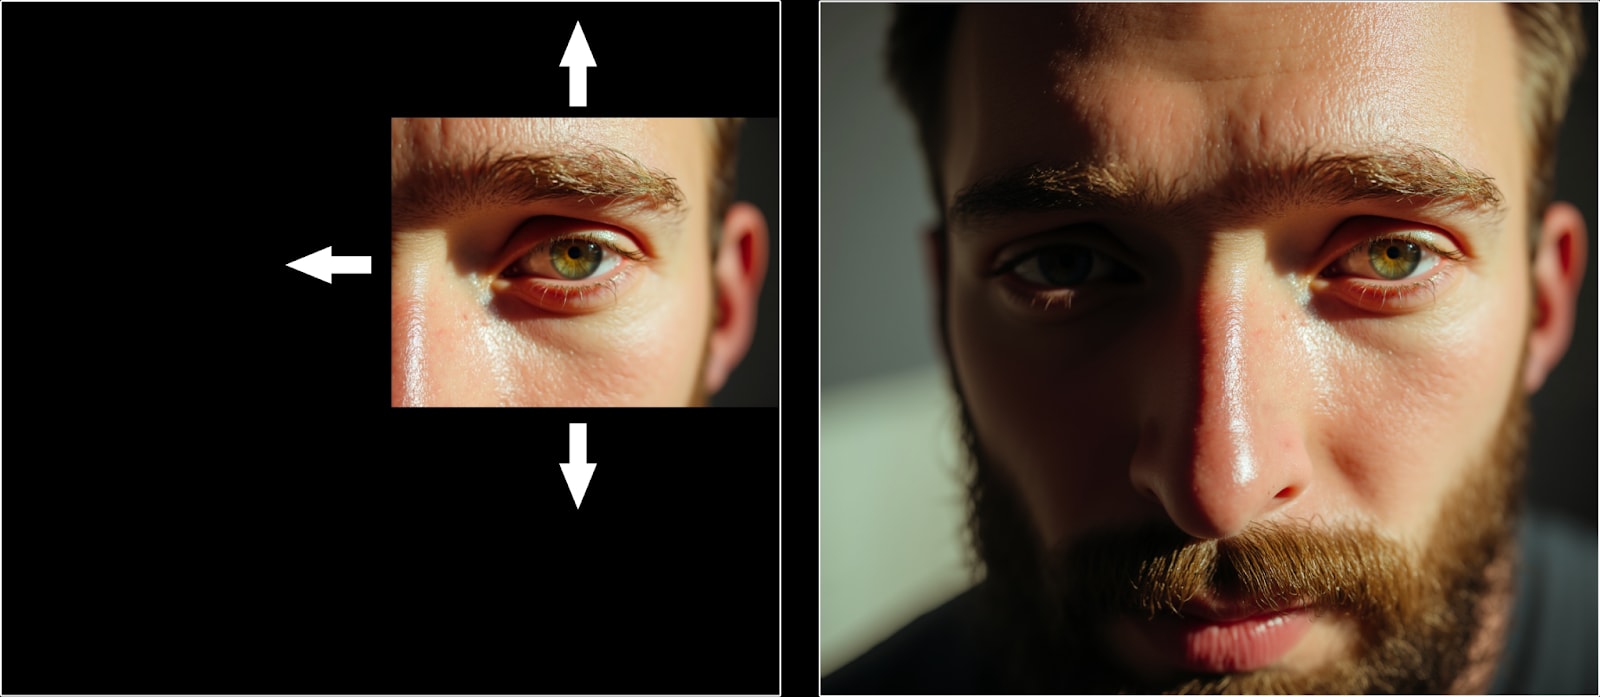
- Key Features:
- Combines inpainting and outpainting tasks in a single model.
- Provides flawless blending between edited and original areas, making changes undetectable.
- Efficient and reliable, even during complex edits or image extensions.
- Advantages Over Competitors:
- Outperforms proprietary tools like Ideogram V2 by providing better accuracy and consistency in edits.
- More efficient than traditional solutions, making it ideal for high-quality results without sacrificing speed.
2. Structural Conditioning with Canny and Depth
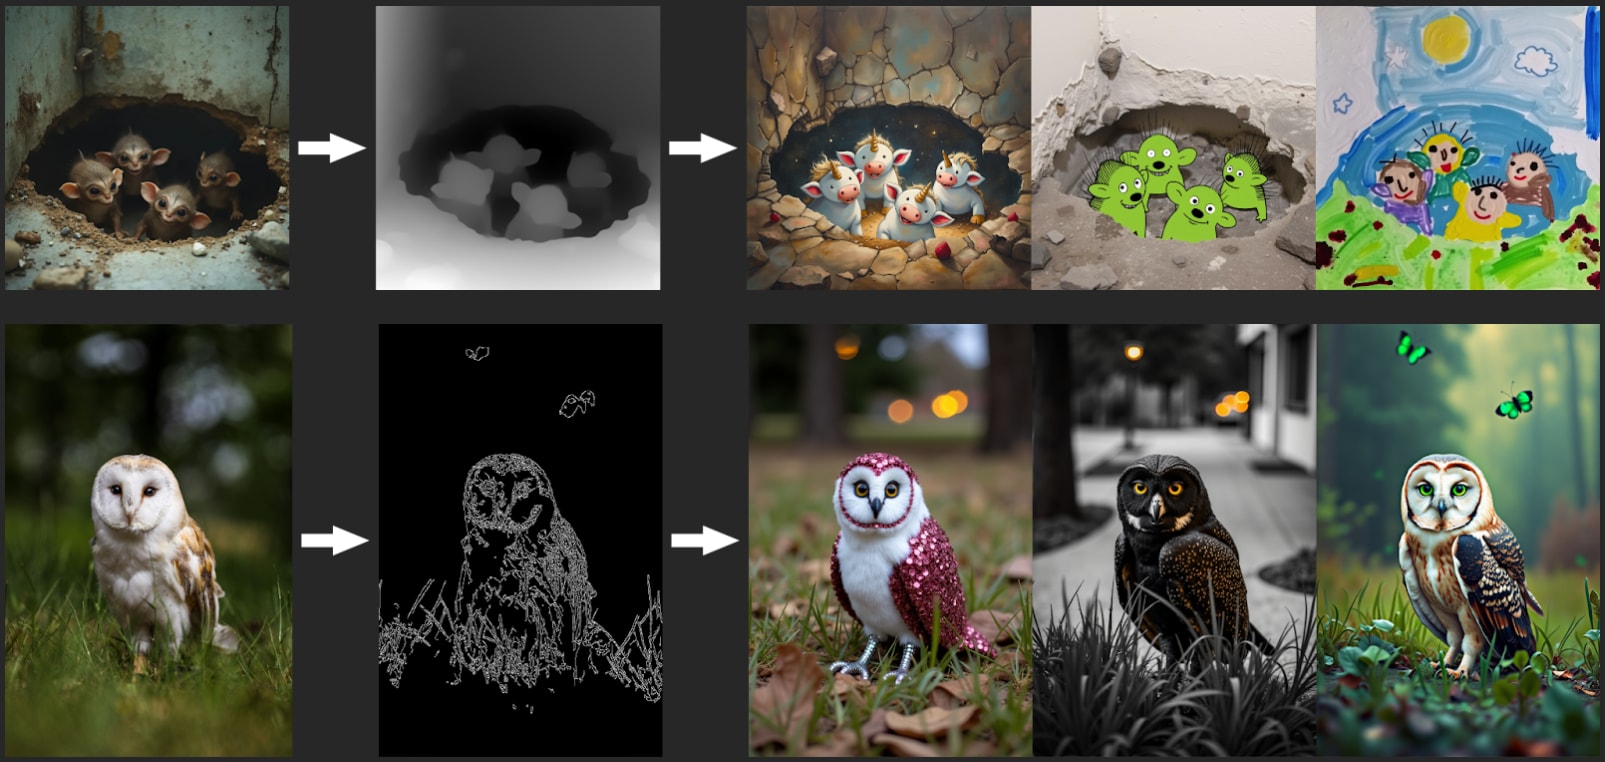
Structural conditioning is a powerful feature in image transformation workflows, using either canny edge detection or depth mapping to maintain the structural integrity of the original image. This process allows users to make precise, text-guided edits while preserving the composition and key details, such as outlines, shapes, and spatial depth.
- Key Applications:
- Ideal for retexturing or style transfer tasks, where preserving the original structure is critical.
- Enables seamless transformations, such as changing textures, materials, or fine details while keeping the object’s form intact.
- Advantages of Structural Conditioning in Flux:
- Canny edge maps focus on edge precision, maintaining sharp and accurate outlines for highly controlled edits.
- Depth mapping ensures that lighting, shadows, and spatial relationships remain realistic, enhancing the dimensionality of transformations.
How Flux Outperforms Competitors:
- Canny Edge Detection:
- The Flux.1 Canny [pro] model delivers the most precise and high-quality edge detection available, ideal for workflows requiring accurate structural conditioning.
- The Dev version provides a reliable and efficient alternative, maintaining excellent output consistency.
- Depth Mapping:
- The Flux.1 Depth [pro] model offers exceptional diversity in outputs, making it highly versatile for creative tasks like retexturing or generating new compositions.
- The Dev version prioritizes consistency, making it a dependable choice for depth-aware tasks that require precision.
- Flux.1 Depth outshines proprietary tools like Midjourney ReTexture by delivering more nuanced results, especially in preserving lighting and spatial details.
3. Redux Model: Transforming Style Transfer
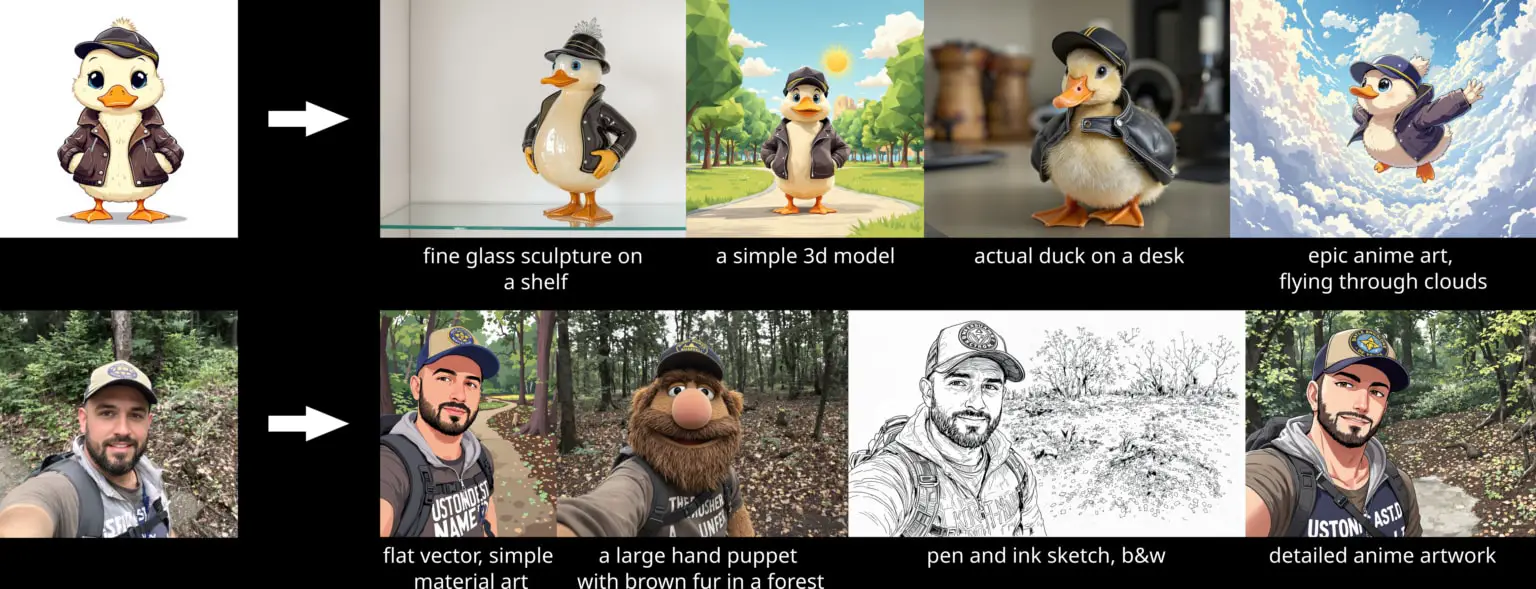
The Redux model brings advanced style-transfer capabilities to Flux, similar to the IP-Adapter in SDXL, but with notable improvements.
- Key Features:
- Applies artistic styles while preserving the structural integrity of the reference image.
- Compatible with fine-tuned models for more creative customization.
- Advantages Over Competitors:
- Combines efficiency with quality, allowing for creative flexibility without compromising on performance.
- Works seamlessly with other Flux models, enhancing its usability in diverse workflows.
Gain exclusive access to advanced ComfyUI workflows and resources by joining our community now!
Here’s a mind map illustrating all the premium workflows: https://myaiforce.com/mindmap
Run ComfyUI with Pre-Installed Models and Nodes: https://youtu.be/T4tUheyih5Q
Workflow Setup
To make the most of the Flux.1 Dev models, an integrated workflow has been developed to streamline their use within ComfyUI. This workflow combines all six models—Flux.1-Canny-Dev, Flux.1-Canny-Dev-LoRA, Flux.1-Depth-Dev, Flux.1-Depth-Dev-LoRA, FLUX.1-Fill-Dev, and FLUX.1-Redux-Dev—into a cohesive setup, enabling you to perform a wide range of tasks efficiently.
Why Use the Dev Versions Only?
The Pro versions of these models are available exclusively through the Black Forest Lab API, which offers additional capabilities like higher diversity and enhanced precision.
The Dev versions are optimized for local workflows in ComfyUI and are designed to be lightweight and VRAM-efficient while still delivering exceptional results.
Structure of the Workflow
The workflow is organized into a modular structure, enabling users to mix and match model groups depending on their needs. Here’s a breakdown of the workflow layout:
- Basic Settings and Image Preprocessing
- Structural Conditioning Node Groups
- Canny Groups
- Depth Groups
- Fill Model Node Groups
- Inpainting Group
- Outpainting Group
- Redux Model Node Group
Model Installation
- flux1-canny-dev: https://huggingface.co/black-forest-labs/FLUX.1-Canny-dev/tree/main
- flux1-canny-dev-lora: https://huggingface.co/black-forest-labs/FLUX.1-Canny-dev-lora/tree/main
- flux1-depth-dev: https://huggingface.co/black-forest-labs/FLUX.1-Depth-dev/tree/main
- flux1-depth-dev-lora: https://huggingface.co/black-forest-labs/FLUX.1-Depth-dev-lora/tree/main
- flux1-fill-dev: https://huggingface.co/black-forest-labs/FLUX.1-Fill-dev/tree/main
- flux1-redux-dev: https://huggingface.co/black-forest-labs/FLUX.1-Redux-dev/tree/main
- For other Flux-base fine-tuned models, refer to this article: https://myaiforce.com/flux-fine-tuned-checkpoints-comparison/
- Video tutorial: https://youtu.be/2Q_r1cecxDE
Node Group 1: Basic Settings
This node group is the foundation of the entire workflow. It ensures all essential configurations are in place before passing inputs to other model groups. This group standardizes image preprocessing and prepares key data, such as edge maps and depth maps, for subsequent stages. Let’s break it down step by step.
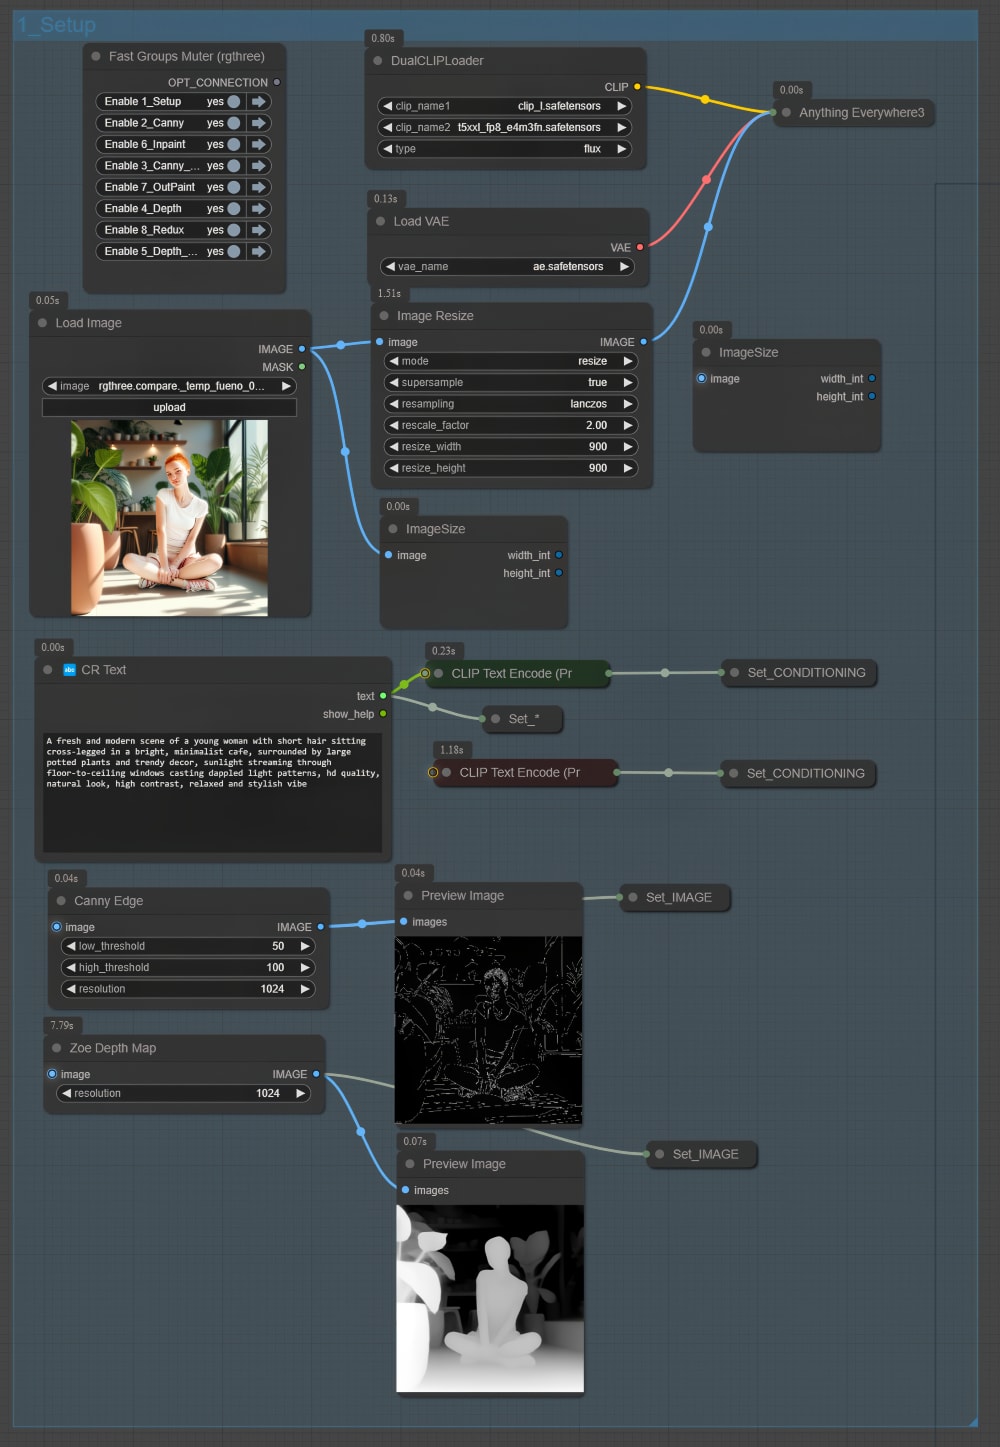
1. Core Components of the Basic Settings Group
This group is designed to handle:
- Global settings like Clip and VAE models.
- Image preprocessing to maintain consistency across model groups.
- Initial structural data creation through edge detection (Canny) and depth mapping.
2. Clip and VAE Setup
At the heart of this group is the “Anything Everywhere 3” node, which manages the distribution of Clip and VAE models. These are crucial for generating consistent and high-quality outputs across all node groups:
- Clip Model:
- Responsible for understanding and processing the textual prompt.
- Two versions of the t5xxl Clip model can be used:
- fp8 version: Optimized for lower VRAM usage and disk space.
- fp16 version: Offers higher precision at the cost of slightly more VRAM.
- VAE Model:
- Handles encoding and decoding of image data to and from latent space.
- Ensures all models in the workflow receive compatible data formats.
3. Image Preprocessing
Proper image preprocessing is essential for maintaining consistent results throughout the workflow. This step includes:
- Image Resize Node
- Ensures input images are scaled appropriately to avoid excessive GPU load.
- Helps standardize image dimensions for all model groups.
4. Canny Edge Processing
The Canny Edge Processing generates precise edge maps that will be used by the Flux.1-Canny-Dev model later in the workflow:
- Steps:
- Input the preprocessed image into a
Canny Edgenode. - Adjust parameters like the minimum and maximum thresholds to control edge sensitivity.
- Output the resulting edge map to the corresponding node in the structural conditioning workflow.
- Input the preprocessed image into a
- Purpose:
- Creates a clear outline of the image’s structure, preserving shape and contours during transformations.
- Particularly useful for tasks like retexturing, where maintaining the original form is critical.
5. Depth Map Processing
The Depth Map Processing Subgroup generates depth data, essential for spatially aware image transformations using the Flux.1-Depth-Dev model:
- Steps:
- Input the preprocessed image.
- Pass the depth map to the Depth model’s node group for further processing.
- Purpose:
- Provides a 3D perspective of the image, capturing lighting, shadowing, and spatial relationships.
- Enables realistic transformations, such as material changes or depth-aware retexturing.
Node Group 2: Canny
The Canny Node Group is the first structural conditioning component of the workflow. It uses the Flux.1-Canny-Dev model to generate edge maps and apply precise structural constraints to the image, ensuring that the core outlines and shapes of the original composition are maintained. This is particularly useful for tasks like retexturing, where preserving the original image’s form is critical.
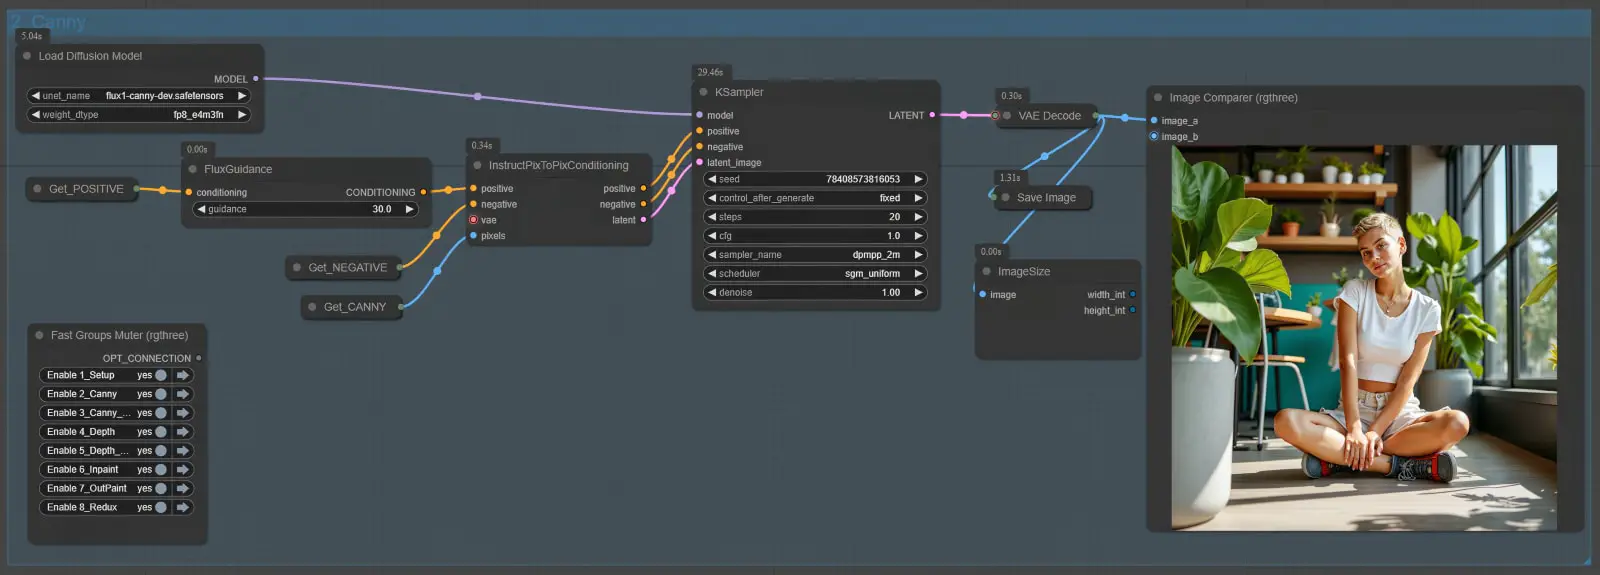
The Canny Node Group is structured as follows:
- Load Diffusion Model Node:
- This node loads the Flux.1-Canny-Dev model into the workflow.
- The model must be stored in the
diffusion_modelsfolder undermodels.
- Edge Map Input:
- The edge map generated in the Basic Settings group is passed as input to this group.
- InstructPixToPixConditioning Node:
- This node integrates the edge map with the textual prompt, conditioning the image transformation.
- Key Parameters:
- Adjust the conditioning weight to balance the influence of the edge map versus the prompt.
- Fine-tune this value to achieve the desired balance between structural adherence and creative flexibility.
- FluxGuidance Node:
- Purpose: Refines the influence of the prompt on the image generation process. This node adjusts the “guidance” parameter, which determines the weight of the text prompt in relation to the structural data (edge map).
- Recommended Value: A guidance of 30.0 is often a sweet spot, providing a good balance between structure and prompt-driven creativity.
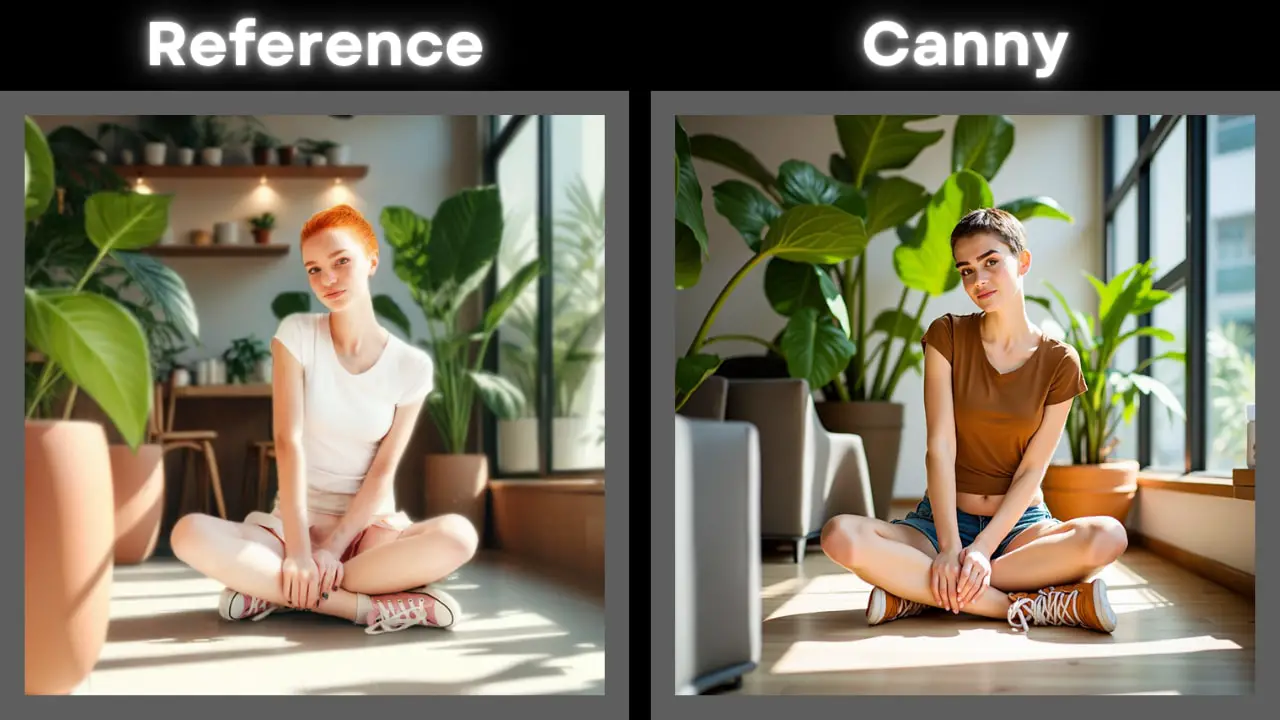
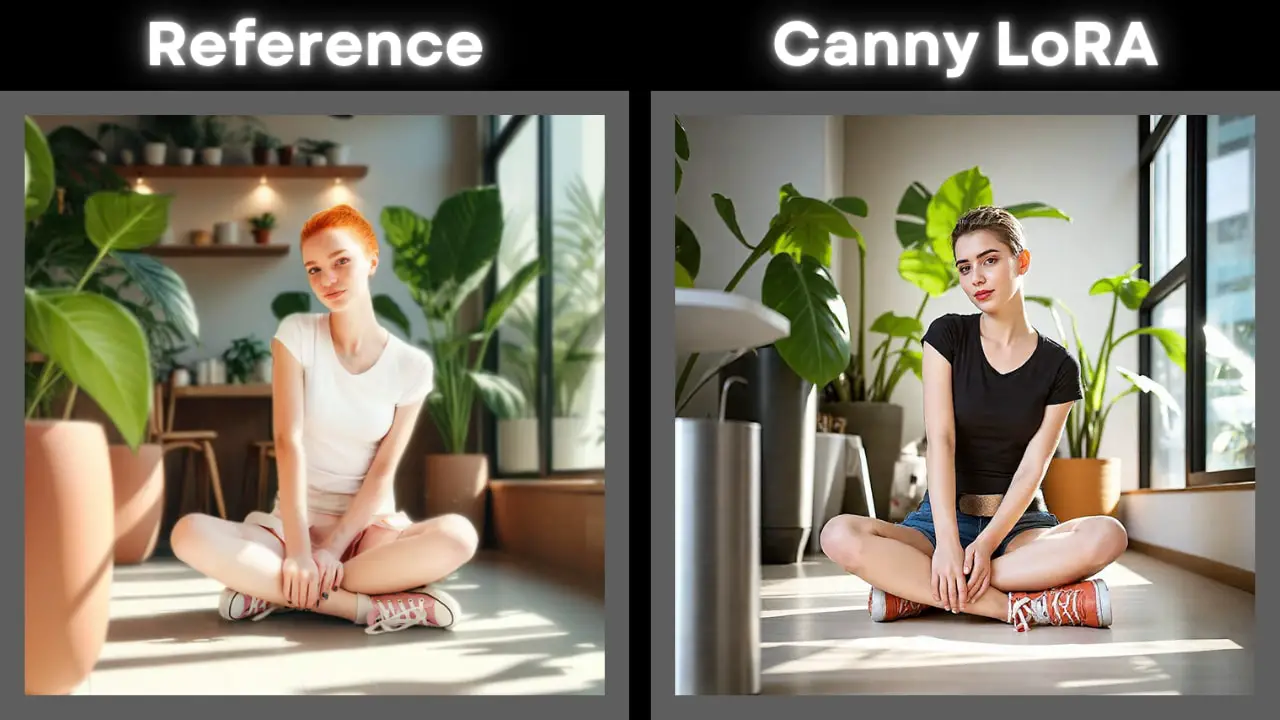
Node Group 3: Canny LoRA
The Canny LoRA Node Group is a variation of the standard Canny Node Group that uses the Flux.1-Canny-Dev-LoRA model. While it introduces LoRA-based (Low-Rank Adaptation) fine-tuning for edge conditioning, its outputs are generally less consistent and slightly lower in quality compared to the standard Canny Node Group. Despite these limitations, the LoRA group offers unique flexibility and remains a valuable tool for certain specialized use cases.
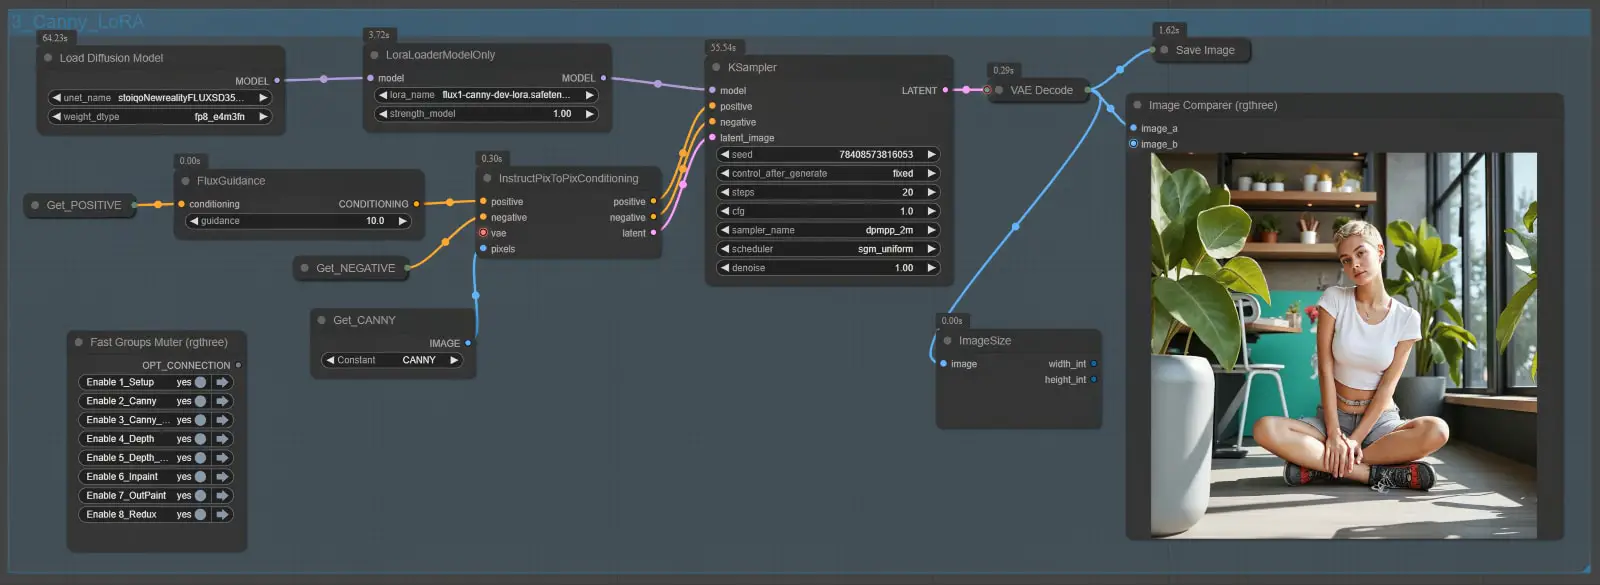
Key Differences Between Standard Canny and LoRA Node Groups
| Feature | Standard Canny Node Group | Canny LoRA Node Group |
|---|---|---|
| Model Used | Flux.1-Canny-Dev | Flux.1-Canny-Dev-LoRA |
| Conditioning Method | Direct edge-based conditioning | LoRA-enhanced edge conditioning |
| Output Quality | High structural fidelity | Slightly lower structural fidelity |
| Use Cases | Tasks needing precise details | Specialized tasks with stylistic flexibility |
Node Group 4: Depth
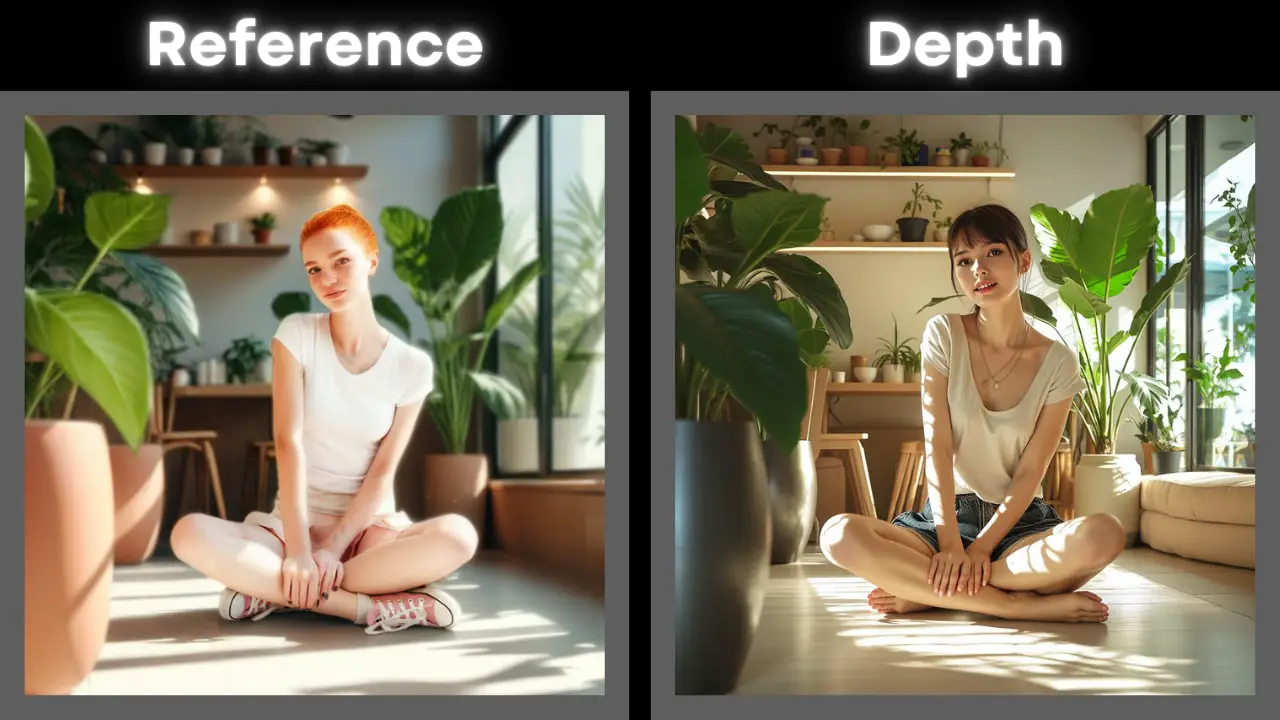
The Depth Node Group utilizes the Flux.1-Depth-Dev model to generate depth-aware image transformations. By introducing a sense of spatial realism through depth mapping, this group enables the preservation and manipulation of lighting, shadows, and spatial relationships, making it ideal for tasks requiring photorealistic effects or depth-guided edits.

The Depth Node Group is structured similarly to the Canny Node Group but operates with depth data instead of edge maps:
- Load Diffusion Model Node:
- Loads the Flux.1-Depth-Dev model into the workflow.
- The model must be placed in the
diffusion_modelsfolder undermodels.
- Depth Map Input:
- The depth map created in the Depth Estimation step of the Basic Settings group is passed as input to this group.
- Depth maps represent the distance or spatial relationship between objects in the image, ensuring realistic transformations.
Node Group 5: Depth LoRA
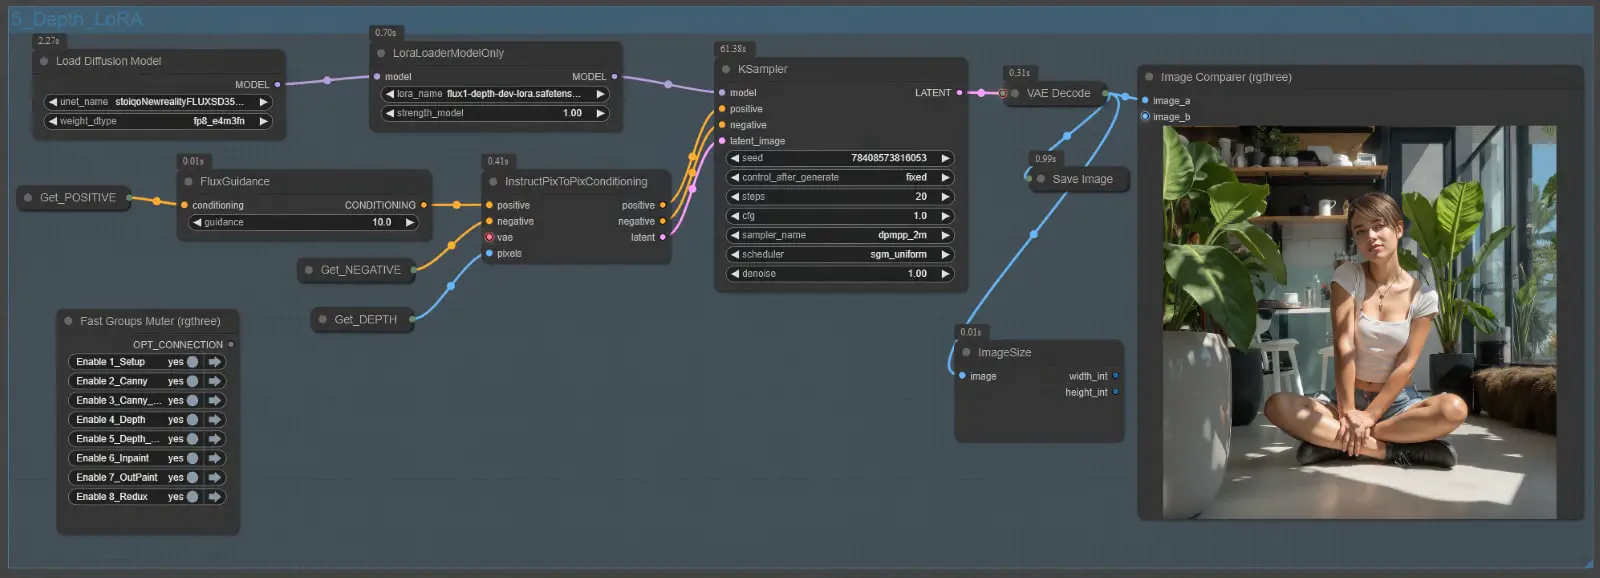
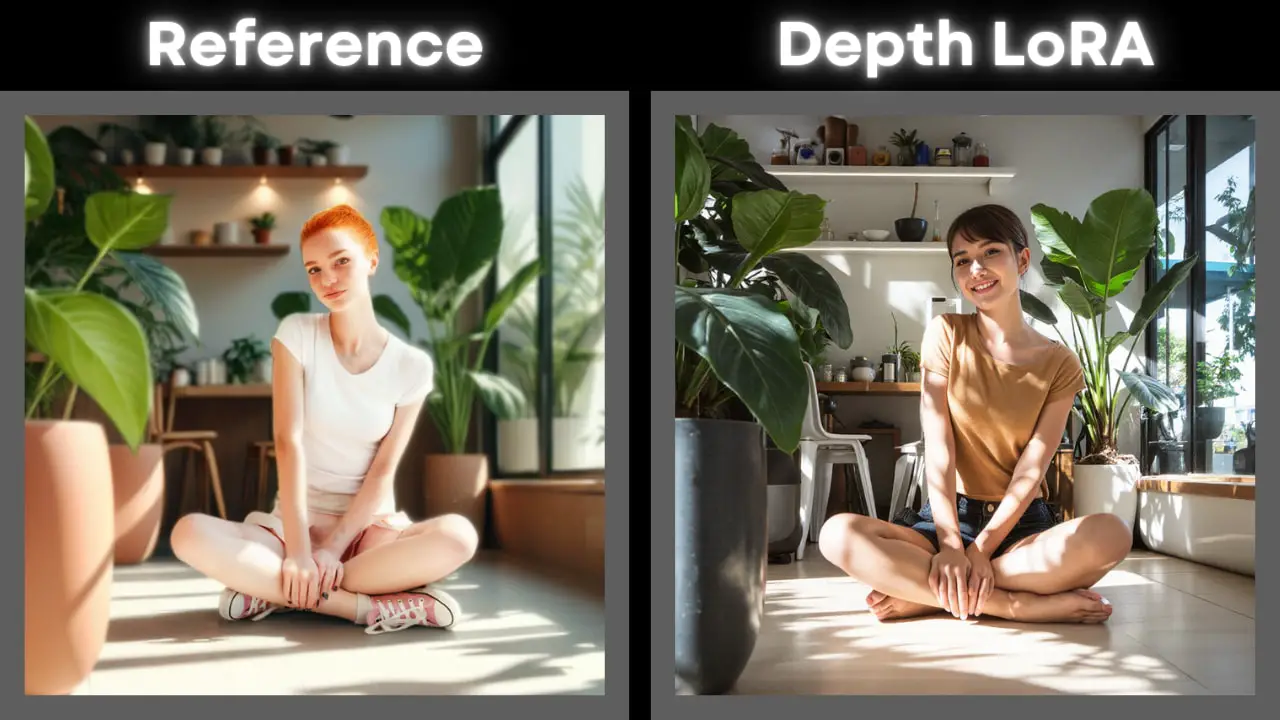
The Depth LoRA Node Group introduces a LoRA-based approach to depth-aware conditioning, leveraging the Flux.1-Depth-Dev-LoRA model. Similar to the Depth Node Group, this group uses depth maps to guide image transformations while ensuring spatial realism. However, the LoRA variant focuses on efficiency and adaptability, providing an alternative method for depth-aware tasks.
This group is particularly useful for experimental workflows where lightweight processing and fine-tuned adjustments are required. That said, it comes with some trade-offs, as the output quality and consistency may not always match the standard Depth Node Group.
Key Differences Between Standard Depth and LoRA Node Groups
| Feature | Standard Depth Node Group | Depth LoRA Node Group |
|---|---|---|
| Model Used | Flux.1-Depth-Dev | Flux.1-Depth-Dev-LoRA |
| Conditioning Method | Direct depth-based conditioning | LoRA-enhanced depth conditioning |
| Output Quality | High consistency and realism | Slightly lower quality, occasional inconsistencies |
| Flexibility | Ideal for strict spatial adherence | More adaptable for creative adjustments |
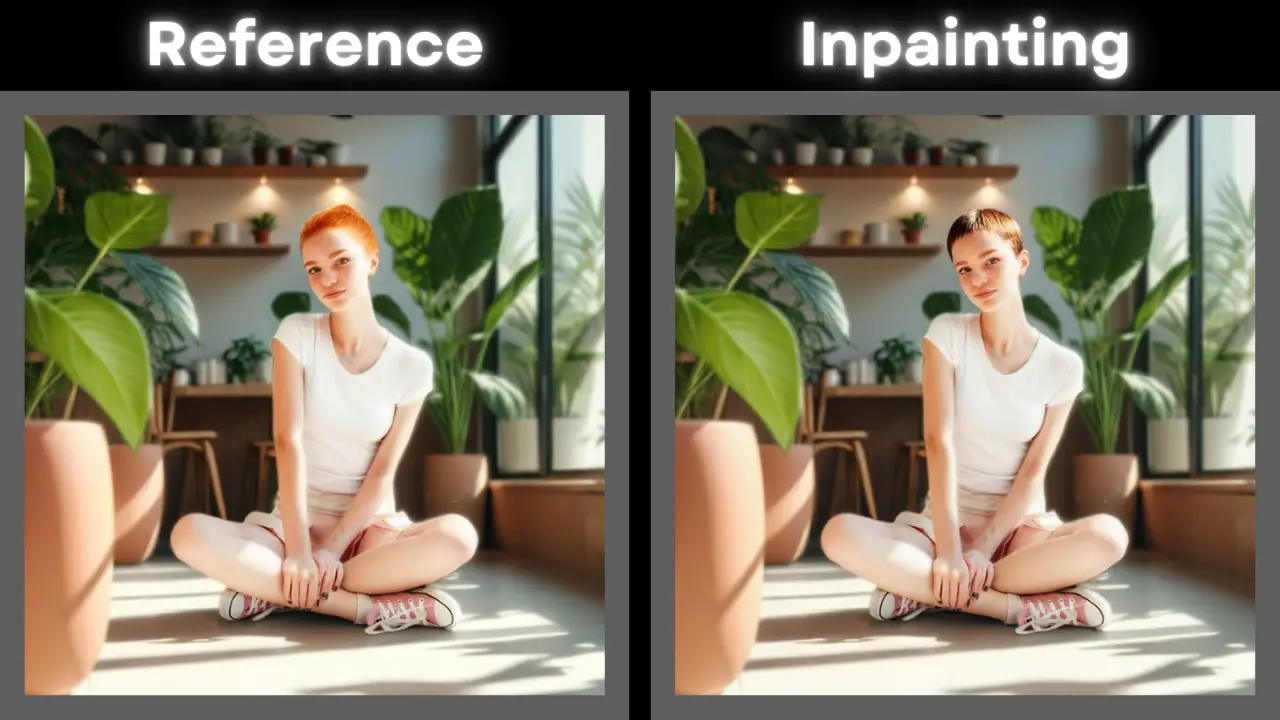
Node Group 6: Inpainting
The Inpainting Node Group uses the FLUX.1-Fill-Dev model to perform precise edits on specific regions of an image, guided by a mask. Unlike earlier node groups, this group is built around the InpaintModelConditioning and Differential Diffusion nodes, which are specifically designed to optimize the inpainting process. These nodes ensure the generation of high-quality results by preparing and refining the conditioning data, as well as enhancing the blending of edited areas with the surrounding context.

Node Setup and Workflow
Here’s how the Inpainting Node Group is configured:
- Mask Input:
- The input includes the original image and a mask that defines the region to be edited.
- The masked area is where the changes will occur, and the unmasked regions are preserved.
- Load Diffusion Model Node:
- Loads the FLUX.1-Fill-Dev model, which is specifically designed for inpainting tasks.
- Ensure the model file is located in the
diffusion_modelsfolder undermodels.
- InpaintModelConditioning Node:
- This node prepares the conditioning data for inpainting by using a Variational Autoencoder (VAE) to encode the input image into latent representations.
- Key Functions:
- Encodes the unmasked portions of the input image to preserve context.
- Guides the model in filling the masked area while ensuring proper alignment with the surrounding image.
- Why It’s Important:
- The encoded conditioning data ensures that the edits align naturally with the rest of the image, resulting in smoother transitions and more cohesive results.
- Differential Diffusion Node:
- Positioned between the
Load Diffusion Modelnode and the K Sampler, this node enhances the denoising process for inpainting. - Key Functions:
- Applies a differential denoising mask to refine the blending of edited and unedited areas.
- Implements soft inpainting, subtly adjusting areas adjacent to the masked region to ensure seamless integration.
- Mindful of the borders between the masked and unmasked regions, it reduces artifacts and visible edges.
- Why It’s Important:
- Prevents harsh transitions or mismatches along the mask’s edges, making the edits appear more natural.
- Positioned between the
Node Group 7: Outpainting

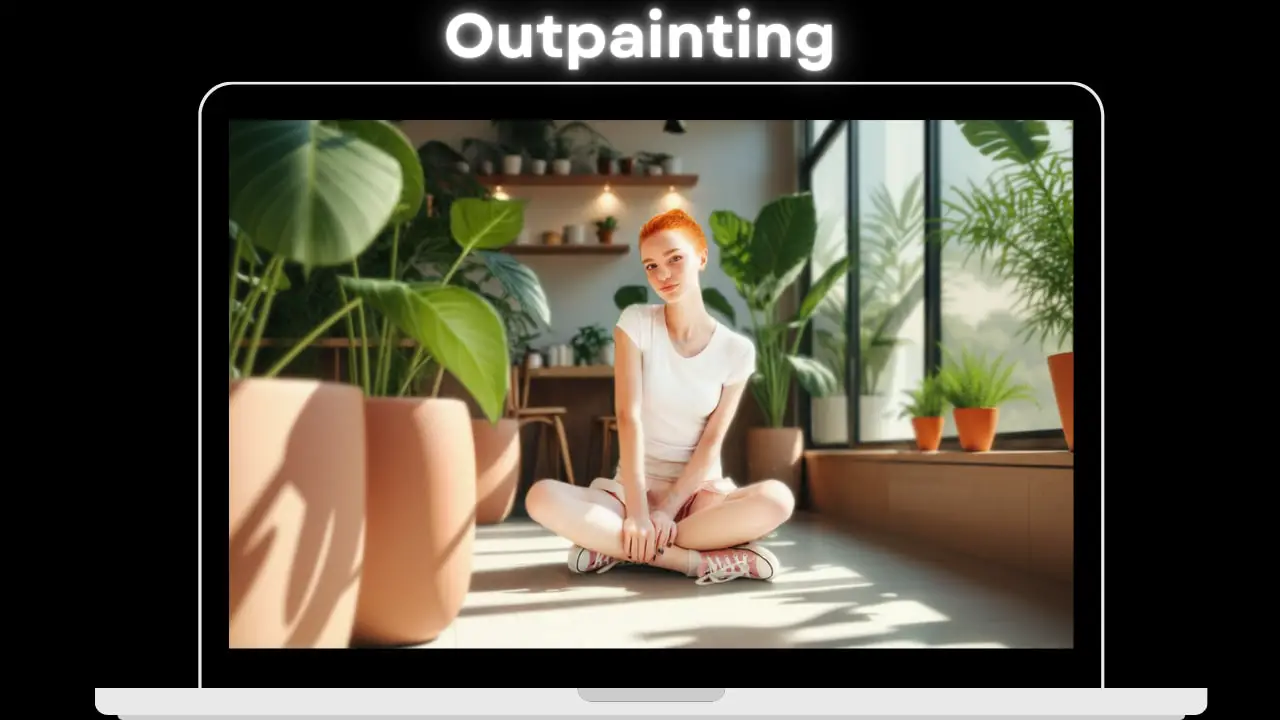
The Outpainting Node Group extends the boundaries of an image while maintaining its style, context, and overall composition. Using the FLUX.1-Fill-Dev model along with the InpaintModelConditioning and Differential Diffusion nodes, this group ensures that the newly generated areas blend seamlessly with the original content. Outpainting is particularly useful for creating expanded scenes, generating additional context around a subject, or enhancing creative storytelling through image extensions.
Node Setup and Workflow
Here’s how the Outpainting Node Group is configured:
- Image Padding for Outpainting:
- Before passing the image to this group, use the Pad Image for Outpainting node to define the areas that will be extended.
- Functionality:
- This node increases the canvas size by adding blank space around the image, which serves as the target for outpainting.
- The size and placement of the padding determine how much and where the image will be expanded.
- Load Diffusion Model Node:
- Loads the FLUX.1-Fill-Dev model to perform the outpainting.
- As with other groups, the model must be placed in the
diffusion_modelsfolder undermodels.
Node Group 8: Redux
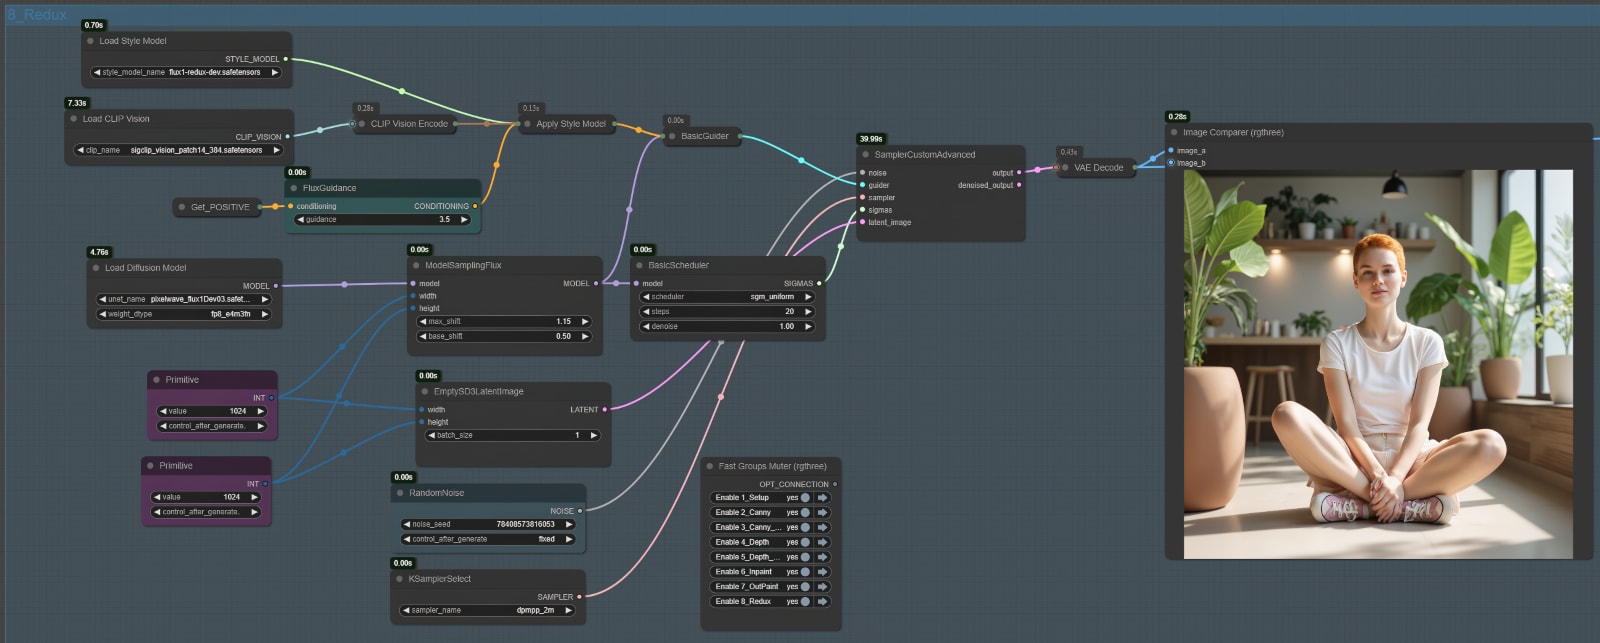
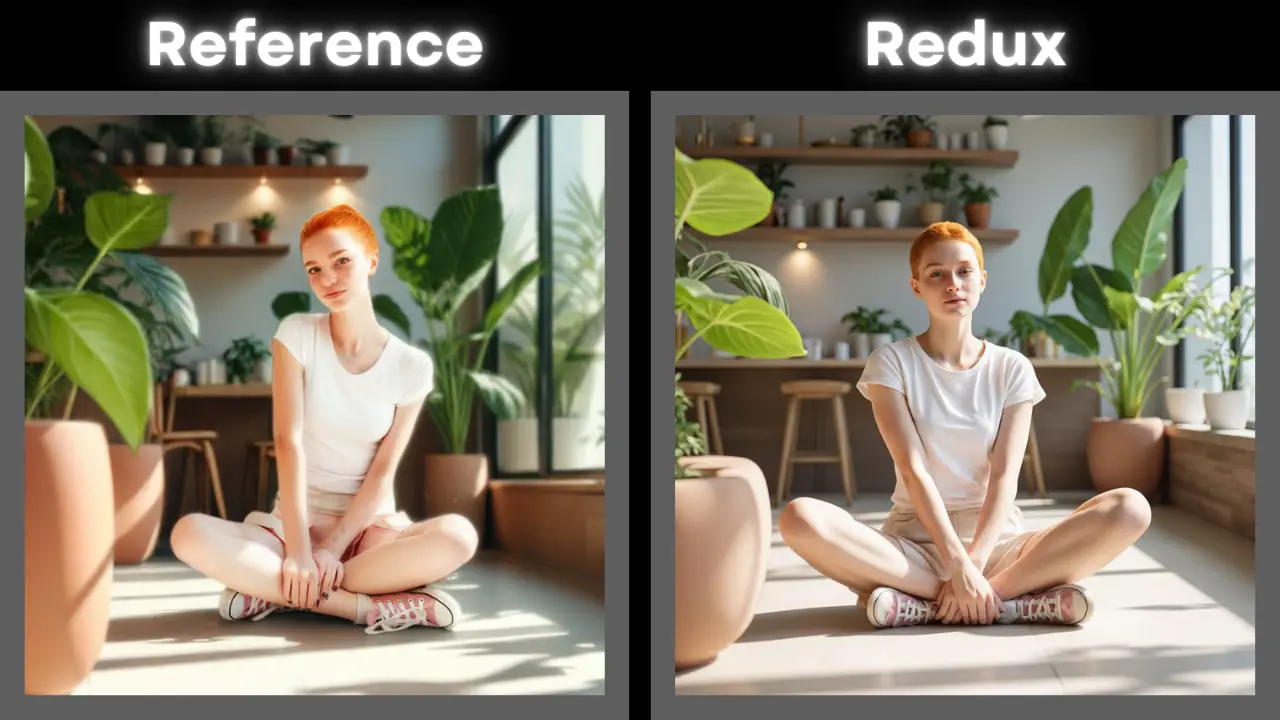
The Redux Node Group introduces style transfer capabilities to the workflow, enabling users to apply artistic or aesthetic changes to their images while preserving the structural and contextual integrity of the original content. Utilizing the FLUX.1-Redux-Dev model, this group incorporates style data through the Apply Style Model node and processes it alongside prompt conditioning, creating visually appealing results with seamless stylistic integration.
Node Setup and Workflow
Input Components
- Load Style Model Node:
- Loads the FLUX.1-Redux-Dev style model into the workflow.
- The style model file must be placed in the
style_modelsfolder undermodels. - This model provides the stylistic reference data used to modify the image’s aesthetics.
- Load CLIP Vision Node:
- Loads the CLIP Vision Model (
sigclip_vision_patch14_384_safesensors) for processing visual information. - This node encodes the input image into latent space, enabling compatibility with the style model.
- Loads the CLIP Vision Model (
- Apply Style Model Node:
- Combines the style model and the visual encoding (from the CLIP Vision node) to create style conditioning.
- This conditioning is passed to the rest of the workflow to guide the style transfer process.
- Load Diffusion Model Node:
- Loads the main FLUX.1-Redux-Dev model into the workflow, which processes the combined style and text conditioning data.
To Sum Up
The new models from Black Forest Lab form a seamless and highly functional pipeline for image generation and editing in ComfyUI. Despite their impressive performance, these models are not without limitations:
- Checkpoint-Style Functionality:
- The models function like checkpoints, requiring a checkpoint loader to integrate them into workflows. This can make it challenging to combine Flux models with other checkpoints or frameworks in a single pipeline.
- Large File Sizes:
- With some models exceeding 20 GB, they demand significant storage space. Users with limited disk capacity may need to be selective about which models to include.
While these downsides are worth noting, they’re not deal-breakers. The community have a track record of refining its models over time, as seen with earlier iterations of Flux. The original Flux model eventually received lighter fp8 and GGUF versions, and similar improvements could be on the horizon for these newer models. We may also see further fine-tuning that enhances output quality, introduces new styles, or optimizes the workflow for even greater efficiency.

