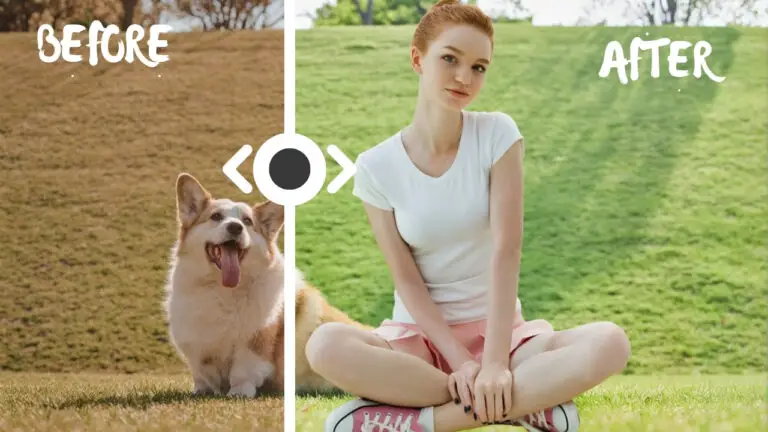
ComfyUI Clothing Swapping: IP-Adapter V2 + FaceDetailer (DeepFashion)
Today, we’re diving into the innovative IP-Adapter V2 and ComfyUI integration, focusing on effortlessly swapping outfits in portraits.
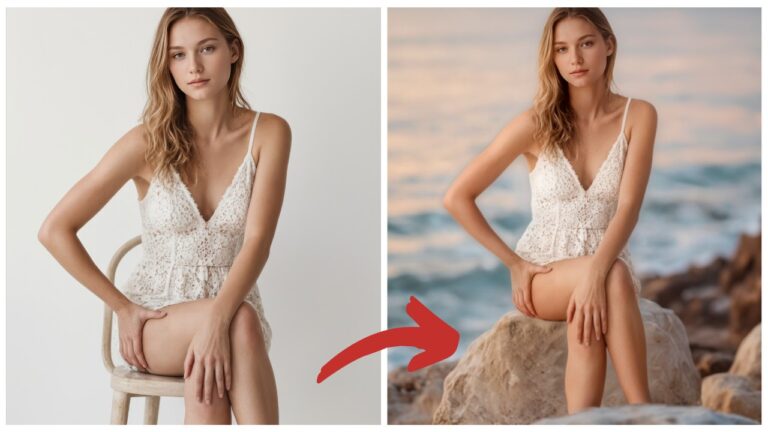
This tutorial simplifies the entire process, requiring just two images: one for the outfit and one featuring a person.
By utilizing ComfyUI’s node operations, not only is the outfit swapped, but any minor discrepancies are resolved with the FaceDetailer node.
For those who love diving into Stable Diffusion with video content, you’re invited to check out the engaging video tutorial that complements this article:
Gain exclusive access to advanced ComfyUI workflows and resources by joining our community now!
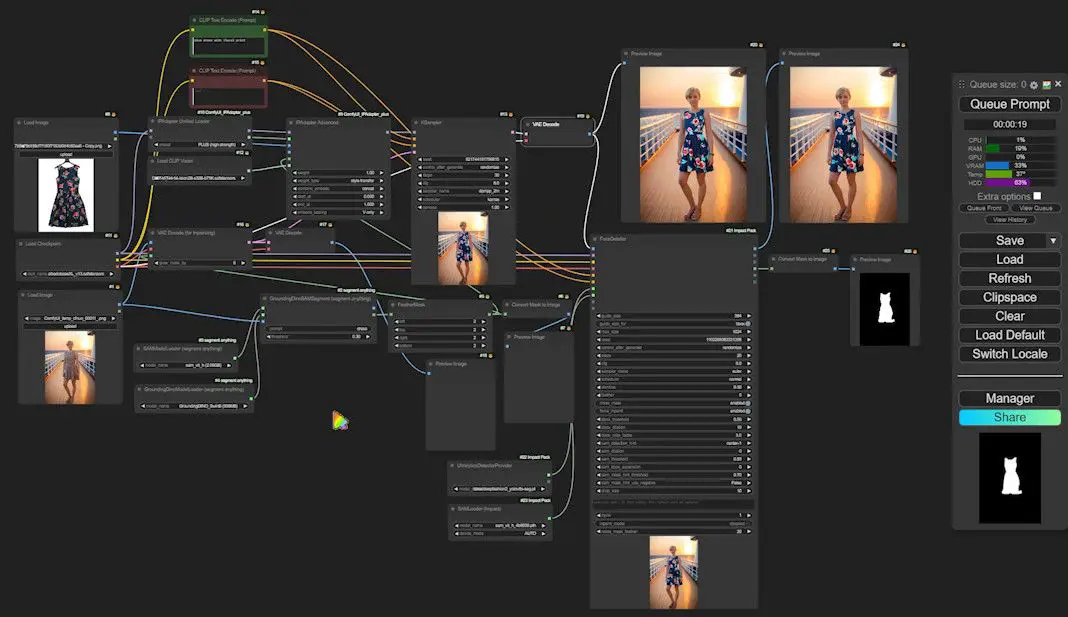
Preparing Your Workflow
Ensure you’ve downloaded and imported my workflow into your ComfyUI.

If you encounter issues like nodes appearing as red blocks or a popup indicating a missing node, follow these steps to rectify:
1️⃣ Update ComfyUI: Start by updating your ComfyUI to prevent compatibility issues with older versions of IP-Adapter.
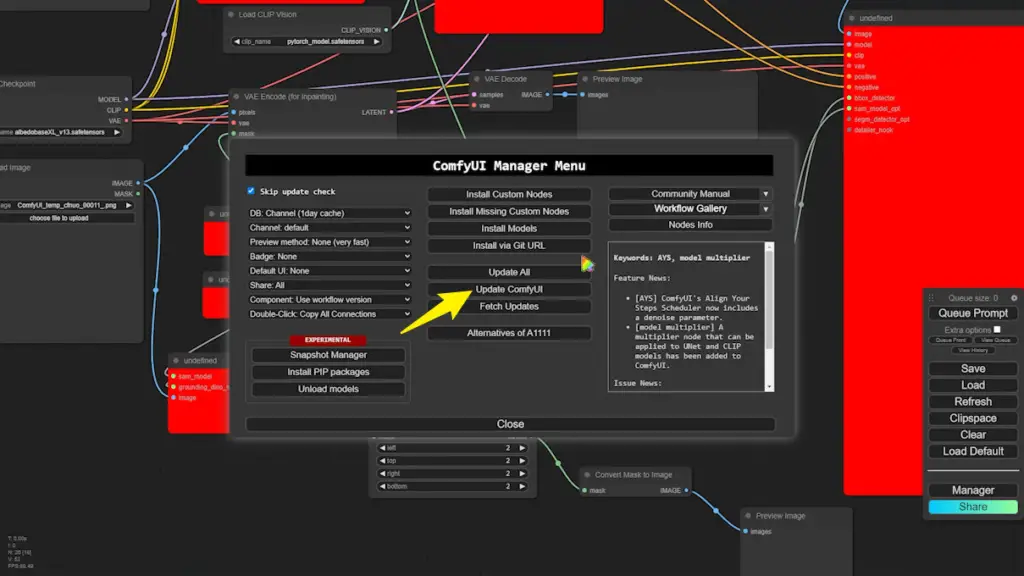
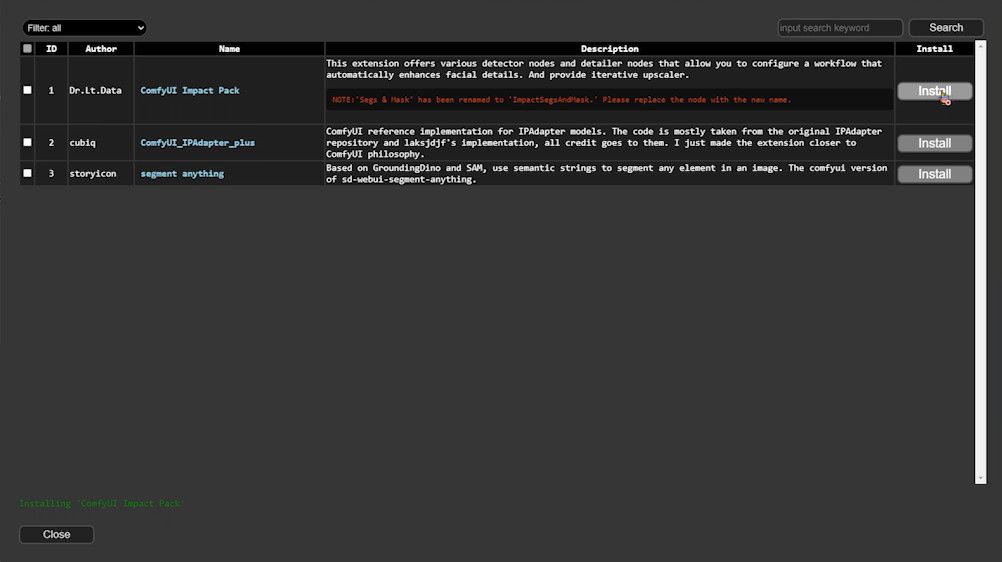
2️⃣ Install Missing Nodes: Access the ComfyUI Manager, select “Install missing nodes,” and install these nodes:
- ComfyUI Impact Pack
- ComfyUI IPAdapter Plus
- Segment Anything

3️⃣ Restart ComfyUI: Post installation, hit the Restart button at the bottom. If any node still appears red, simply refresh the webpage.
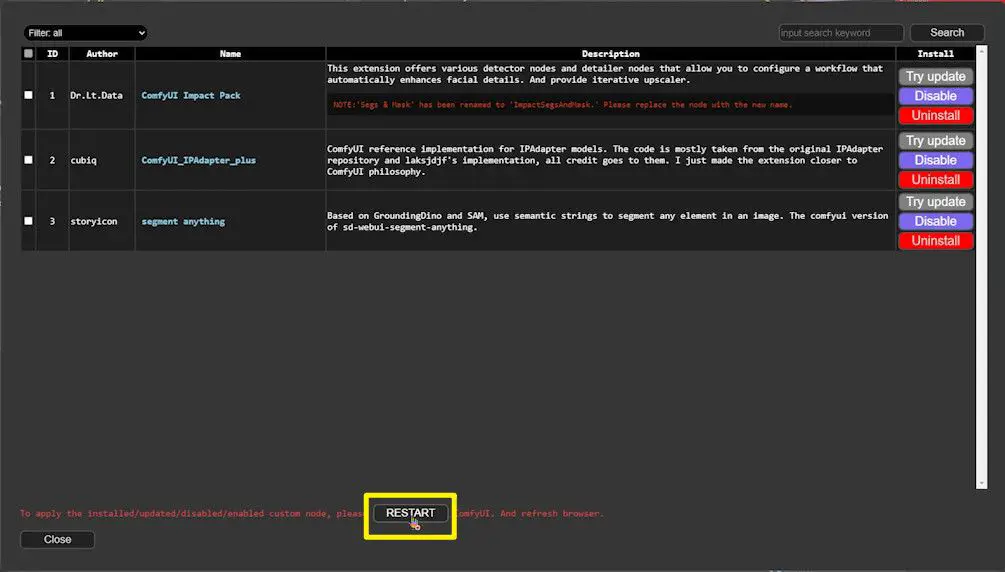
Image Importation and Preparation
Maximize your workflow’s efficiency by meticulously setting up each step in ComfyUI. Let’s start with image preparation.
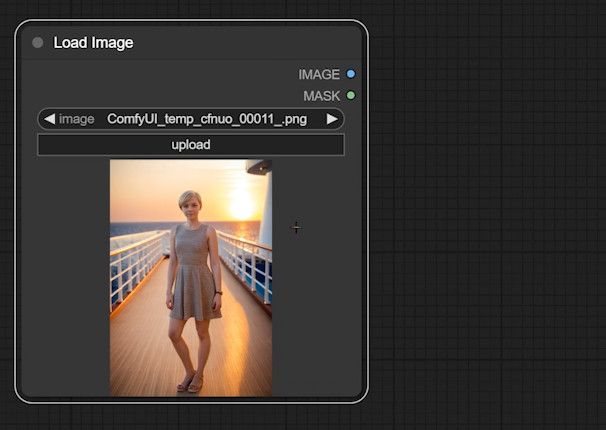
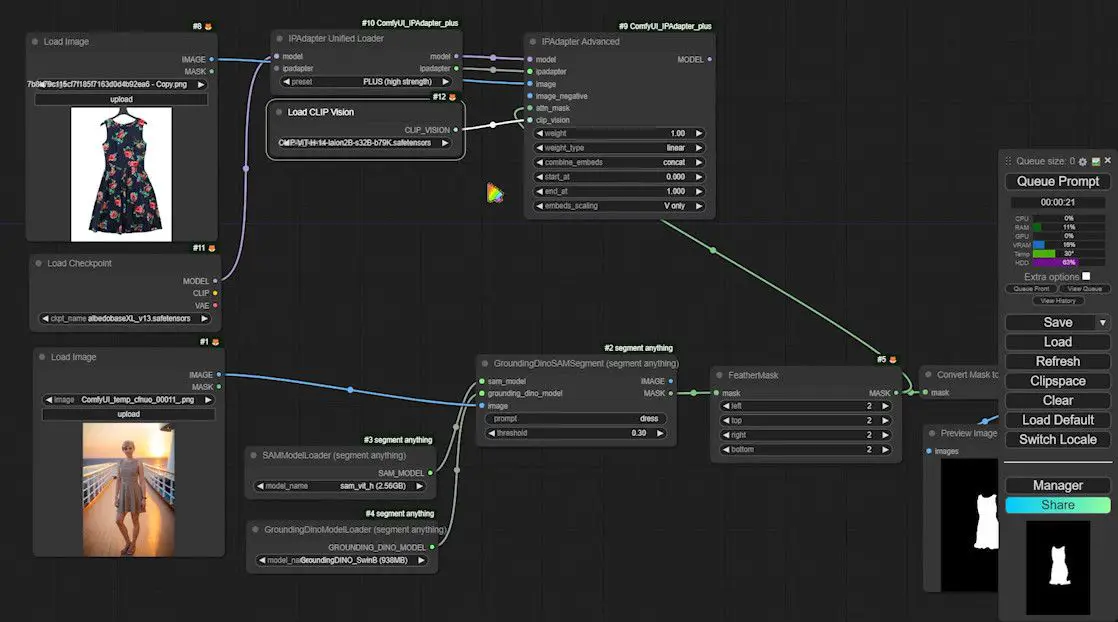
Step 1: Load Image
- Access ComfyUI Interface: Navigate to the main interface.
- Import Load Image Node: Search for
load, select, and import theLoad Imagenode. - Upload a Portrait: Use the
uploadbutton to add a portrait from your local files.
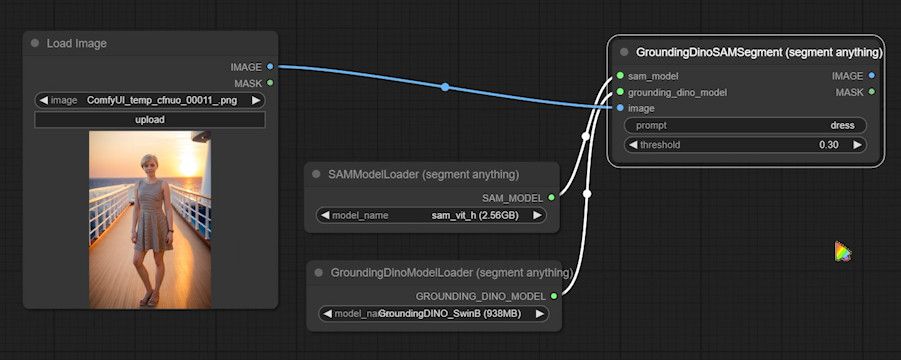
Step 2: Create Outfit Masks
- Import Semantic Segmentation Node: Type
groundingin the search, select, and import theGroundingDinoSAMSegmentnode. - Load SAM Model: Search for
sammodel, selectSAMModelLoader, and connect both nodes. - Configure the Model: Adjust settings in the model popup, specifying the model based on your system’s capabilities.
- Connect Image Input: Link the
Load Imagenode output to theGroundingDinoSAMSegmentinput.
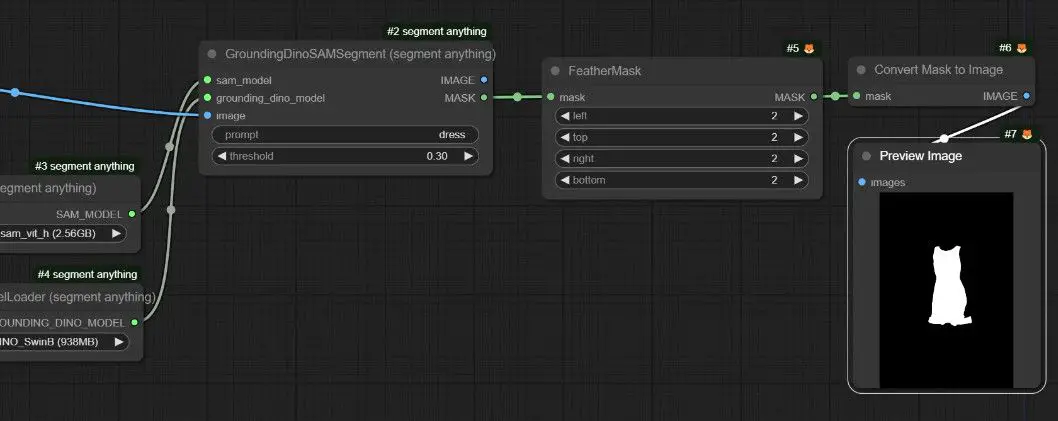
Step 3: Mask Refinement and Preview
- FeatherMask Processing: Import
FeatherMaskby searching forfeather, and connect it to refine the edges. - Convert Mask to Image: Search and import
Convert Mask to Imageto visualize the mask effect. - Generate and View Preview Image: Connect
PreviewImagenode to view the mask that will be used in the outfit swapping.
Configuring the IP-Adapter
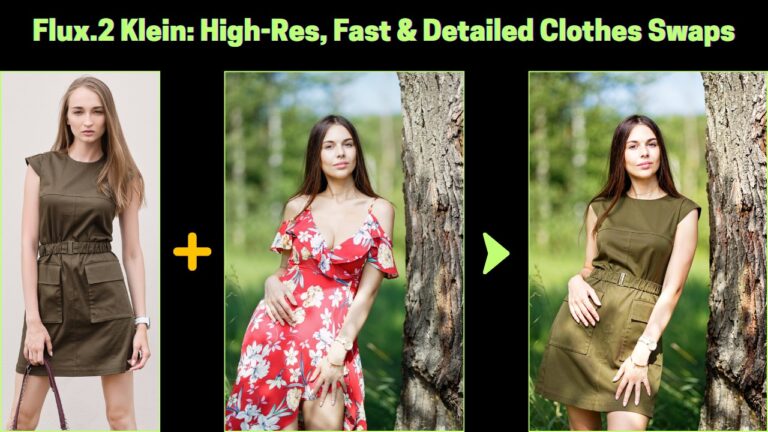
This section will guide you step-by-step on how to construct the IP-Adapter module to effectively perform outfit swapping using an image of a skirt. We’ll cover everything from installing necessary models to connecting various nodes, ensuring a seamless fit swapping process.
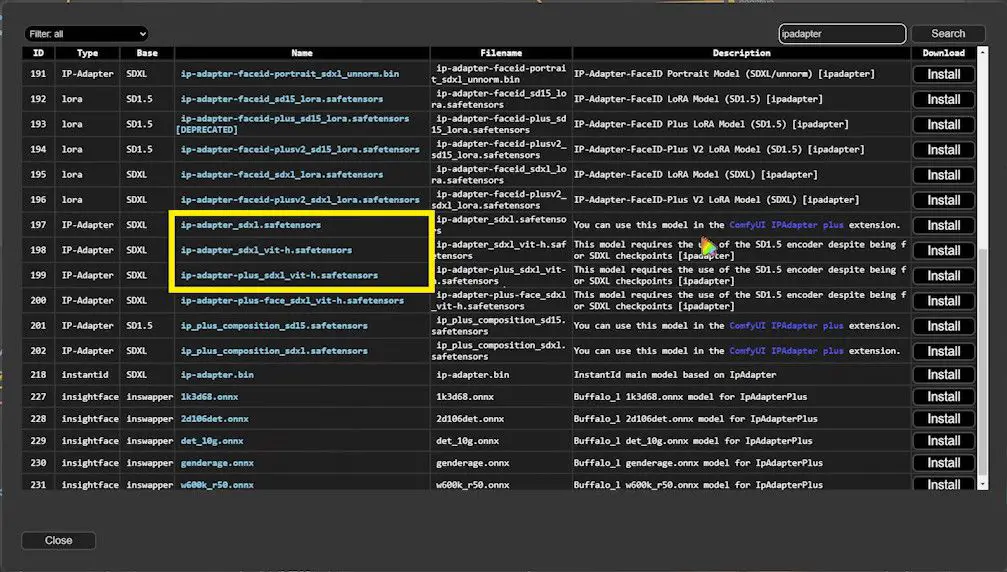
Install the Necessary Models
- Open the ComfyUI Manager: Navigate to the Manager screen.
- Install the IP-Adapter Model: Click on the “Install Models” button, search for “ipadapter”, and install the three models that include “sdxl” in their names.
- Close the Manager and Refresh the Interface: After the models are installed, close the manager and refresh the main interface to update the settings.
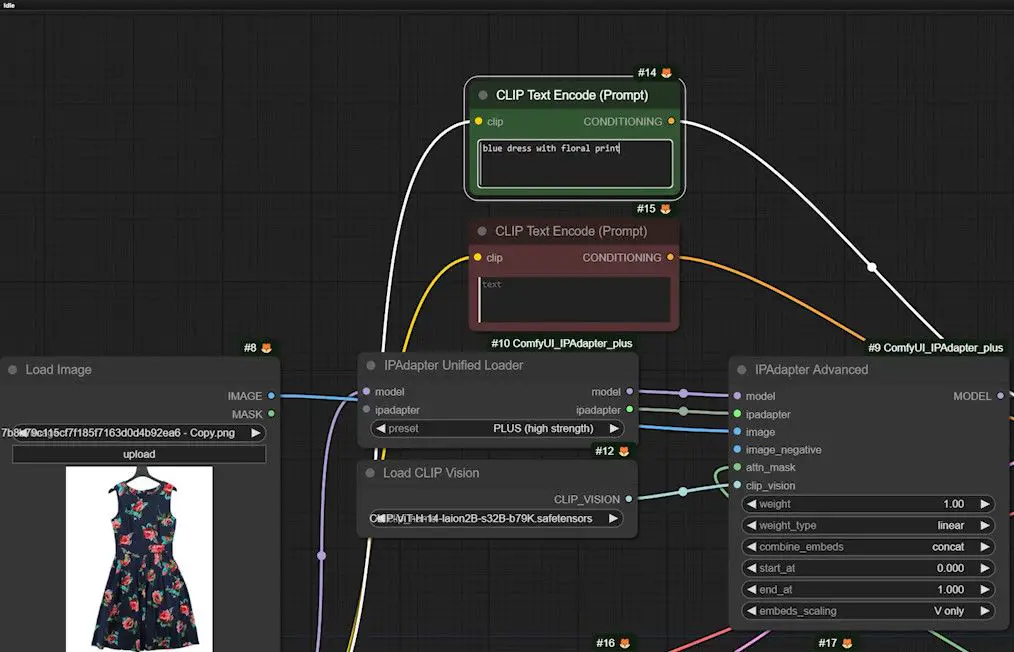
Import the Outfit Image
Following the same process as loading a person image, search for and import the Load Image node, then upload the desired outfit image.
Setting Up the IP-Adapter
- Import the IP-Adapter Node: Search for and import the
IPAdapter Advancednode. - Import Model Loader: Search for
unified, import theIPAdapter Unified Loader, and select thePLUSpreset. - Connect the CheckpointLoader: Import and connect the CheckpointLoader to the IP-Adapter Model Loader, and select the SDXL model.
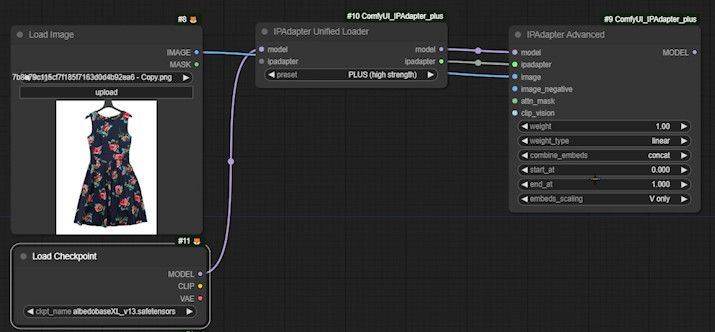
Configuring the Attention Mask and CLIP Model
- Connect the Mask: Connect the
MASKoutput port of theFeatherMaskto theattn_maskinput of theIPAdapter Advanced. This step ensures the IP-Adapter focuses specifically on the outfit area. - Import the CLIP Vision Loader: Drag the
CLIP Vision Loaderfrom ComfyUI’s node library. - Install the CLIP Model:
- Open the ComfyUI Manager if the desired CLIP model is not already installed.
- Search for
clip, find the model containing the termlaion2B, and install it. These models are optimized for various visual tasks and selecting the right one can significantly enhance the process.
- Refresh the Interface: After installation, refresh the main interface to ensure the newly installed model is recognized and usable by the Loader.
- Select the Right Model: In the CLIP Vision Loader, choose a model that ends with
b79k, which often indicates superior performance on specific tasks.
Setting Up KSampler with the CLIP Text Encoder
- Configure the KSampler: Attach a basic version of the KSampler to the model output port of the IP-Adapter node. The KSampler adjusts specific image areas based on model instructions.
- Connecting the CLIP Text Encoder:
- Drag two “CLIP Text Encoders” from the “positive” and “negative” inputs of the KSampler, color-coding them for distinction.
- Connect these encoders to the “Load Checkpoint”. This connection is crucial for enabling the text encoder to process the relevant text cues, thereby influencing image generation.
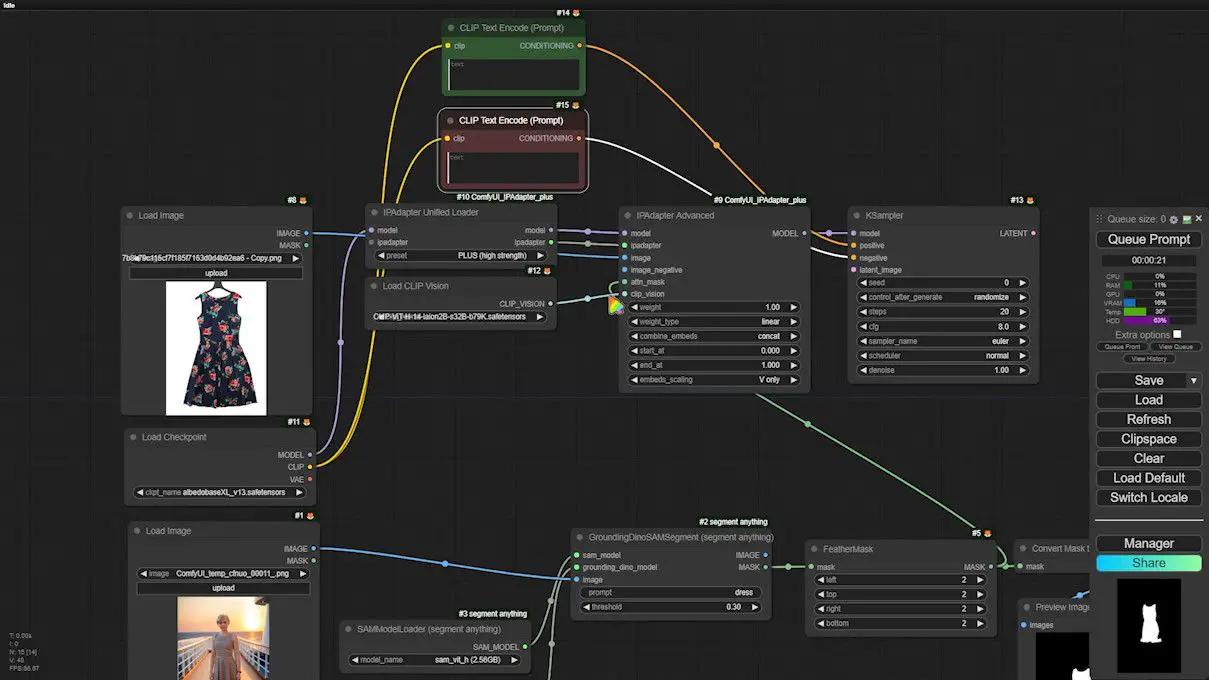
Configuring the VAE Encoder and Decoder
- Set Up the VAE Encoder:
- Drag the “VAE encoder for inpainting” from the output of the “latent_image”.
- Connect the “pixels” port of this encoder to “Load Image”, the “vae” to “Load Checkpoint”, and the “mask” to “FeatherMask”. This setup informs the encoder which parts need denoising based on the generated masks.
- Activate the VAE Decoder:
- Attach the VAE decoder to the “Latent” port.
- Connect the “vae” port to the “Load Checkpoint” for accurate image parsing and reconstruction.
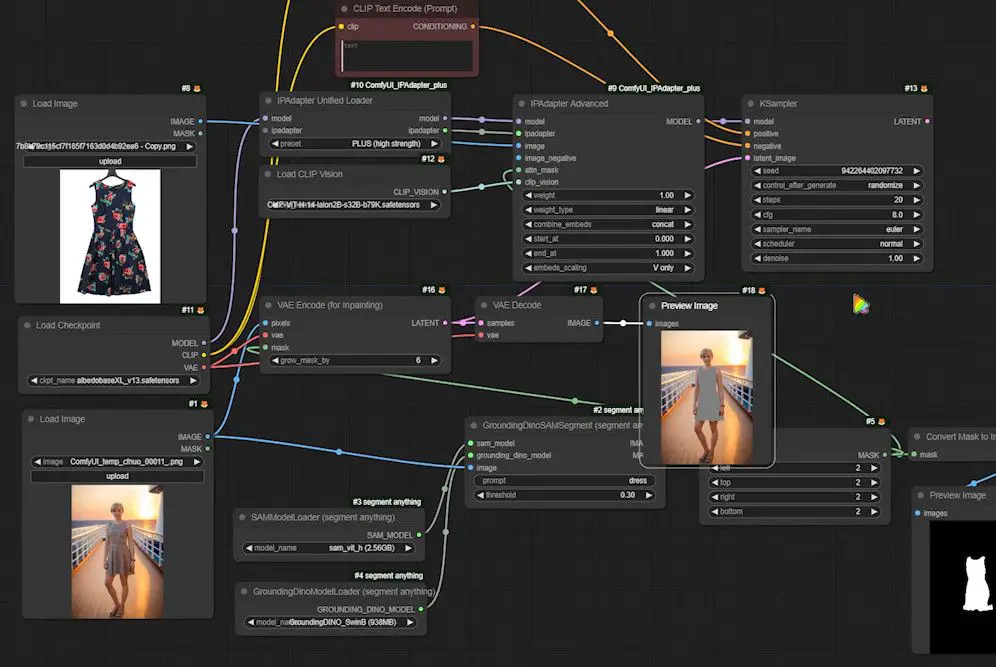
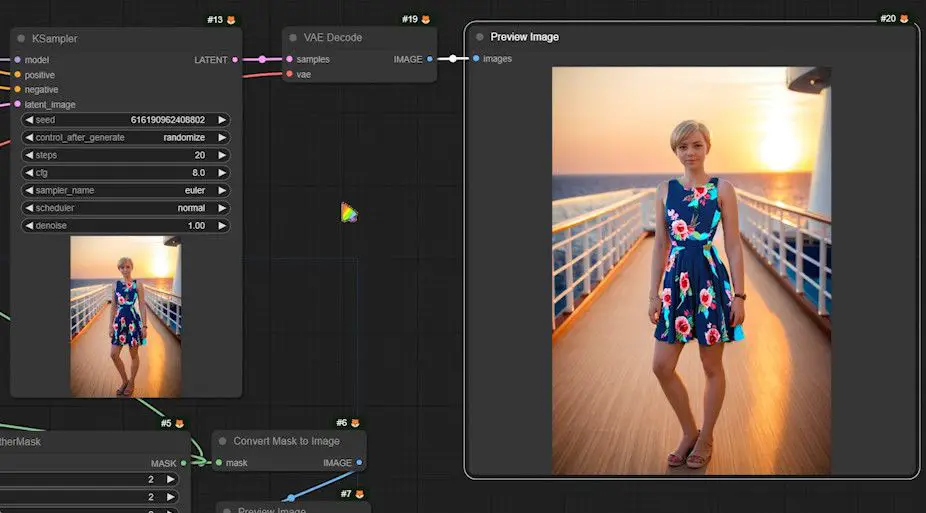
Refining the VAE Decoding Process
- Attach the “VAE Decode” node to the “LATENT” output of the KSampler.
- Link the “vae” of the decoder to the “Load Checkpoint” to load and apply model parameters effectively.
- Use the “Preview Image” node connected to the decoder’s image port to generate and view the final image.

Applying a Prompt for Fine-Grained Control
- Add a Prompt: Insert a description, such as “blue dress with floral print,” into the IP-Adapter settings. This detail helps the model accurately interpret and implement the desired outfit style and pattern.
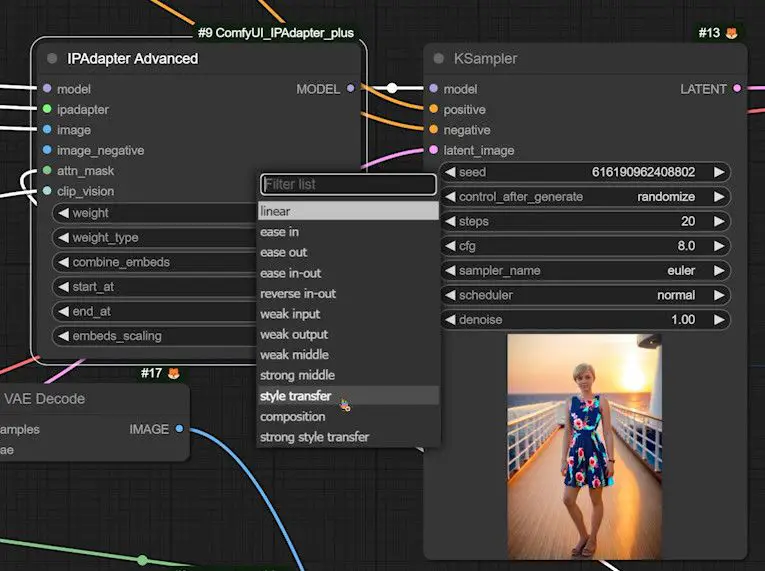
Evaluating and Adjusting Weight Types
1️⃣ Initial Evaluation:
- Produce and examine the image, focusing on the visual quality of the skirt. Adjust the weight type if the skirt appears overly flat or lacks dimensionality.
2️⃣ Adjust Weight Type:
- Style Transfer: Opt for “Style Transfer” to re-generate the image and enhance its dimensionality.
- Weak Input: If the skirt still lacks depth, select “Weak Input”. This setting often highlights pattern details more distinctly, though it may reduce dimensionality.
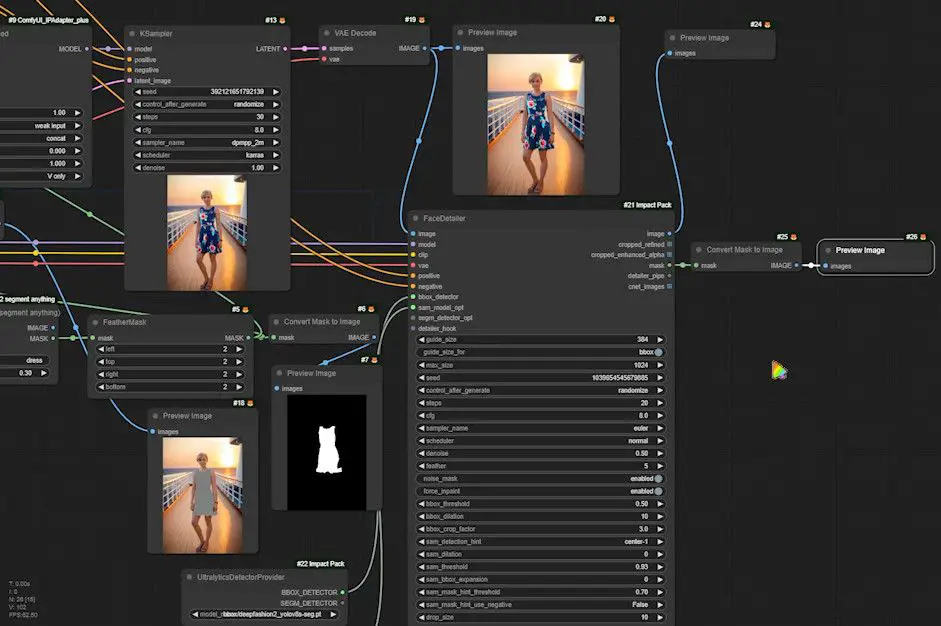
Introducing FaceDetailer to Enhance Outfit Details
To elevate the quality of outfit swapping and enhance the dimensionality and detail of the attire, we introduce the “FaceDetailer” node along with an area detection feature specifically for outfits.
This section will guide you through installing necessary models, configuring the nodes, and evaluating the optimization effect for improved results.
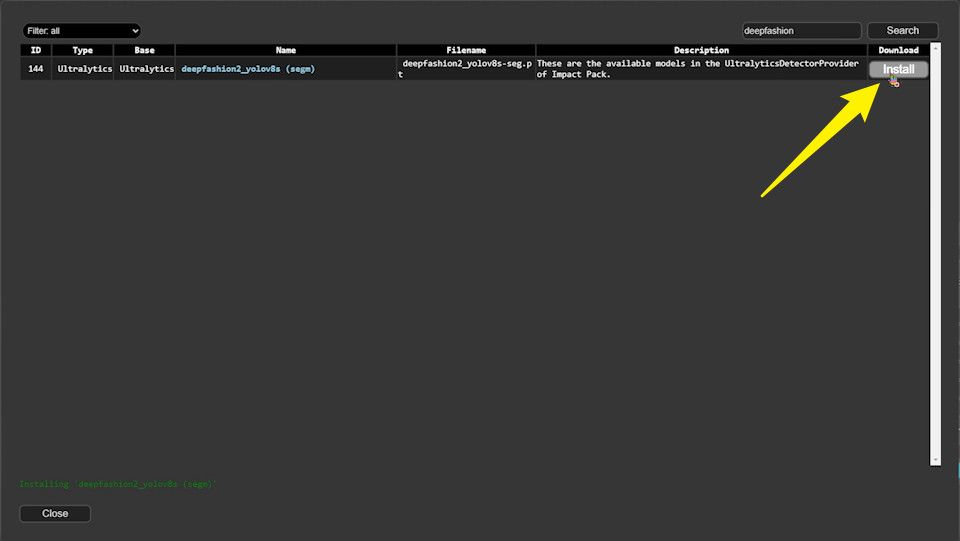
Installing and Configuring DeepFashion Models
Start by opening the ComfyUI Manager, search for, and install the “DeepFashion” model, which is optimized for detailed image processing related to outfits.
Configuring the FaceDetailer Node
- Import the FaceDetailer Node:
- Import the “FaceDetailer” node, commonly used for enhancing facial details, but equally effective for refining outfit details.
- Connect Image and Checkpoint:
- Link the image port of “FaceDetailer” to the output of the “VAE Decoder” to utilize the previously generated image.
- Connect the “Load Checkpoint” to import the necessary model parameters.
- Configuring the CLIP Text Encoder:
- Optionally, reuse the CLIP text encoder from the KSampler setup, or introduce a new encoder dedicated to “FaceDetailer” for tailored prompt optimization, enhancing the visual quality of the outfit details.
Setting Up Outfit Region Detection
- Import and Configure the Detector:
- Implement the “UltralysticsDetectorProvider” node to pinpoint outfit regions, ensuring precise application of image enhancements.
- Set “deepfashion” as the source in the model connection for optimal detection accuracy.
- Configure the SAM Model Loader:
- Attach the “SAMLoader(Impact)” from the “sam_model_opt” port, selecting the model configuration that best matches your system’s capabilities.
- Import and Set Up the Image Preview Node:
- Add the preview image node to directly visualize the effects post-processing.
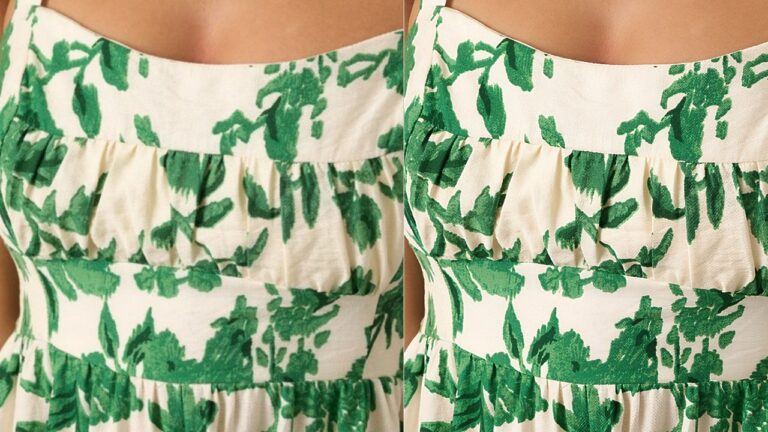
Generate and Compare Images
- Generate a Repaired Image:
- Execute the configuration to produce an image optimized by FaceDetailer.
- Compare the Optimized Results:
- Display the original and optimized images side-by-side to assess improvements in dimensionality and detail, particularly noting enhancements in the floral patterns and texture of the outfit.
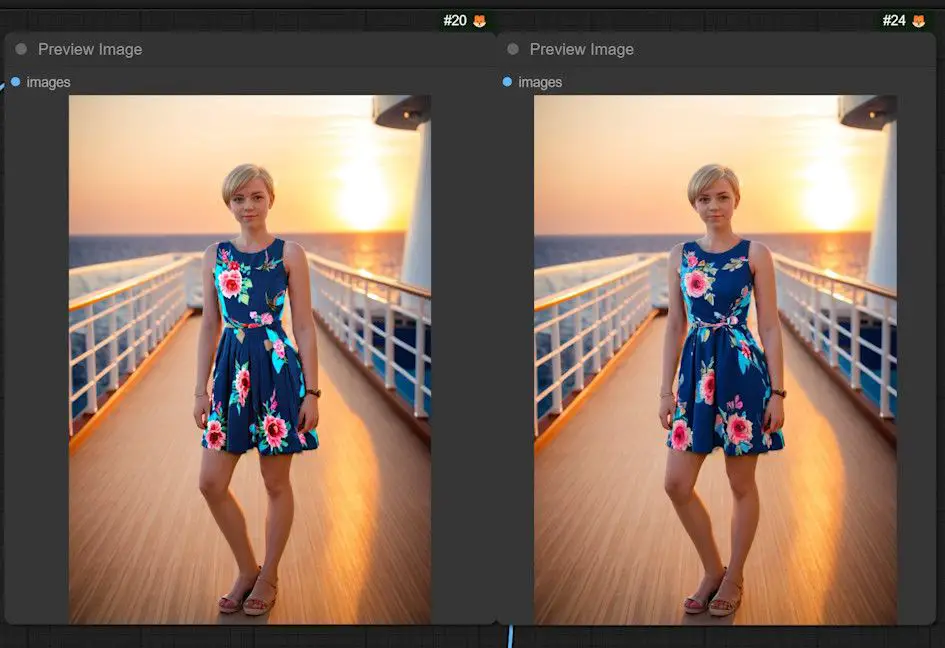
With these enhancements, not only do you address initial shortcomings in the outfit swapping image, but you also significantly boost the outfit’s three-dimensionality and detail, achieving a more realistic and appealing appearance.
Conclusion
Following the outlined steps, you can effectively swap outfits in images with enhanced realism and precision using the advanced capabilities of IP-Adapter.
This workflow not only involves fundamental tasks like image loading and node connections but also extends into complex configurations of sophisticated models and codecs, making the process both comprehensive and instructive. This ensures a robust educational experience while achieving visually striking results.