ComfyUI Workflow: Relight and Blend Subject Flawlessly into Background
In the realm of digital creativity, the ability to seamlessly integrate subjects into new backgrounds is a sought-after skill. Whether it’s for personal projects or professional work, achieving a natural blend between the subject and the background can elevate the quality of your visuals.
In our previous article, we explored a ComfyUI workflow that allowed for AI-generated background swaps. This time, we delve deeper, focusing on a new workflow designed to tackle the challenges of relighting subjects to match existing backgrounds.
Practical Application
Imagine you have an image with a subject that you want to place into a different background.
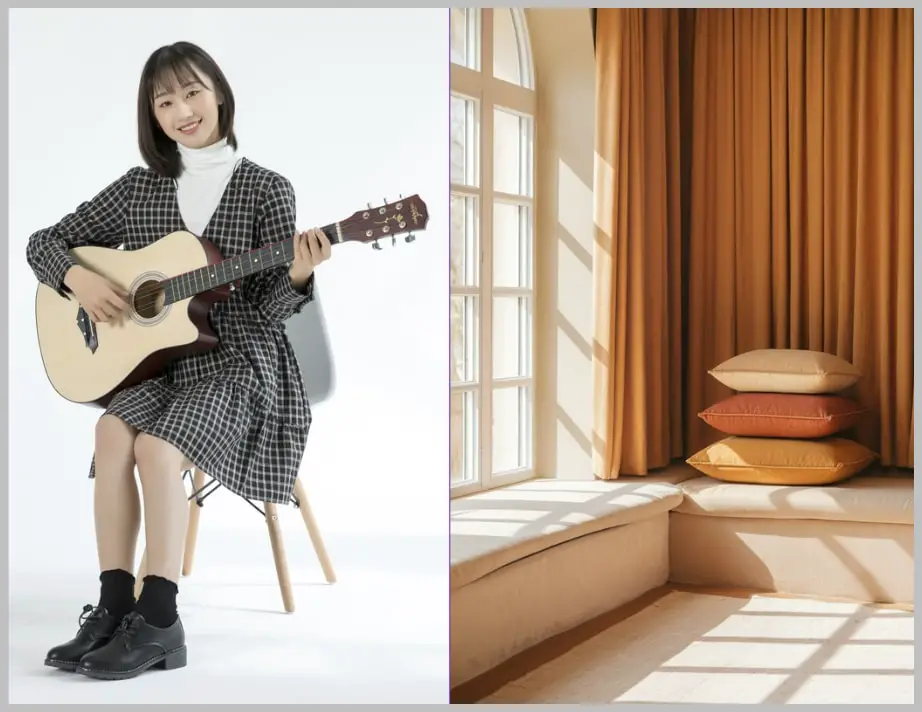
The first step is to remove the existing background. This workflow is versatile enough to handle both simple and complex backgrounds.
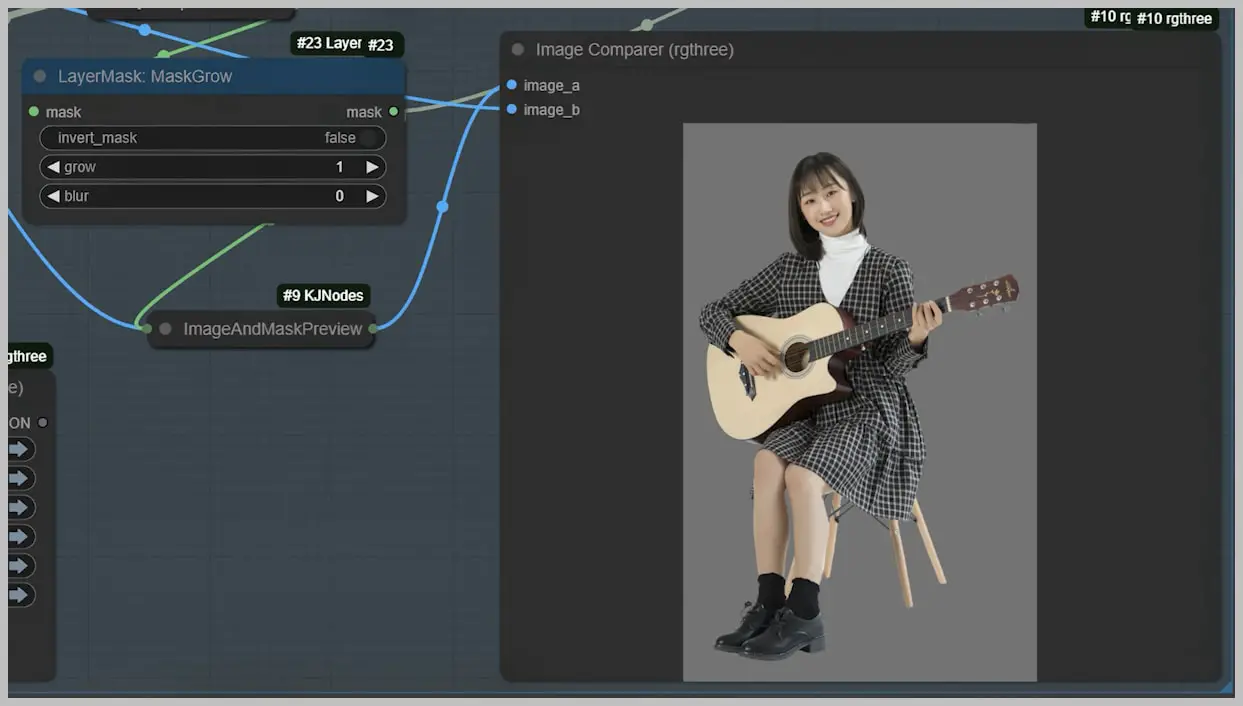
Once the background is removed, the subject is repositioned within the new scene.
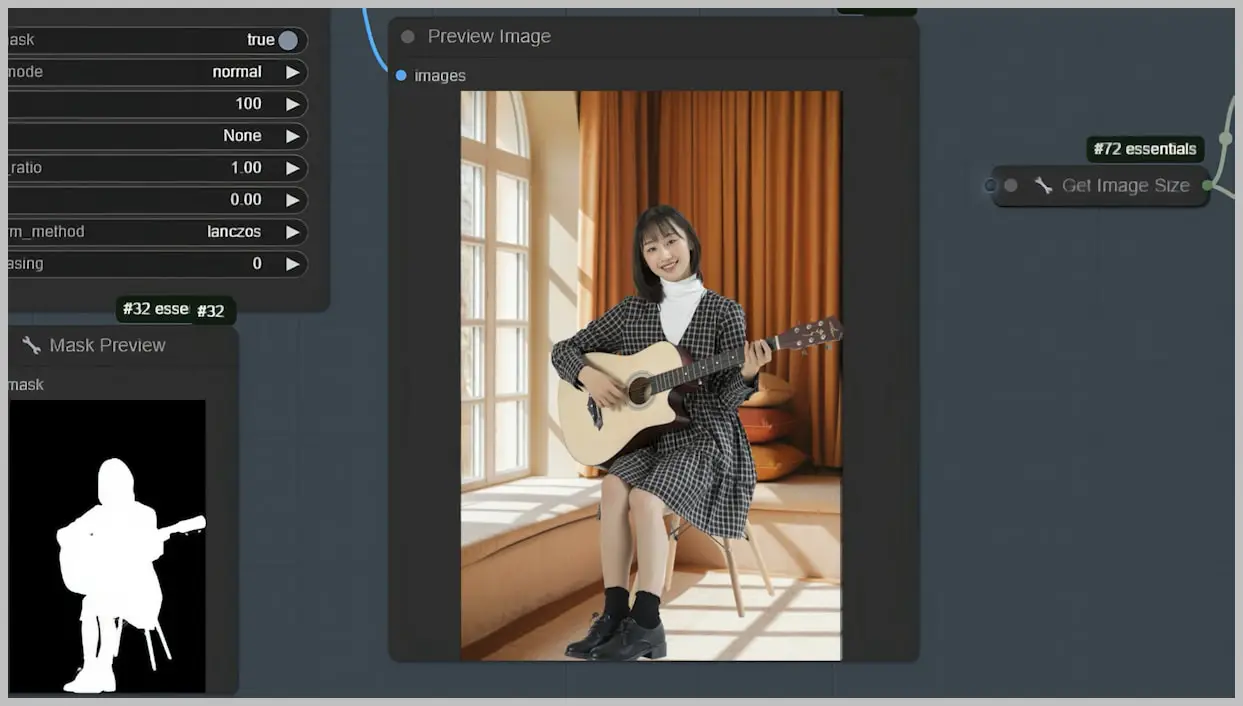
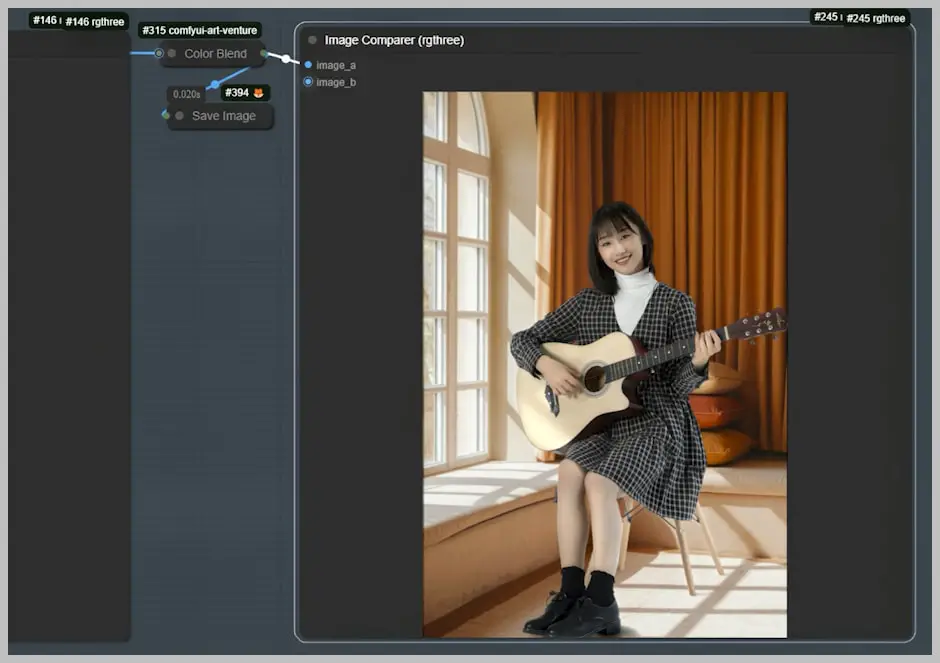
The magic truly happens when we utilize the lightning version of the SDXL model. This model enables us to relight the subject, ensuring that the lighting direction, highlights, and shadows match the new environment.
For instance, if the original lighting came from the right, but the new scene’s lighting is from the left, the SDXL model will adjust the subject’s lighting accordingly. This results in a natural appearance, with shadows and highlights that blend seamlessly with the new background.
This workflow isn’t limited to people; it works beautifully with products too.
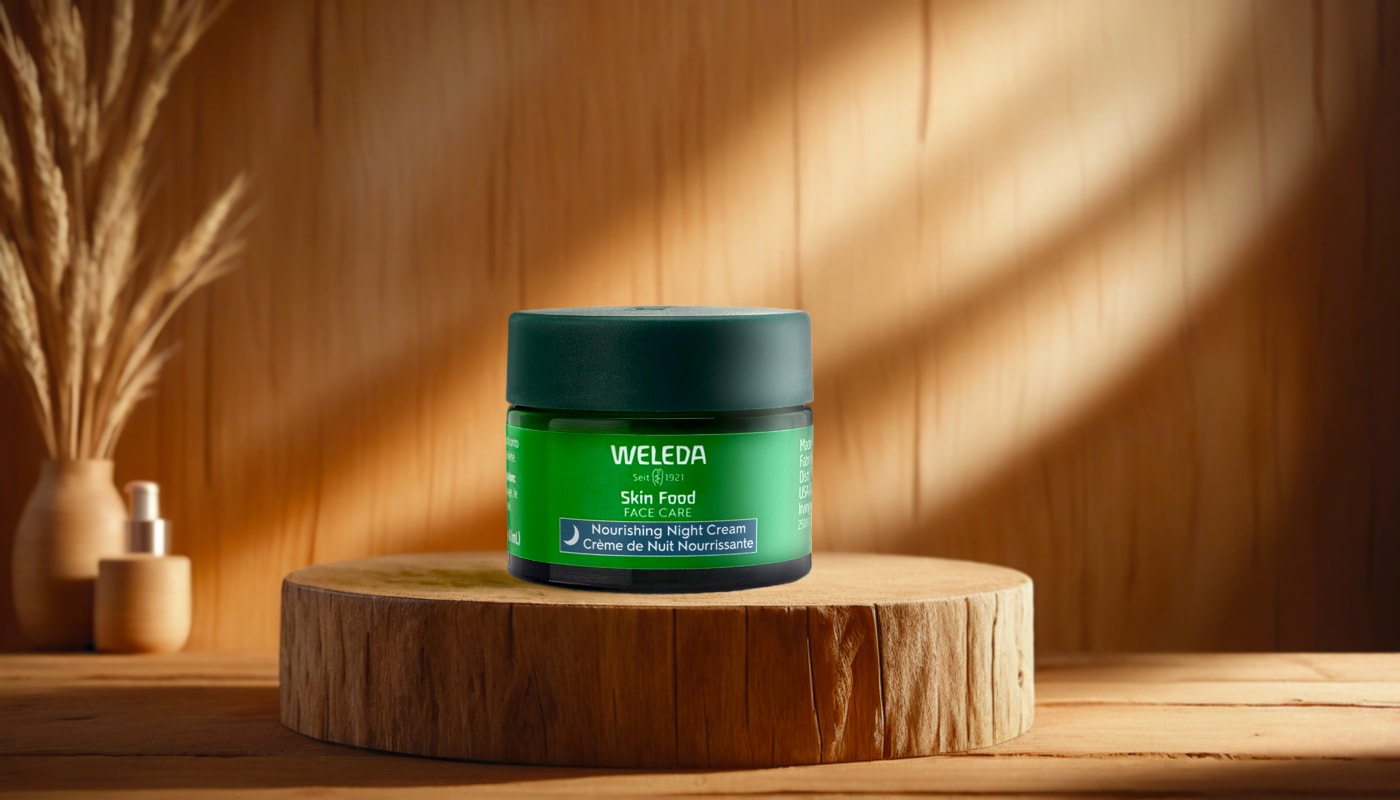
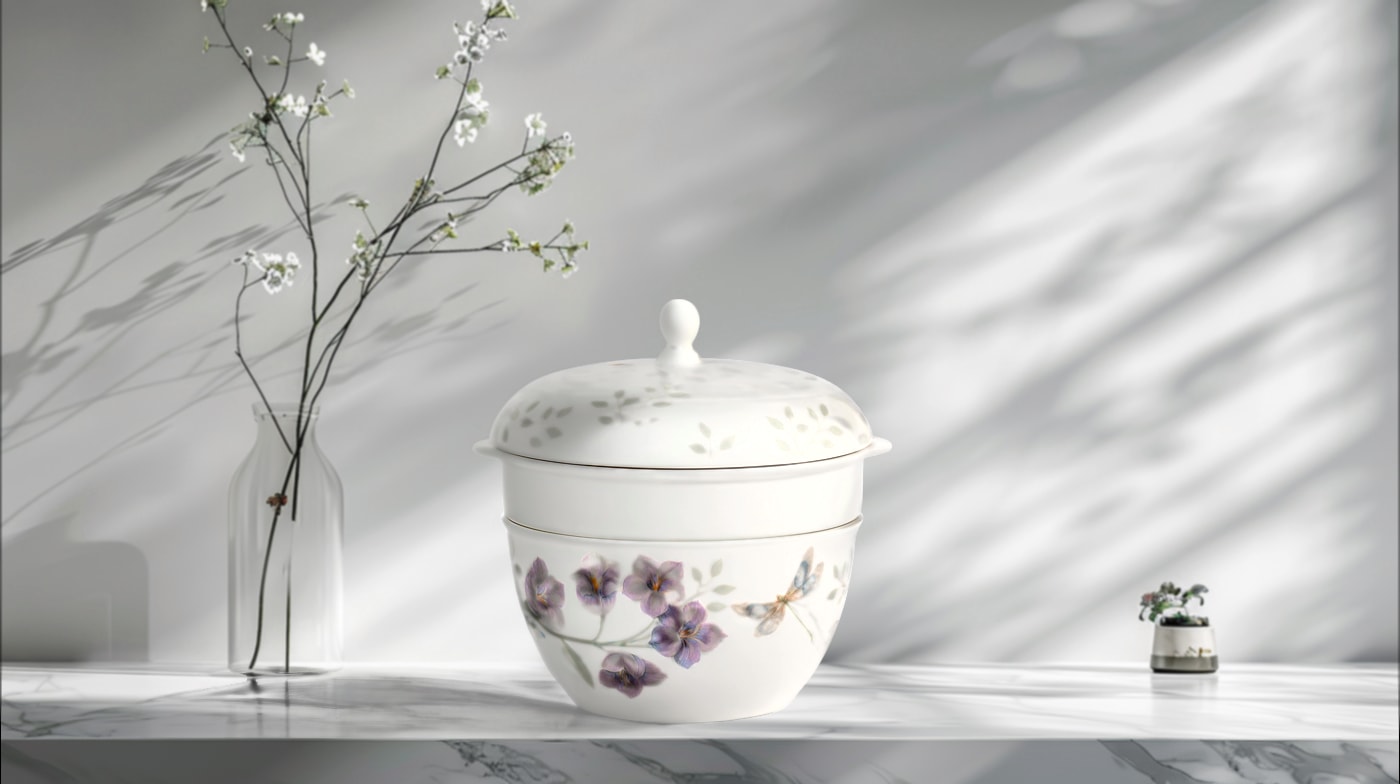
Whether you’re placing a person on a beach or a product in a studio setting, the possibilities are endless.
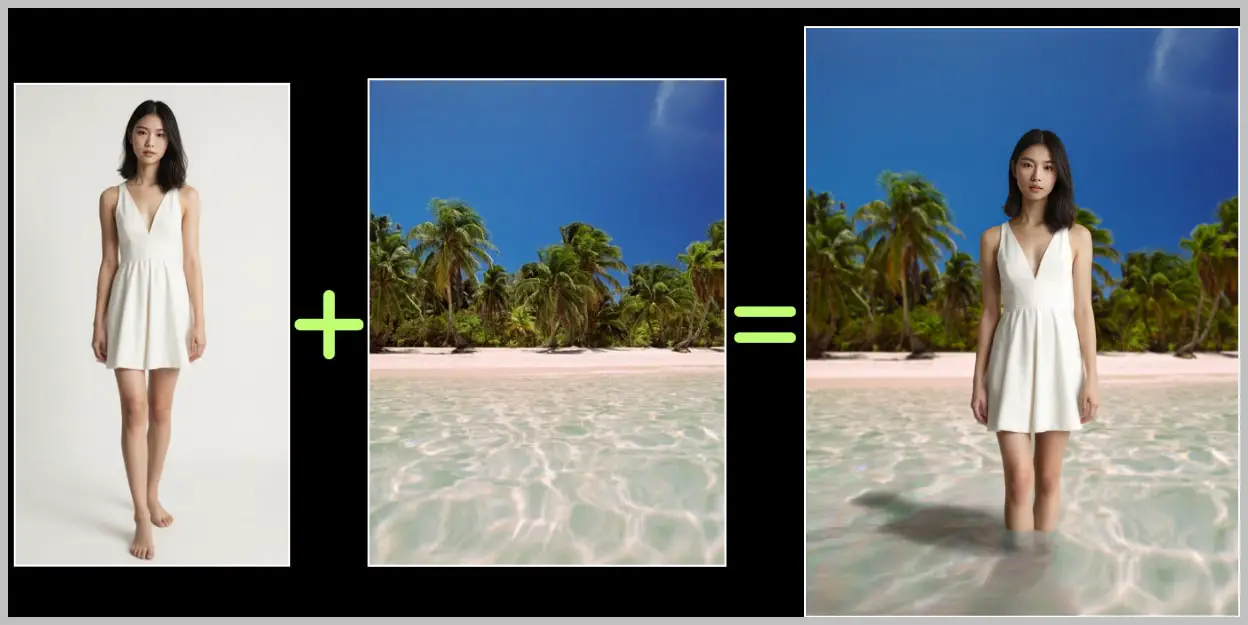
By following this process, you can achieve stunning results that enhance the visual appeal of your projects.
For those who love diving into Stable Diffusion with video content, you’re invited to check out the engaging video tutorial that complements this article:
Gain exclusive access to advanced ComfyUI workflows and resources by joining our community now!
Here’s a mind map illustrating all the premium workflows: https://myaiforce.com/mindmap
Run ComfyUI with Pre-Installed Models and Nodes: https://youtu.be/T4tUheyih5Q
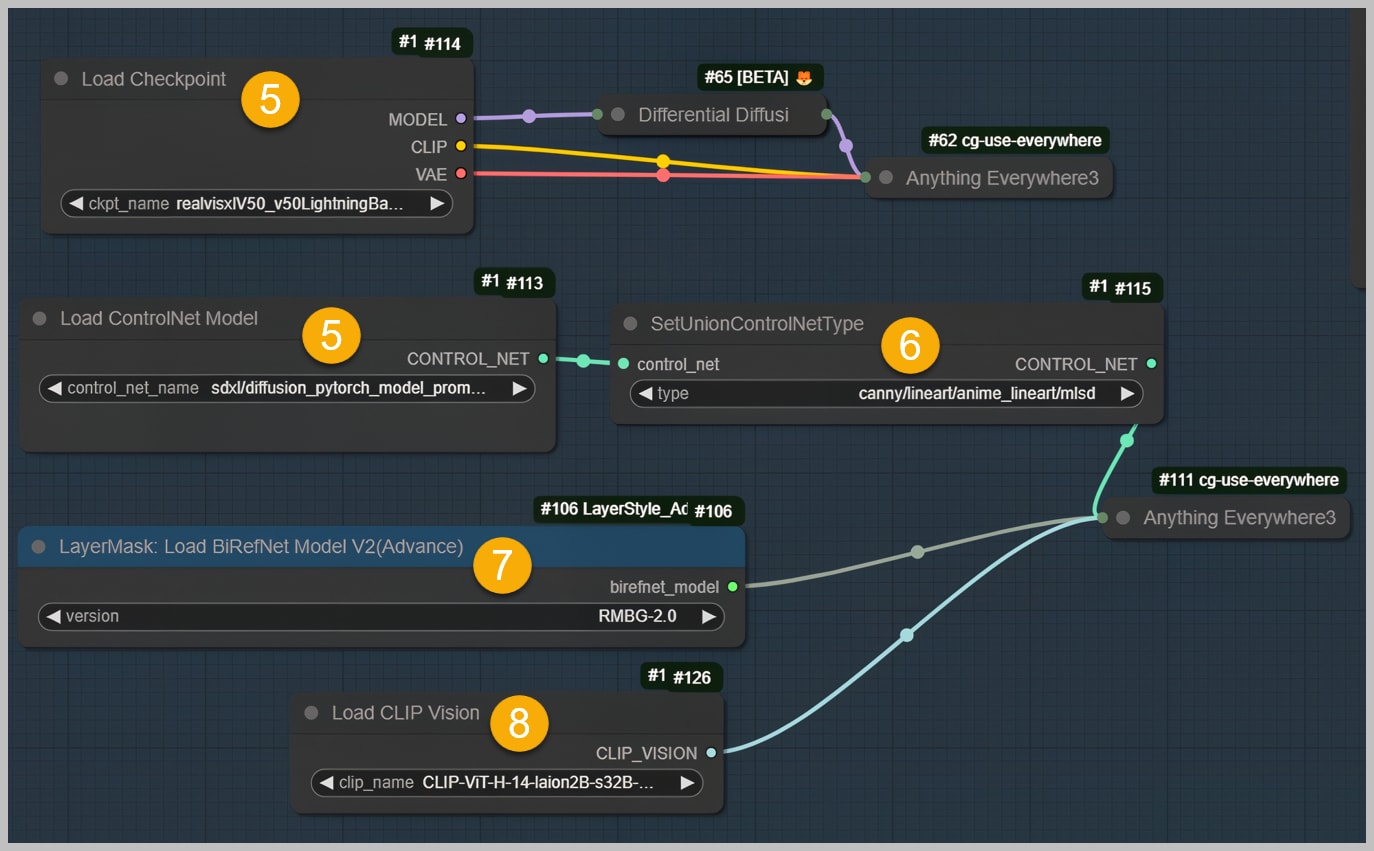
Node Group 1: Loading Models
Now, let me show you how to use this workflow.
In this first node group, our primary focus is to load the necessary models and prepare the images for processing. This step is crucial as it sets the foundation for the entire workflow. Let’s walk through the process:
- Activate the Initial Node Group:
- Begin by activating only the first node group. This will streamline the process by focusing solely on loading the models.
- Running the Workflow:
- Execute the workflow to initiate the model loading process. This step ensures that all required models are ready for use.
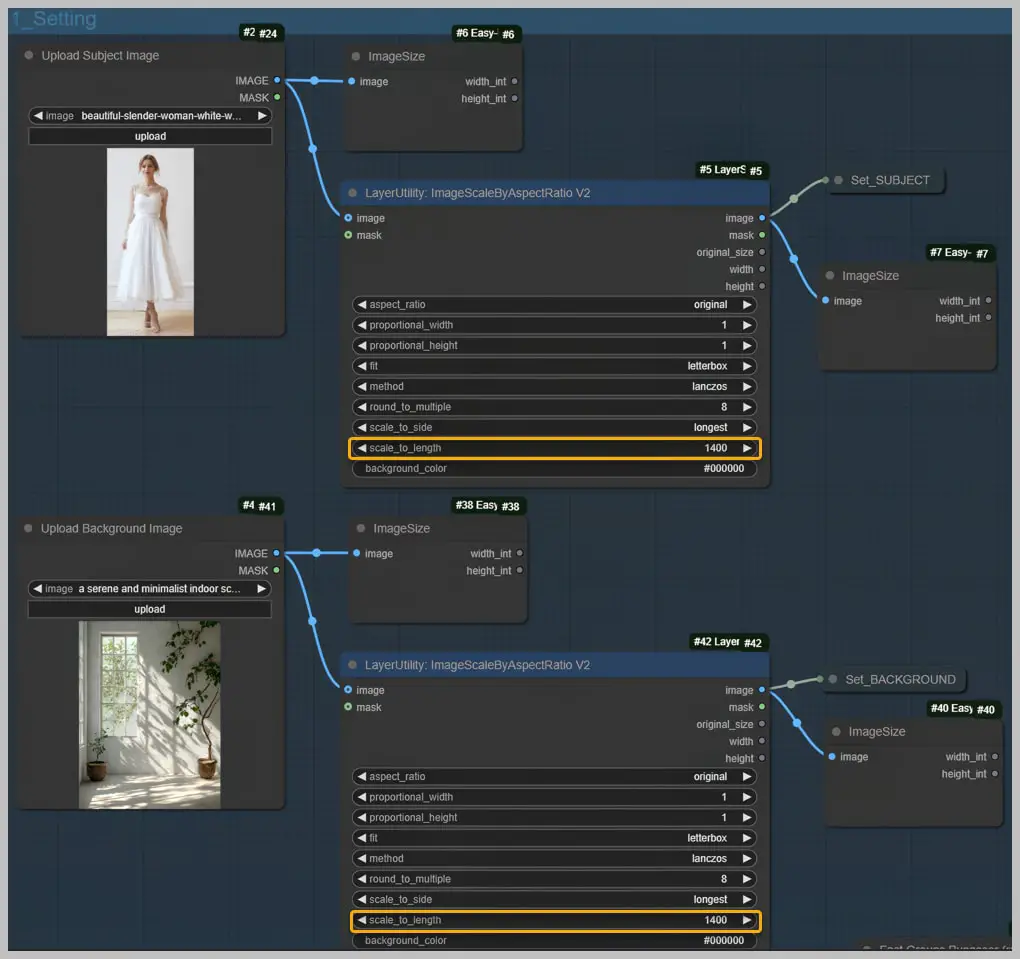
- Upload Subject and Background Images:
- Import both the subject image and the background image into the workflow. These images are the core components you’ll be working with.
- Limit Image Size:
- Utilize the nodes designed to limit image size. By adjusting the “scale_to_length” parameter, you can control the dimensions of the images, ensuring they are appropriately sized for processing.
- Loading Checkpoint and ControlNet Models:
- Load the checkpoint model and the ControlNet model. These models are pivotal in providing structure and control over the image manipulation process.
- Set ControlNet Type:
- Specify the type of ControlNet model you’re using.
- Background Removal with BiRefNet Model:
- Employ the BiRefNet model to remove the background from the subject image. There are two versions of this model available, and while their outputs are generally similar, you can choose the one that best suits your needs.
- Clip Vision Model and IP-Adapter Integration:
- The clip vision model will be integrated with the IP-Adapter in later steps. This combination will enhance the workflow’s ability to process and manipulate images effectively.
Node Group 2: Removing Background
In the second node group, our goal is to effectively remove the background from the subject image. This step is crucial for isolating the subject and preparing it for integration into a new background. Here’s how we achieve this:
- Initiate the Workflow for Background Removal:
- Begin by running the workflow specifically designed to remove the background from the subject image. This node group mirrors the one used in my previous workflow.
- Background Removal Execution:
- Observe the workflow as it precisely removes the background from the subject image. The precision achieved in this step is essential for a clean cut-out, free from unwanted elements.
- Identify and Correct Imperfections:
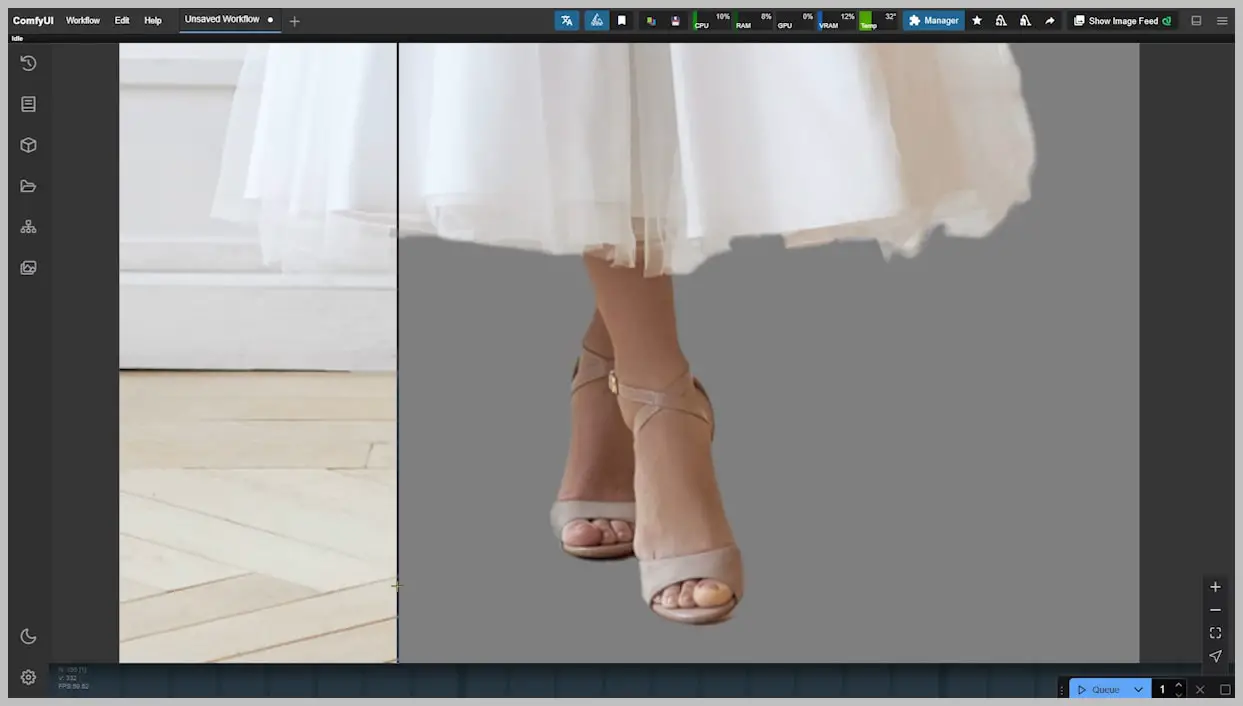
- Upon initial removal, check for any remaining shadows or imperfections, such as those under the subject’s shoes. These minor details can affect the overall quality of the final image.
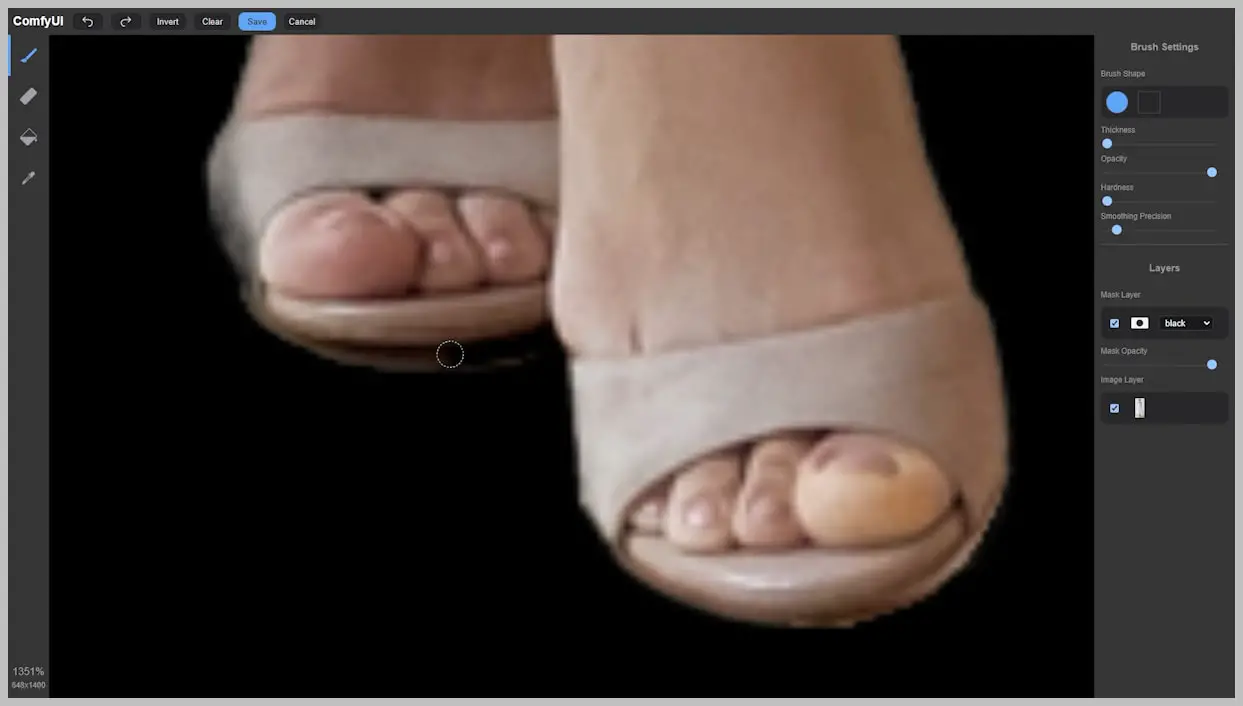
- Adjustments Using the “Preview Bridge” Node:
- Utilize the “Preview Bridge” node to make necessary adjustments. This node allows for fine-tuning, ensuring that any residual shadows or artifacts are effectively eliminated.
- Re-run the Workflow:
- After making the adjustments, run the workflow again to finalize the background removal process.
- Completion of Background Removal:
- With the background successfully removed, the subject image is now isolated and prepared for integration into a new scene.
Node Group 3: Repositioning the Subject, Generating Prompt, and Canny Edge Image
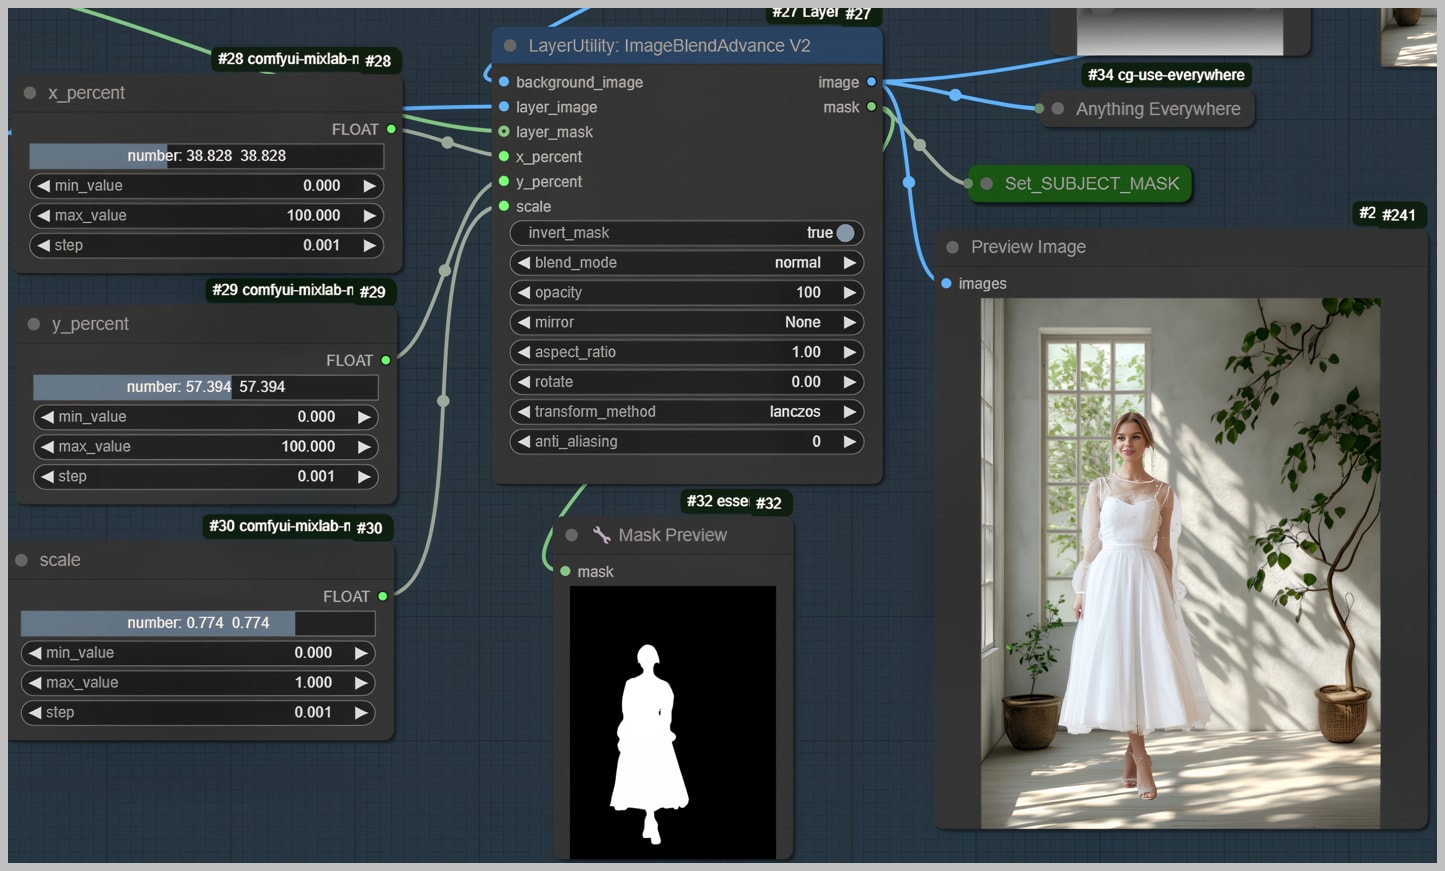
In this node group, we focus on positioning the subject within the new background and refining the image’s overall appearance. Let’s explore the steps involved:
- Positioning the Subject:
- Begin by using this node group to adjust the subject’s position within the background. This step ensures that the subject aligns seamlessly with the new scene.
- Background Blurring with Depth Map:
- Notice that the background has been slightly blurred. This effect is achieved using the “ProPostDepthMapBlur” node, which applies a blur based on a depth map. The further an object is in space, the blurrier it appears, adding depth to the image.
- The depth map is created using the “Depth Anything” node. This node is crucial for determining how the blur is applied across different areas of the image.
- Focus on the “blur_strength” parameter to control the intensity of the blur. Adjusting this setting allows you to fine-tune the depth effect to suit your artistic vision.

- Automatic Prompt Generation:
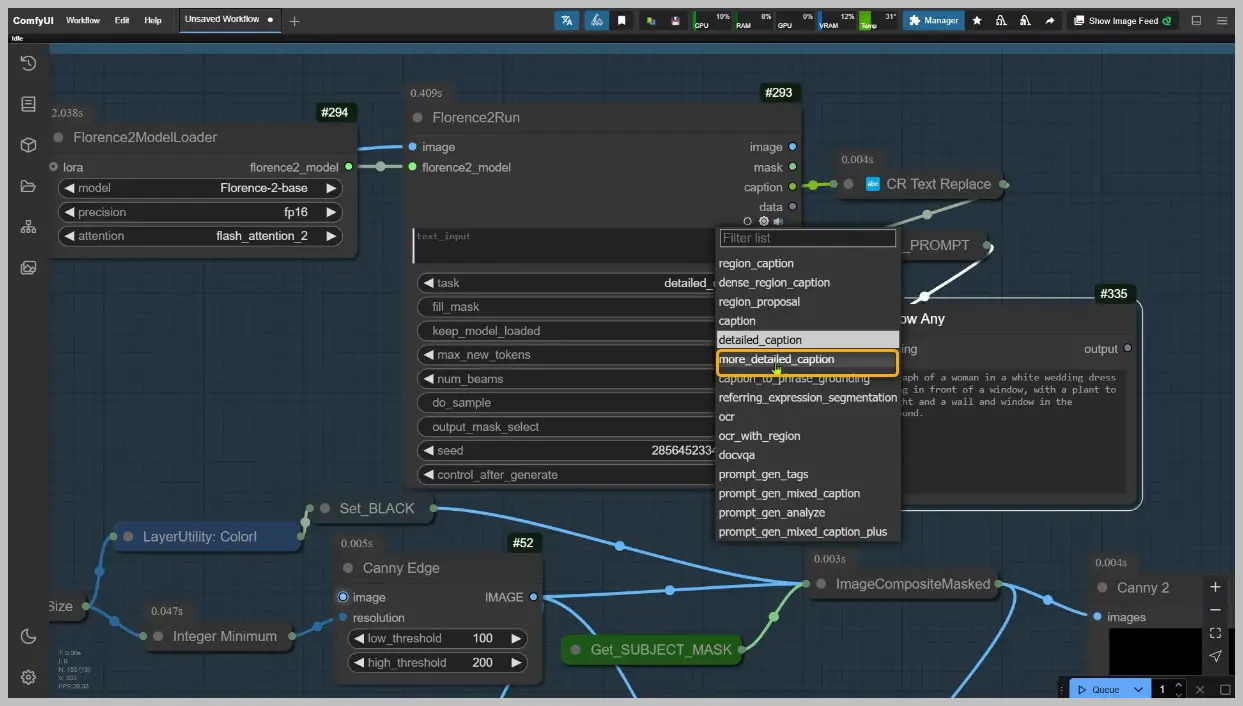
- The “Florence2Run” nodes are employed to generate prompts automatically. If a more detailed prompt is desired, adjust the “task” parameter to “more_detailed_caption,” resulting in a longer, more descriptive prompt.
- Canny Edge Image Creation:
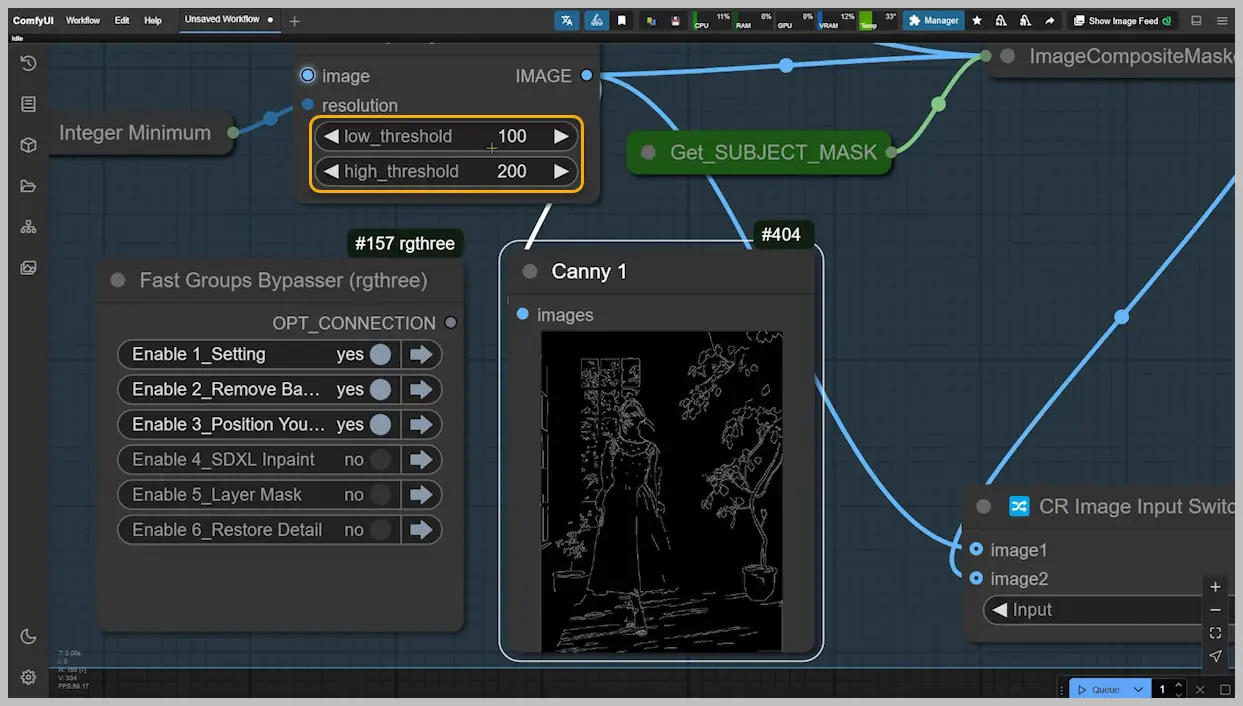
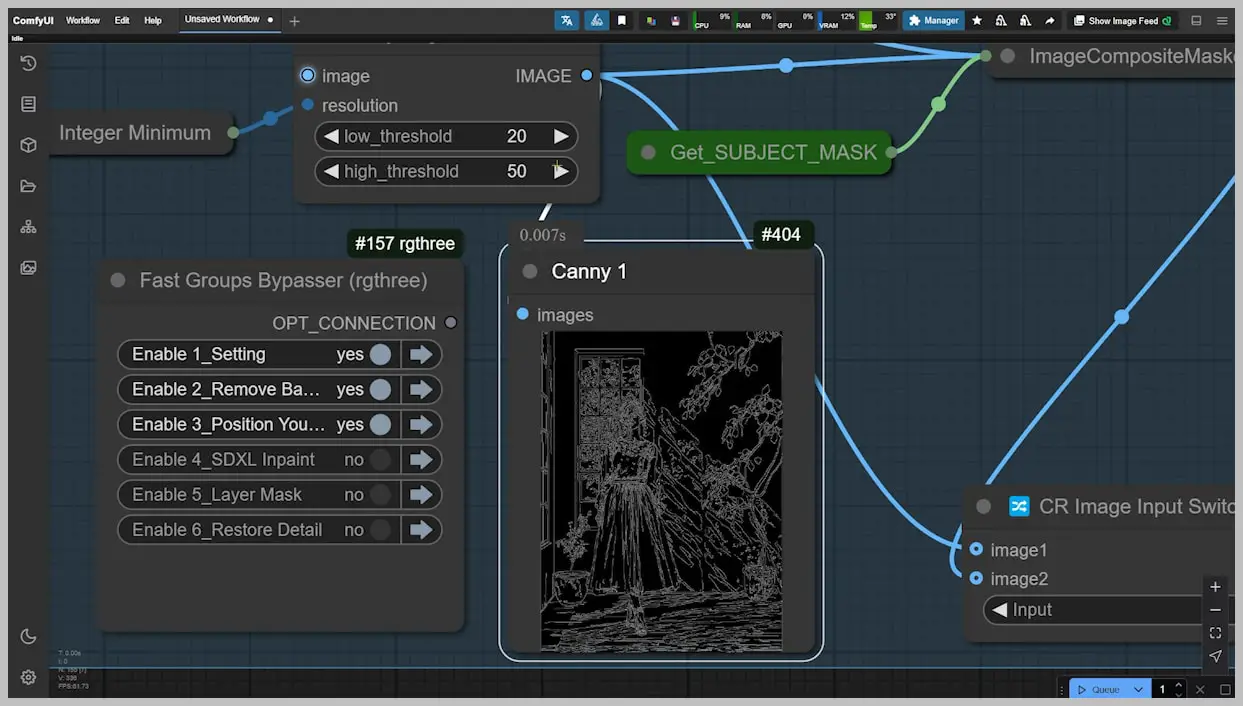
- Generate Canny Edge images to aid in controlling the outline of the subject. Lower the threshold parameters until the outline becomes distinct and clear.
- Selecting Canny Edge Versions:
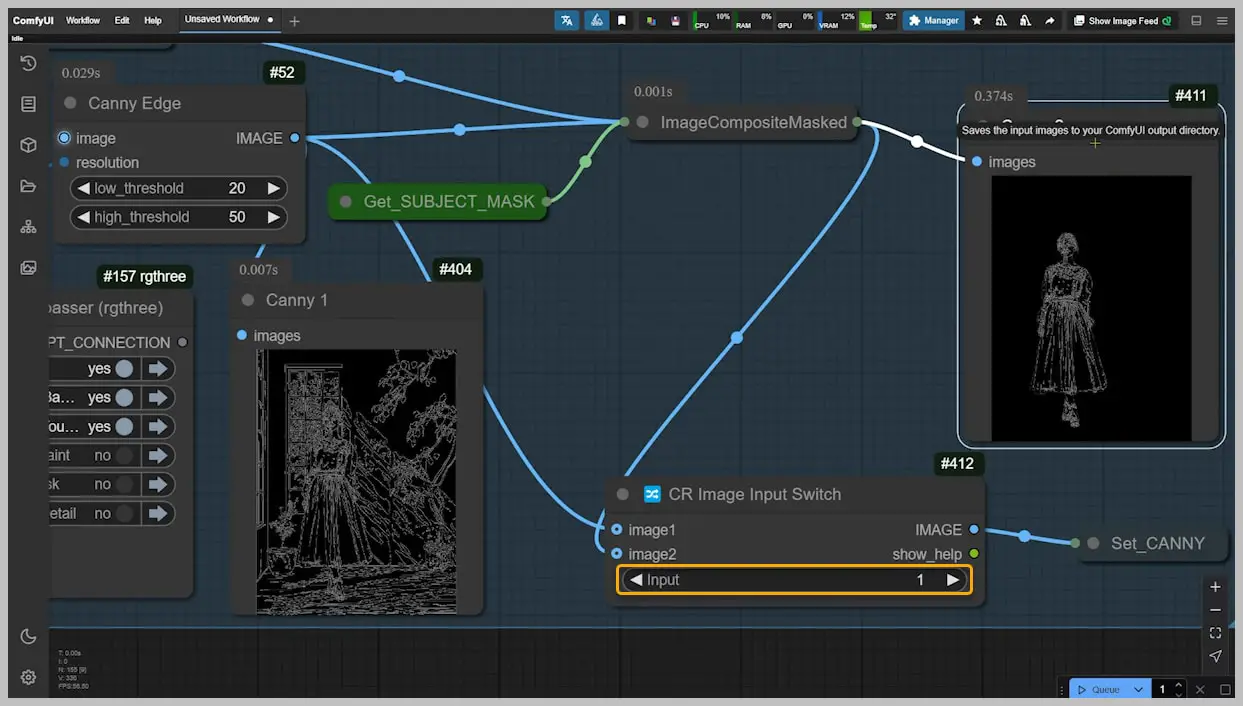
- There are two versions of the Canny Edge: one showing the contours of both the subject and the background, and another focusing solely on the subject. Typically, the first option in the “Image Input Switch” node is preferred, though the second option may be chosen for specific scenarios, which will be explained later.
Node Group 4: Repainting and Shadow Adjustment
This node group focuses on refining the image by repainting it to enhance lighting and shadow effects, ensuring the subject integrates seamlessly into the background. Let’s delve into the steps involved:
- Repainting the Image:
- Use this node group to repaint the image generated by the previous group. This process is crucial for relighting the subject and creating shadows that help the subject blend naturally with the background.
- Comparison and Adjustments:
- Compare the newly generated image with the one from the last group. Notice the changes in highlights and shadows, which contribute to a more cohesive appearance. While some original details may be lost, they can be recovered in the final group, provided the newly generated subject maintains the same outline as the original.
- Expanding the Repaint Area:
- Identify the need for shadows on the floor around the subject. Initially, the repaint area may only focus on the subject, so expand this area to include the floor using the “Preview Bridge” node. This adjustment is essential for creating natural-looking shadows.
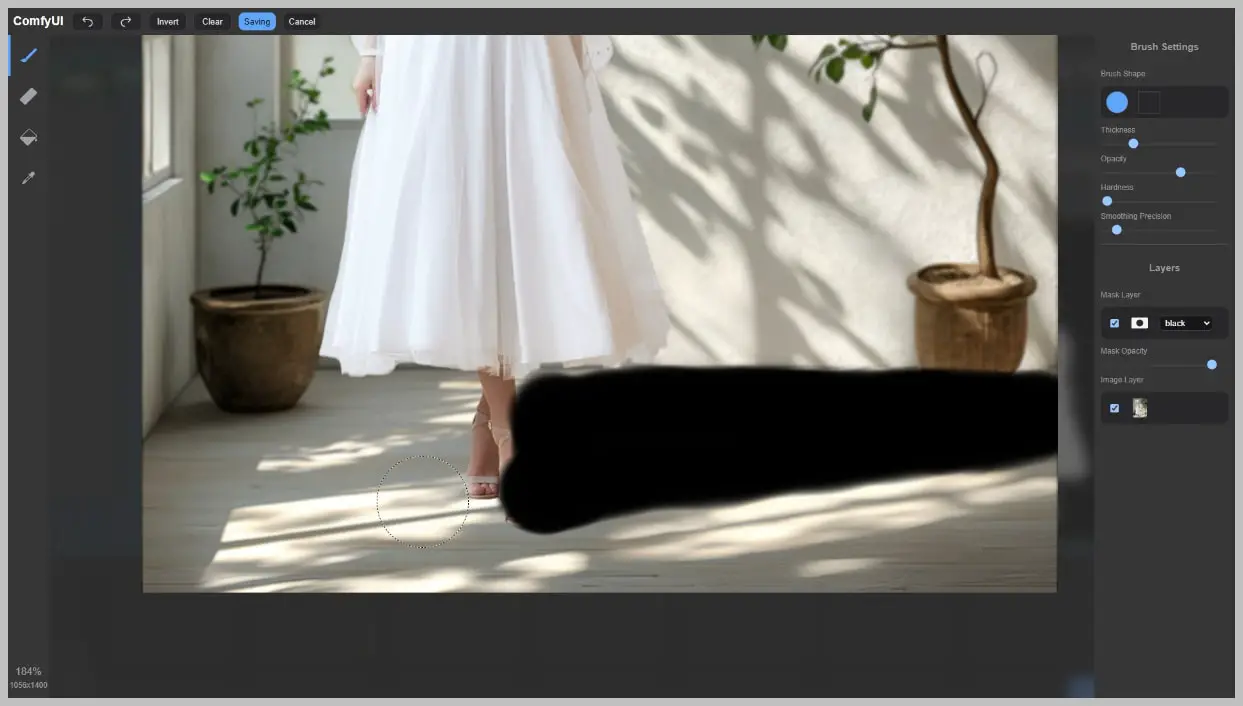
- Running the Workflow with Adjustments:
- Run the workflow again after expanding the repaint area. Be prepared to change the seed in the KSampler and try several iterations, as shadows will vary with each seed. The process is efficient, thanks to the lightning version of the SDXL model, which requires only five sampling steps in the KSampler.
- Addressing Shadow Discrepancies:
- If shadows appear shattered or unchanged from the original, the issue likely stems from the Canny edge limiting shadow shape. To resolve this, use the “Image Switch” node to select the subject outline as the contour image, allowing for more natural shadow formation.
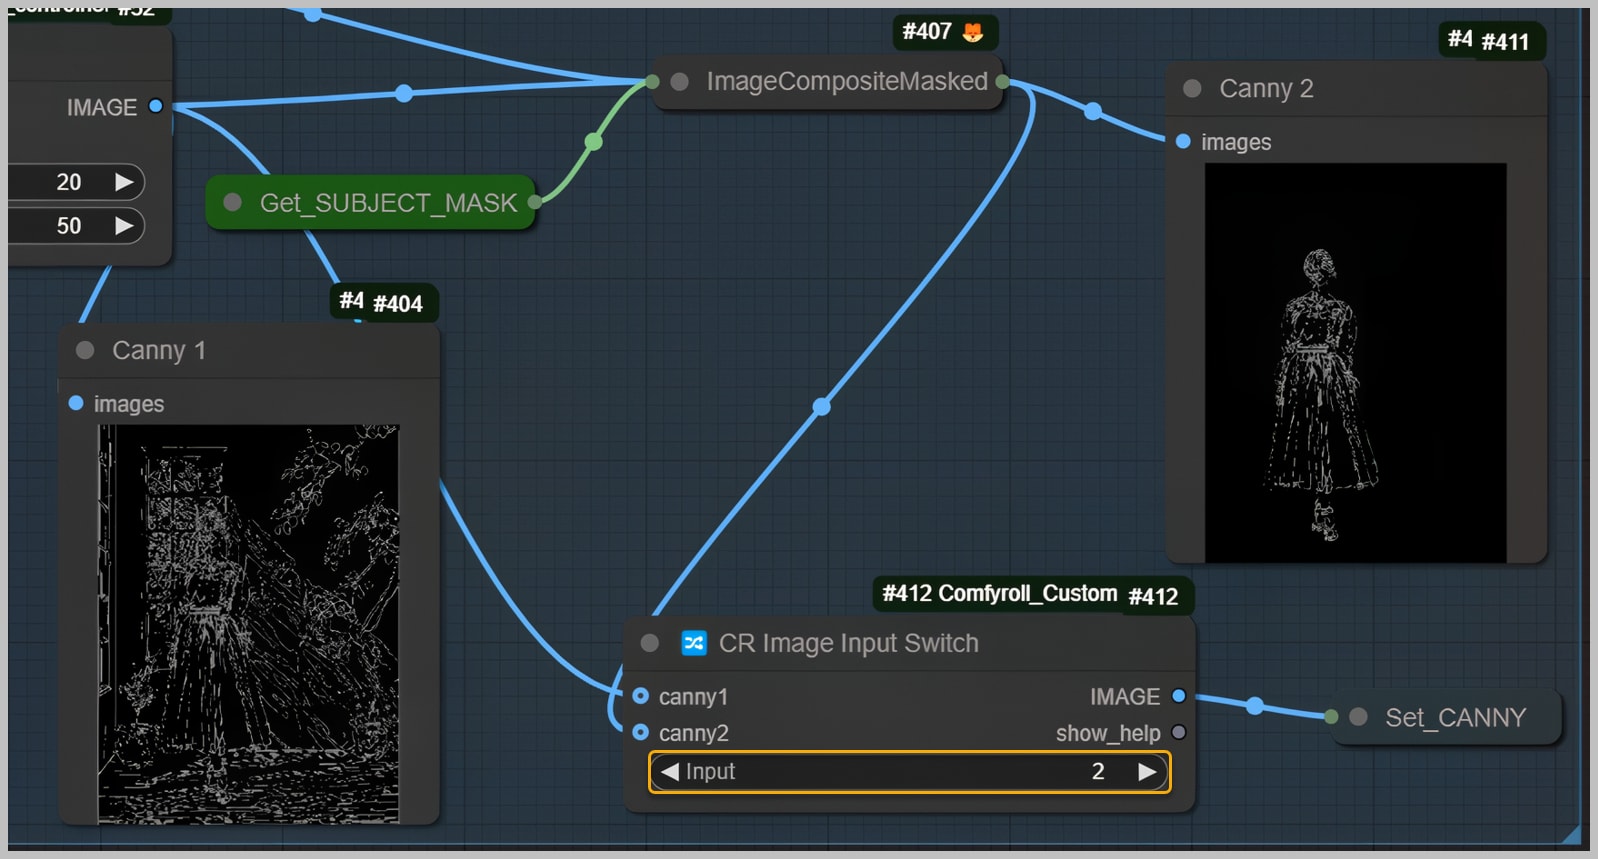
- Final Workflow Execution:
- After making the switch, run the workflow again. Observe the improved shadows on the floor, which now spread evenly across the surface, enhancing realism.
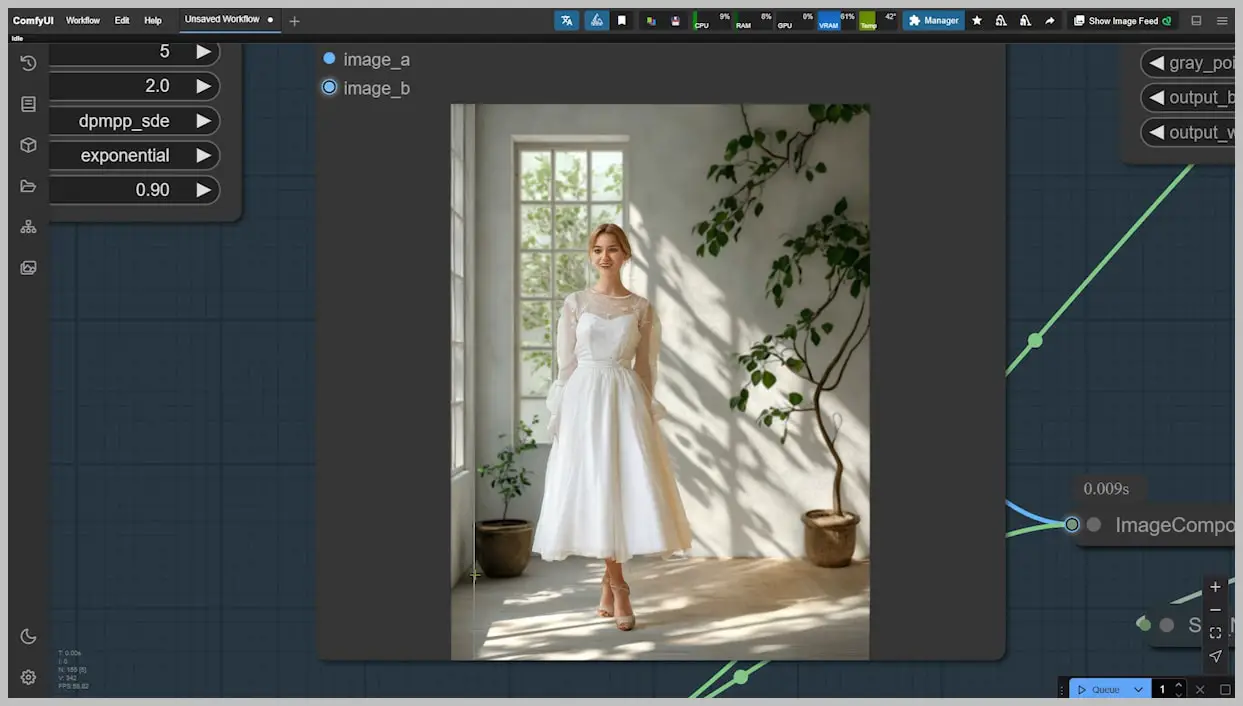
- Recommended Sampler and Scheduler Settings:
- Utilize the “dpmpp_sde” sampler and set the scheduler to “exponential” to maintain composition stability during the process. Further details on the remaining nodes in this group will be explored later.
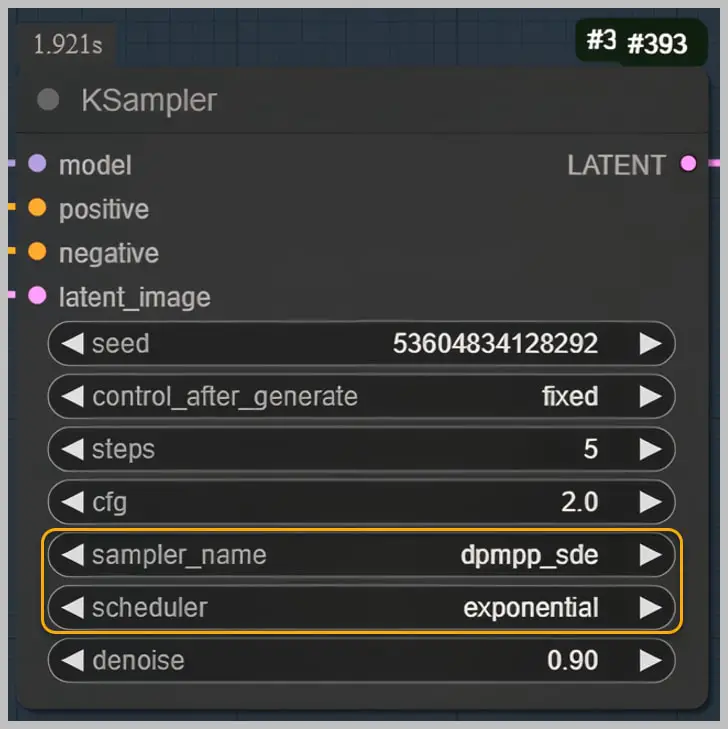
Node Group 5: Creating and Modifying Shadow Masks
In this final node group, we focus on generating and refining shadow masks to enhance the overall image quality. Here’s a step-by-step breakdown of the process:
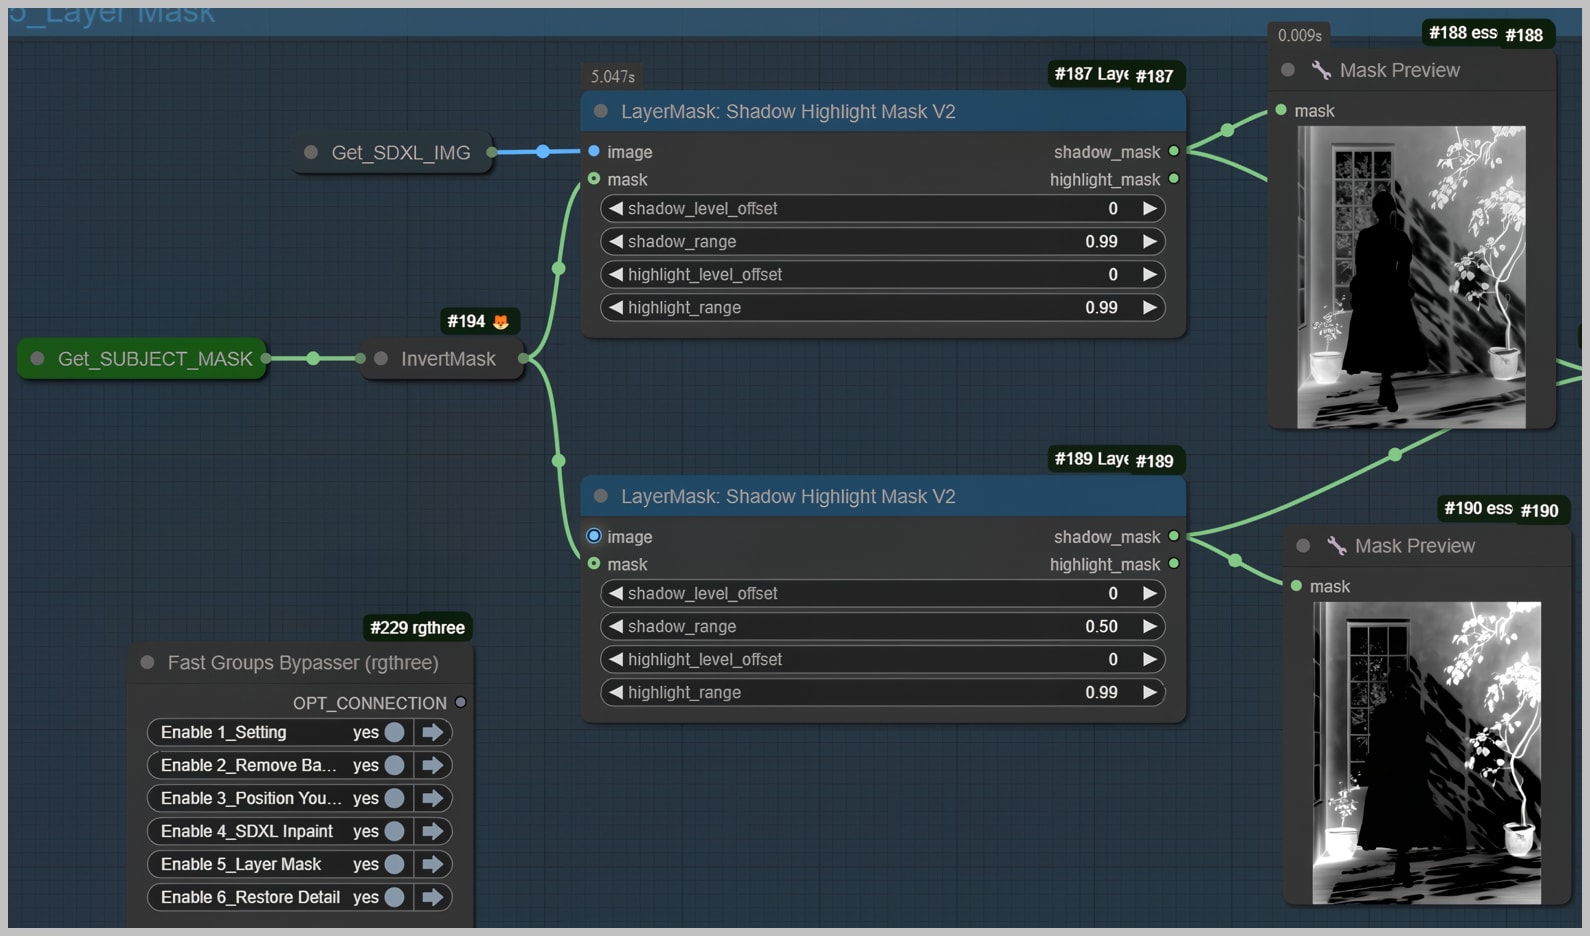
- Generating Initial Shadow Masks:
- Start by using a specific node to generate a shadow mask from the image produced in the last group. This mask highlights the shadows present in the image.
- Repeat the same process to create another shadow mask from the image generated in the third group. This ensures consistency in shadow representation across different stages.
- Subtracting Shadow Masks:
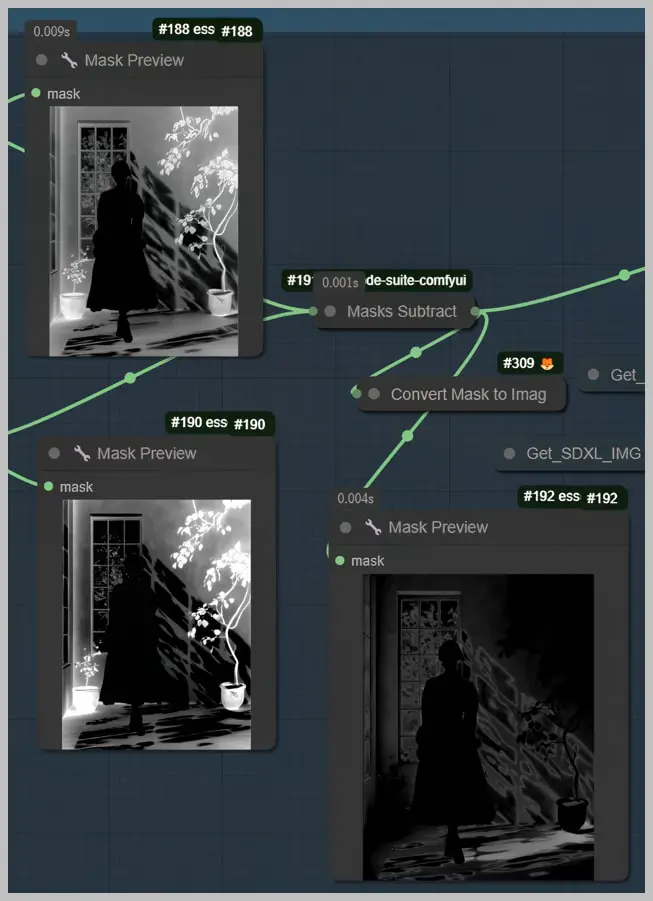
- Perform a subtract operation on the two generated shadow masks. This operation results in a shadow mask with a smaller range, allowing for more precise shadow adjustments.
- Modifying the Shadow Mask:
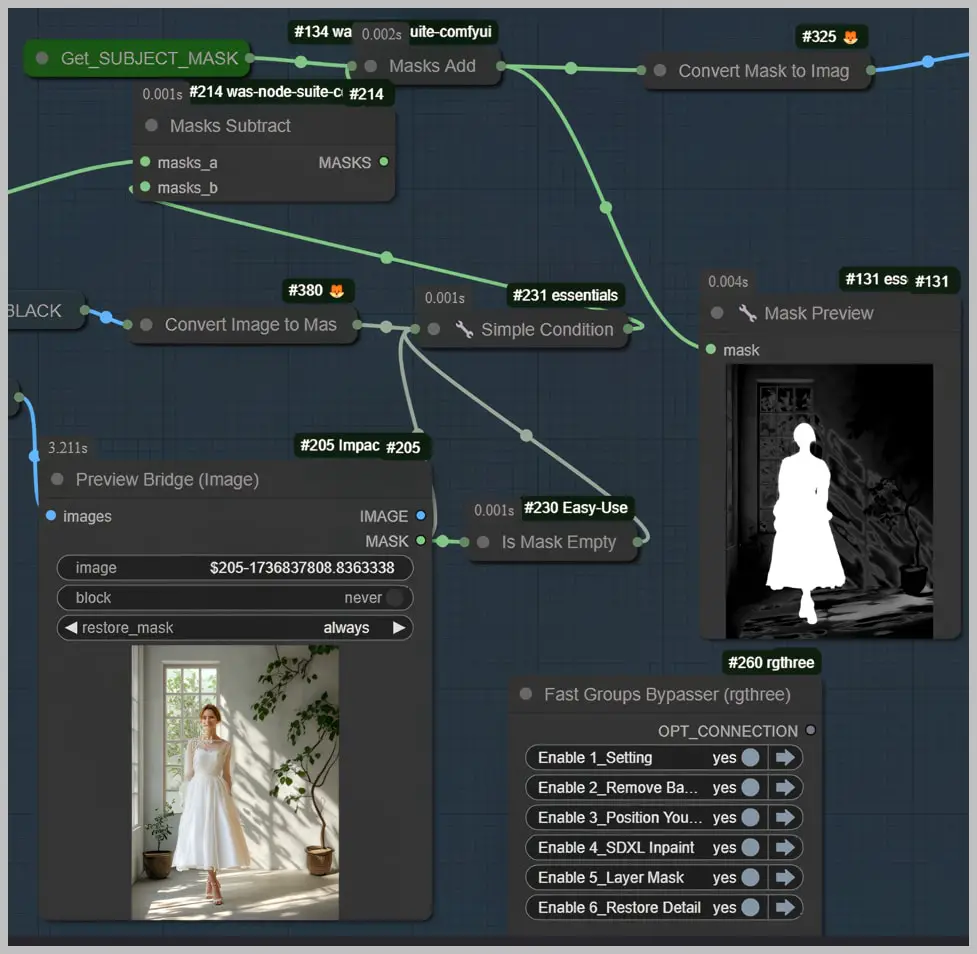
- Utilize the “Preview Bridge” node to modify the shadow mask as needed. For instance, if the mask inadvertently covers areas like a plant pot on the floor, paint over those sections to exclude them from the mask.
- Enhancing Shadow Visibility:
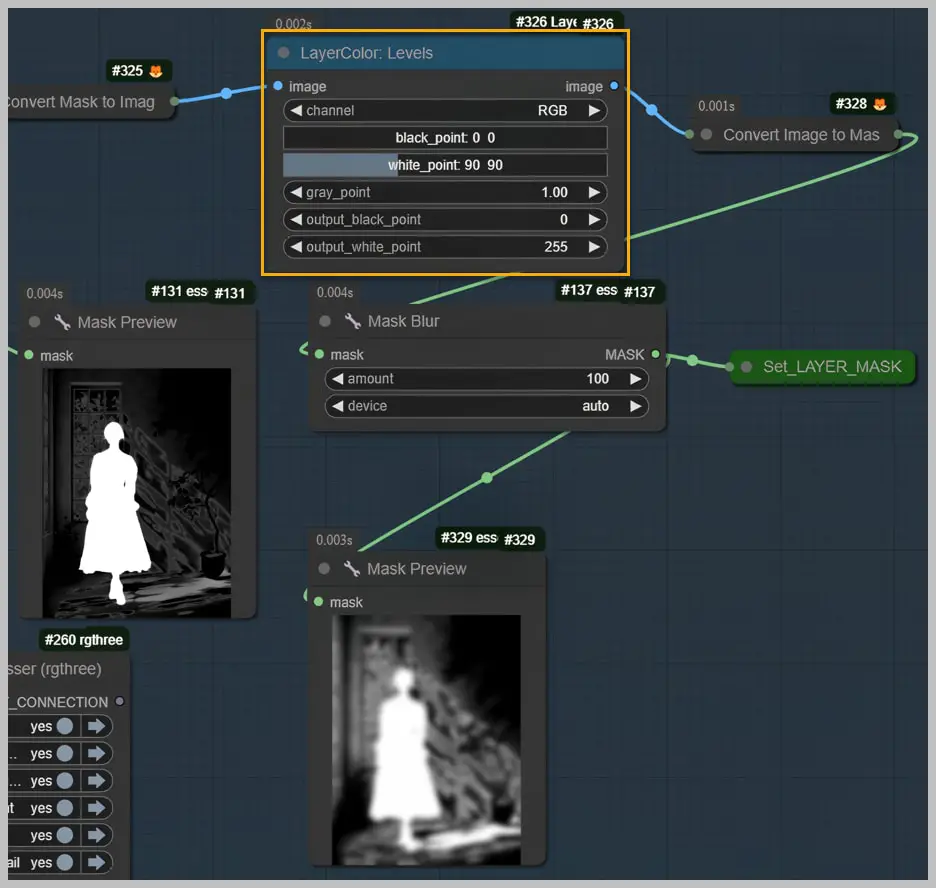
- Use the “Levels” node to adjust the brightness of the shadow mask. By brightening the mask, you make the shadows more prominent and visible in the final image, contributing to a more realistic appearance.
- Finalizing the Layer Mask:
- With these adjustments, you create a refined layer mask that effectively enhances the shadows without compromising other elements of the image.
Node Group 6: Recovering Details and Adjusting Shadows
In this section, we aim to recover details lost during the repainting process and address shadow blending issues. Here’s a comprehensive guide to the steps involved:
- Recovering Details with Image Detail Transfer:
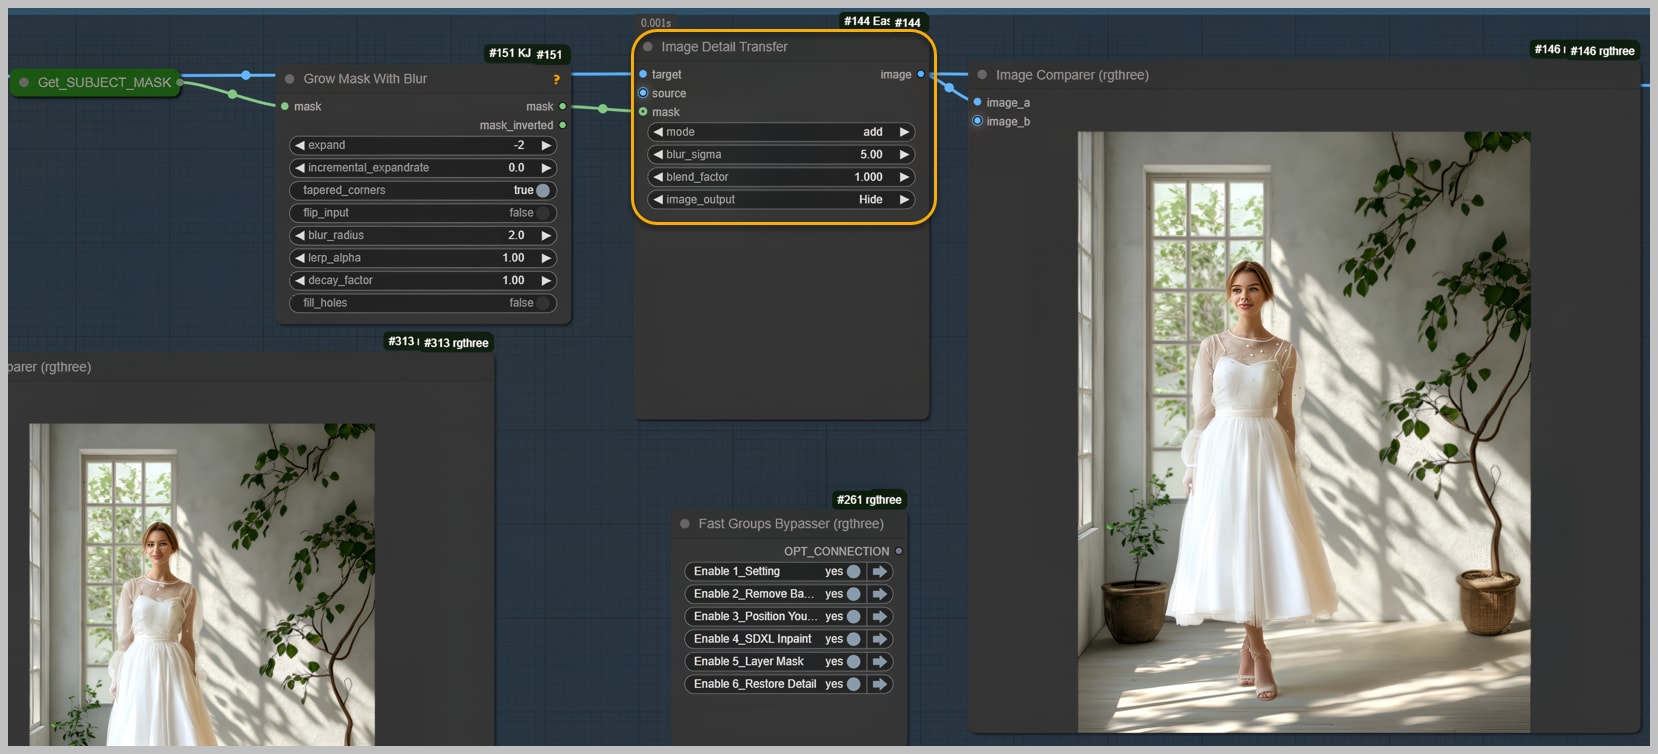
- Use the “Image Detail Transfer” node to restore most of the details lost during repainting. This node requires two images and a mask: the target image with the correct highlights and shadows, and the source image with the correct details. The subject mask limits the detail transfer to the subject only.
- Adjusting Shadow Blending:
- If shadows on the subject’s face aren’t blending evenly, adjust the “blur_sigma” or “blur_radius” values in the “Image Blur” node. This helps soften the shadows for a more natural appearance.

- Addressing Floor Shadow Issues:
- Shadows on the floor may not blend evenly due to shattered original shadows. Unfortunately, the “Image Detail Transfer” node doesn’t affect the background. This issue requires a specific solution, which we’ll tackle later.
- Color Adjustment with Color Blend:
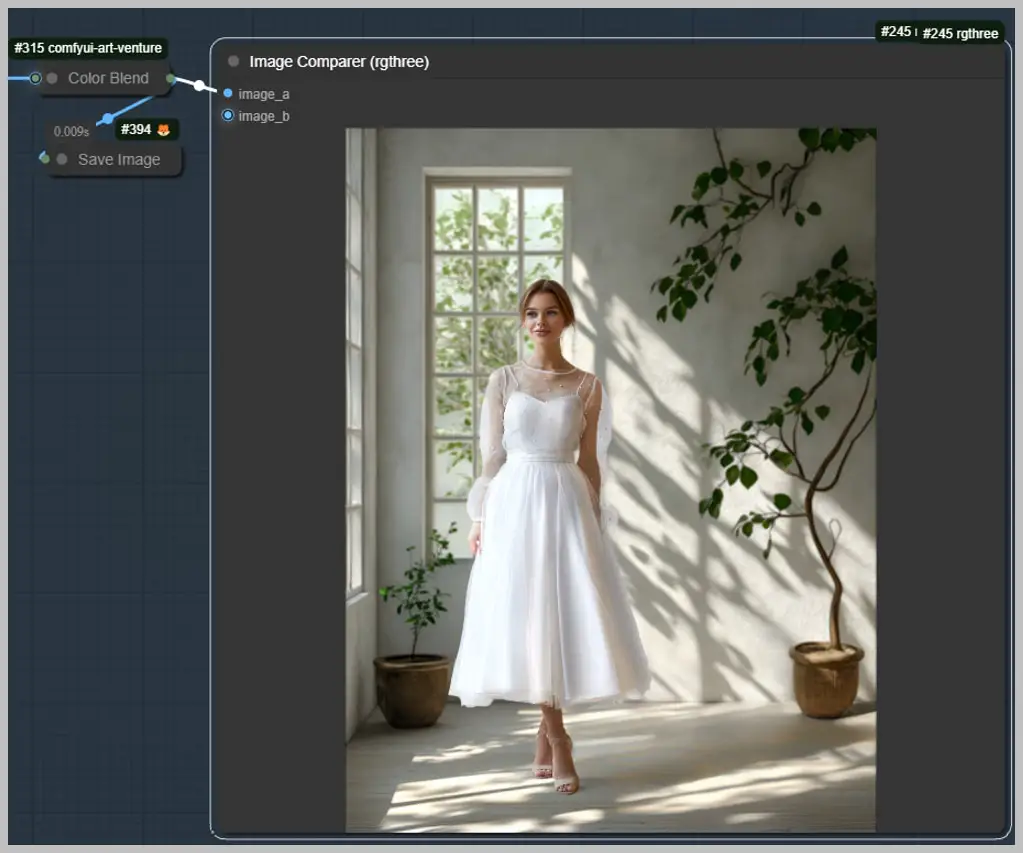
- The “Color Blend” node is used to adjust the color of the image to match the original. This ensures consistency in color tones throughout the image.
- Blending Images for Shadow Creation:
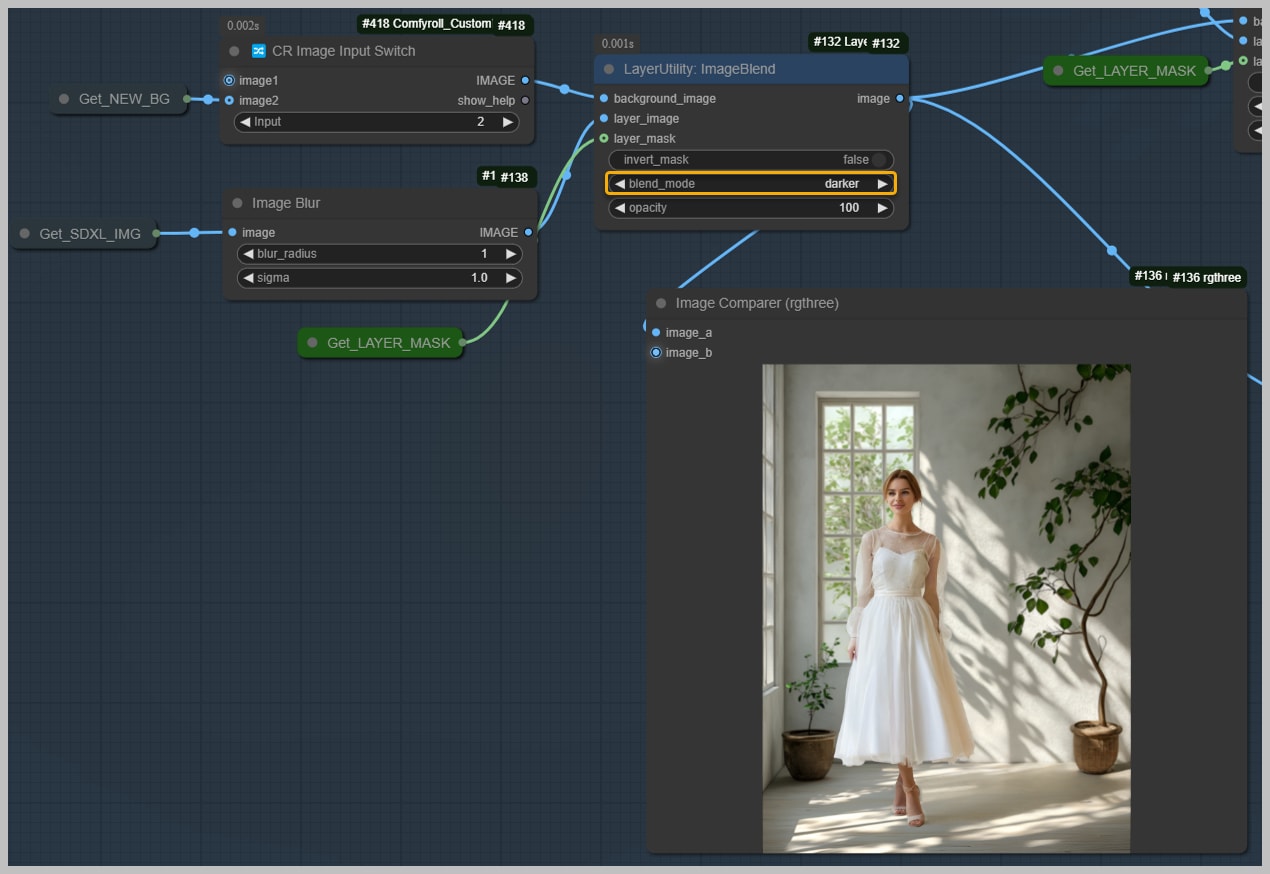
- Utilize the “ImageBlend” node to blend the layer image with the background image. Set the blend mode to “darker” to darken specific areas and create shadows. The layer mask, generated in the previous group, defines these shadow areas.
- Recovering Highlights:
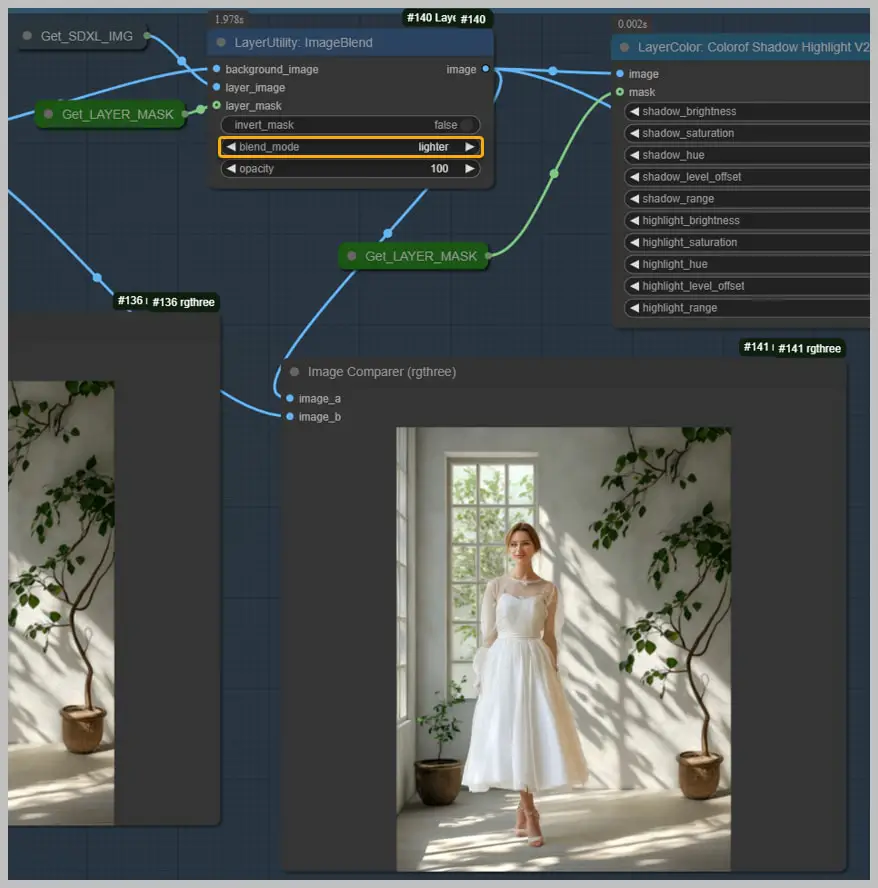
- Adjust the blend mode to “lighter” to recover highlights in the shadow areas. This step balances the shadows and highlights, enhancing the image’s depth and realism.
- Fine-Tuning Highlights and Shadows:
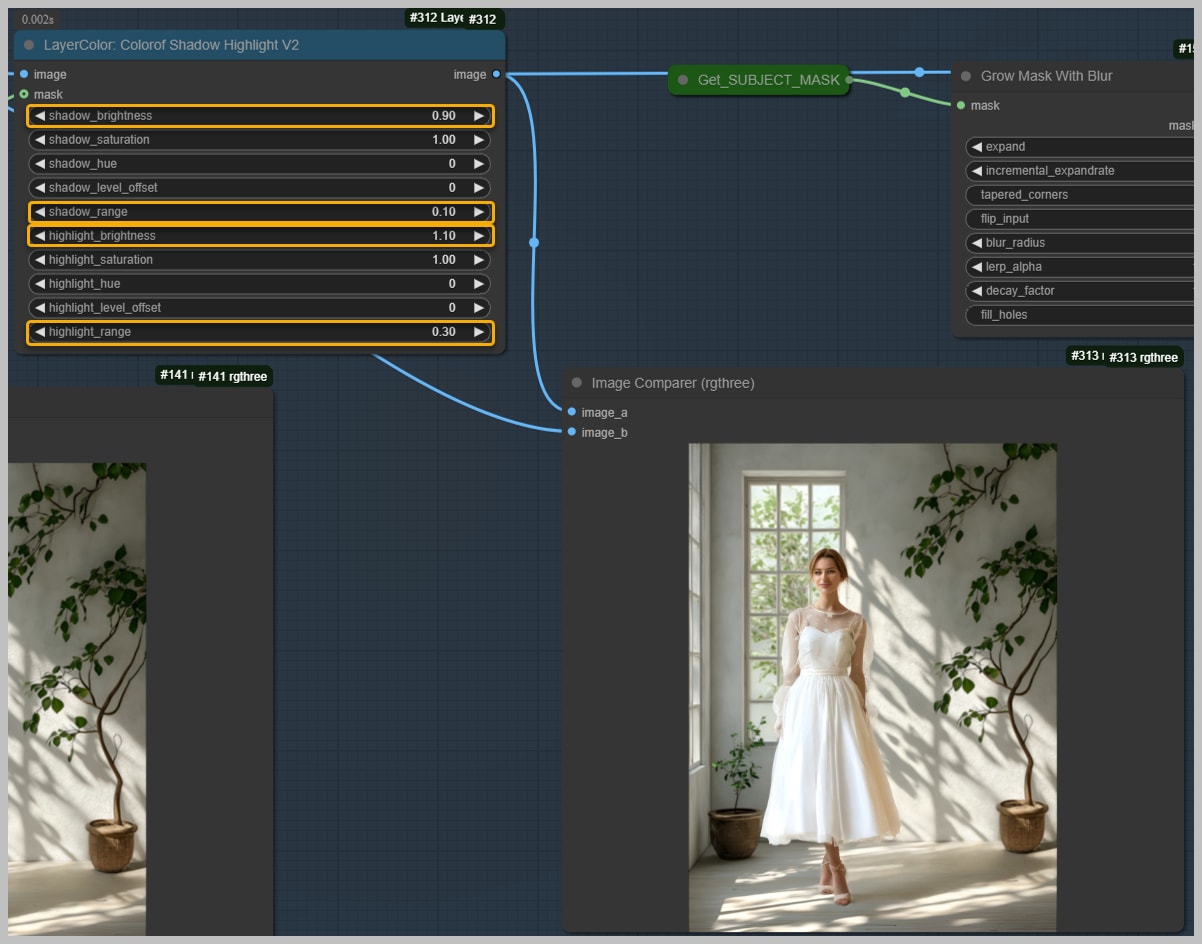
- Use the node on the right to adjust highlights and shadows further. Set “shadow_brightness” below 1 to darken shadows and “highlight_brightness” above 1 to lighten highlights. Modify the range of shadows and highlights to achieve the desired effect.
Troubleshooting and Optimization Tips
When working with complex workflows, encountering issues is natural. Here are some tips to help you troubleshoot and optimize for the best results:
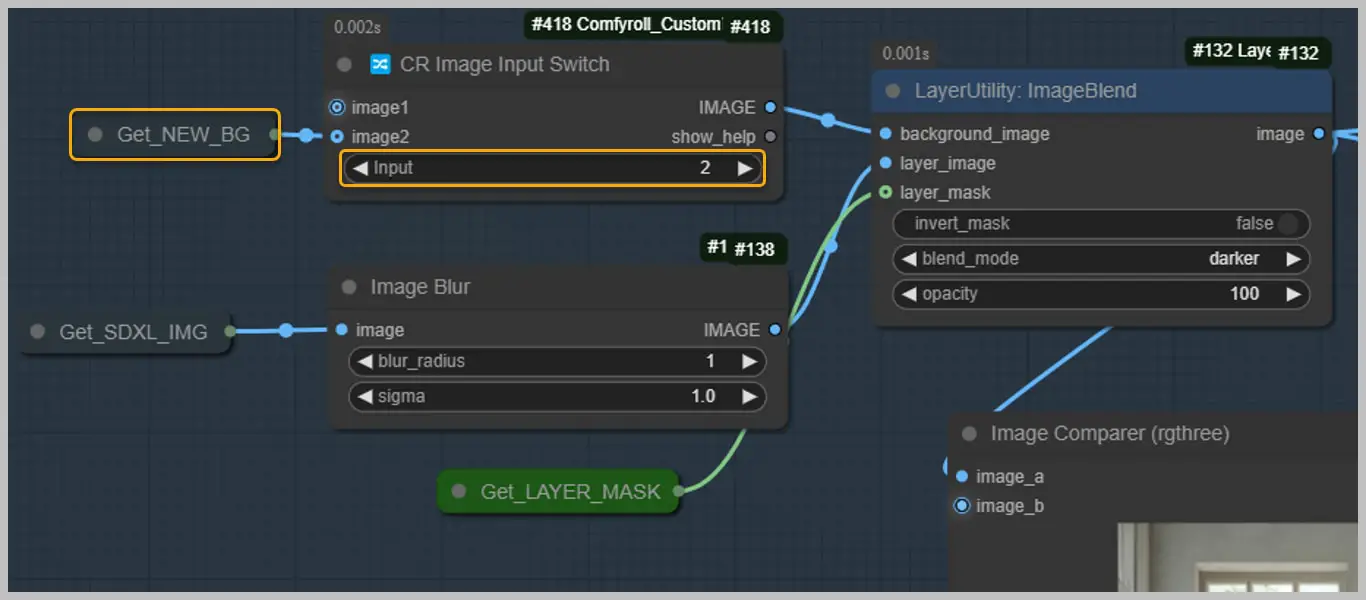
- Floor Shadow Issues: – If shadows on the floor aren’t blending well, consider switching to a new background image from the fourth node group. This background includes the repainted shadow area, which can enhance shadow integration.
- Texture and Transition Adjustments: – Should the texture in shaded areas not match the surrounding flooring, blur the masks further. This adjustment will help create smoother transitions and more cohesive textures.
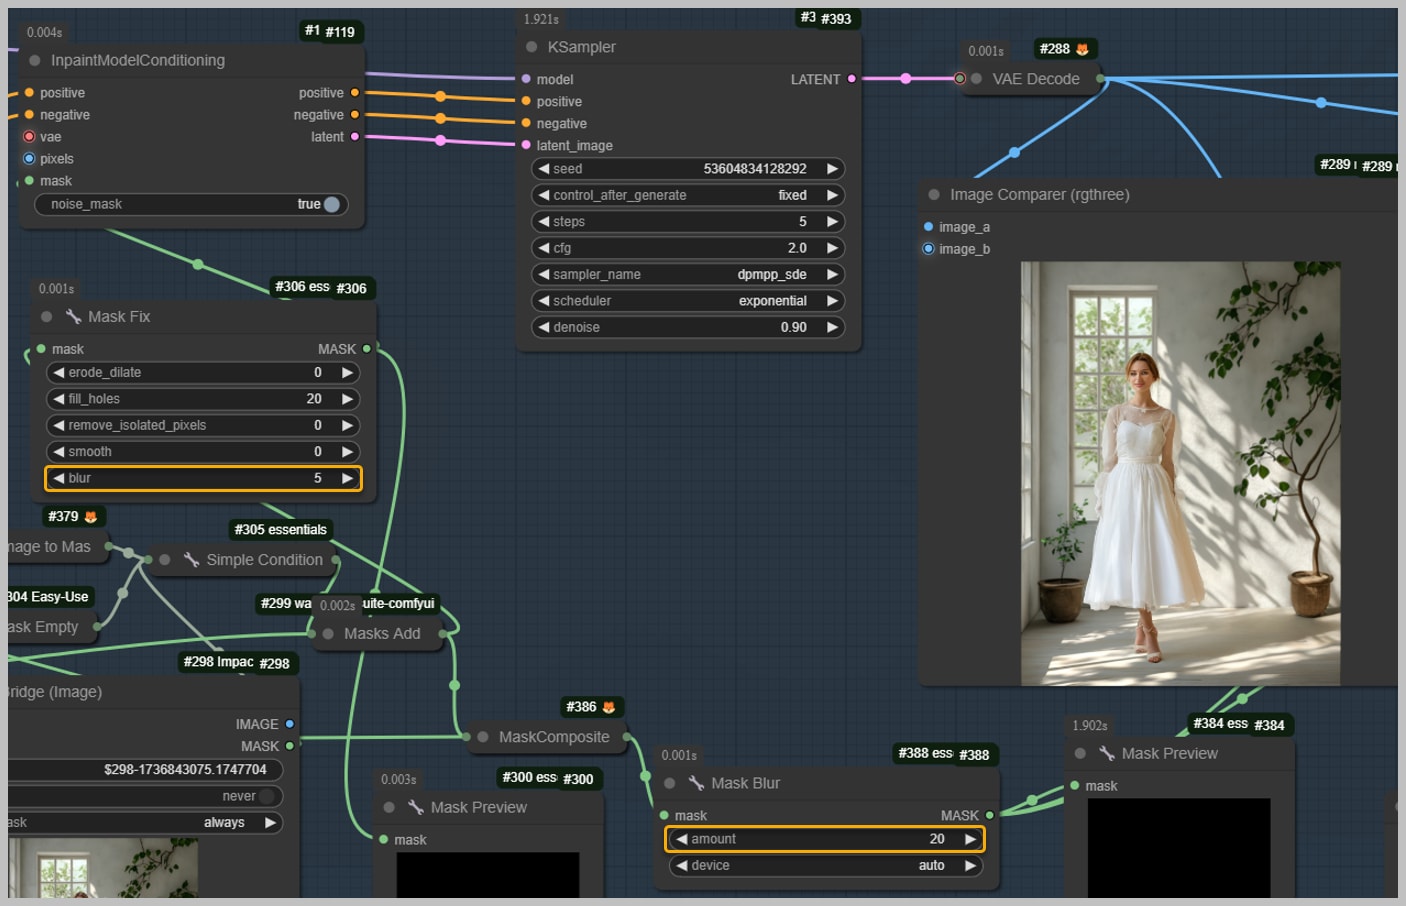
- Iterative Workflow Execution: – Don’t hesitate to run the workflow multiple times. Each iteration allows you to refine the image, achieving a result you’re satisfied with. Adjust the mask to exclude specific elements, like a plant plot, to focus repainting efforts solely on the floor.
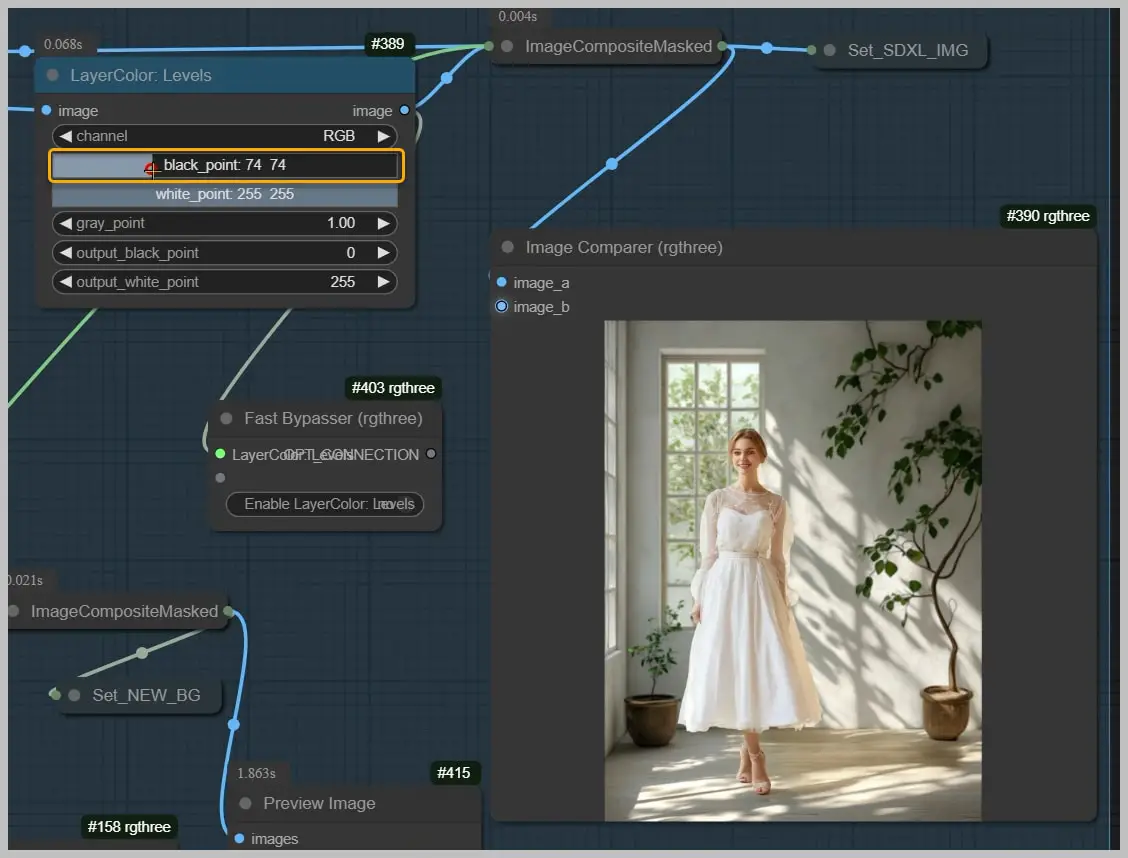
- Enhancing Shadows with the Levels Node: – For darker floor shadows, use the “Levels” node. Increase the black point value to deepen shadows, then rerun the workflow to apply the change effectively.
Conclusion and Encouragement for Exploration
This workflow empowers you to enhance images by effectively managing shadows and backgrounds. By following the steps and tips provided, you can achieve realistic and visually appealing results. Remember, the key to mastering this workflow is experimentation. Don’t be afraid to explore new ideas and push the boundaries of your creativity. Each attempt brings you closer to discovering innovative techniques and effects. Feel free to dive into this process and explore the exciting possibilities it offers. Happy experimenting!

