Krea 2 Inpainting and Outpainting Workflow (No Detail Loss)
Recent releases such as Flux 3 Klein, Qwen Image 2.1, and Moss have introduced more options for AI image generation. However, when it comes to text-to-image quality, Krea 2 remains one of my favorite models, particularly for creating realistic images with convincing details.
What’s even more exciting is that Krea 2 can also deliver excellent results for inpainting and outpainting with the help of a specialized LoRA.
In this article, I’ll introduce a ComfyUI workflow that uses Krea 2 and AnyPaint LoRA to perform both tasks. More importantly, I’ll explain how to improve the original workflow to avoid pixel drifting, preserve fine image details, and edit high-resolution photographs without unnecessarily regenerating the entire image.
By the end, you’ll understand how to:
- Perform precise inpainting while preserving the original image.
- Extend images naturally using outpainting.
- Prevent pixel drifting and unnecessary detail loss.
- Use cropped-region processing to reduce GPU memory requirements.
- Automatically switch between inpainting and outpainting within a single ComfyUI workflow.
Let’s start by looking at what this workflow can achieve.
YouTube Tutorial:
Gain exclusive access to advanced ComfyUI workflows and resources by joining our community now!
Why Use Krea 2 for Inpainting and Outpainting?
Krea 2’s Image Generation Quality
Although several new image models have appeared recently, Krea 2 continues to impress me with its ability to generate highly realistic content.
This is particularly useful for image-editing tasks, where generated objects must blend naturally with an existing photograph.
When performing inpainting, we don’t just want the model to generate an object that matches our prompt. We also need the new content to match the original image’s lighting, colors, perspective, and overall visual style.
Similarly, when performing outpainting, the extended parts of an image should look like a natural continuation of the original scene rather than a separate generated picture.
In my experience, Krea 2 performs exceptionally well in both situations when used with the appropriate workflow.
Inpainting Example: Adding a Fruit Basket
Let’s begin with a group photograph showing several people sitting on a beach.
Suppose we want to add a basket of fruit to the hands of the man sitting in the foreground.
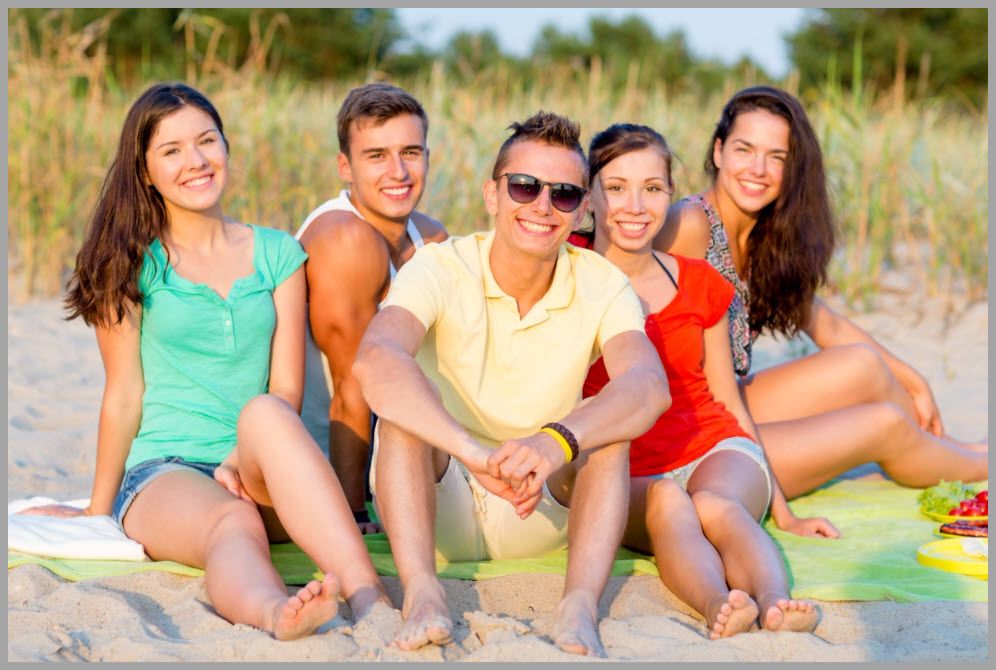
Using the Krea 2 inpainting workflow, we can paint a mask around the area where the basket should appear and let the model generate the new object.
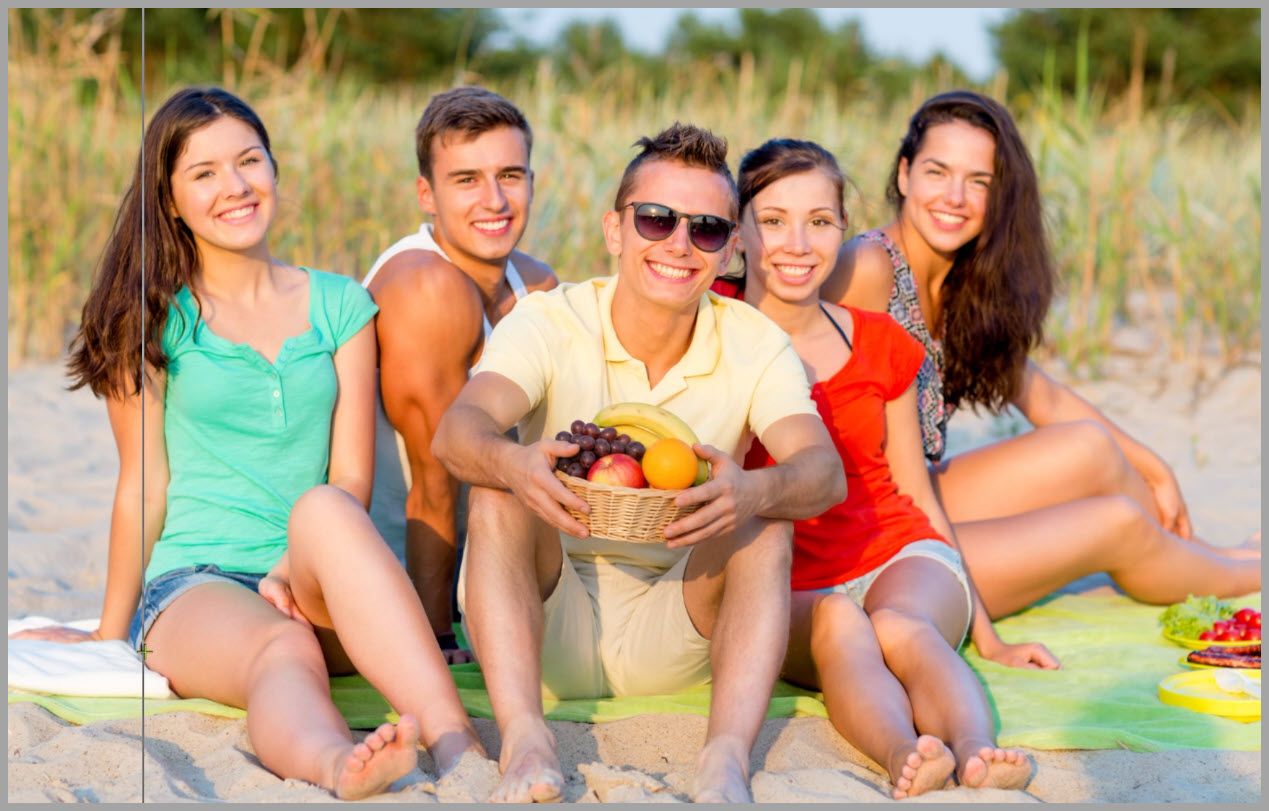
The result is a realistic fruit basket that integrates naturally into the photograph.
The most important detail, however, is what happens to the rest of the image.
Only the selected editing region needs to be regenerated. The original photograph outside the processed region can remain unchanged.
This is especially valuable when working with photographs containing faces, clothing, or intricate background details that we don’t want the AI to alter.
Outpainting Example: Extending a Beach Scene
The same workflow can also extend an image beyond its original boundaries.
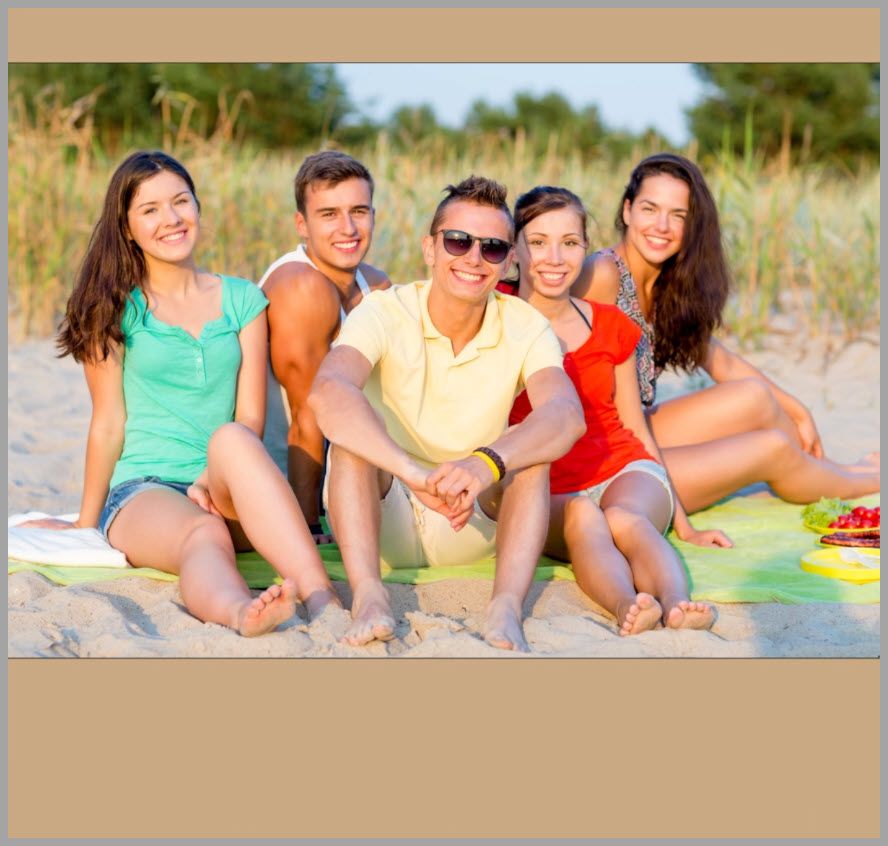
For example, we can expand a beach photograph to create additional space in the foreground and generate more ocean waves.
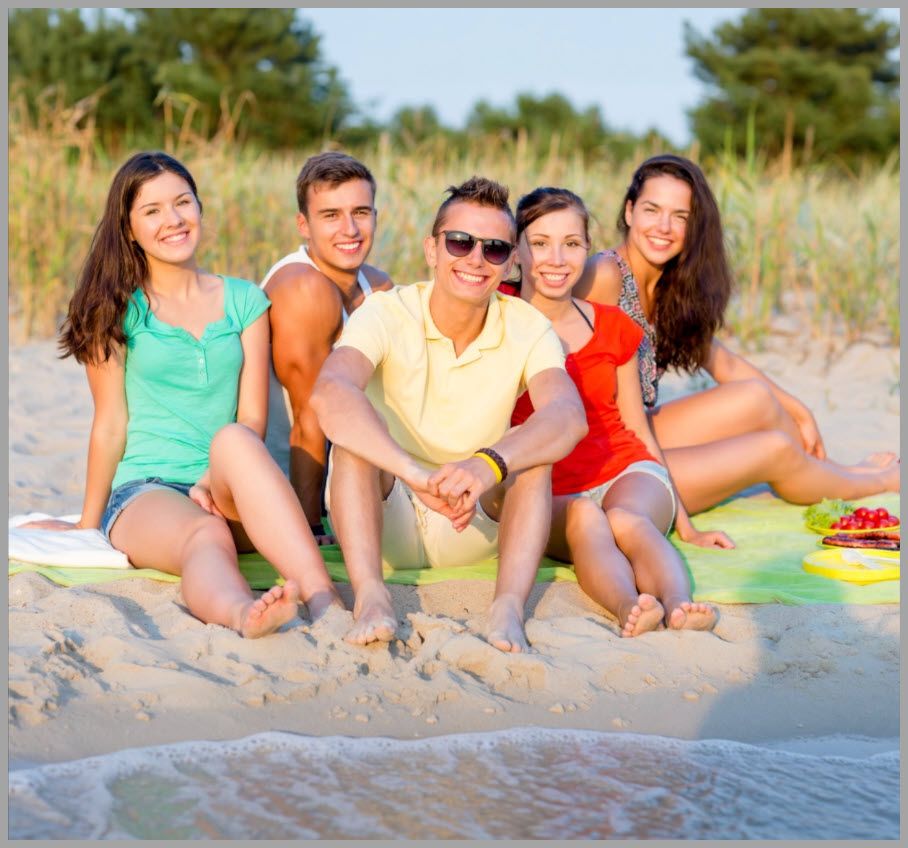
Instead of stretching or duplicating existing pixels, the model generates new visual content based on the original scene.
The additional waves blend naturally with the existing beach, maintaining the overall lighting, colors, and composition.
This makes outpainting useful for tasks such as:
- Extending landscape photographs.
- Changing an image’s aspect ratio.
- Creating additional background space.
- Expanding compositions for posters or other designs.
- Generating new foreground or background details.
Setting Up Krea 2 and AnyPaint LoRA in ComfyUI
Before exploring the workflow itself, we need to understand the tools that make it possible.
Why Krea 2 Needs AnyPaint LoRA
There’s an important limitation to understand before getting started.
Krea 2 does not natively support the inpainting and outpainting operations demonstrated in this workflow.
Fortunately, a developer has trained a specialized LoRA called AnyPaint to enable these capabilities.
By combining Krea 2 with AnyPaint LoRA, we can guide the model to generate content inside masked regions or outside an image’s existing boundaries.
This gives us a much more flexible image-editing system without requiring a completely different model for each task.
The LoRA also works with a corresponding custom node designed to prepare the editing information for generation.
Original Workflow vs. Modified Workflow
The AnyPaint creator provides a relatively simple workflow that demonstrates how the LoRA works.
This original workflow is useful because it contains the essential components for image editing.
https://github.com/alexw5702-afk/krea2-anypaint/blob/main/krea2_anypaint_workflow.json
However, I noticed two issues when using it with high-resolution images:
- Some pixels could drift or change unexpectedly.
- Fine details in the original image could be lost during generation.
Both problems are related to how the input image is processed.
To address them, I created a modified workflow that prepares and crops the editing region before sending it to the generation pipeline.
https://www.skool.com/myaiforce/krea-2-inpainting-outpainting-is-insanely-good
Before examining those improvements, let’s understand why the original workflow can produce these issues.
Understanding the Original AnyPaint Workflow
Processing the Entire Image
Let’s return to the example of replacing a woman’s straw hat with a flower wreath.
The original image has a resolution of:
3908 × 5862 pixels
That’s a relatively large photograph.
In the original workflow, the image and its painted mask are prepared before being passed to the AnyPaint processing nodes and KSampler.
The problem is that many consumer GPUs don’t have enough VRAM to process an image of this size directly through the generation pipeline.
Therefore, I first had to downscale the image.
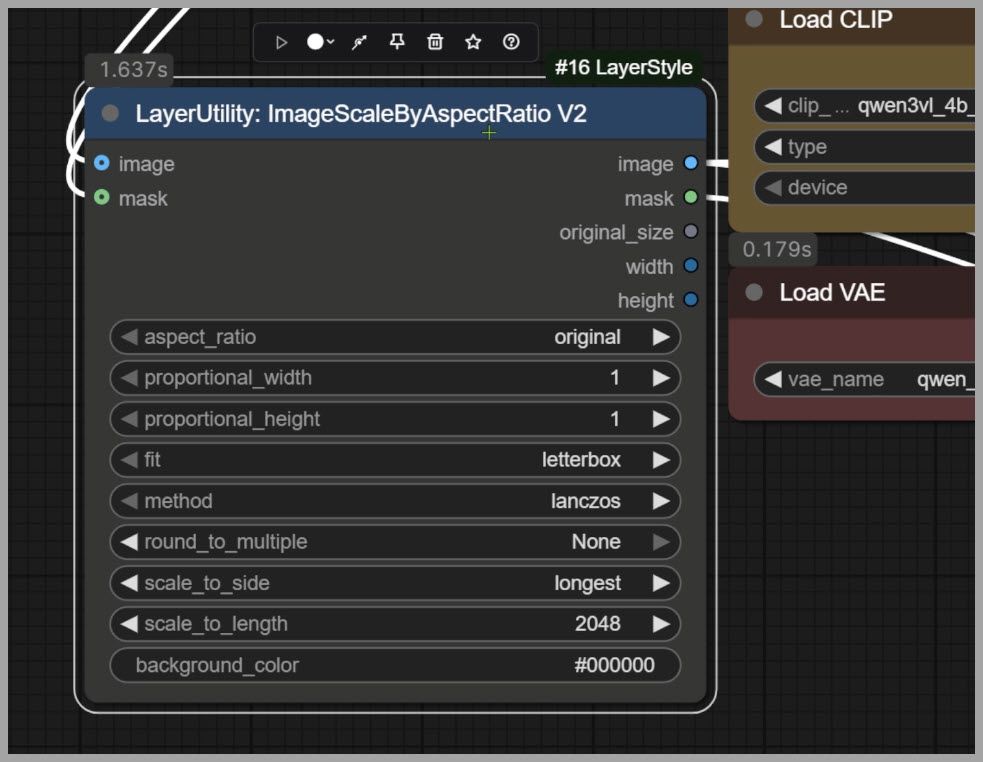
The corresponding resizing operation also downscaled the painted mask, ensuring that the mask and image had matching dimensions.
This allowed the workflow to run within the available GPU memory.
However, reducing the image resolution introduced a tradeoff.
Even though the model could successfully replace the straw hat, the final result no longer preserved all the fine details from the original high-resolution photograph.
How the AnyPaint Prepare Node Works
One of the most important components in the workflow is the AnyPaint Prepare node.
This node is designed specifically for use with the AnyPaint LoRA.
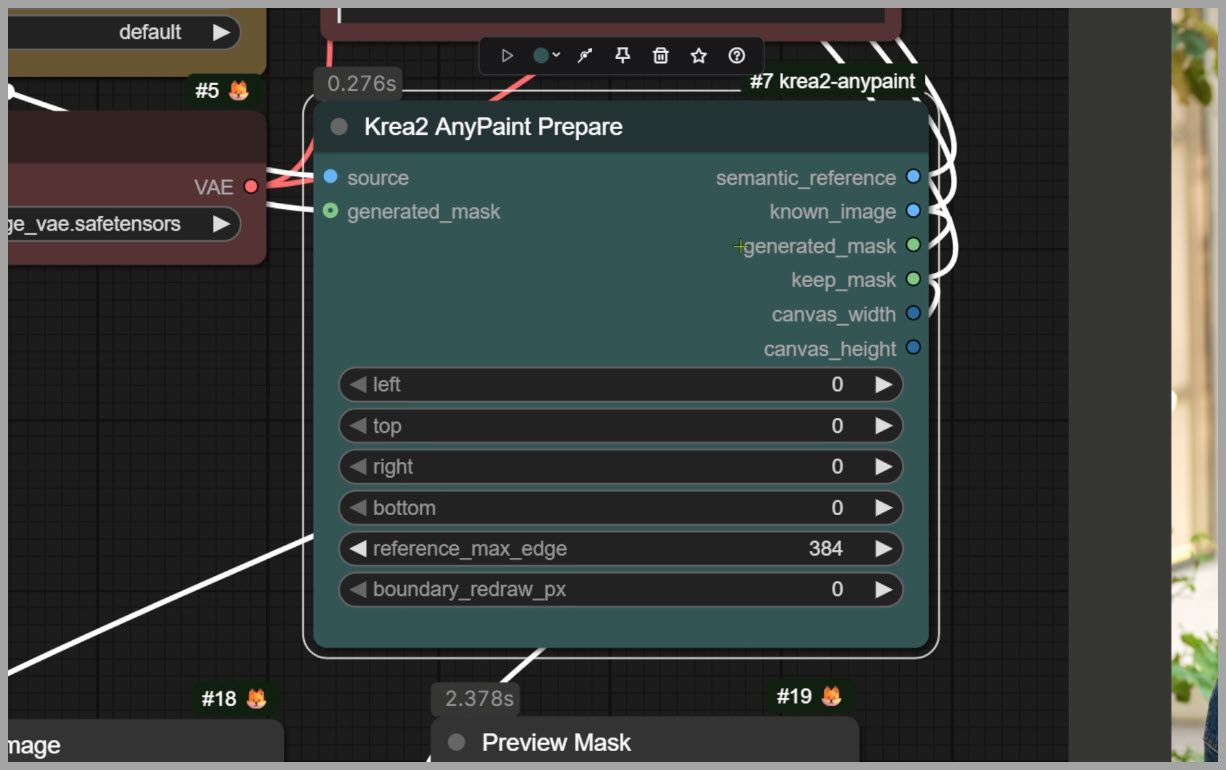
It prepares the image-editing information required by the generation pipeline, including information about the regions that should be generated or preserved.
When working with inpainting, the painted mask identifies the area that needs to be modified.
The mask can be previewed to confirm which region the workflow is targeting.
The AnyPaint Prepare node also provides several important settings that affect how the image is processed.
Let’s examine them individually.
Reference Max Edge
The first important setting is Reference Max Edge.
This parameter determines the maximum edge length of the reference image used during encoding.
In the demonstrated workflow, the value is:
Reference Max Edge: 384
This means the reference image is encoded with its longest edge set to 384 pixels, while preserving its aspect ratio.
For most purposes in this workflow, there’s no need to change this parameter.
I recommend starting with the value used in the original workflow unless you have a specific reason to adjust it.
Boundary Redraw PX
The next important setting is Boundary Redraw PX.
This parameter controls the width of the boundary region used for redrawing and blending new content with the original image.
Its default value is:
Boundary Redraw PX: 32
A boundary redraw region can help the generated content transition more naturally into an existing image.
However, in our inpainting example, we don’t need this additional boundary area.
Therefore, I changed the setting to:
Boundary Redraw PX: 0
This reduces unnecessary boundary redrawing for the demonstrated inpainting setup.
It’s worth checking the mask preview after making this adjustment.
In the original workflow, I noticed a very thin strip along the right edge of the mask.
That strip was associated with an unwanted change in the final image.
This illustrates why mask boundaries deserve attention, particularly when precise pixel preservation is important.
The Outpainting Parameters
The AnyPaint Prepare node also includes four directional settings:
- Left
- Top
- Right
- Bottom
These settings define how much the canvas should expand in each direction when performing outpainting.
For example, increasing Left adds new space to the left side of the image, while increasing Bottom adds space beneath it.
We don’t need these values for ordinary inpainting.
Later, when we explore outpainting, these four parameters will become the main settings we adjust.
Why the Original Workflow Can Lose Details
After running the original workflow, the inpainting result looked good at first glance.
The straw hat was successfully replaced, and the generated content blended naturally with the surrounding photograph.
There were no obvious seams around the edited area.
However, closer inspection revealed subtle differences between the original image and the output.
Some details had changed, and there was evidence of pixel drifting.
The main issue was that the entire image had been processed rather than only the area that needed editing.
When KSampler resamples an image, it can regenerate details even in regions that don’t require modification, depending on how the workflow handles masking and compositing.
As a result, some original pixels may no longer match the source perfectly.
Furthermore, because the large input image had to be downscaled before generation, the final image could lose fine texture and detail.
This is unnecessary when the actual edit occupies only a small portion of the photograph.
Consider the flower-wreath example.
We only want to modify the woman’s hat.
Why should we resample her clothing, the background, and every other part of a 3908 × 5862 image?
That’s exactly the problem the modified workflow is designed to solve.
Building an Improved ComfyUI Workflow
The modified workflow is slightly more complex than the original one, but it introduces several important improvements.
The core idea is straightforward:
Instead of processing the entire image, crop the region that needs editing, generate the new content inside that region, and place the edited result back into the original photograph.
This approach helps preserve the details of the untouched image while reducing the amount of data processed by the model.
Overview of the Improved Workflow
Most of the core generation components remain similar to those in the original AnyPaint workflow.
The main changes are in the preprocessing stage.
I added several custom nodes to manage the image and mask before generation.
Conceptually, the improved workflow has two processing paths.
Inpainting path:
- Load the image and painted mask.
- Detect the presence of the mask.
- Prepare and optionally blur the mask.
- Crop the area around the mask.
- Process the cropped image using AnyPaint LoRA and KSampler.
- Place the generated crop back into the original image.
Outpainting path:
- Load the original image without a painted mask.
- Detect that no painted mask is present.
- Optionally resize the image to accommodate available VRAM.
- Expand the canvas using the directional settings.
- Generate content for the newly created regions.
- Produce the extended image.
Both paths share the underlying generation workflow.
This eliminates the need to maintain two completely separate setups.
Automatic Detection of Inpainting and Outpainting
One of the first custom nodes I added detects whether a mask has been painted on the input image.
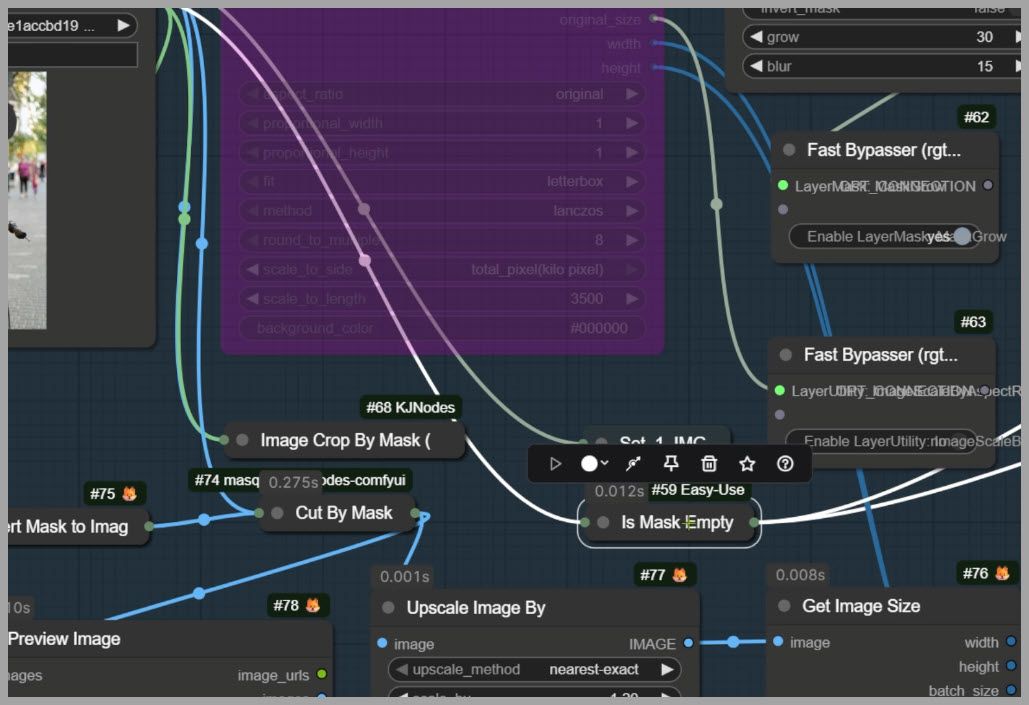
The workflow uses this information to determine which operation should run.
If a painted mask is detected, the workflow automatically selects inpainting mode.
If no painted mask is detected, it selects outpainting mode.
This is a convenient improvement because it eliminates the need to manually reconnect nodes whenever we switch tasks.
For example, when we upload the photograph of the woman and paint a mask over her straw hat, the workflow recognizes that we want to perform inpainting.
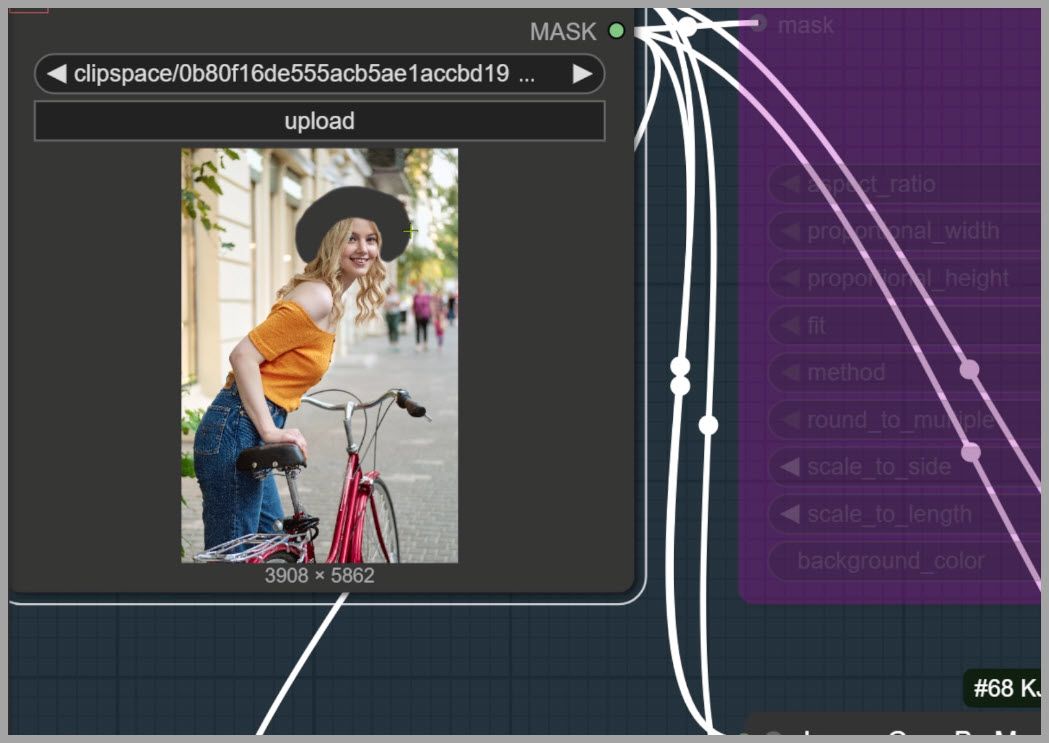
Later, when we upload a beach photograph without a mask, the same workflow can switch to outpainting.
All we need to do is configure the appropriate settings.
Avoiding Unnecessary Full-Image Downscaling
In the original workflow, we had to reduce the resolution of the entire photograph before generation.
But if we’re only going to process a cropped region, this is no longer necessary in many cases.
Instead, we can keep the original image at its full resolution and crop out the area that requires editing.
Only that smaller region needs to enter the model’s generation pipeline.
This is particularly beneficial for high-resolution photographs.
For instance, our original image is 3908 × 5862 pixels.
The area around the straw hat occupies only a fraction of that image.
Rather than downscaling the full photograph, we can extract a smaller region around the hat and process it separately.
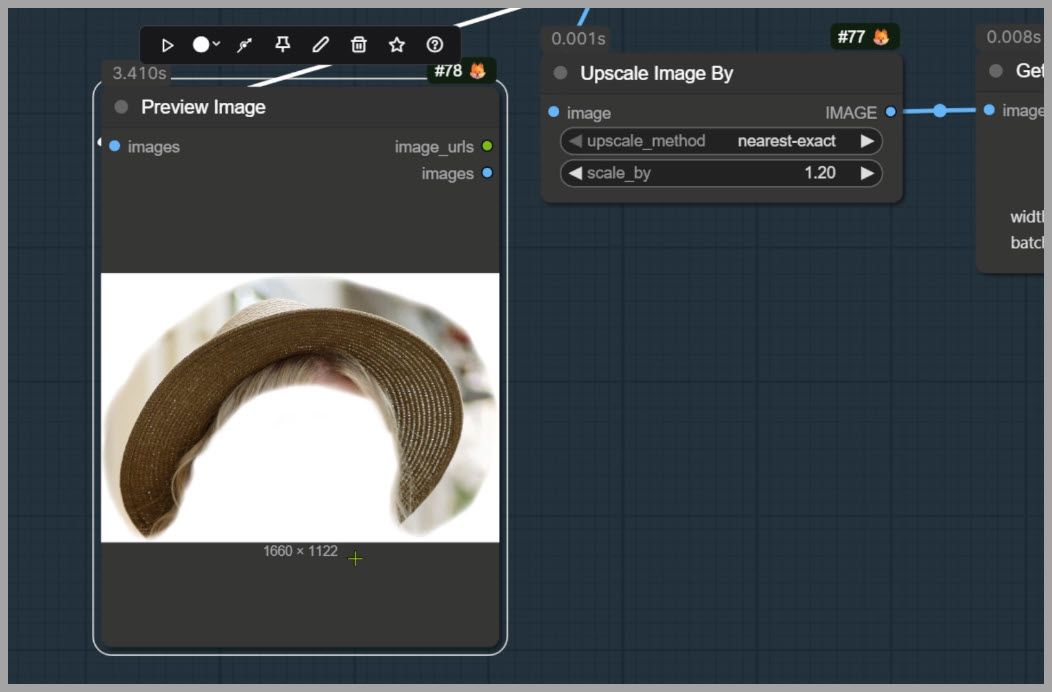
The rest of the image retains its original resolution and details.
The workflow still includes an optional resizing node for situations where image dimensions or available GPU memory make downscaling necessary.
However, when working with cropped inpainting, I generally prefer to bypass unnecessary full-image resizing.
Applying Blur to the Mask
Another useful preprocessing option is mask blur.
A painted mask usually defines a boundary between the region that should be edited and the region that should remain unchanged.
If this boundary is too sharp, the transition between generated and original pixels can sometimes become noticeable.
Applying a small amount of blur softens the mask edges.
This can help the generated region blend more naturally into the surrounding image.
However, mask blur should be used carefully.
Too much blur can enlarge the effective transition area and potentially affect details that we want to preserve.
For precise editing, a subtle blur is usually a better starting point than a very wide transition.
Cropping the Inpainting Region
The most important improvement is the addition of the Inpaint Crop node.
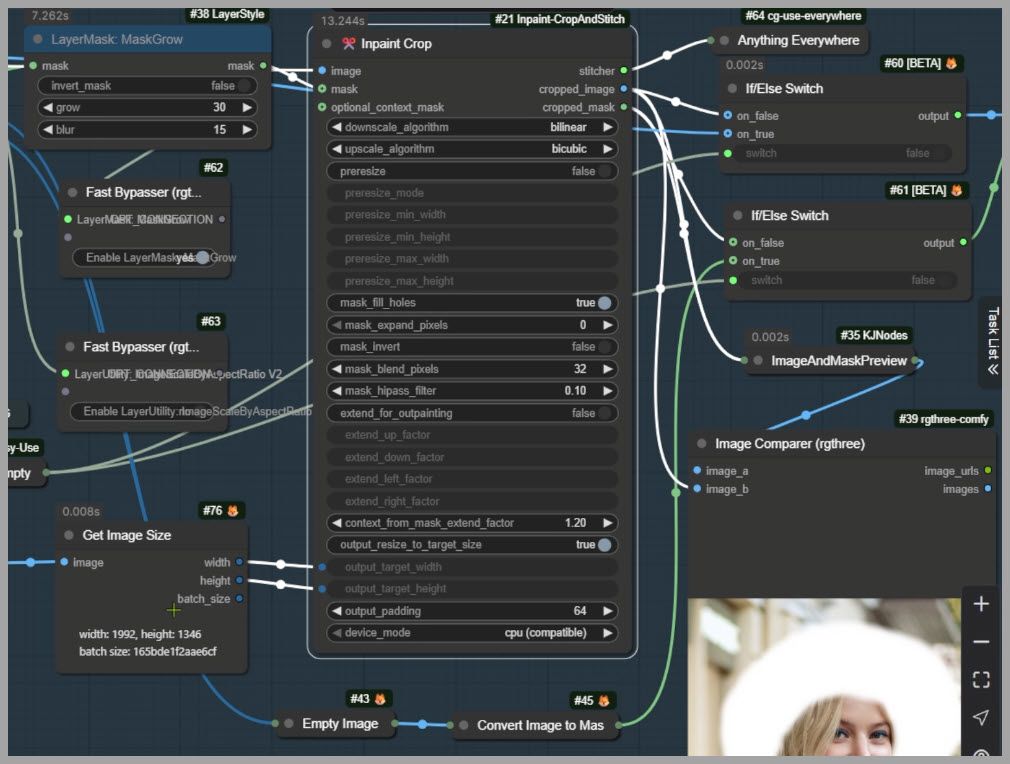
This node extracts the relevant portion of the original image around the painted mask.
In the flower-wreath example, the crop’s processing resolution is:
1660 × 1122 pixels
Notice that this is not a square image.
That’s an important detail because some image-editing models or pipelines may introduce alignment problems when processing non-square crops.
In my tests, the Krea 2 workflow handled this cropped region without the pixel drifting observed in the earlier approach.
This allowed the generated crop to be placed back into the original image without unwanted positional shifts.
The crop is also much smaller than the original 3908 × 5862 photograph, allowing the model to focus its processing on the important area.
I increased the crop’s processing size to help produce a more detailed inpainting result.
The ideal processing resolution will depend on the complexity of the edit and the available hardware, so the example resolution should not be treated as a universal requirement.
Expanding the Crop Beyond the Mask
When cropping an inpainting region, we shouldn’t extract only the exact pixels covered by the mask.
The model also needs visual information about the surrounding scene.
For this reason, I configured the crop expansion parameter to:
Crop expansion: 1.2
This expands the crop slightly beyond the masked region.
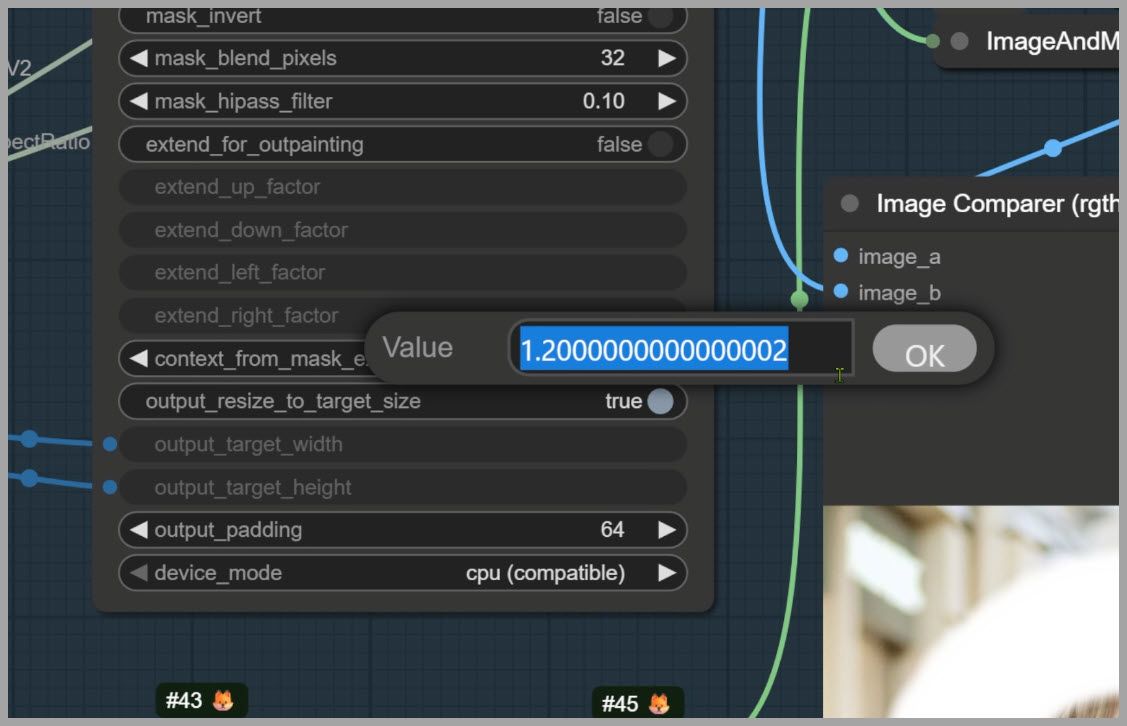
The additional space provides two important advantages.
First, it helps ensure that the entire masked area is included.
A crop that is too tight may exclude important parts of the object or leave insufficient space for the new content.
Second, it provides more visual context.
For example, when replacing a straw hat with a flower wreath, the model benefits from seeing the woman’s head, surrounding hair, nearby clothing, and background.
These details help it understand the image’s lighting, colors, perspective, and composition.
As a result, the generated wreath can blend more naturally with the original photograph.
A crop expansion value of 1.2 provided a useful balance in this example.
Restoring the Edited Crop
Once KSampler finishes generating the new content, the workflow places the edited crop back into the original image.
This is the key to preserving the photograph’s quality.
Rather than replacing the entire image with a regenerated version, we update only the relevant region.
The original pixels outside the composited area remain untouched.
Because the workflow retains the original image as the base, its final dimensions can also remain unchanged.
In our example, the input resolution is:
3908 × 5862 pixels
After inpainting and compositing, the output resolution is still:
3908 × 5862 pixels
More importantly, the original details outside the edited region are preserved.
This is how we can perform high-quality inpainting without unnecessarily sacrificing image sharpness or introducing changes elsewhere in the photograph.
Step-by-Step: Outpainting with the Same Workflow
Now that we’ve explored inpainting, let’s see how to extend an image using outpainting.
The best part is that we don’t need to rebuild the workflow.
We can use the same ComfyUI setup and adjust a few settings.
For this demonstration, we’ll extend a photograph to create additional scenery beyond its original boundaries.
Step 1: Load the Image Without a Painted Mask
First, upload the photograph you want to extend.
Unlike inpainting, we don’t need to paint a mask over an existing object.
Instead, the workflow will create new regions outside the original image.
Because no painted mask is detected, the workflow automatically switches to outpainting mode.
This is the main advantage of the automatic mode-selection system.
We can move from editing existing content to expanding the canvas without reconnecting the generation pipeline.
Step 2: Check the Input Resolution
Before generating the extended image, consider the size of the input photograph.
Outpainting increases the canvas dimensions, which can increase the amount of data processed by the model.
If the input image is already very large, the expanded canvas might exceed your GPU’s available memory.
In that case, use the optional resizing node to reduce the image resolution before processing.
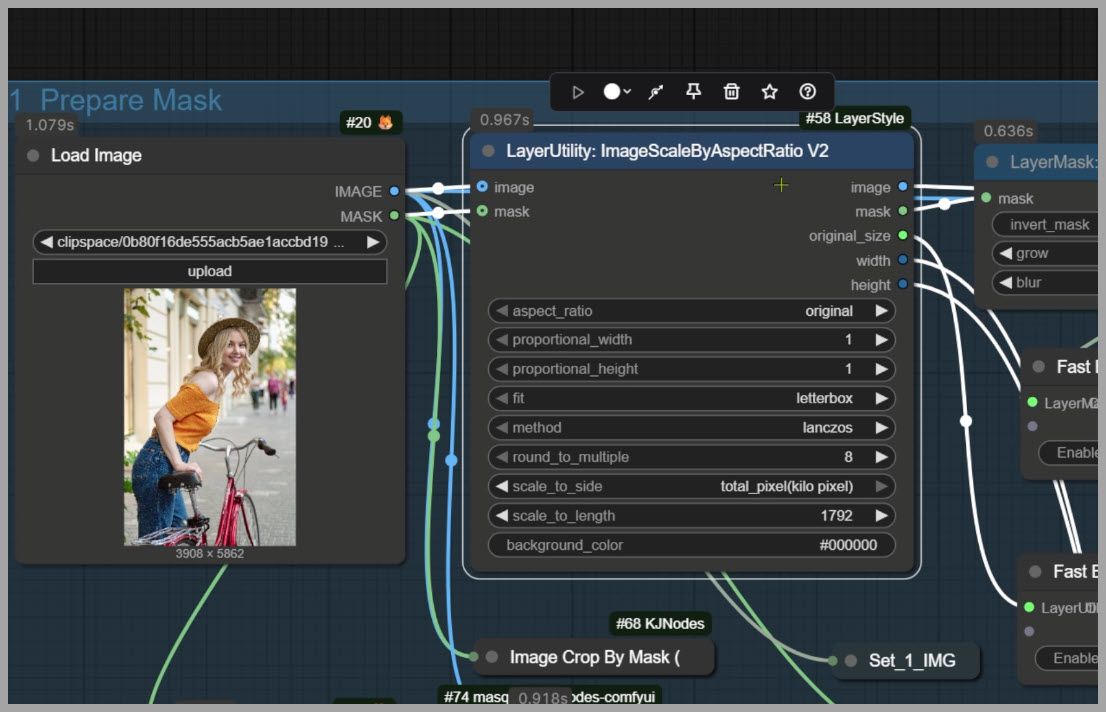
If your hardware can handle the dimensions, you can bypass this step.
The choice depends on the original resolution, desired expansion, and available VRAM.
Step 3: Configure the Outpainting Directions
Next, locate the four directional settings in the AnyPaint Encode node:
- Left: Expands the canvas to the left.
- Top: Expands the canvas upward.
- Right: Expands the canvas to the right.
- Bottom: Expands the canvas downward.
These parameters control how much new space is created around the original image.
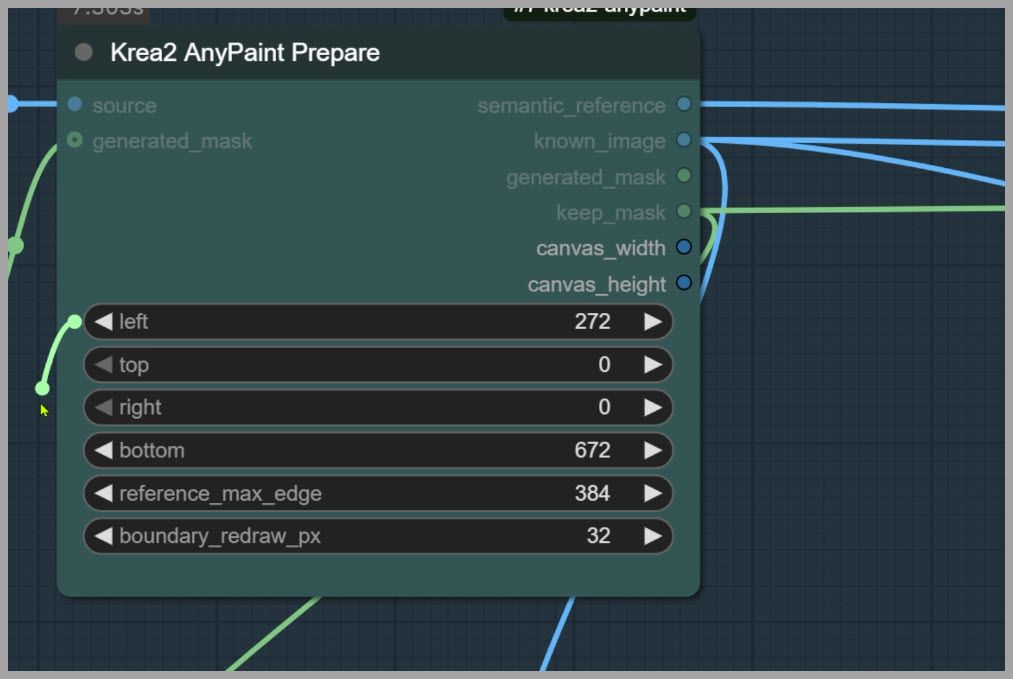
For example, if you want to extend the scene toward the left and bottom, enter the desired expansion amounts for those two settings.
The remaining directions can stay at zero when no expansion is required.
The exact values depend on your desired composition and output dimensions.
Step 4: Preview the Expanded Canvas
After configuring the directional values, inspect the canvas preview.
In the demonstrated workflow, the canvas has been extended along the left and bottom edges.
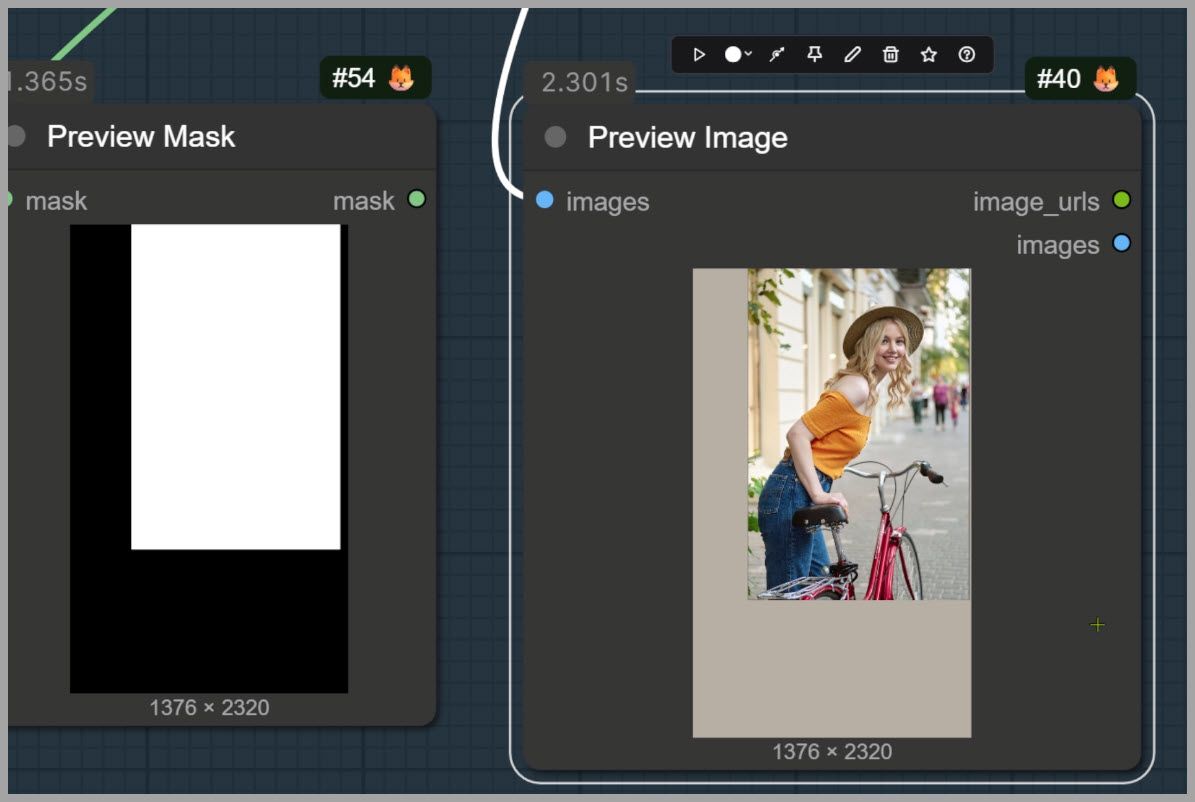
The preview shows gray areas around the original photograph.
These gray areas represent the regions that the model will generate.
The original photograph remains positioned within the expanded canvas, providing the visual context needed to create new content.
This preview is useful because it lets us confirm the expansion directions before running the generation process.
If the new space is on the wrong side of the photograph, simply adjust the corresponding directional values.
Step 5: Write the Outpainting Prompt
Next, describe what should appear in the expanded regions.
For example, suppose we’re extending a beach scene and want to add ocean waves.
The prompt tells the model what kind of content we want.
At the same time, the original photograph provides information about the scene’s colors, perspective, lighting, and visual style.
This combination allows the model to create content that fits the existing composition.
A good outpainting prompt should focus on extending the scene naturally rather than introducing unrelated elements.
Step 6: Run the Outpainting Workflow
Once the image, expansion settings, and prompt are ready, run the workflow.
The AnyPaint processing stage prepares the newly added canvas regions for generation.
KSampler then generates content for those regions using the prompt and the original image as context.
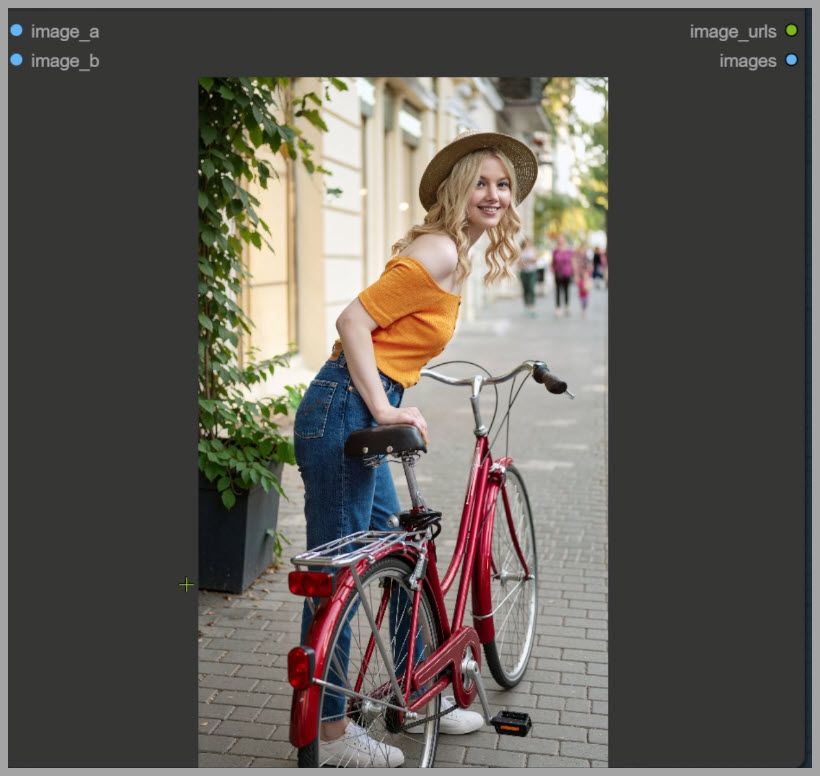
In the beach example, the workflow generates new waves and surrounding scenery.
The new content fills the gray areas shown in the canvas preview.
Step 7: Review the Final Outpainting Result
After generation, examine how the new content connects to the original photograph.
In the example, the newly generated ocean waves blend naturally into the existing scene.
The extended image maintains a consistent visual style and composition.
For the best results, pay close attention to the boundaries between original and generated content.
Look for issues such as:
- Visible seams.
- Abrupt changes in brightness or color.
- Inconsistent perspective.
- Repeated or unnatural patterns.
- Objects that don’t align correctly across the boundary.
A successful outpainting result should look like a photograph captured with a wider composition.
With Krea 2 and AnyPaint LoRA, the demonstrated workflow produces convincing extensions while remaining relatively straightforward to configure.
Conclusion
Krea 2 continues to be one of my preferred models for generating realistic images, and AnyPaint LoRA makes it even more versatile by enabling inpainting and outpainting.
With the right setup, you can use the same workflow to make subtle, localized image edits or expand an entire scene—all while keeping the process organized within ComfyUI.
Happy creating!
Gain exclusive access to advanced ComfyUI workflows and resources by joining our community now!