How to Prevent and Fix Pixel Drift in Qwen Image 2.1
When editing images with AI models, one of the most frustrating problems is pixel drift. You might ask a model to change just one part of an image, only to discover that other elements have shifted or changed unexpectedly.
For example, you might want to remove a coat from a person while keeping everything else exactly the same. However, after processing the image, you may notice that the person’s legs have moved slightly, clothing details have changed, or even facial features look different.
This is a common issue when using Qwen Image 2.1 for image editing.
Fortunately, there are several ways to prevent or correct pixel drift in ComfyUI.
In this article, I’ll walk you through three methods:
- Prevent pixel drift with a two-pass generation workflow — the most reliable method I’ve found.
- Correct pixel drift using an image alignment node — a simpler approach that works after generation.
- Fix pixel drift with Klein Edit Composite — an alternative correction method that sometimes produces better results.
I’ll also explain the image resolution settings, denoising values, and LoRA configurations that can help preserve the original image structure.
YouTube Video Tutorial:
Gain exclusive access to advanced ComfyUI workflows and resources by joining our community now!
1. What Is Pixel Drift in AI Image Editing?
Pixel drift occurs when an AI image editing model unintentionally changes the positions or appearance of image elements that were supposed to remain unchanged.
To understand this problem, let’s look at a practical example.
1.1 An Example of Pixel Drift in Qwen Image 2.1
I used Qwen Image 2.1 to remove a woman’s coat from an image.
The model successfully removed the coat, but when I compared the edited result with the original image, I noticed several unexpected changes:
- Her legs had shifted slightly from their original positions.
- Some details of her dress had changed, even though I hadn’t requested those changes.
- Her facial features looked different, despite the editing task having nothing to do with her face.
These changes might not be immediately noticeable when viewing the edited image by itself. However, they become much more obvious when comparing the original and edited images side by side.
This is what we call pixel drift.
1.2 Why Does Pixel Drift Happen?
The main reason is that Qwen Image 2.1 doesn’t simply remove or replace a small region of the original image.
Instead, the model reconstructs the image based on the reference image and the editing instructions.
During this reconstruction process, the model may reinterpret parts of the image that don’t actually need editing.
As a result, it can unintentionally modify:
- Object positions and proportions
- Clothing textures and patterns
- Facial features
- Body posture
- Background details
- Fine image structures
Even if the generated image looks visually similar to the original, its pixels may no longer align correctly.
This can be especially problematic when you want to combine the AI-edited result with the original image in an external editing application.
1.3 Why Is Eliminating Pixel Drift Important?
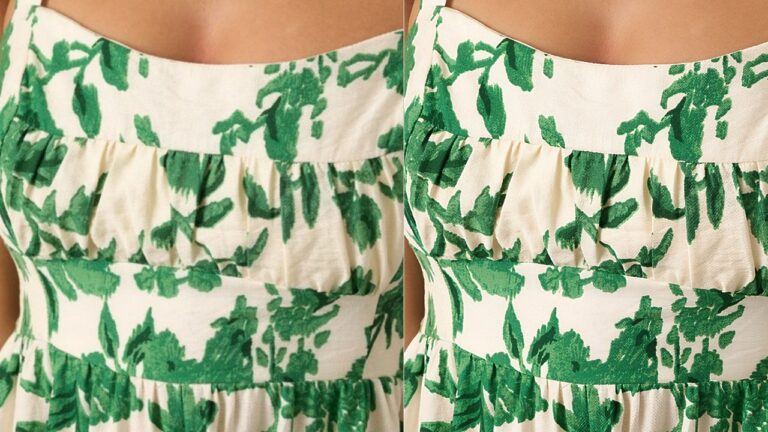
Let’s consider another comparison.
In this example, the edited image has almost no noticeable positional shifts.
The woman’s legs remain in exactly the same positions as in the original image. The shape and position of her dress are also preserved.
Although some facial details have changed slightly, her head hasn’t moved.
This is a much better result.
Why?
Because when the original and edited images remain aligned, it’s much easier to restore unwanted changes using Photoshop or other image editing software.
For example, if the model modifies the woman’s face, we can simply copy the original facial details back into the edited image.
When pixel drift is present, this becomes much more difficult because the facial features and surrounding structures may no longer line up.
The goal isn’t necessarily to preserve every individual pixel. It’s to keep the original image elements in their correct positions while allowing the model to make the requested edits.
1.4 Overview of the ComfyUI Workflow
To address this problem, I’ve created a ComfyUI workflow containing multiple groups.
Each group handles a different part of the process, including:
- Preparing the source image
- Preventing pixel drift during generation
- Restoring lost image details
- Removing temporary image padding
- Correcting pixel drift after generation
2. Understanding How Image Resolution Affects Pixel Drift
Before we start building the workflow, there’s something important you should know about Qwen Image 2.1.
Pixel drift can occur even when the image dimensions appear perfectly compatible with the model.
After testing different image sizes, I discovered an interesting pattern that became the foundation of my solution.
2.1 Why Standard Image Dimensions Don’t Always Work
You might assume that pixel drift happens because the input image has an unusual resolution.
For example, some AI image processing workflows require image dimensions to be divisible by specific numbers, such as 16 or 32.
It would therefore seem reasonable to resize the source image to dimensions that satisfy these requirements.
Unfortunately, this doesn’t necessarily solve the problem.
In my tests with Qwen Image 2.1, pixel drift could still occur even when:
- The source image was square.
- The image width and height were multiples of 16.
- The image dimensions were multiples of 32.
In other words, using model-friendly dimensions alone wasn’t enough to keep the generated image aligned with the original.
2.2 The 1024 × 1024 Resolution Exception
After experimenting with different output sizes, I found one particularly interesting exception.
When I set the generated image resolution to exactly 1024 × 1024 pixels, I consistently obtained results without noticeable pixel drift in my tests.
First-pass output resolution used to prevent noticeable positional shifts.
I suspect this behavior may have something to do with the image resolutions used during the model’s training.
However, this is only my hypothesis, not a confirmed explanation of the model’s internal behavior.
The important takeaway is that, in my testing, generating at exactly 1024 × 1024 pixels produced significantly more consistent alignment.
That doesn’t mean every possible edit or model configuration is guaranteed to be drift-free. It simply makes this resolution a useful starting point for the workflow.
2.3 The Challenge: What If the Original Image Isn’t Square?
Of course, most images we want to edit aren’t exactly 1024 × 1024 pixels.
For example, the original image used in this tutorial measures:
1333 × 2000 pixels
This is a portrait-oriented image.
If we directly resize it to 1024 × 1024 pixels, we’ll distort its aspect ratio. The person in the image may appear wider or shorter than before.
We could crop the original image into a square, but that would remove part of the image content.
Neither solution is ideal.
Instead, we need a way to generate a square image without losing the original composition.
My workaround is to add temporary padding around the source image, making it square while preserving its original aspect ratio.
After editing and refining the image, we can remove the padding to recover the original framing.
Let’s walk through the complete process.
3. Method 1: Prevent Pixel Drift with a Two-Pass ComfyUI Workflow
This is the most reliable method I’ve found for preventing pixel drift in Qwen Image 2.1.
The workflow consists of two generation passes.
The first pass focuses on maintaining image alignment, while the second pass improves image details without significantly changing the positions of image elements.
Here’s the overall process:
Original Image
1333 × 2000 pixels
Resize + Square Padding
2048 × 2048 pixels + padding mask
Pass 1: Qwen Image 2.1
1024 × 1024 output, no LoRA
Upscale 2× + Encode to Latent
2048 × 2048 pixels
Pass 2: KSampler Refinement
Denoise 0.5, LoRA enabled
Remove Padding and Restore Framing
Final portrait image with improved details
3.1 Step 1: Resize the Original Image
The first step is to prepare the source image.
In my example, the original image measures 1333 × 2000 pixels.
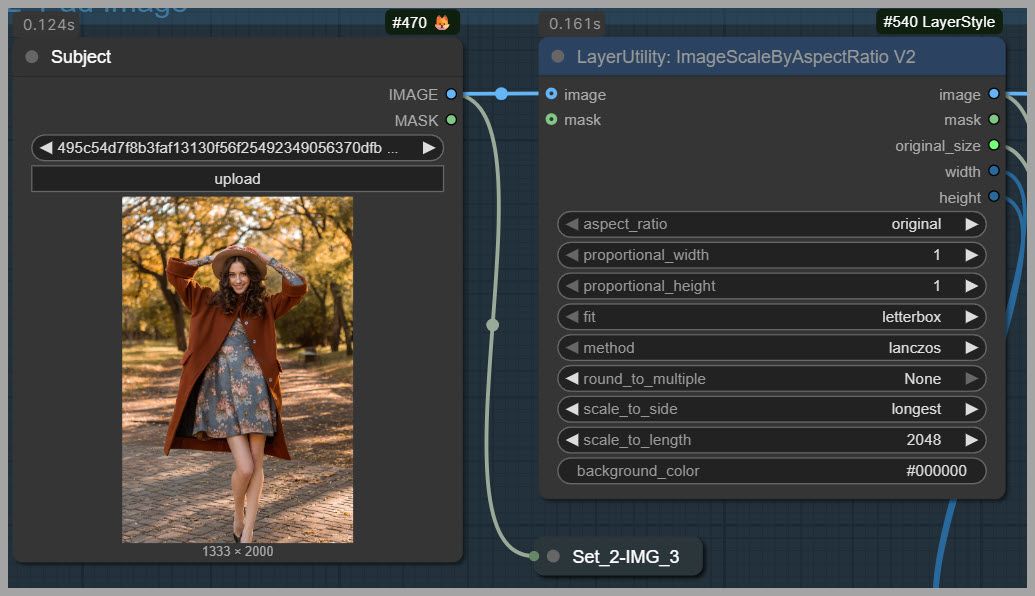
I use an image resizing node to upscale the image so that its longest side becomes 2048 pixels.
The important setting here is to maintain the original aspect ratio.
Since the original image is portrait-oriented, its height becomes 2048 pixels, and its width is scaled proportionally.
The new dimensions will be approximately 1365 × 2048 pixels, depending on how the resizing node rounds the result.
This slightly enlarges the original image while keeping its composition unchanged.
Why resize it to 2048 pixels?
Because we’ll eventually create a square reference image measuring 2048 × 2048 pixels.
By setting the longest side to 2048 first, we can create this square canvas simply by adding padding to the shorter side.
3.2 Step 2: Add Padding with the Image Pad Node
Next, we need to convert the resized portrait image into a square without stretching or cropping it.
To do this, I use an Image Pad node.
The node adds extra space around the image until the total canvas measures:
2048 × 2048 pixels
The additional space is filled with black.
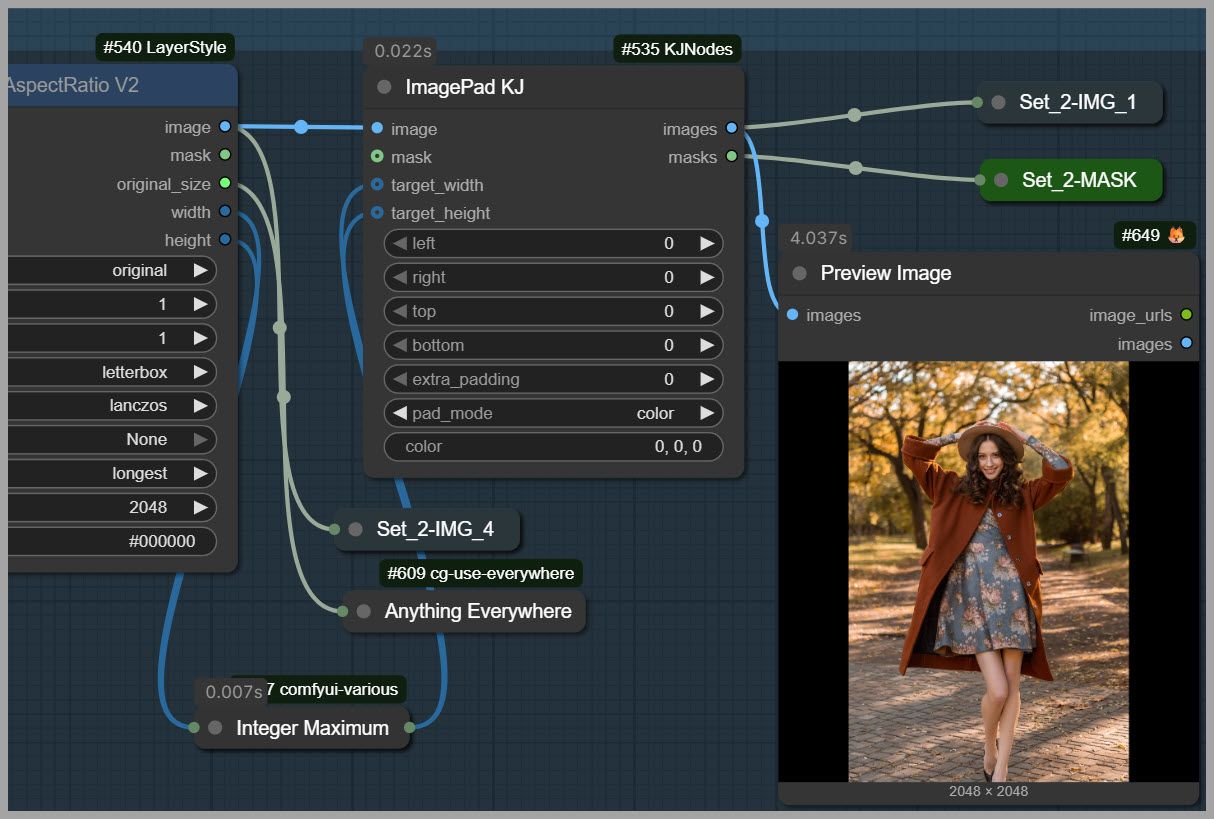
Conceptual illustration: black padding fills the unused space without stretching the portrait image.
Because the source image is portrait-oriented, the padding is primarily added to the left and right sides.
The image itself stays proportional.
There’s another important benefit to using this node.
The Image Pad node also generates a mask.
This mask identifies the padded region, allowing us to remove the extra black space later.
Make sure to preserve this mask in your workflow.
We’ll need it in the final processing stage.
3.3 Step 3: Configure the First Qwen Image 2.1 Generation Pass
Now that we’ve prepared our square reference image, we can configure the first generation pass.
This is the most important stage for preventing pixel drift.
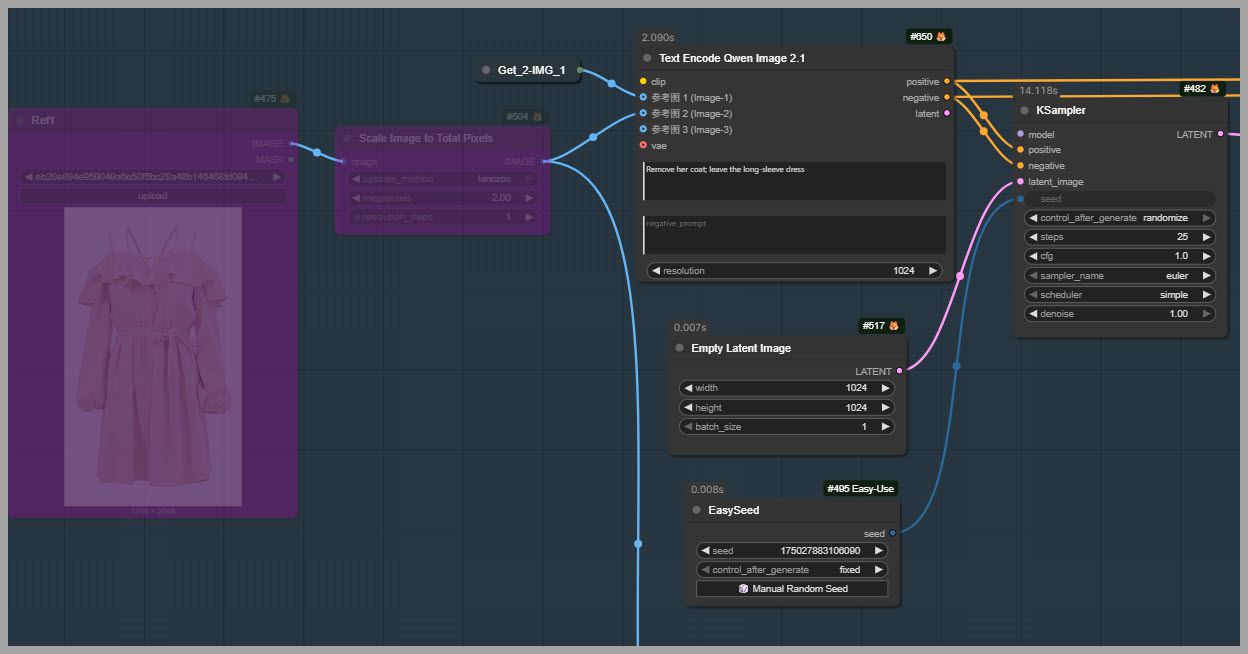
First, connect the padded 2048 × 2048 image to the Qwen Image 2.1 workflow as the primary reference image.
You can also provide additional reference images if your editing task requires them.
For example, you might use another reference image to specify the appearance of a piece of clothing or another visual element.
These additional reference images don’t need to have the same 2048 × 2048 resolution.
However, the primary reference image should be the square image we just prepared.
Next, configure the output resolution.
First-pass generation settings
| Model | Qwen Image 2.1 BF16 |
|---|---|
| Primary reference | 2048 × 2048 |
| Output width | 1024 |
| Output height | 1024 |
| LoRA | Disabled |
Why Set the Output to Exactly 1024 × 1024?
As mentioned earlier, this is the only resolution that consistently prevented noticeable pixel drift in my tests.
Even though the input reference image is 2048 × 2048, the generated output should be exactly 1024 × 1024 pixels.
Don’t confuse the reference image size with the output image size.
They serve different purposes.
The larger reference image provides the model with the padded composition, while the 1024 × 1024 output setting is the key part of our alignment-preserving workaround.
Which Qwen Image Model Should You Use?
I’m using the BF16 version of Qwen Image 2.1.
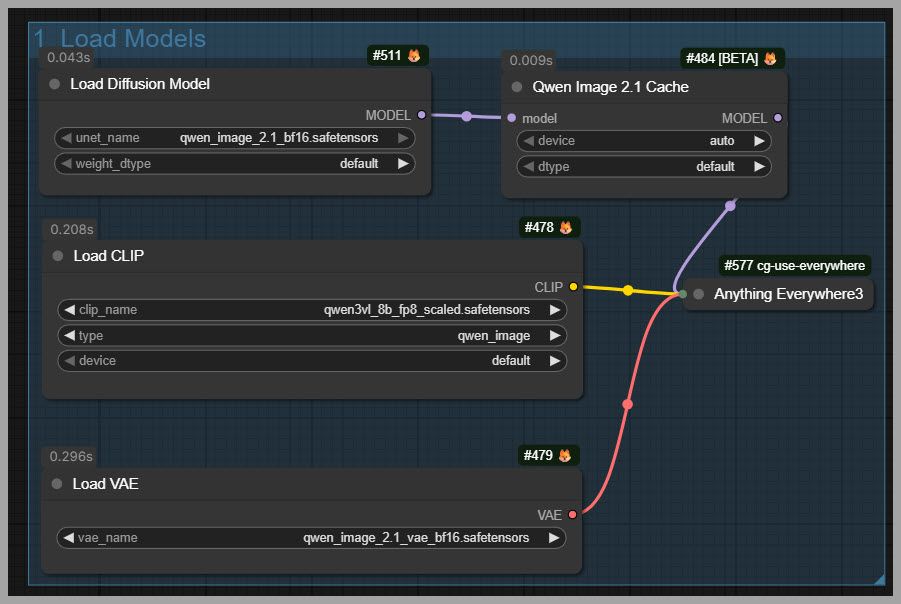
However, you can experiment with other versions if you prefer.
Just keep in mind that their behavior may not be identical, so it’s worth checking alignment when changing models.
Why Should You Avoid LoRAs in the First Pass?
One more important detail: don’t connect any LoRA during this first generation pass.
In my testing, adding a LoRA at this stage could introduce pixel drift.
Since the main goal of this pass is to preserve image structure, it’s better to keep the configuration as simple as possible.
We’ll introduce a LoRA later when we refine the image.
3.4 Step 4: Configure the Second Generation Pass
The next stage focuses on restoring image detail.
First, I upscale the generated image by a factor of two.
This increases its dimensions from:
1024 × 1024 → 2048 × 2048 pixels
At this point, the image is back to the same square dimensions as our padded reference.
However, simply enlarging an image doesn’t necessarily restore the details lost during the first generation pass.
That’s why we’ll use the upscaled image as the starting point for another diffusion pass.
Next, we need to prepare the upscaled image for the KSampler.
To do this, encode the image into latent space using the appropriate VAE encoding node.
The process is straightforward:
- Connect the 2048 × 2048 upscaled image to the VAE encoder.
- Use the VAE associated with your model workflow.
- Connect the resulting latent output to the KSampler’s latent image input.
This allows the second pass to refine the existing image rather than generate an entirely new one from scratch.
The difference is important.
In the first pass, we want the model to perform the requested image edit while maintaining alignment.
In the second pass, we mainly want the model to improve the details already present.
Now we come to the most important setting in the second pass.
In the first generation stage, the denoising strength was set to 1.
For the second pass, I reduce it to:
Denoising strength: 0.5
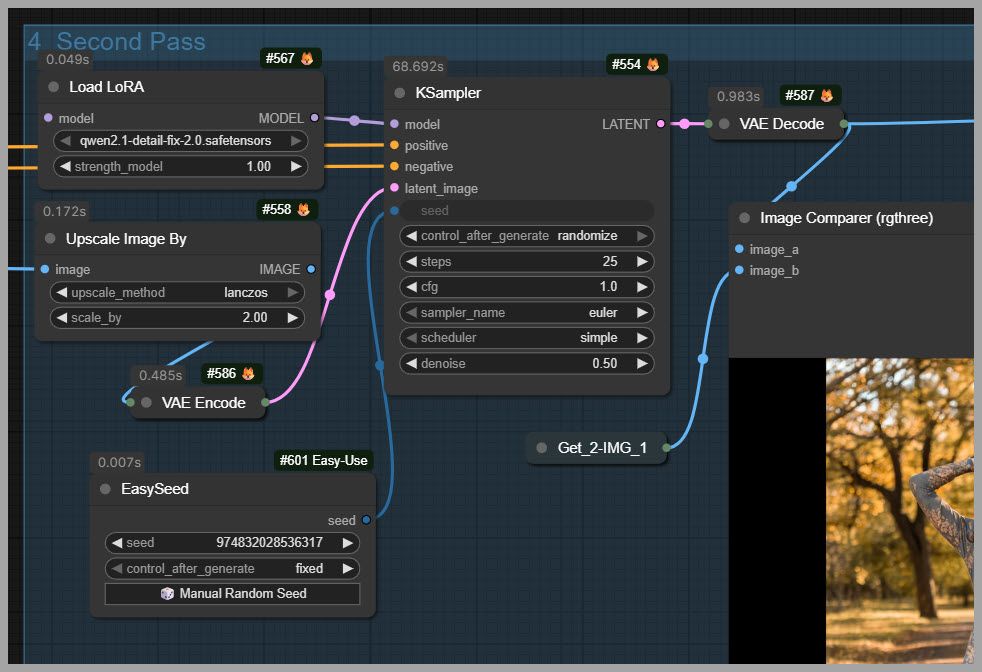
This is a conceptual guide to denoising behavior, not a guarantee of drift-free results at a particular value.
Denoising strength controls how much freedom the model has to modify the input image.
At a high denoising value, the model can make substantial changes to the image.
This can be useful for major transformations, but it also increases the risk of changing object positions and other image structures.
At a lower denoising value, the model tends to preserve more of the original image while refining its details.
By using 0.5, I found that the model could improve image quality without introducing significant positional shifts.
You can adjust this value depending on your goals.
For example, if your priority is to preserve as much of the original structure as possible, you may want to experiment with a lower value.
If you need stronger detail regeneration, you can try increasing it.
Just remember that higher denoising values can increase the risk of pixel drift.
Now we can introduce a LoRA.
You might remember that I specifically recommended avoiding LoRAs during the first generation pass.
So why am I adding one now?
The difference is the denoising strength.
During the first pass, the model has much more freedom to reconstruct the image. Introducing a LoRA at that stage may affect the image’s alignment.
During the second pass, we’re starting with an existing image and using a relatively low denoising value of 0.5.
This limits how extensively the model modifies the input.
As a result, the LoRA can help improve details without significantly changing the positions of image elements.
In my tests, this approach worked well.
After adding the LoRA and running the second pass, the image had noticeably better detail while maintaining the alignment achieved during the first pass.
Of course, the result may depend on the LoRA you’re using and its strength.
Different LoRAs can influence the model in different ways, so it’s still important to inspect the result.
At this point, we have two generated images.
The first image is the 1024 × 1024 output from the alignment-preserving generation pass.
The second image is the 2048 × 2048 output from the detail-refinement pass.
When comparing them, the difference should be easy to see.
The second image generally has:
- More defined facial details
- Improved clothing textures
- Sharper fine structures
- Better overall image quality
Most importantly, the positions of the main image elements remain largely unchanged in the demonstrated workflow.
This gives us a higher-resolution edited image without the noticeable pixel drift that appeared in the original editing attempt.
However, there’s one final issue we need to address.
The black padding is still present around the image.
3.5 Step 5: Remove the Black Padding Using the Original Mask
Remember the mask we generated earlier using the Image Pad node?
Now it’s time to use it.
The mask identifies the areas that were added when we converted the original portrait image into a square.
In the final processing group, I use this mask to remove the padded areas and restore the original image framing.
The process works as follows:
- Take the refined 2048 × 2048 output image from the second pass.
- Retrieve the mask created by the Image Pad node.
- Use the mask in the cropping or padding-removal stage of the workflow.
- Remove the black padded regions.
- Output the edited image with the original portrait aspect ratio.
Make sure the mask corresponds to the padded image and is aligned with the final output. If mask dimensions differ from the image, they may need to be resized appropriately before cropping.
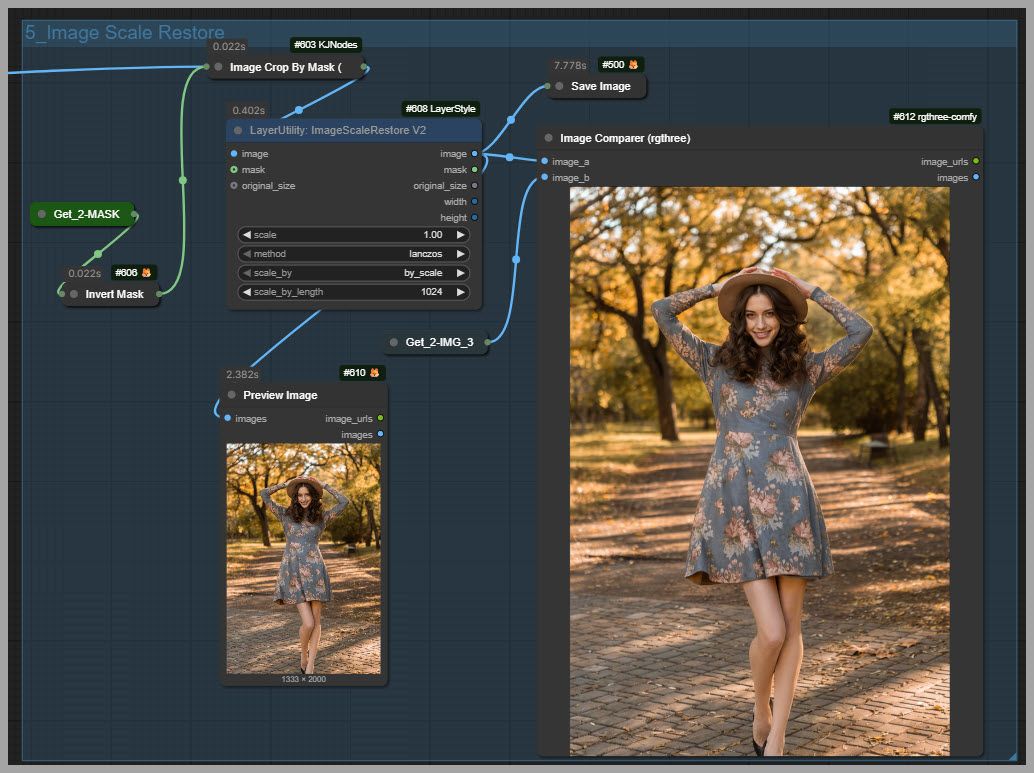
Once the padding has been removed, the image returns to its original portrait framing.
One important distinction: restoring the original aspect ratio doesn’t necessarily restore the exact original pixel dimensions.
If you need the final file to be exactly 1333 × 2000 pixels, you can add a final resizing step after removing the padding.
3.6 Final Result: Improved Details Without Noticeable Pixel Drift
And there we go!
We now have an edited image that preserves the original composition while offering much better detail than the first 1024 × 1024 generation.
The main advantages of this method are:
- The first generation pass helps preserve the positions of image elements.
- The second pass improves the image details.
- Using a LoRA during the lower-denoising refinement stage allows additional quality enhancement.
- The padding mask helps us recover the source image’s original aspect ratio.
In my testing, this has been the most reliable approach for preventing noticeable pixel drift in Qwen Image 2.1.
The only downside is that it requires several processing steps.
So, is there an easier way to deal with pixel drift?
Yes!
Let’s look at a simpler method that corrects pixel drift after the image has already been generated.
4. Method 2: Pixel Drift Fix Node
The previous method is designed to prevent pixel drift during image generation.
However, sometimes you may prefer a simpler workflow.
Instead of carefully controlling the output resolution and performing two generation passes, you can generate the edited image normally and then attempt to correct the pixel shifts afterward.
This method is much easier to set up, although it isn’t always as reliable.
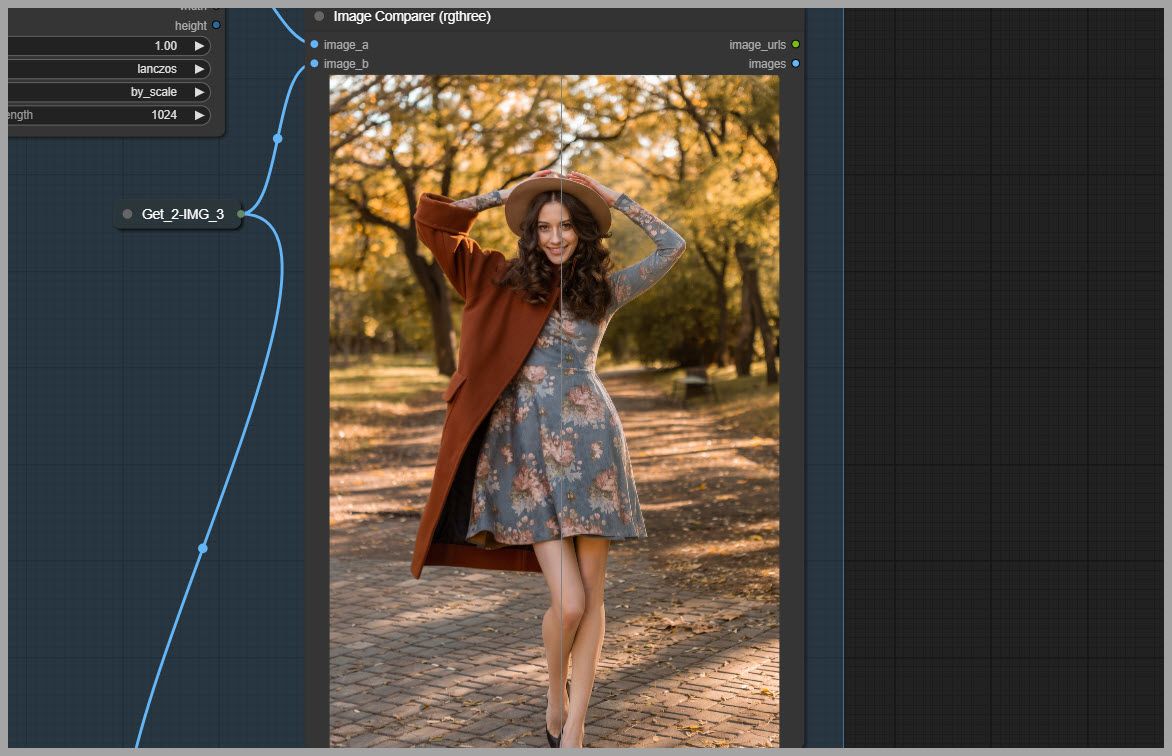
4.1 Step 1: Generate an Image with the Original Aspect Ratio
For this example, I’ll use Image 4 as the reference image.
This is the image that was resized earlier in the workflow.
Unlike the padded 2048 × 2048 image, Image 4 still has the same aspect ratio as the original portrait image.
This time, we use it directly as the reference for Qwen Image 2.1, without adding square padding.
After running the model, we can see some obvious pixel drift, just as expected.
The generated result may look acceptable on its own, but the positions of certain image elements no longer match the source.
Now we need to correct those shifts.
4.2 Step 2: Connect the Source and Edited Images to the Alignment Node
In the next group of the workflow, I’ve added a node designed specifically to correct pixel drift.
The setup is very simple.
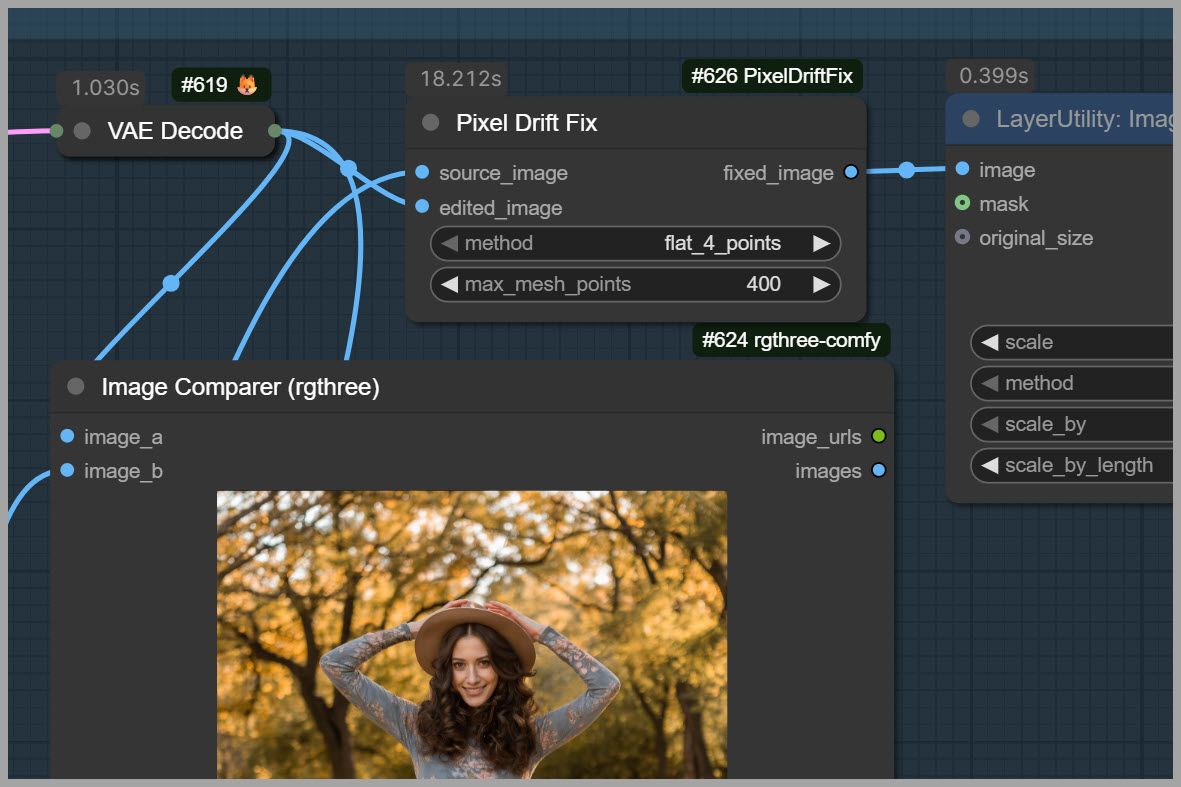
You only need two images:
- Original source image: The image before AI editing.
- Edited image: The result generated by Qwen Image 2.1.
Connect both images to the correction node.
The node then attempts to analyze the differences between the two images and align the edited result with the original.
The objective is to correct unwanted positional changes while preserving the intended edit.
For example, if the woman’s legs shifted slightly during generation, the correction process attempts to bring those elements back into alignment with their original positions.
This approach can be very convenient because it doesn’t require us to perform the entire two-pass workflow.
Conceptual connection diagram for post-generation alignment. Both the original and edited images are required.
5. Method 3: Fix Pixel Drift with Klein Edit Composite
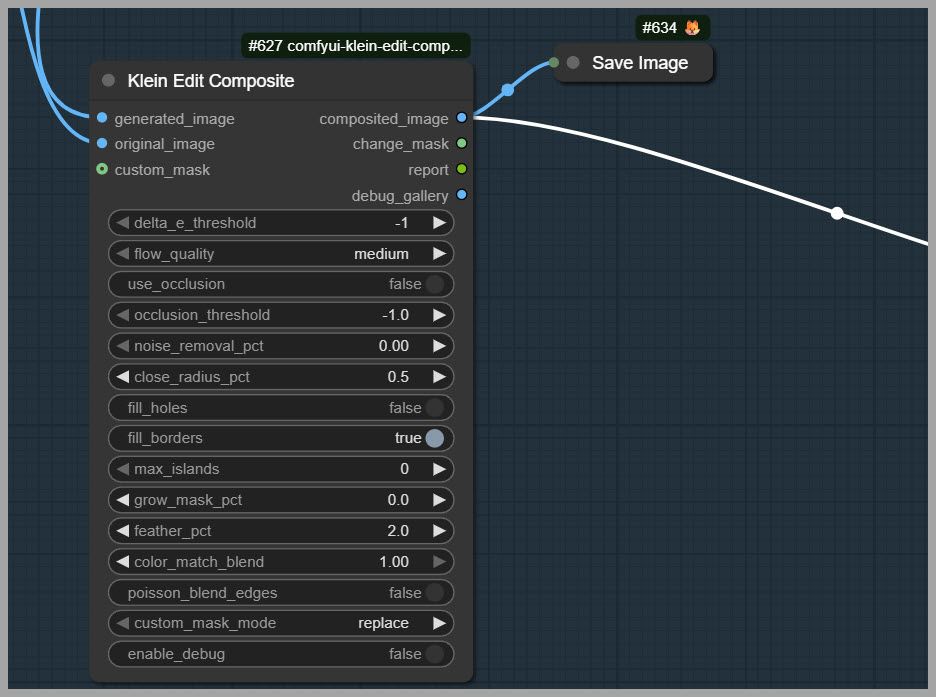
Another option for correcting pixel drift is a node called Klein Edit Composite.
This node provides a similar type of post-generation correction, and in some cases, it can produce better results than the previous alignment node.
5.1 What Is Klein Edit Composite?
Klein Edit Composite is a compositing node associated with image editing workflows.
Despite its name, it isn’t limited to images generated with Flux 2 Klein.
You can also try using it with edited images produced by other AI models, including Qwen Image 2.1.
This makes it a useful alternative when working with different image editing workflows in ComfyUI.
6. Comparing the Three Pixel Drift Solutions
Now that we’ve covered all three methods, let’s compare their strengths and limitations.
| Method | Main advantage | Limitation | Best use case |
|---|---|---|---|
| Two-pass square-padding workflow | Most reliable in my tests for preventing noticeable drift | Requires more nodes and processing | When image alignment is the highest priority |
| Pixel Drift Fix | Simple post-generation correction | Results can vary depending on the image | When you already have an edited image with pixel drift |
| Klein Edit Composite | Can outperform the other correction node in some cases | May produce inconsistent results or errors | When the standard correction method doesn’t work well |
8. Conclusion: The Best Way to Prevent Pixel Drift in Qwen Image 2.1
Pixel drift is one of the challenges you may encounter when editing images with Qwen Image 2.1.
Because the model reconstructs images rather than simply modifying isolated pixels, it can unintentionally change the positions and appearance of elements outside the intended editing area.
Fortunately, we have several ways to address the problem.
The most reliable method I’ve found is to prepare a square reference image using padding, generate the first result at exactly 1024 × 1024 pixels without a LoRA, and then perform a second refinement pass at 2048 × 2048 pixels.
By reducing the denoising strength to 0.5 during the second pass, we can improve image details while reducing the likelihood of introducing new positional changes.
Finally, we remove the temporary padding using the original mask and restore the source image’s aspect ratio.
Although this workflow requires more processing stages, it produced the most consistent results in my experiments.
For a simpler solution, you can also try correcting pixel drift after generation using an image alignment node or Klein Edit Composite.
Both approaches can be helpful, although their effectiveness may vary depending on the image.
Ultimately, the best method depends on your priorities.
If preserving the positions of image elements is critical, the two-pass prevention workflow is the method I’d recommend trying first.
If you simply want to correct an existing edited image, the post-generation alignment methods offer a more convenient alternative.
I hope these techniques help you achieve more consistent and precise image editing results in ComfyUI!
If you’d like to download the ComfyUI workflow demonstrated in this article, you can join our community and support the channel to access the workflow resources.
Gain exclusive access to advanced ComfyUI workflows and resources by joining our community now!