Head Swapping in ComfyUI with Qwen Image 2.1 — No LoRA Required
In the last article, we explored the newly released Qwen Image 2.1 model and tested its image-editing capabilities. The results were impressive, especially when it came to making localized edits while preserving the rest of an image.
In this article, we’ll use Qwen Image 2.1 for a practical and very common image-editing task: head swapping.
The interesting part is that we won’t use an identity LoRA to help with the head swap itself. Instead, the workflow relies on careful reference-image preparation, spatial alignment, pose guidance, and a simple prompt.
The result is a workflow that can handle surprisingly difficult cases, including:
- Faces partially covered by hands
- Different hairstyles between the source and target
- Hair overlapping the body
- Reconstructing shoulders and clothing hidden by the original hair
- Maintaining natural head-to-body proportions
- Preserving the original pose
Let’s walk through the entire workflow step by step.
Video Tutorial:
Gain exclusive access to advanced ComfyUI workflows and resources by joining our community now!
1. What We’re Building
The goal is simple: take a target portrait and replace the person’s head with the head from another reference image.
However, a convincing head swap involves much more than pasting one face over another.
The model has to understand:
- Which parts of the original image should stay unchanged
- Which regions should be regenerated
- How large the new head should be
- Where the head should be positioned
- How the new hairstyle interacts with the body
- How lighting should be adjusted
- How to preserve the original pose
That is where Qwen Image 2.1 performs particularly well.
Why Qwen Image 2.1 Works Well for Head Swapping
Qwen Image 2.1 is an image-editing model, which means it can reason about the existing contents of an image instead of simply generating a new image from scratch.
For head swapping, that distinction is important.
Rather than replacing the entire person, we can ask the model to change the head while keeping the rest of the image as close to the original as possible.
With good guidance, the model can also reconstruct regions that were hidden by the original hairstyle.
2. What the Results Can Handle
Before breaking down the workflow, it helps to understand the kinds of challenges it can solve.
Example 1: A Hand Covering the Face
In one test image, the woman in the target portrait has her hand partially covering her mouth.
This makes the head swap significantly more difficult.
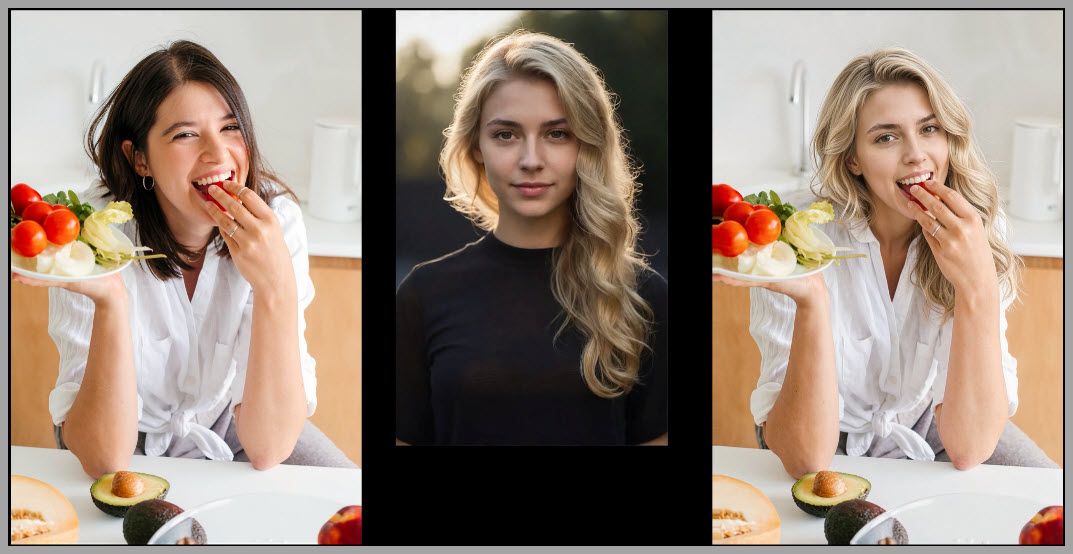
The model cannot simply replace the entire head region. It has to understand that the hand belongs in front of the face and should remain unchanged.
At the same time, the head reference uses a noticeably different hairstyle.
Despite that, the final result works very well.
The new blonde hair is generated correctly, and importantly, the hair appears behind the hand rather than being painted over it.
That demonstrates that the model is interpreting depth and occlusion instead of treating the edit as a flat overlay.
Example 2: Reconstructing the Shoulder and Clothing
In another test, the same head reference is used with a different target portrait.
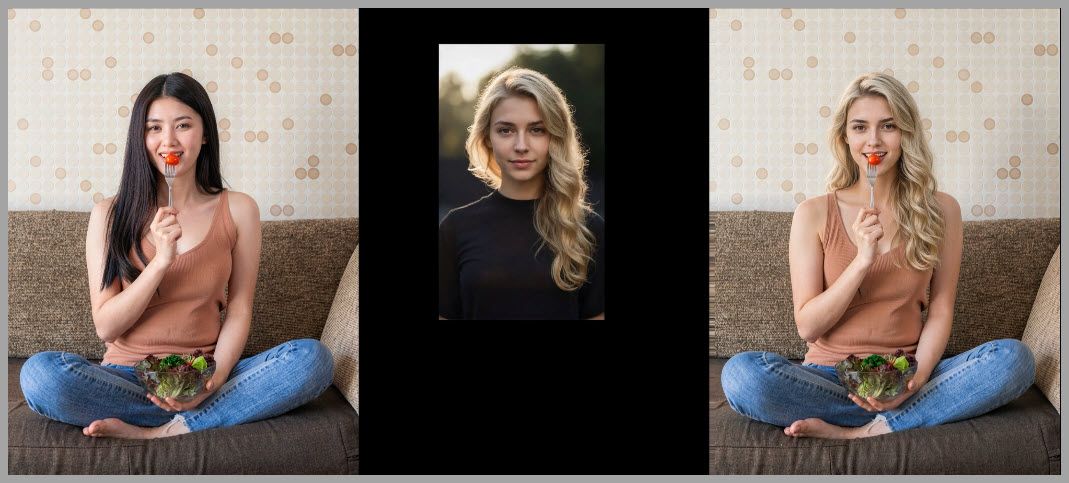
In the original target image, black hair falls over the woman’s right shoulder.
After the head is replaced, that black hair is no longer supposed to be there.
This means the model must generate completely new pixels in that area.
It needs to reconstruct:
- The missing part of the shoulder
- The skin underneath the hair
- The tank top that was partially hidden
The final result successfully rebuilds those regions, which shows why image-editing models can be much more flexible than traditional face-swapping methods.
3. The Biggest Problem: Incorrect Head Proportions
One of the biggest challenges when using image-editing models for head swapping is maintaining realistic proportions between the head and the body.
A very common failure is that the generated head becomes too large.
Even if the identity looks correct and the face is well generated, an oversized head can immediately make the image look unnatural.
To reduce this problem, I preprocess the head reference before sending it into Qwen Image 2.1.
Preparing the Head Reference
Instead of feeding the head reference image directly into the model, I place it on a canvas that matches the dimensions of the target image.
The area surrounding the head is filled with black.
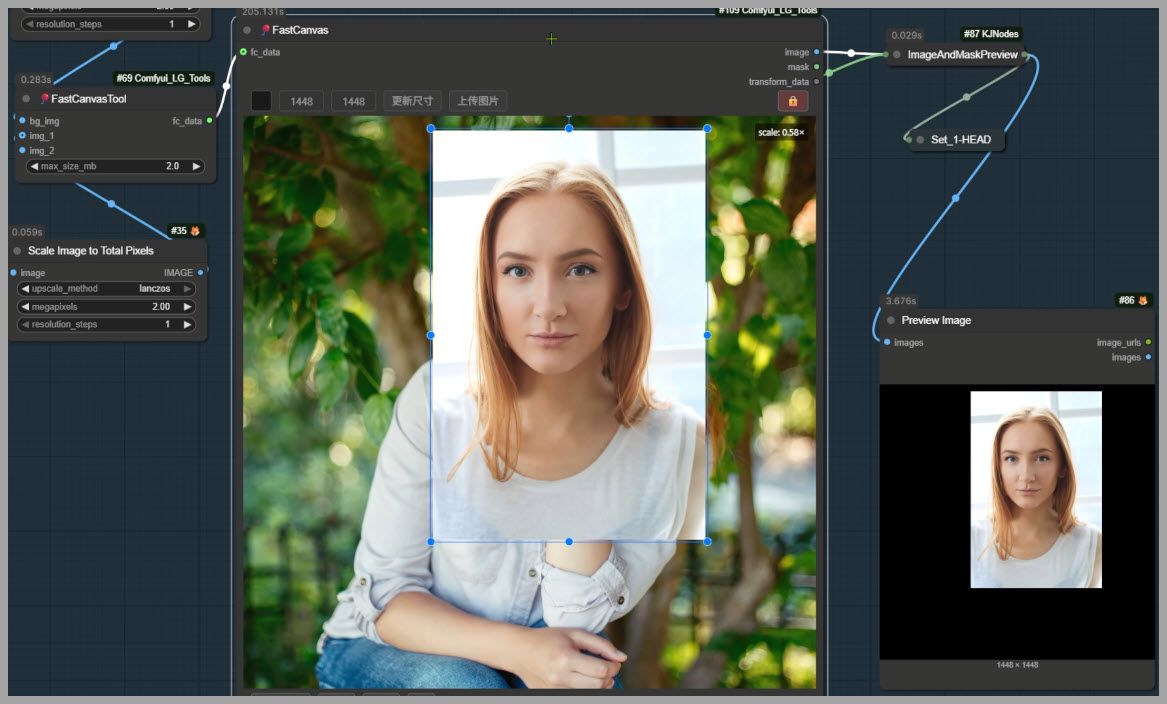
The head itself is then resized and positioned so that it roughly matches the target head.
The goal is to make sure:
- Both heads are approximately the same size
- Both heads sit at approximately the same vertical position
- The overall canvas dimensions are identical
This gives Qwen Image 2.1 much stronger spatial guidance.
Instead of making the model guess how large the replacement head should be, we are effectively showing it the desired scale and placement before generation starts.
4. Aligning the Head with the Fast Canvas Node
To prepare the reference image, I use the Fast Canvas node.
This node makes it easy to overlay the head reference on top of the target image and visually align the two.
Step 1: Load the Images
Load both:
- The target image
- The head reference image
The head reference is displayed over the target so you can compare their relative scale and position.
Step 2: Unlock the Canvas
In the top-right corner of the Fast Canvas interface, you will see a button that looks like a lock.
Click it to unlock the canvas.
Once unlocked, you can freely resize and move the reference image.
Step 3: Resize the Head Reference
Use the mouse wheel to change the size of the reference image.
The goal is not necessarily to make the two faces perfectly overlap.
Instead, focus on making the two heads roughly the same overall size.
Pay attention to:
- Head width
- Head height
- Chin position
- Forehead position
- General face scale
This alignment helps the model understand the intended proportions.
Step 4: Reposition the Head
Next, hold down the left mouse button and drag the reference image.
Move it until the head sits at approximately the same position as the head in the target image.
In particular, try to keep both heads at roughly the same height.
This helps prevent Qwen Image 2.1 from shifting the new head too far up or down.
Step 5: Lock the Images
Once you are satisfied with the scale and placement, click the open lock again.
This locks the images in place so the alignment does not change accidentally.
Step 6: Reset if Necessary
If the alignment becomes messy or you want to start over, use the reset button at the bottom of the node.
This lets you return to the original state and repeat the positioning process.
5. Choosing the Qwen Image 2.1 Version
For this workflow, I recommend using the BF16 version of Qwen Image 2.1 if your GPU has enough VRAM.
In my testing, BF16 produces better results than the FP8 or INT8 versions.
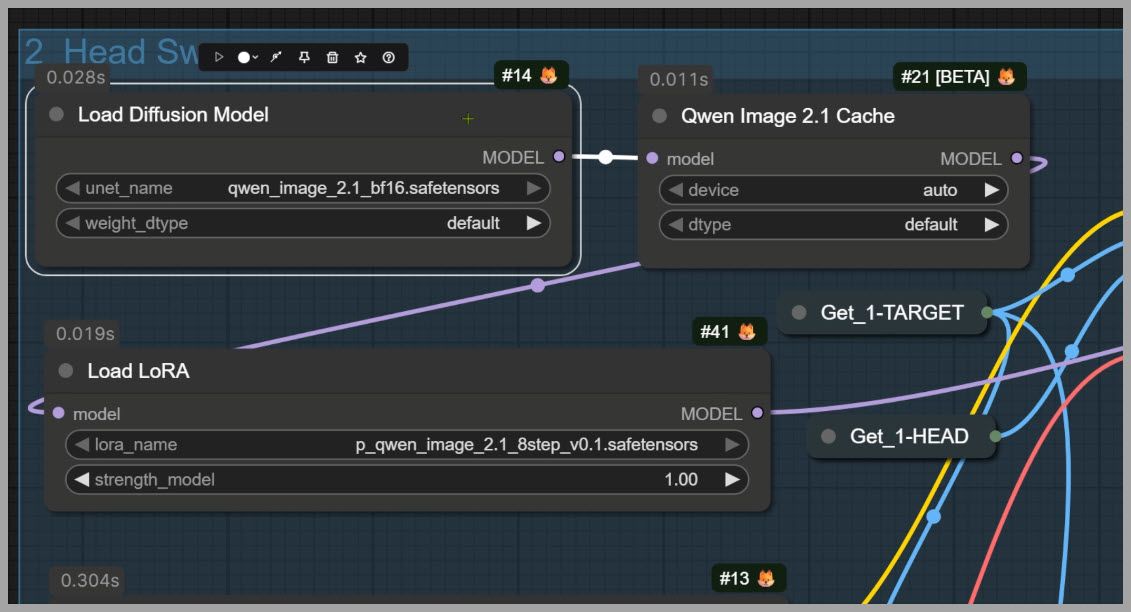
The tradeoff is memory usage.
BF16 requires more VRAM, so users with limited hardware may need to use one of the lower-precision versions.
As a general rule:
- Use BF16 when image quality is the priority and you have sufficient VRAM.
- Use FP8 or INT8 when memory limitations are more important.
For head swapping, where facial quality and structural consistency matter a lot, BF16 is preferable when possible.
6. Using an 8-Step LoRA for Faster Generation
Although this workflow does not use a LoRA to provide the identity for the head swap, I do use a LoRA adapter for acceleration.
This distinction is important.
The head reference itself provides the identity information.
The LoRA is only used to help Qwen Image 2.1 complete the editing process in fewer sampling steps.
With the acceleration LoRA enabled, the workflow can complete the edit in only 8 steps.
This makes the workflow much faster without requiring an identity-specific LoRA for every person.
7. Adding a Pose Skeleton Reference
Another important part of the workflow is pose guidance.
I provide a pose skeleton image as an additional reference.
The purpose of this is to encourage the model to preserve the original body pose while changing the head.
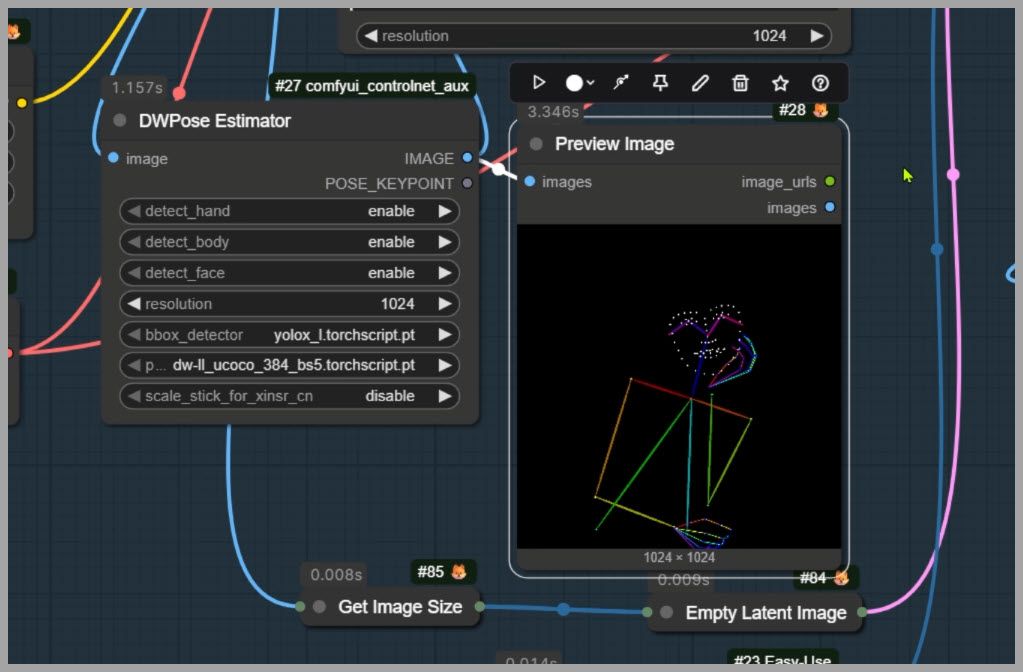
Without pose guidance, the model may sometimes make unnecessary changes to the body while trying to integrate the new head.
Those changes can include:
- Slight shoulder shifts
- Changed arm positions
- Modified body posture
- Different head angles
- Altered torso alignment
The pose skeleton provides a structural constraint.
It tells the model, in effect:
“Change the head, but keep the body where it is.”
This is especially useful when the target pose is complex or when the hands are close to the face.
8. Writing the Head-Swap Prompt
The prompt used in this workflow is intentionally simple:
Replace the head in image 1 with the head in image 2. Adjust the lighting on the head. Keep her pose unchanged.
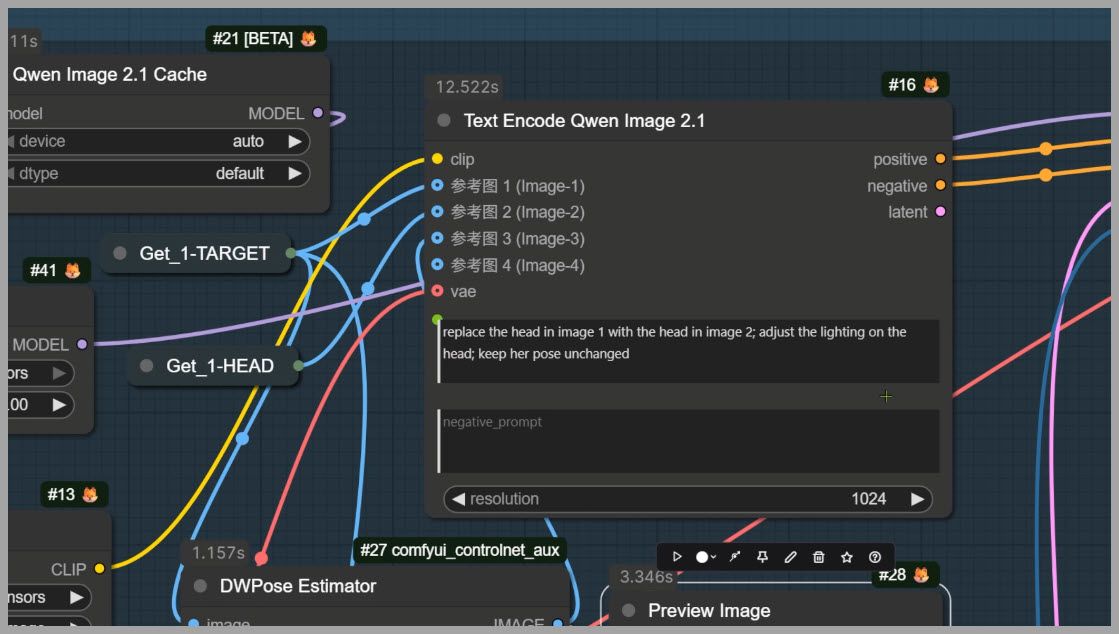
Each part of the prompt has a specific purpose.
“Replace the head in image 1 with the head in image 2”
This clearly defines the roles of the two images.
Image 1 is the target.
Image 2 provides the replacement head.
Keeping the instruction direct reduces ambiguity.
“Adjust the lighting on the head”
The lighting in the reference image may not match the target image.
If the head is copied too literally, it can look pasted into the scene.
By explicitly telling the model to adjust the lighting, we give it permission to modify highlights, shadows, and overall brightness so the new head blends more naturally with the target portrait.
“Keep her pose unchanged”
This reinforces the pose skeleton reference.
It tells the model that the body structure should remain stable while the head is edited.
The combination of the pose reference and the prompt makes unnecessary pose changes less likely.
9. Understanding Pixel Drift in Qwen Image 2.1
There is another issue you may notice when editing images with Qwen Image 2.1.
Even when the source image and the output are supposed to have exactly the same resolution, the edited image may not line up perfectly with the original.
For example, you may use:
- 1024×1024
- 2048×2048
Yet after editing, you might notice slight differences in alignment.
These can include:
- Small pixel shifts
- Slight stretching
- Minor cropping
- Subtle scaling differences
This is often referred to as pixel drift.
Why Pixel Drift Matters
In many cases, the shift is small enough that it may not be obvious when viewing the final image by itself.
However, it becomes much more noticeable if you:
- Compare the original and edited images directly
- Composite the edit over the original
- Use masks
- Perform additional localized edits
- Switch rapidly between before and after images
Even a few pixels of movement can create visible edges or misalignment.
Reducing Pixel Drift
Near the end of the workflow, I use an additional node to reduce this drift as much as possible.
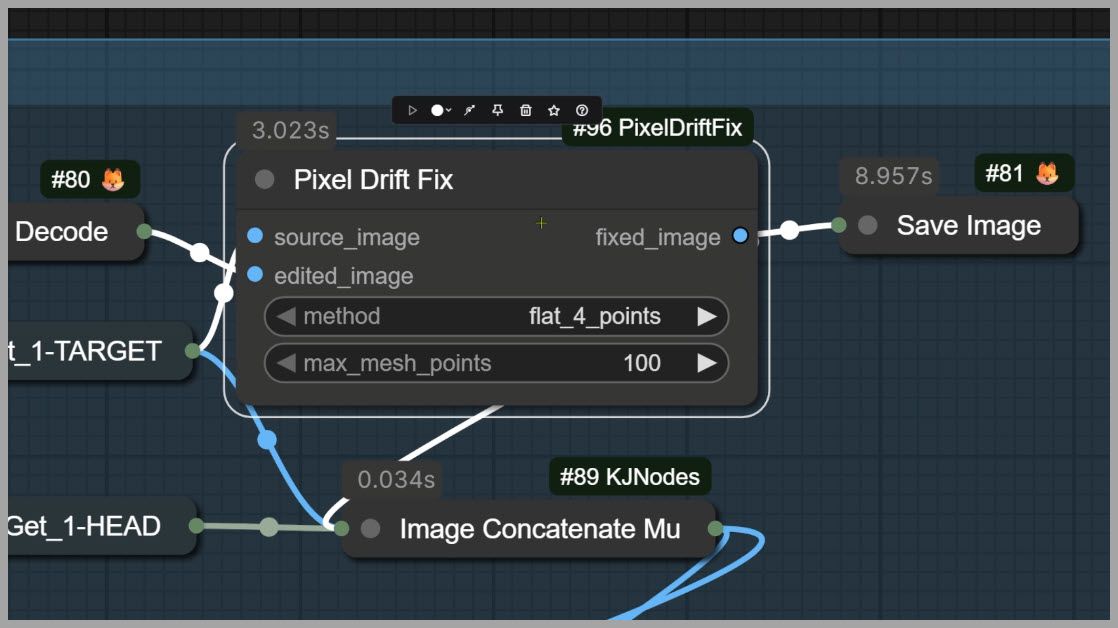
The purpose of this node is to realign the edited result with the original image and compensate for small changes in scale or position.
It may not completely eliminate every pixel-level difference, but it helps make the output much more consistent with the input.
10. Final Thoughts
Qwen Image 2.1 is surprisingly capable when it comes to head swapping, especially when the reference image is prepared carefully.
The most important idea in this workflow is that we are not relying on the model to guess everything.
We provide several layers of guidance:
- The target image defines the body and composition.
- The head reference defines the new identity and hairstyle.
- Fast Canvas controls the scale and placement of the reference head.
- The pose skeleton helps preserve the original body.
- The prompt defines exactly what should change.
- The final correction node helps reduce pixel drift.
With these pieces working together, Qwen Image 2.1 can handle difficult cases where the face is partially covered, hairstyles are completely different, or previously hidden body regions need to be reconstructed.
And because the workflow does not require an identity-specific LoRA for the actual head swap, it can be adapted quickly to different reference images.
If you want to reproduce the workflow directly, the original workflow is available through the creator’s community.
Gain exclusive access to advanced ComfyUI workflows and resources by joining our community now!