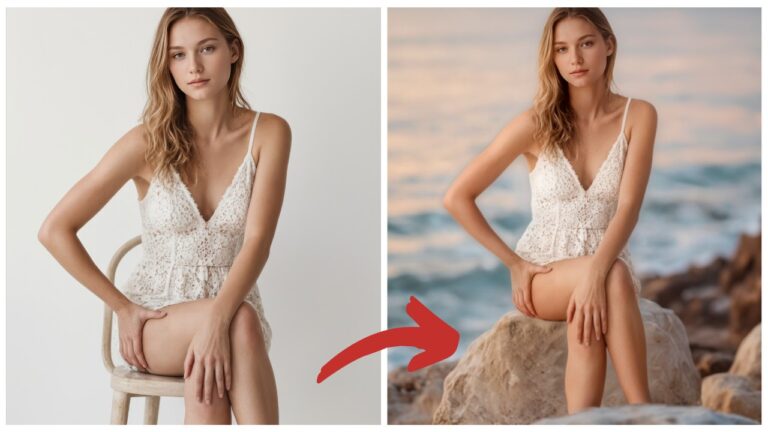
Getting More Texture and Detail from Krea 2 in ComfyUI
If you want to get the best possible texture, detail, and realism from the Krea 2 model, this workflow is worth trying.
In this article, I’ll walk you through a two-pass image generation workflow built in ComfyUI using RunningHub, a cloud-based ComfyUI platform. The core idea is simple: instead of generating the final image in one pass, we first create a smaller base image, then upscale and refine it through a second sampler pass.
The result is a much more detailed image with richer skin texture, better fabric detail, and stronger realism, especially when creating large final outputs.
YouTube Tutorial:
Workflow Overview
This workflow uses:
- Krea 2 raw model
- Turbo LoRA
- Two Clownshark Samplers
- A text encoder for prompt enhancement
- A first-pass low-resolution generation stage
- A second-pass high-resolution refinement stage
- Final output around 4 megapixels
The main reason for using two passes is texture. A single-pass image can look clean, but it often appears overly smooth or polished. The two-pass method gives the model another opportunity to add surface detail, fabric texture, skin realism, and background clarity.
Why Use Krea 2 Raw with Turbo LoRA?
In this workflow, I am not using the Krea 2 turbo model directly.
Instead, I use the Krea 2 raw model together with a Turbo LoRA.
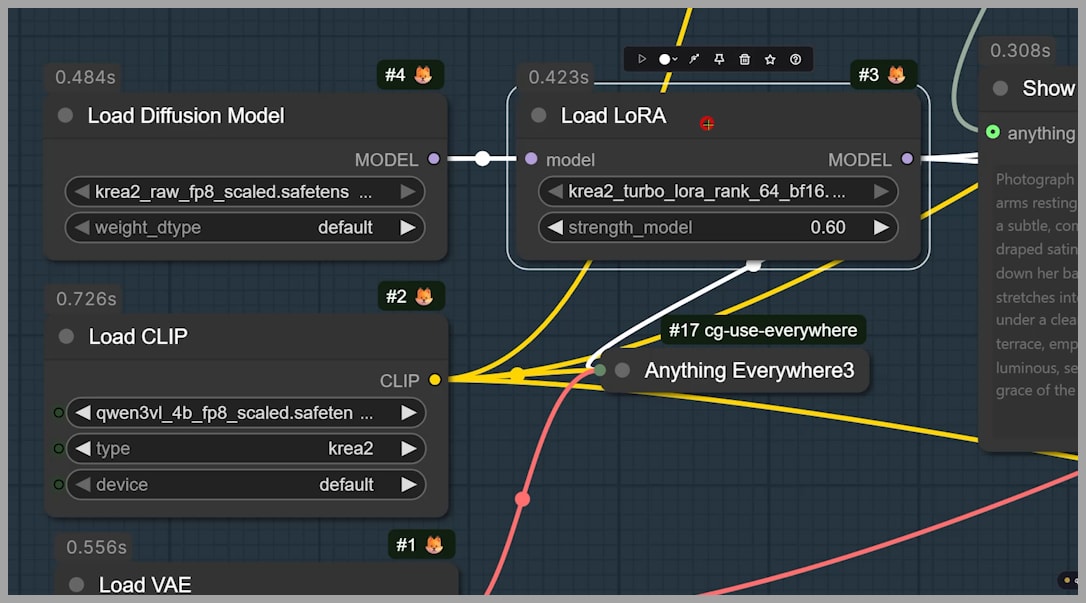
There are two main reasons for this choice:
- More seed variety
- Better prompt following
The Krea 2 turbo model is fast and convenient, but in my testing, the raw model combined with a Turbo LoRA gives more variation across different seeds. It also tends to follow prompts better than the turbo model alone.
Recommended Turbo LoRA Strength
For the Turbo LoRA strength, I set it to:
0.6
Of course, this is not a fixed rule. You can experiment with different values depending on the type of output you want.
However, in my tests, 0.6 produced a more visually distinct and interesting result compared with strength 1.
For example, I compared three images:
- Krea 2 raw model + Turbo LoRA strength 1
- Krea 2 turbo model only
- Krea 2 raw model + Turbo LoRA strength 0.6
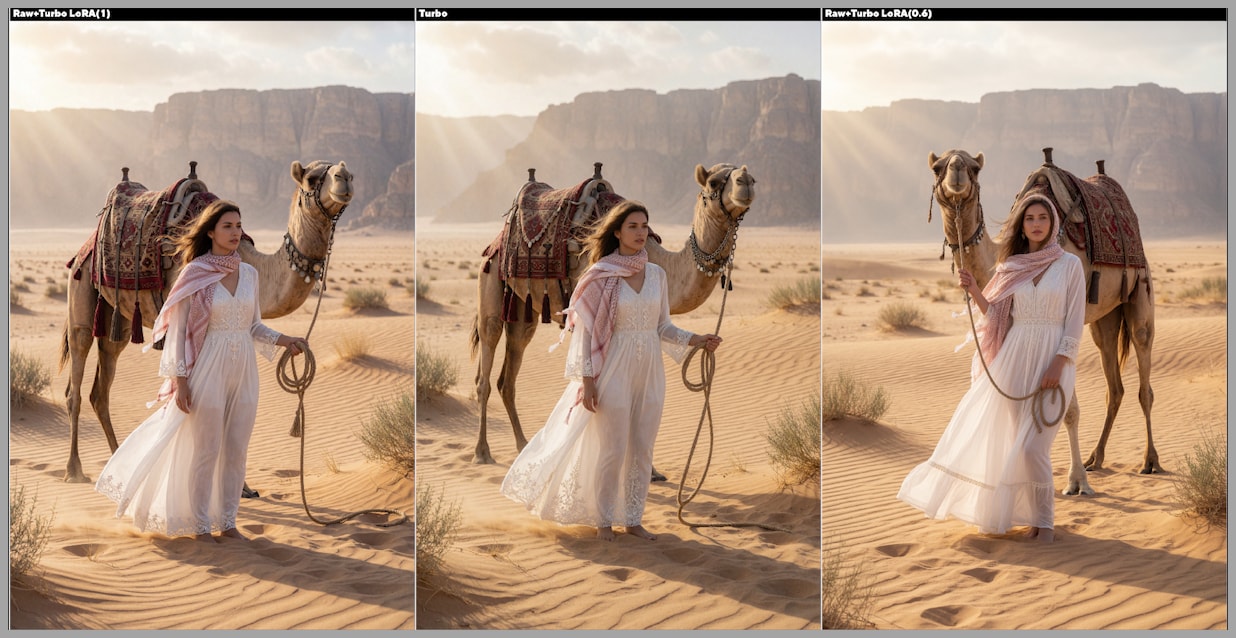
The first and second images looked extremely similar. But the third image, using the raw model with Turbo LoRA strength 0.6, looked noticeably different.
That is why I prefer using the raw model with the Turbo LoRA set to 0.6.
Using the Text Encoder to Improve Prompts
Another important part of this workflow is the text encoder.
The text encoder can enhance a very simple user prompt and turn it into something more detailed and effective.
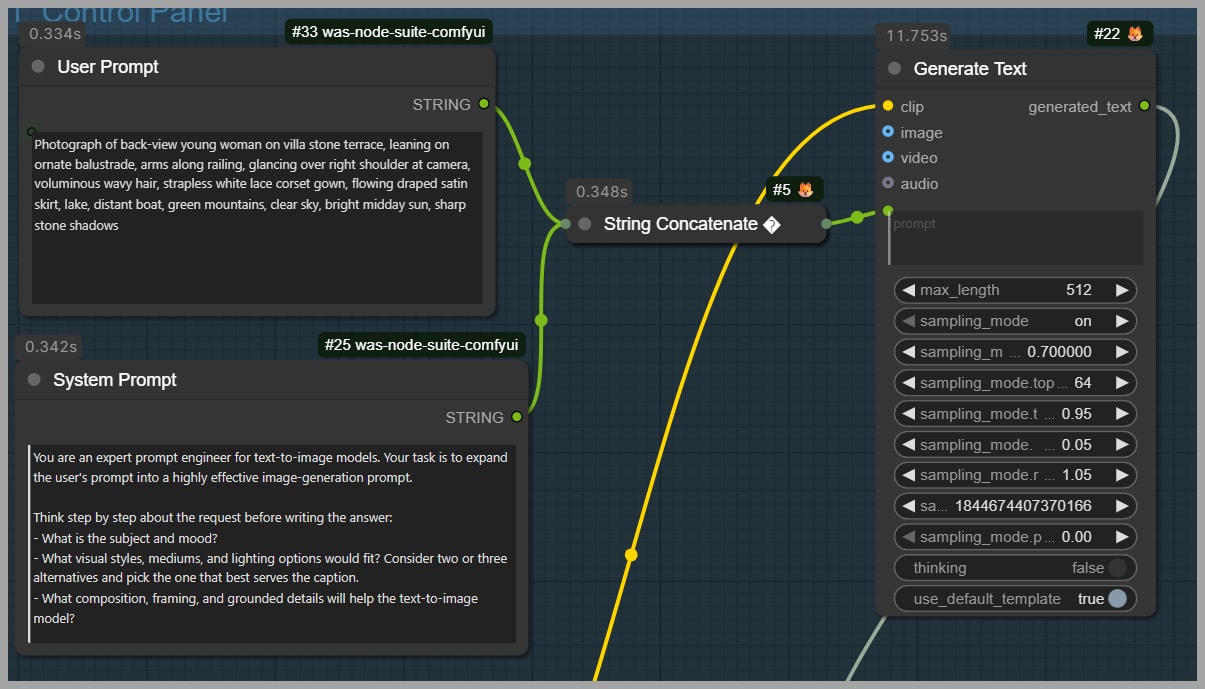
The process works like this:
- Start with a simple user prompt.
- Send that prompt into the text encoder.
- The text encoder enhances the prompt based on the system prompt.
- The node outputs a richer and more detailed final prompt.
This is useful because you do not always need to write a long, complex prompt manually. You can begin with a simple idea, then let the text encoder expand it into something more suitable for image generation.
Why Use a Two-Pass Generation Setup?
A major question is:
Why use two samplers instead of just generating the image once?
I had the same question, so I tested it directly.
I compared two images created from the same prompt:
- One image was generated with a single pass.
- The other image was generated with the two-pass method.
The difference was obvious, especially when zooming in.
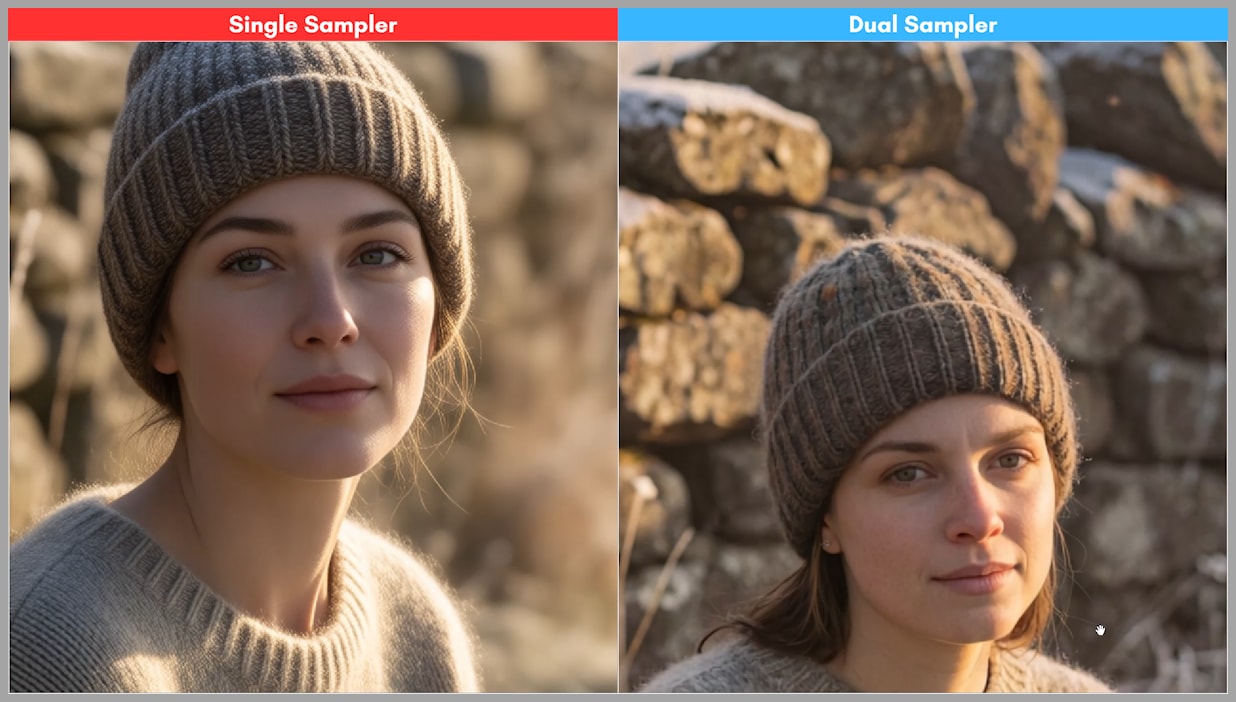
The one-pass image looked smooth and polished, but the texture was weaker. The two-pass image had much more realistic surface detail.
The difference was especially noticeable in:
- The face
- The skin texture
- The sweater
- The fabric detail
- The overall realism of the final image
The face in the one-pass result looked a little too clean and polished. The face in the two-pass result looked more realistic because it had stronger texture.
The sweater also showed a major difference. In the two-pass result, the fabric texture was much richer and more detailed.
This is the main reason the two-pass setup is so useful.
Why Two-Pass Generation Matters for Large Images
The two-pass method becomes even more important when the final output image is large.
In this workflow, the final resolution is around:
4 megapixels
At this size, small texture differences become much more visible. If the image is too smooth, the lack of detail becomes obvious when viewed closely.
The first pass gives us the main composition. The second pass then adds detail and texture at a higher resolution.
This makes the final result look more complete and refined.
First Pass: Keep It Small and Fast
The first pass does not need to be large.
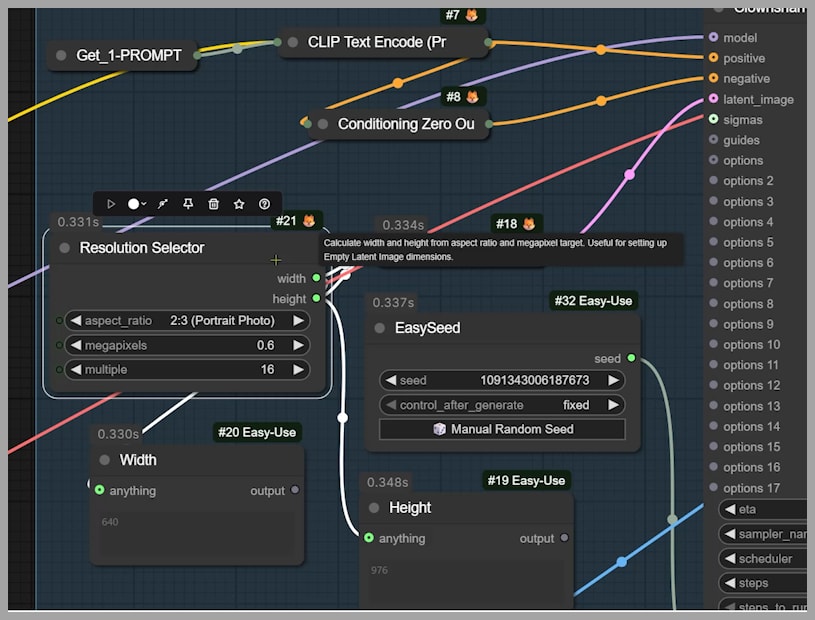
In this workflow, I set the first-pass resolution to around:
0.6 megapixels
The latent image size is:
976 × 640
This is similar to the size you might use with SD 1.5-based models.
Keeping the first pass small has a big advantage: speed.
The first pass is mainly responsible for establishing:
- Composition
- Character pose
- General lighting
- Main subject placement
- Overall visual direction
It does not need to produce the final detail. That job belongs to the second pass.
So by keeping the first pass small, the workflow stays fast while still giving us a strong base image.
You Do Not Have to Use Krea 2 for the First Pass
Another important point: you do not have to use Krea 2 models for the first pass.
In fact, the SD 1.5 and SDXL ecosystems are still very powerful and flexible.
They offer a huge range of tools, including:
- LoRA models
- ControlNet models
- IP-Adapters
- Specialized checkpoints
- Mature workflows
- More community resources
Because of that, you can use SD 1.5 or SDXL to create the first-pass image, then send that image into the second stage for refinement.
This gives you more creative control.
It can also reduce restrictions depending on the kind of image you are trying to create.
Why Use the Clownshark Sampler?
For this workflow, I prefer using the Clownshark Sampler instead of the standard KSampler.
The reason is simple:
The Clownshark Sampler can create more texture while using fewer sampling steps.
To test this, I compared two images using nearly identical settings.
For the first image, I used the standard KSampler with:
Sampler: res 2s
Scheduler: simple
Steps: 4
For the second image, I used the Clownshark Sampler with the same settings.
The result from the Clownshark Sampler had noticeably more facial texture.
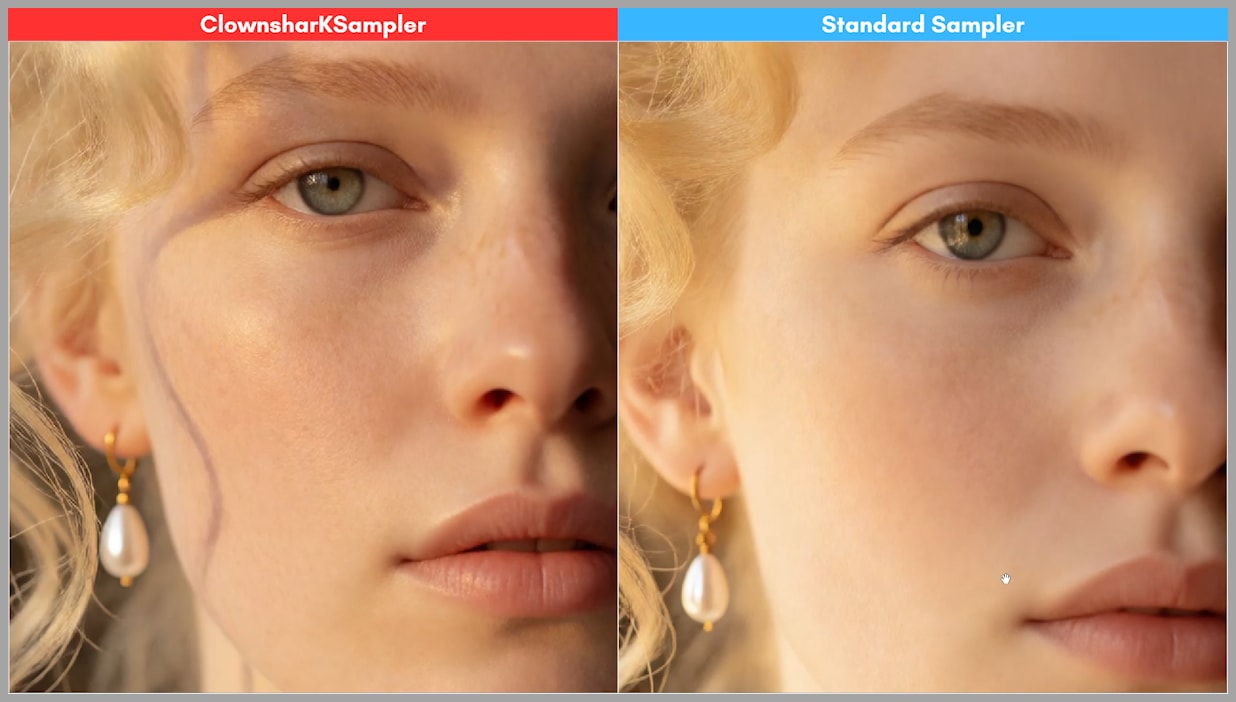
This makes it a great choice for a workflow focused on detail and realism.
First Clownshark Sampler Settings
For the first Clownshark Sampler, I recommend using:
Sampler: heun 3s
Scheduler: ddim uniform
After testing several sampler options, I found that heun 3s worked best for generating small first-pass images.
heun 3s vs heun 2s
I also tested heun 3s against heun 2s.
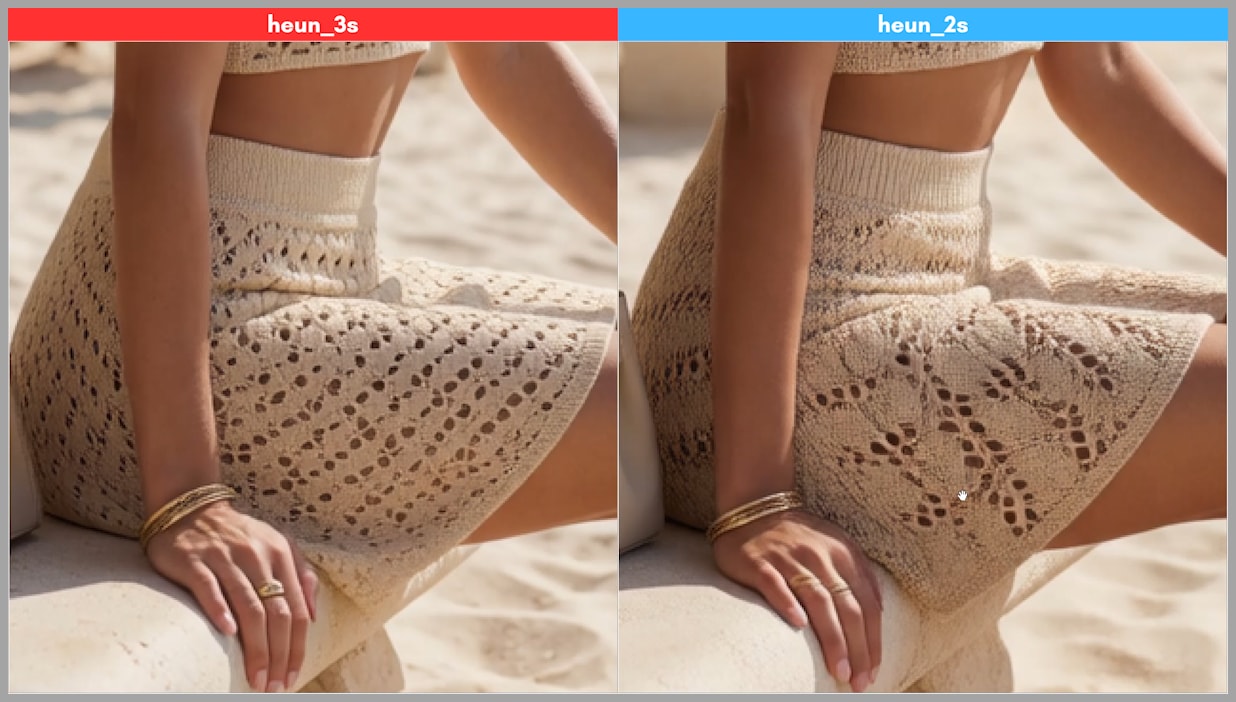
The left image used heun 3s, while the right image used heun 2s.
The heun 2s result showed some underfitting. The details were not as fully developed.
For example:
- The knit texture on the skirt was not delicate enough.
- Some ring-like shapes appeared on the fingers, but they were not fully formed.
- The overall detail felt less complete.
By comparison, heun 3s produced a more finished and better-textured result.
That is why heun 3s is my preferred sampler for the first pass.
res 2s vs heun 2s
I also compared res 2s with heun 2s.
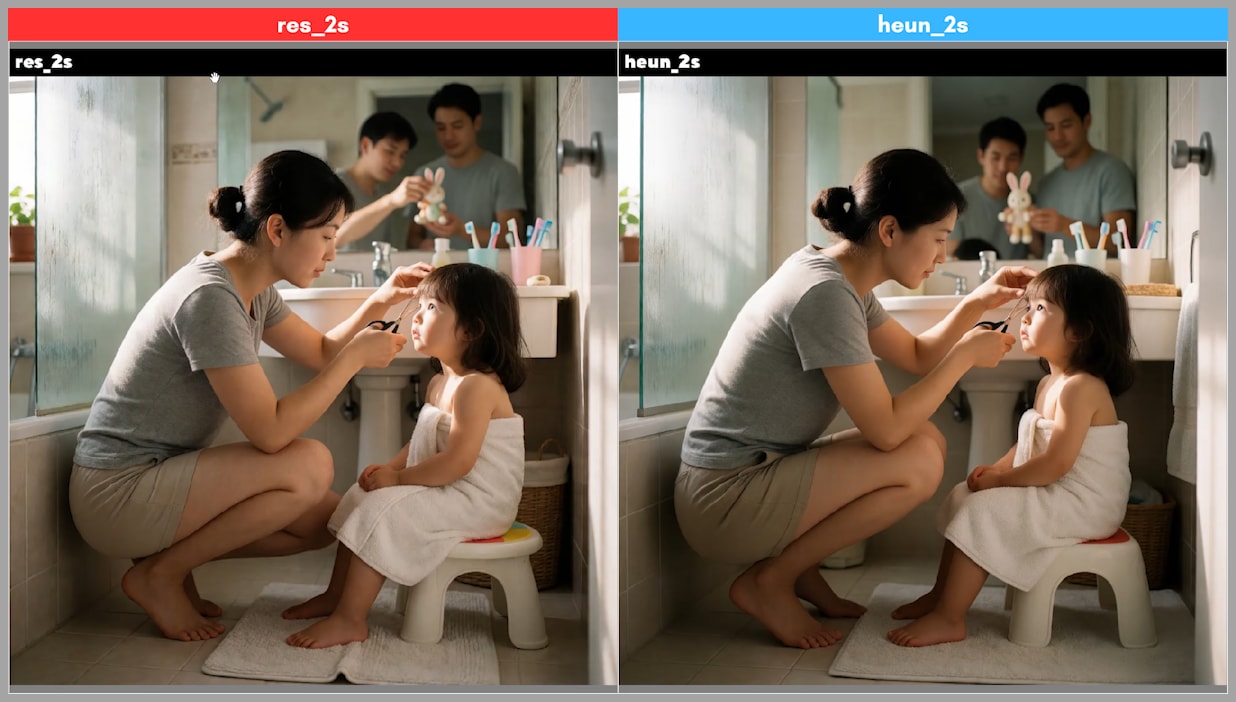
In this test:
- The left image used res 2s.
- The right image used heun 2s.
When looking closely at the eyes, I found that heun 2s performed better.
So even though heun 2s was not as strong as heun 3s overall, it still handled some details better than res 2s.
After comparing all of these tests, the conclusion is clear:
heun 3s is the best choice for the first-pass small image stage.
First-Pass Scheduler: ddim uniform
For the scheduler in the first pass, I use:
ddim uniform
I like this scheduler because it gives more variety across different compositions.
If you are experimenting with different image layouts, character poses, or framing ideas, ddim uniform can help generate more diverse results.
This is especially useful during the first pass, where the goal is to establish a strong base composition before moving into the detail stage.
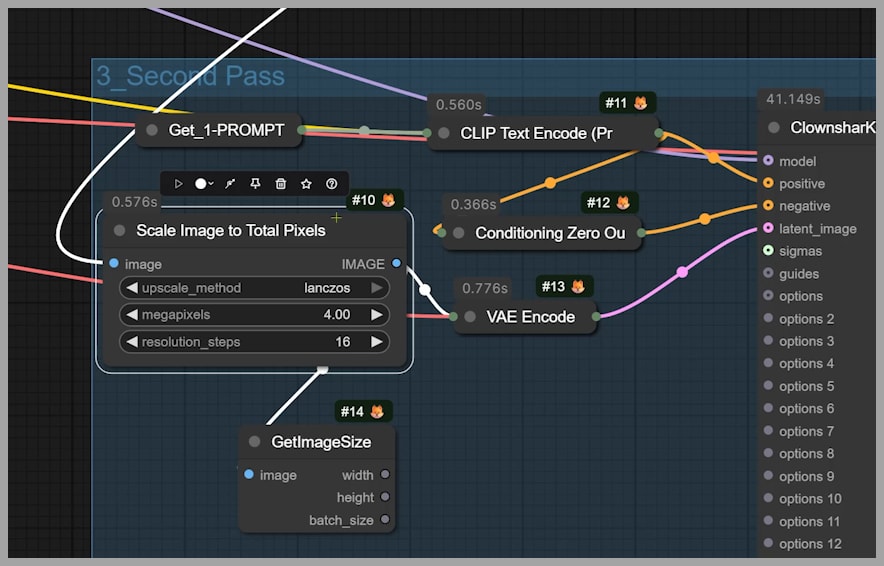
Second Pass: Upscaling to 4 Megapixels
Once the first-pass image is generated, the next step is upscaling.
For this, the workflow uses the:
Scale Image to Total Pixels
node.
This node takes the image from the first generation group and scales it up to the target final size.
In this workflow, the image is upscaled to:
4 megapixels
After the image is scaled up, it is sent into the second Clownshark Sampler.
This second sampler pass is where a huge amount of detail gets added.
What the Second Pass Does
The second pass keeps the overall composition similar to the first-pass image.
However, it adds much more detail.
This includes:
- More realistic skin texture
- More detailed clothing
- Richer background surfaces
- Sharper material definition
- Better high-resolution clarity
The first pass creates the structure. The second pass enhances the detail.
That is the key idea behind the workflow.
Second-Pass Sampler Options
For the second Clownshark Sampler, there are several suitable sampler options.
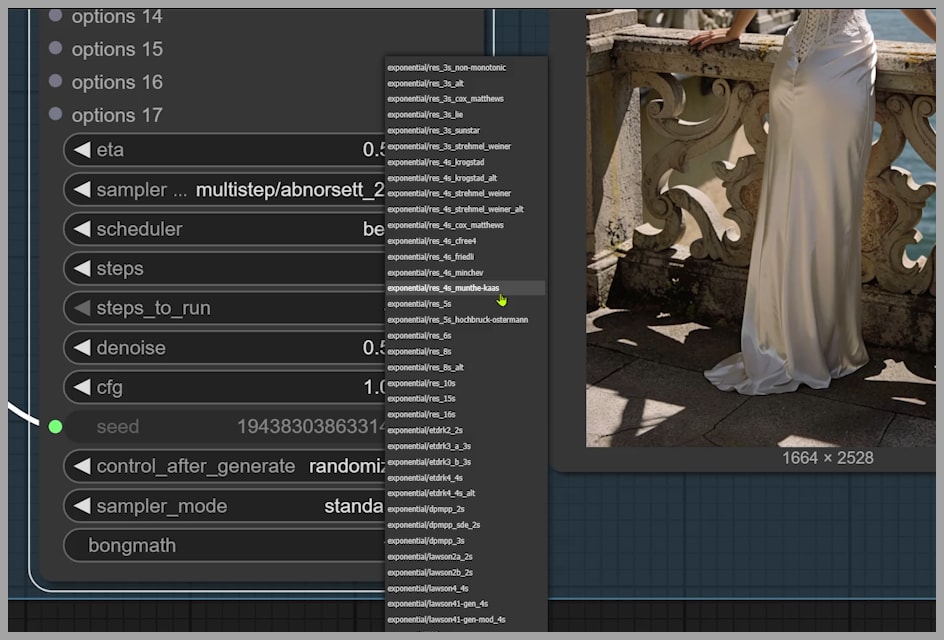
Some good choices include:
- res_2m
- abnorsett_2m
- deis_2m
- res_2s
- res_4s_munthe_kaas
Different samplers create different texture styles, so the best choice depends on the look you want.
abnorsett 2m vs deis 2m
First, I compared:
abnorsett 2m
with:
deis 2m
In the comparison, the image using abnorsett 2m had more facial texture.
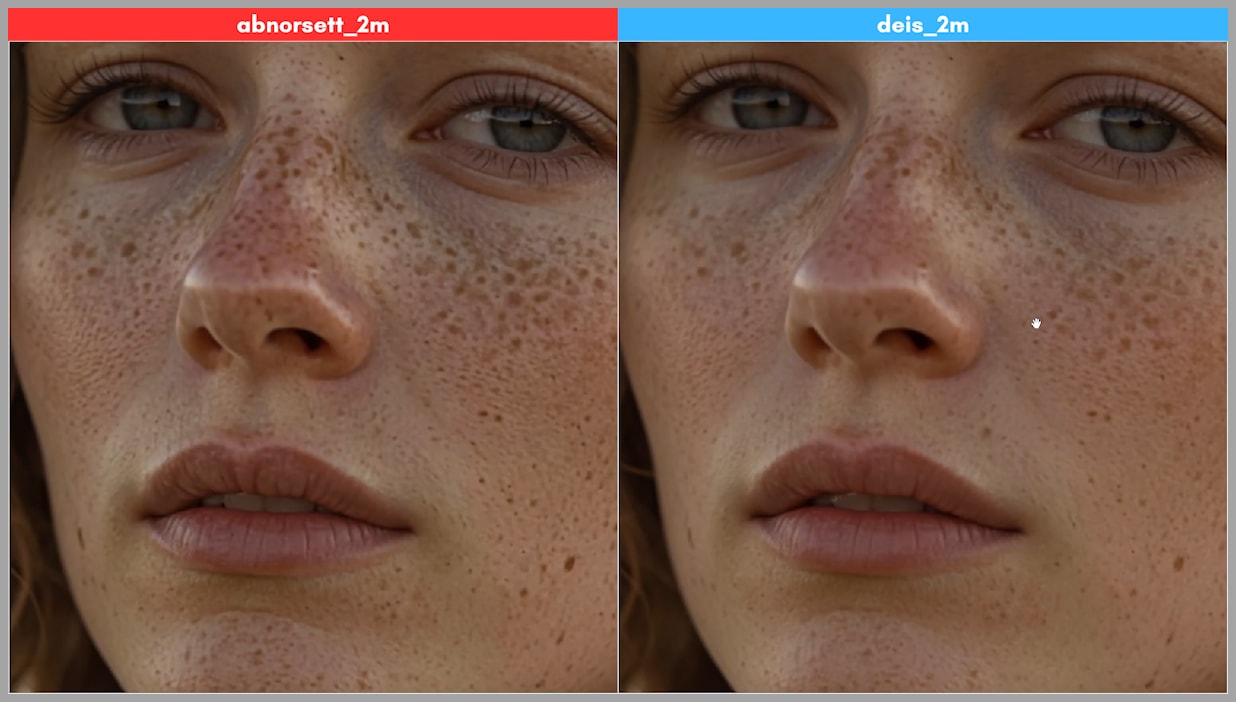
This can be useful if you want stronger realism and a more detailed surface.
However, depending on your image style, this may sometimes feel like too much texture.
If that happens, you can switch to another sampler.
res 2s vs deis 2m
Next, I compared:
res 2s
with:
deis 2m
The res 2s result had significantly less texture on the face.
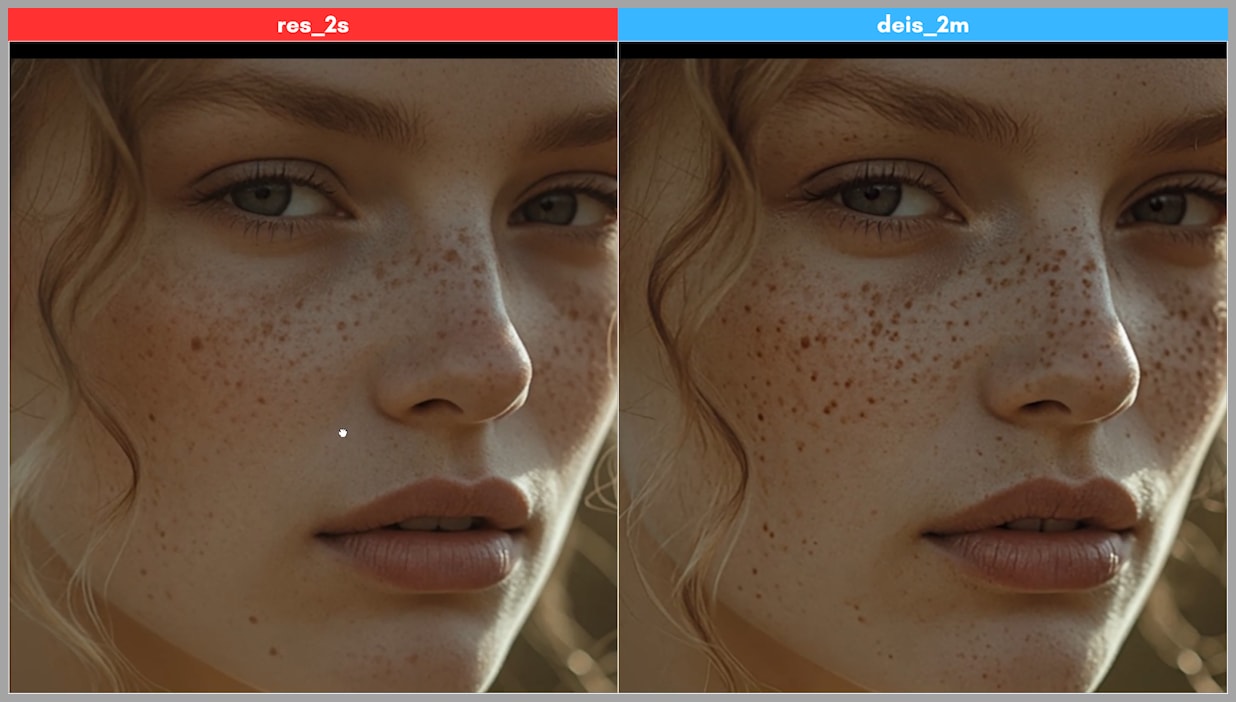
This makes res 2s a good option when the image feels over-textured or too rough.
So if abnorsett 2m gives you too much facial detail, res 2s can help create a cleaner and smoother look.
res 4s munthe kaas vs deis 2m
Another sampler worth trying is:
res 4s munthe kaas
Compared with deis 2m, res 4s munthe kaas creates smoother and more delicate skin texture.
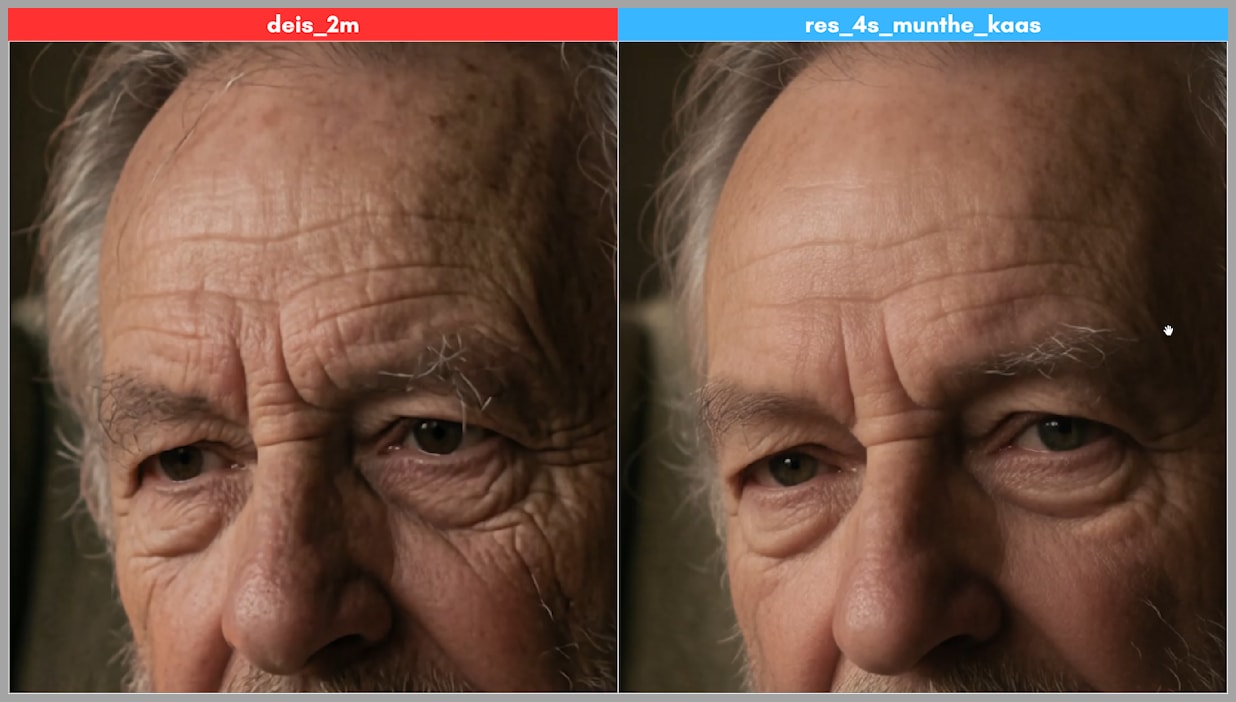
This can be a great choice when you want the final image to feel polished but still detailed.
It is especially useful for portraits where you want skin to look refined rather than overly rough.
Second-Pass Scheduler: beta
For the second Clownshark Sampler, I highly recommend using:
beta
I compared the beta scheduler with the simple scheduler.
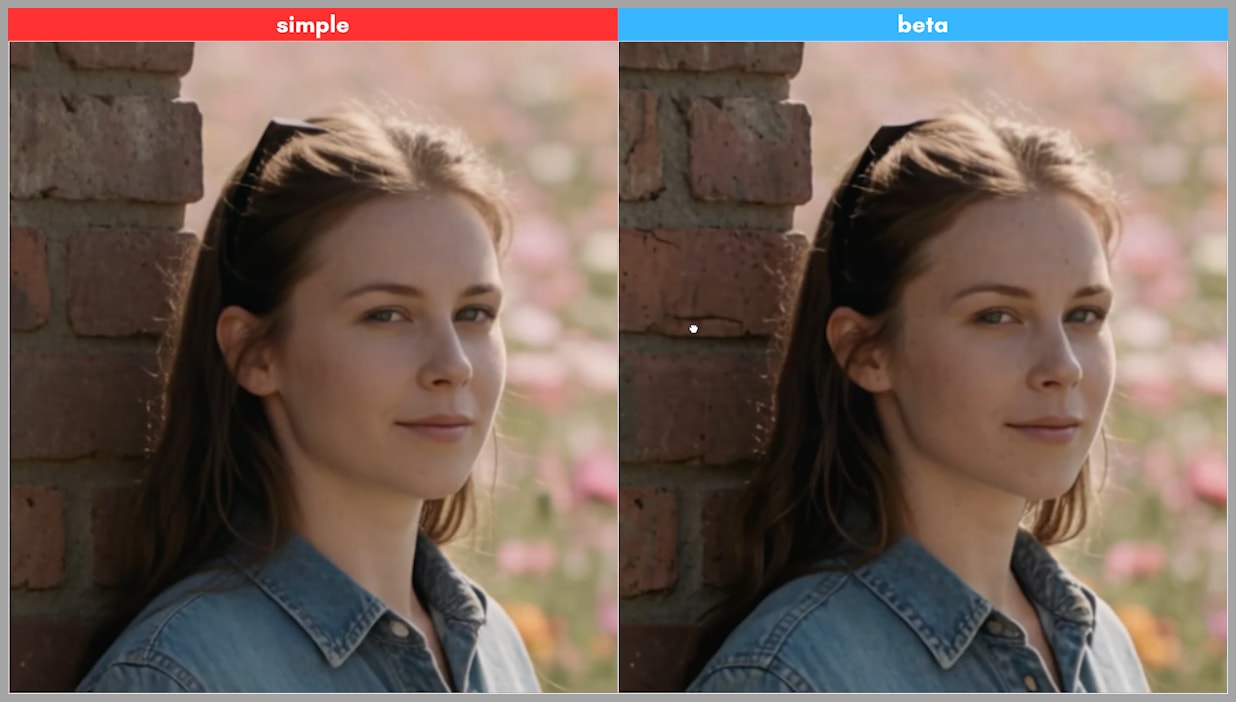
The image using beta had more visible texture, especially in the face.
It also improved background details, such as the texture of bricks on the wall.
That makes beta a strong choice for the second pass, where the main goal is to add detail and high-resolution texture.
Final Thoughts
This two-pass ComfyUI workflow is designed for creators who want more texture, stronger detail, and better realism from Krea 2.
The most important idea is simple:
Do not force the model to do everything in one pass.
Instead, let the first pass create the composition quickly at a smaller size. Then use the second pass to upscale and add texture at a much higher resolution.
By using Krea 2 raw with a Turbo LoRA, a text encoder, two Clownshark Samplers, and carefully selected sampler and scheduler settings, you can create final images that feel richer, sharper, and more realistic.