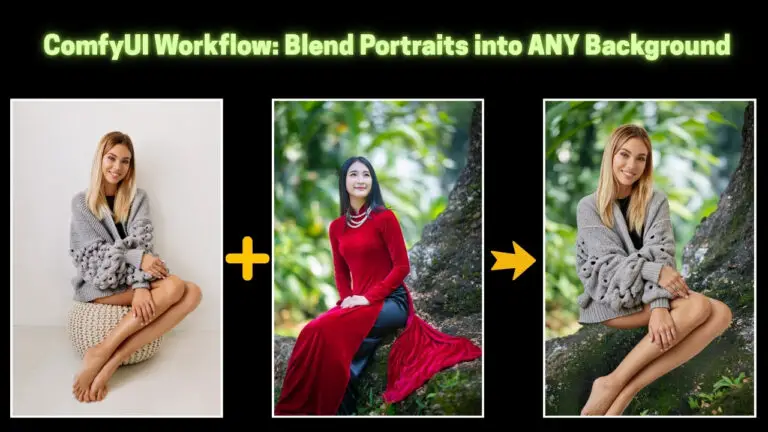
Qwen Image 2.1: Finally, an EASY Fix for Pixel Drifting!
Pixel drifting is one of the most frustrating problems when editing images with Qwen Image 2.1. Even when you only want to modify a specific part of an image, the model may slightly shift the position of objects or subjects, making it difficult to maintain consistency with the original image.
In a previous article, I introduced three different methods to eliminate pixel drifting in Qwen Image 2.1. While those methods worked, the first approach involved a relatively complicated workflow, and the other two required additional custom code to correct pixel drifting after image generation.
Fortunately, there’s a much simpler solution.
In this article, I’ll introduce a ComfyUI workflow that significantly reduces pixel drifting by combining automatic image resizing, properly matched encoder resolution, and a consistency LoRA. I’ll also explain how to adjust the LoRA strength to achieve stable results without limiting the model’s ability to make the changes you want.
The best part is that the workflow requires very little manual configuration. Let’s get started!
YouTube Tutorial:
Gain exclusive access to advanced ComfyUI workflows and resources by joining our community now!
Introduction: A Simpler Way to Fix Pixel Drifting
Understanding the Pixel Drifting Problem
When using Qwen Image 2.1 for image editing, you might notice that some elements shift slightly from their original positions, even when your editing instructions don’t require those changes.
For example, imagine you have an image of a woman standing outdoors, and you want to add snow to the surrounding environment.
Ideally, the model should modify the environment while preserving the woman’s original position. However, pixel drifting can cause her body, facial features, or other image elements to shift.
These unintended changes can become particularly problematic when precise alignment with the original image is important.
A More Efficient Solution
The workflow I’m introducing addresses this problem using two complementary techniques:
- Automatic image resizing: Ensures that the reference image dimensions are properly matched to the resolution settings used by Qwen Image 2.1.
- Consistency LoRA: Helps prevent the remaining positional shifts that can occur during image editing.
Together, these techniques provide a practical way to improve image consistency without requiring complicated post-processing.
Example: Adding Snow Without Moving the Subject
Let’s look at a practical example.
I used Qwen Image 2.1 to add snow to an outdoor scene featuring a woman.
Although the environment changed significantly, the woman’s body remained in exactly the same position as in the original image.
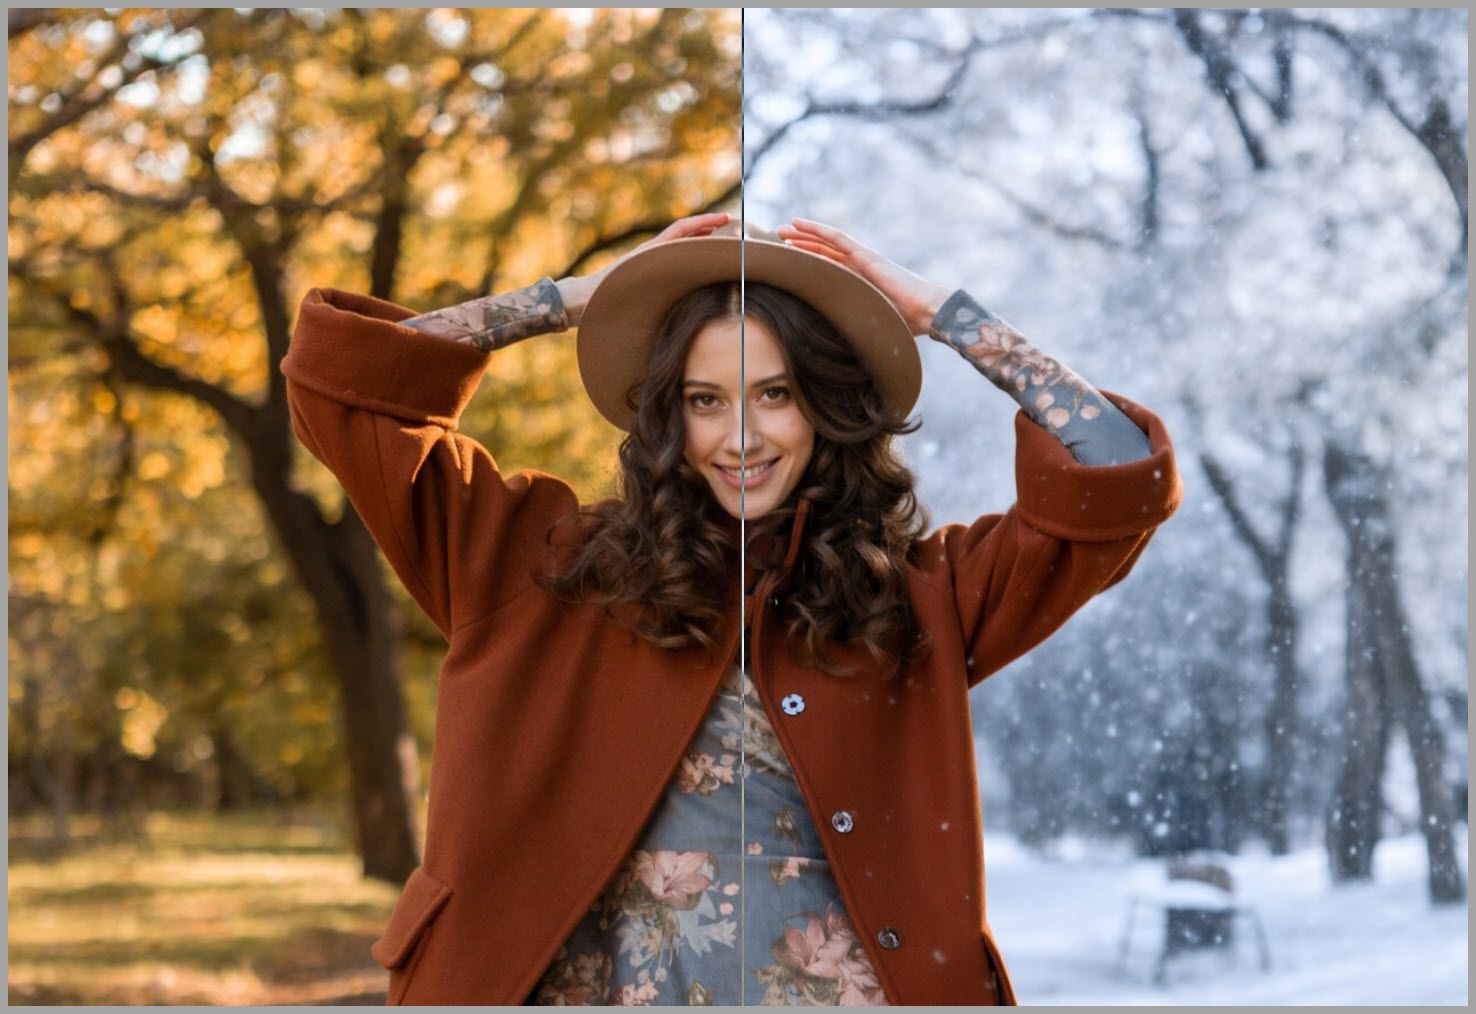
This is precisely the behavior we want: the ability to make substantial visual changes while preserving the position of elements that should remain unchanged.
And achieving this result is surprisingly straightforward.
Image Resizing: The Foundation of Pixel Stability
The first important technique in this workflow is automatic image resizing.
Rather than sending the original reference image directly into the editing process without adjusting its dimensions, the workflow calculates a suitable image size and a matching encoder resolution.
Let’s examine how this works.
Understanding the Image Resizing Node Group
The resizing node group has two primary responsibilities:
- Resize the uploaded reference image to appropriate dimensions.
- Calculate the corresponding resolution value required by the Text Encode Qwen Image 2.1 node.
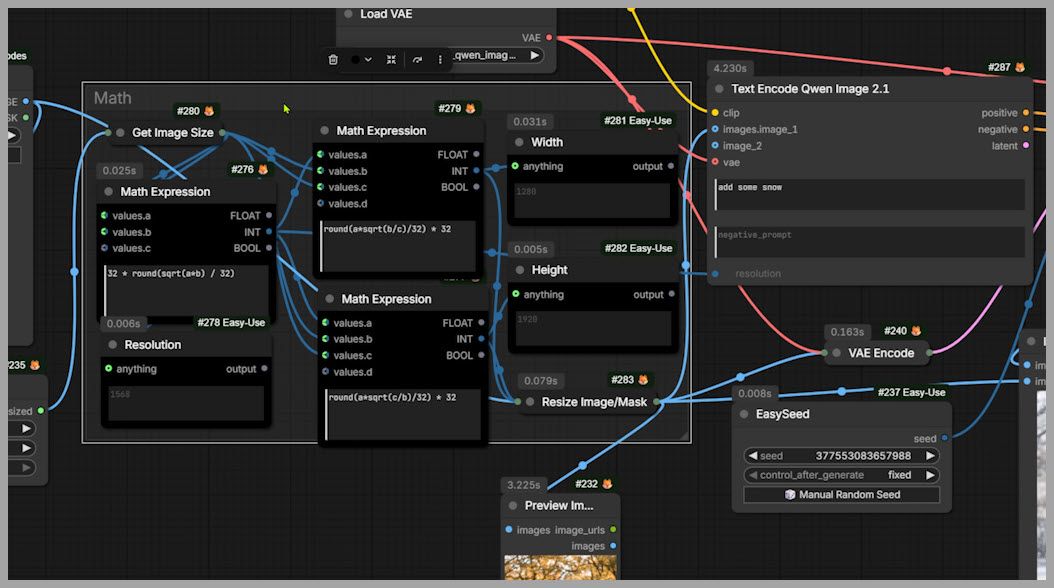
Both calculations are performed automatically.
This is important because the dimensions of the reference image and the resolution setting used by the text encoder need to be consistent.
Without this coordination, the model may internally process the reference image at dimensions that don’t match the prepared input, potentially contributing to positional shifts.
How the Workflow Processes an Input Image
Let’s use an actual example from the workflow.
The original uploaded image has the following dimensions:
- Original width: 1333 pixels
- Original height: 2000 pixels
Inside the resizing node group, the megapixel setting is set to 2.3 megapixels.
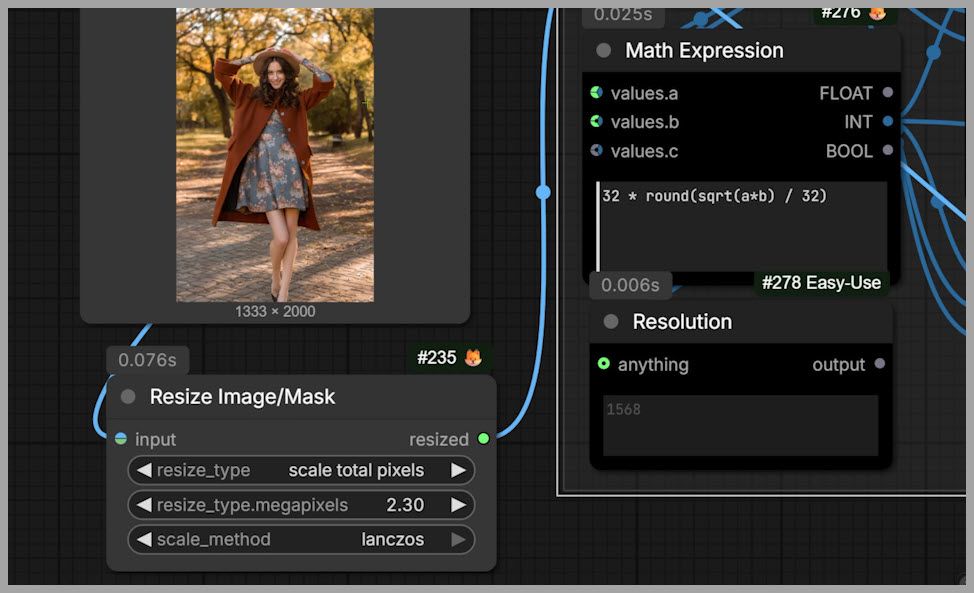
With this setting, the node group calculates a new image size of:
- Resized width: 1280 pixels
- Resized height: 1920 pixels
The image is therefore resized from 1333 × 2000 to 1280 × 1920 pixels.
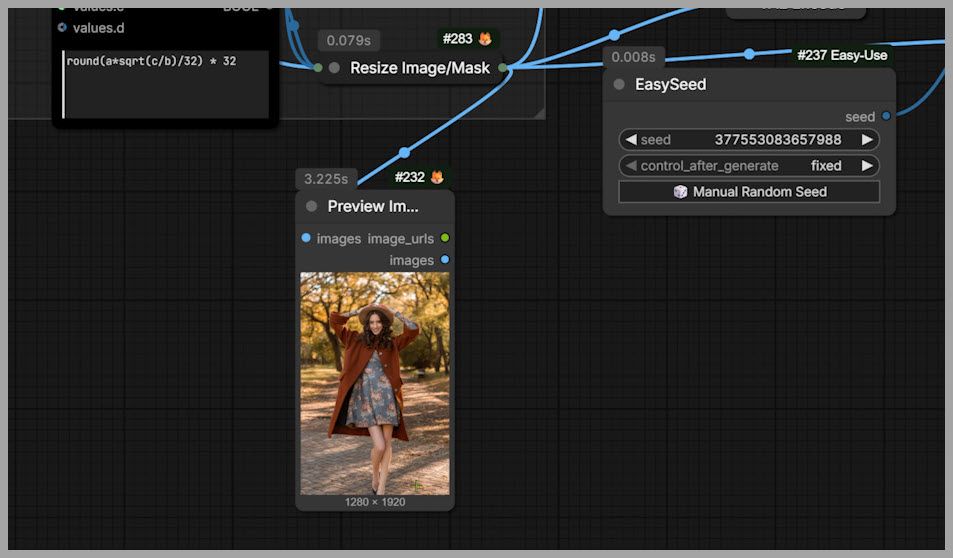
Importantly, this adjustment maintains approximately the same aspect ratio as the original image.
The new dimensions are also both divisible by 32, which is an important requirement for the resolution alignment used in this workflow.
Although the node group’s megapixel setting is 2.3, the actual resized image contains approximately 2.46 million pixels. The setting and the resulting pixel count are therefore not exactly the same.
Automatically Calculating the Encoder Resolution
The node group doesn’t stop after resizing the image.
It also calculates a separate resolution value that is sent to the Text Encode Qwen Image 2.1 node.
For our example, this calculated resolution is:
1568
This value is connected to the text encoder’s resolution input.
The important point is that the resized image dimensions and the encoder resolution are calculated together.
Instead of manually selecting an arbitrary image size and resolution value, the workflow ensures that they are properly matched.
This coordination is one of the main reasons the workflow can reduce pixel drifting.
Why Matching Image Dimensions and Encoder Resolution Matters
Now that we understand what the resizing node group does, let’s explore why these calculations are so important.
How Qwen Image 2.1 Handles Reference Image Resolution
In the Text Encode Qwen Image 2.1 node, there’s an input called resolution.
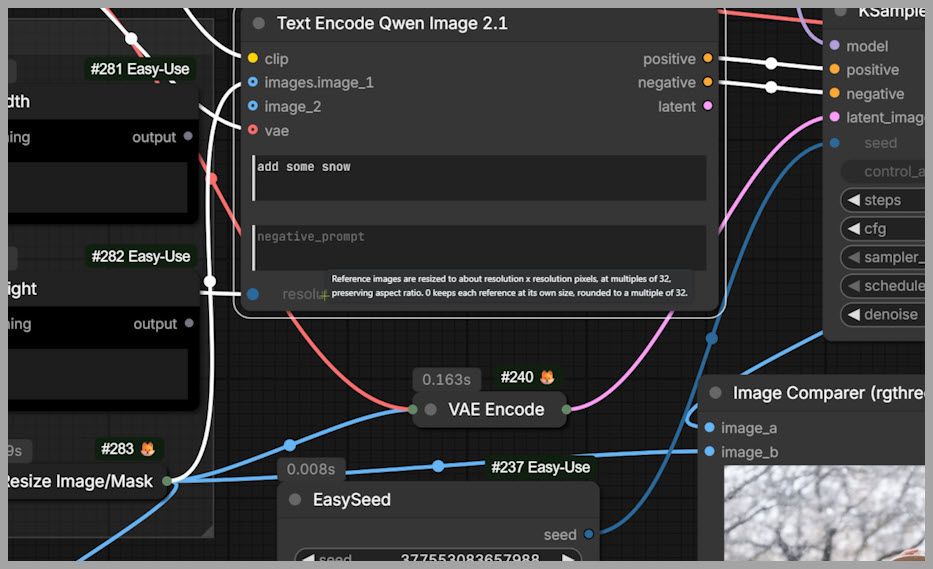
If you hover your mouse over this input, ComfyUI displays a tooltip explaining how the parameter works.
The tooltip states:
Reference images are resized to about resolution by resolution pixels, at multiples of 32, preserving aspect ratio.
This description reveals three important details:
- The encoder uses the resolution value to determine the approximate pixel count for reference images.
- Image dimensions are adjusted to multiples of 32.
- The original aspect ratio is preserved.
This means the resolution parameter doesn’t necessarily force every image into a square.
Instead, the model aims for a total pixel count approximately equal to the resolution value squared, while maintaining the reference image’s proportions.
Understanding the Resolution Calculation
Let’s return to our example.
The calculated encoder resolution is 1568.
If we multiply this value by itself:
1568 × 1568 = 2,458,624 pixels
That’s approximately 2.46 megapixels.
Now, let’s calculate the total number of pixels in our resized reference image:
1280 × 1920 = 2,457,600 pixels
That’s also approximately 2.46 megapixels.
Notice how closely these two values match.
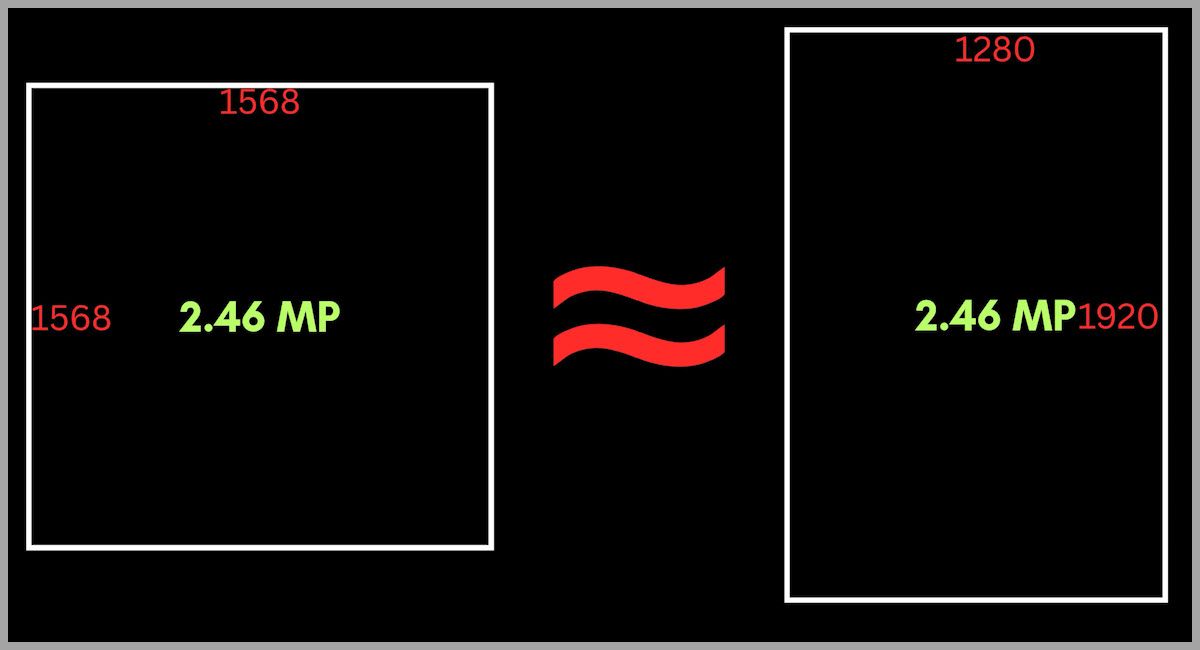
The difference between the encoder’s target pixel count and the resized image’s actual pixel count is only 1,024 pixels.
This close relationship helps keep the reference image dimensions consistent with the encoder’s resolution setting.
Preserving Aspect Ratio and Multiples of 32
Matching the approximate pixel count is only part of the process.
We also need to consider the dimensions themselves.
The resized image has a width of 1280 pixels and a height of 1920 pixels.
Both dimensions are multiples of 32:
- 1280 ÷ 32 = 40
- 1920 ÷ 32 = 60
Additionally, the image maintains its original aspect ratio almost exactly.
The original image has an aspect ratio of approximately 0.6665, while the resized image has an aspect ratio of 0.6667.
This means the workflow can prepare the reference image without noticeably stretching or distorting it.
By maintaining the aspect ratio and using dimensions that are multiples of 32, the workflow aligns the image with the resizing behavior described by the text encoder.
How This Reduces Pixel Drifting
The main idea behind this technique is simple.
If the reference image is resized to dimensions that closely match what the text encoder expects, the workflow can avoid unnecessary differences between the prepared image and the dimensions used during encoding.
Those differences can contribute to pixel drifting during image editing.
By calculating the image dimensions and encoder resolution together, we make the reference image processing more consistent.
This improves the stability of the editing process.
However, there’s one important limitation.
Matching the image dimensions and encoder resolution doesn’t always eliminate pixel drifting completely.
In some cases, small positional shifts can still occur.
That’s why the next component of the workflow is so useful.
Using a Consistency LoRA to Further Reduce Pixel Drifting
Why a Consistency LoRA Is Still Necessary
Even after applying the image resizing technique, Qwen Image 2.1 may occasionally produce small changes in the positions of subjects or objects.
These shifts may not be dramatic, but they can still be noticeable when comparing the generated image with the original.
To address this, the workflow includes a consistency LoRA.
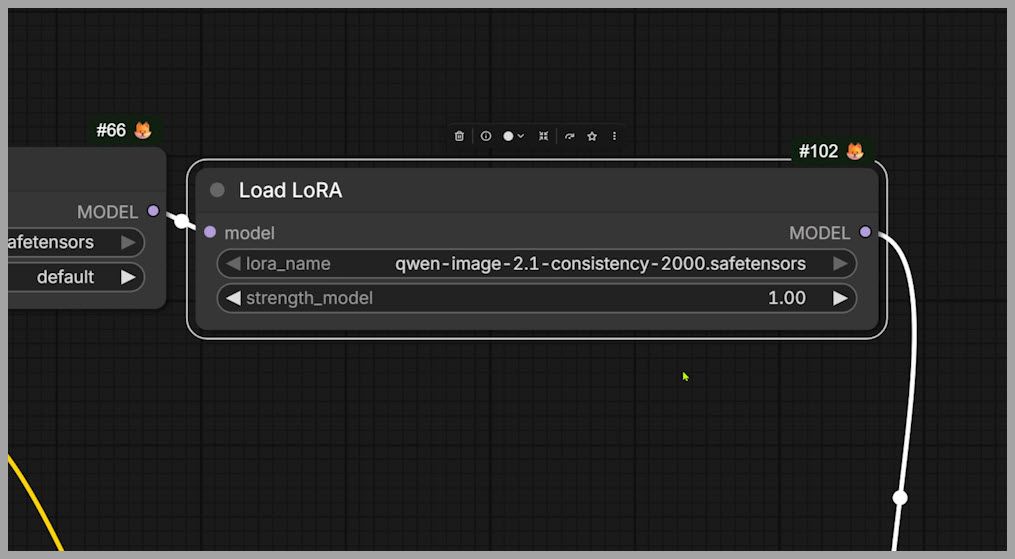
The purpose of this LoRA is to encourage the model to preserve important visual details and spatial relationships from the reference image.
When used alongside the automatic resizing node group, it provides another layer of positional stability.
Comparing Results With and Without the LoRA
Let’s return to the example where I asked Qwen Image 2.1 to add snow to the scene.
With the consistency LoRA enabled, the model successfully transformed the environment while keeping the woman’s body in its original position.
To demonstrate the difference, I bypassed the LoRA and generated the image again.
This time, the result showed noticeable pixel drifting.
Although the resizing node group was still doing its job, the image didn’t maintain the same level of positional consistency.
This comparison demonstrates why both techniques are useful.
The resizing node group helps align the reference image dimensions with the encoder, while the consistency LoRA further stabilizes the generated result.
Understanding LoRA Strength
In the snow-editing example, the consistency LoRA strength was set to:
1.0
This setting provided strong consistency and helped prevent unwanted positional changes.
However, it’s important to understand that a LoRA strength of 1 isn’t always the best choice.
The optimal value depends on what you’re trying to change in the image.
A higher strength may help preserve the original composition, but it can also make the model less willing to modify certain elements.
In some cases, a much lower strength is sufficient to prevent pixel drifting while allowing more significant edits.
Let’s look at another example to understand this trade-off.
Finding the Right LoRA Strength for Different Editing Tasks
One of the most important things to learn about this workflow is how to balance consistency with editing flexibility.
Preventing pixel drifting is useful, but we don’t necessarily want to preserve every element from the original image.
Sometimes, the purpose of an edit is to replace an existing object with something completely different.
If the consistency LoRA is too strong, it may interfere with that change.
Example: Replacing a Guardrail with a Car
For this example, the original image shows a woman sitting on a guardrail.
I asked Qwen Image 2.1 to modify the scene so that the woman would be sitting on a car instead.
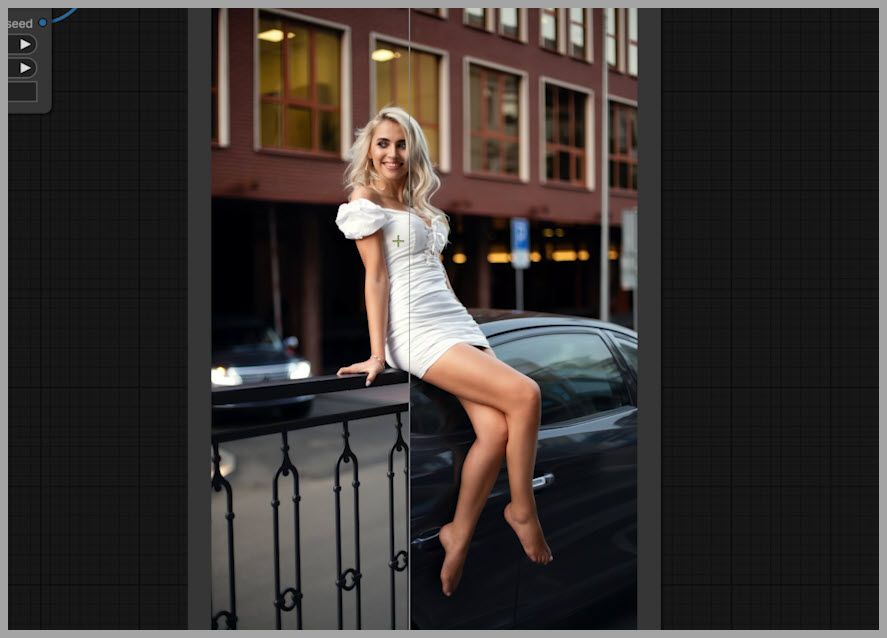
The intended result was straightforward:
- Replace the original guardrail with a car.
- Keep the woman in the same position.
- Avoid unnecessary pixel drifting.
- Maintain the overall visual consistency of the scene.
This task is different from simply adding snow.
We’re asking the model to replace a prominent object that directly interacts with the subject.
As a result, the consistency LoRA needs to allow enough flexibility for the replacement.
Using a LoRA Strength of 0.3
For the first generation, I set the consistency LoRA strength to:
0.3
The result was excellent.
The woman appeared sitting on the car, and there was no visible pixel drifting.
More importantly, the original guardrail was successfully replaced.
This example shows that a relatively low LoRA strength can sometimes provide enough positional stability without interfering with the requested edit.
In other words, you don’t always need a high consistency strength to achieve consistent results.
What Happens When LoRA Strength Is Increased to 1
Next, I increased the LoRA strength from 0.3 to:
1.0
Then I ran the workflow again using the same editing task.
This time, something interesting happened.
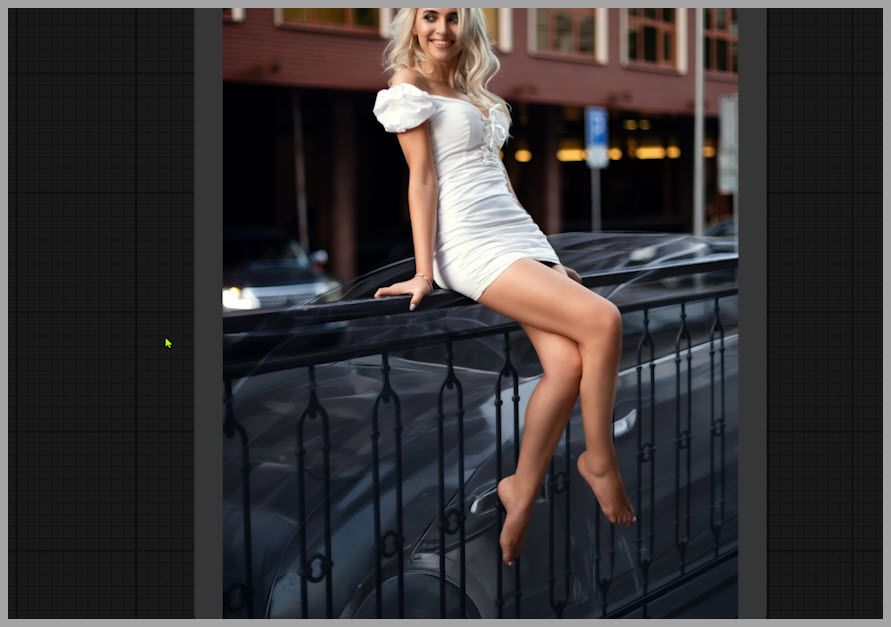
Although the model attempted to generate the car, the original guardrail also appeared in the resulting image.
Why did this happen?
The consistency LoRA was now too strong.
Instead of simply preserving the woman’s position, it also encouraged the model to preserve the guardrail from the original image.
But the guardrail was exactly what we wanted to replace.
This is an important distinction: preserving the original image isn’t always the same as following the editing instructions correctly.
A strong consistency setting can sometimes work against the desired changes.
Balancing Consistency and Editing Freedom
These two examples demonstrate why adjusting LoRA strength is essential.
A useful way to approach the setting is to consider how much of the original image you want to preserve.
| Editing task | Example LoRA strength | Observed behavior |
|---|---|---|
| Adding snow to an existing scene | 1.0 | Strong positional consistency |
| Replacing a guardrail with a car | 0.3 | Successful replacement without visible drifting |
| Replacing a guardrail with a car | 1.0 | Original guardrail was also preserved |
| General image editing | Task-dependent | Adjust based on the generated result |
These values are examples from the workflow, not universal requirements.
If you’re performing an edit that primarily changes the environment while preserving the subject, a higher consistency strength may work well.
However, if you’re replacing an important object or making a more substantial structural change, a lower strength may produce better results.
Here’s a practical way to tune the consistency LoRA:
- Start with a moderate or low strength. For example, try 0.3 when replacing an object in the original scene.
- Generate an image and inspect the result. Pay attention to both positional stability and whether the requested edit was completed.
- Increase the strength if pixel drifting is still visible. A higher value may help stabilize elements that should remain unchanged.
- Decrease the strength if unwanted original elements remain. If objects that should have been removed continue appearing, the LoRA may be preserving too much.
- Repeat until you find a suitable balance. The goal is to preserve the intended composition without restricting the changes you actually want.
Remember, the purpose of the consistency LoRA isn’t to make the edited image identical to the original.
It’s to preserve the elements that should remain consistent while allowing the model to modify everything else according to your instructions.
Improving Image Quality with a Fine-Tuned VAE
There’s one more component in this workflow that I recommend using: a fine-tuned VAE.
Unlike the resizing node group and consistency LoRA, this component primarily focuses on improving the visual quality of the generated image.
Why the Default VAE May Not Be Ideal
A VAE, or Variational Autoencoder, is responsible for converting between the model’s latent representation and image pixels.
During image generation, the VAE plays an important role in how the final image is decoded.
Depending on the VAE being used, the resulting image may contain unwanted visual artifacts.
One issue that can appear is checkerboard artifacts.
These artifacts can manifest as subtle repeating patterns or grid-like texture irregularities, reducing the overall quality of the image.
Such problems can be especially distracting in areas with fine texture details.
Benefits of the Fine-Tuned VAE
In this workflow, I’m using a fine-tuned VAE instead of the original version.
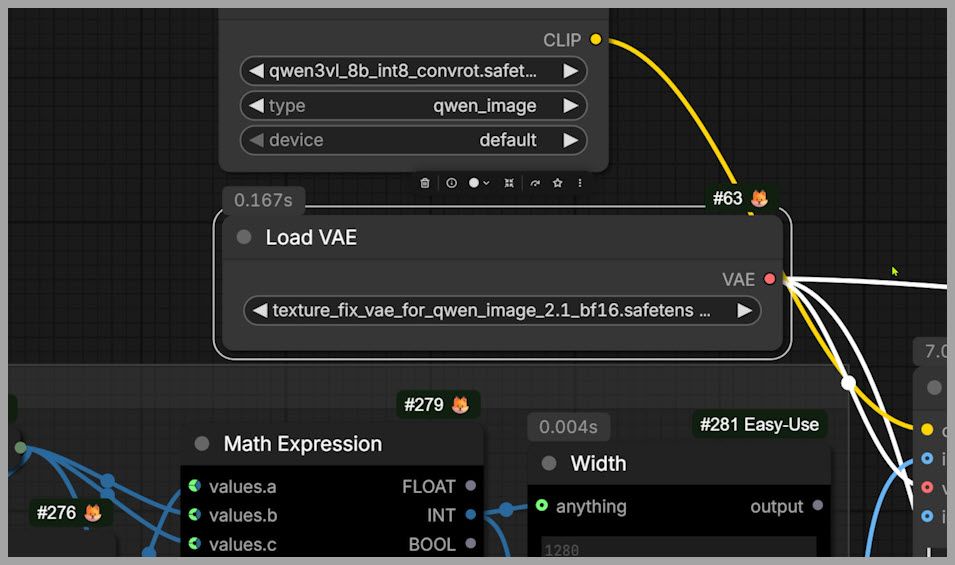
The fine-tuned version produces cleaner textures and helps eliminate checkerboard artifacts.
This improvement is useful because it enhances the visual quality of the generated image without changing the main pixel-drifting correction strategy.
The image resizing node group and consistency LoRA still handle positional stability.
The fine-tuned VAE improves the appearance of the decoded result.
Why I Recommend Using the Fine-Tuned VAE
If you’re recreating this workflow, I recommend using the fine-tuned VAE rather than the original one.
The main benefits are:
- Cleaner textures in the generated images.
- Fewer checkerboard artifacts.
- Better overall visual quality.
Keep in mind that the fine-tuned VAE isn’t the primary solution for pixel drifting.
Its purpose is to improve image quality, while the resizing and LoRA components address consistency.
The specific fine-tuned VAE checkpoint is not identified in this article, so you’ll need the checkpoint used by the original workflow to reproduce this part exactly.
Conclusion
Pixel drifting can make image editing with Qwen Image 2.1 frustrating, especially when you want to preserve the positions of important subjects while changing other parts of the scene.
Fortunately, you don’t need a complicated workflow or additional post-generation correction code to significantly reduce this problem.
The approach introduced in this article combines two effective techniques.
With these techniques, you can perform substantial image edits while maintaining much better consistency with the original reference.
And because the workflow is relatively simple, you can spend less time troubleshooting pixel drifting and more time creating the images you actually want.
If you’d like to try this workflow yourself, you can find it through our creator community. By joining and supporting the channel, you’ll also help us continue developing and sharing new ComfyUI workflows.
Thanks for reading, and I’ll see you in the next article!
Gain exclusive access to advanced ComfyUI workflows and resources by joining our community now!