6 Ways to Make Krea 2 Uncensored in ComfyUI
Krea 2 quickly became one of the most talked-about image generation models thanks to its impressive realism, strong prompt understanding, and excellent anatomy generation. Shortly after its release, many creators began experimenting with the model and shared mixed opinions. While many praised its quality and potential, others found that its built-in safety filtering often limited creative control.
In this article, I’ll compare 6 different methods for reducing the effects of Krea 2’s safety filtering inside ComfyUI. Although these techniques are often described as “uncensoring” the model, their benefits extend far beyond generating sensitive content. In many everyday workflows, reducing the influence of the safety filter can significantly improve prompt adherence, facial expressions, character poses, injuries, body types, and other creative details.
We’ll also examine why each method works, compare their strengths and weaknesses, and conclude with practical recommendations for different use cases.
YouTube Tutorial:
Gain exclusive access to advanced ComfyUI workflows and resources by joining our community now!
Why the Safety Filter Affects Everyday Image Generation
Many users assume the safety filter only blocks explicit content. In practice, it influences a much wider range of image generation.
When the safety tuning is active, Krea 2 often becomes conservative whenever prompts include emotionally intense or physically descriptive elements. This can affect:
- Strong facial expressions
- Bruises
- Scars
- Cuts and wounds
- Fear, sadness, anger, or pain
- Certain body types
- Overall prompt adherence
As a result, perfectly safe prompts may still produce overly sanitized images.
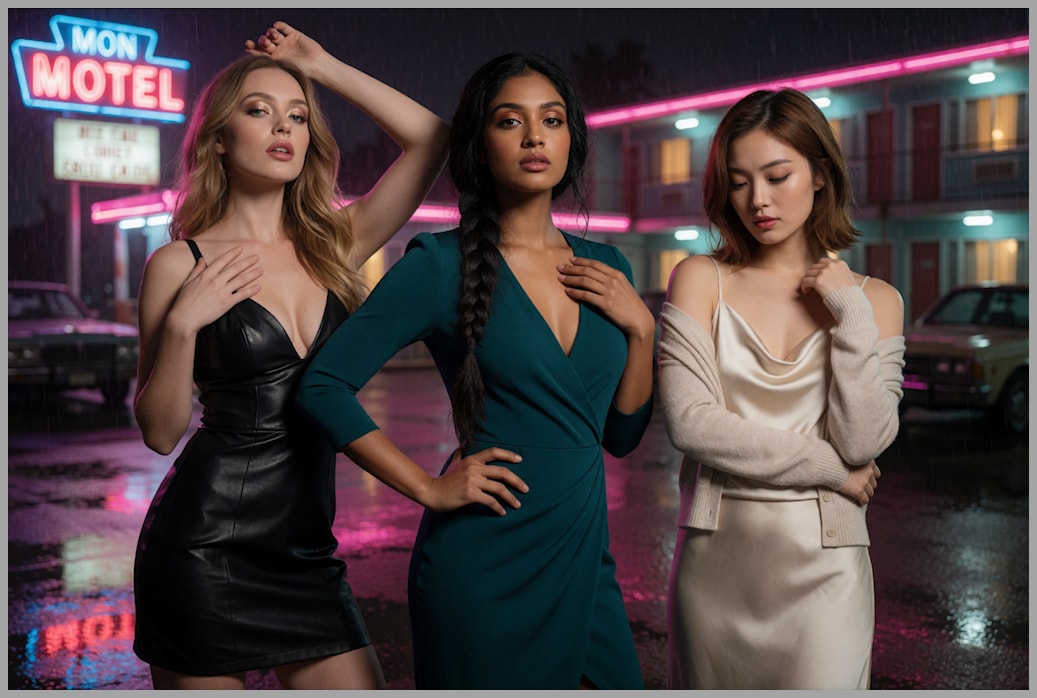
Example Prompt
Throughout this comparison, every test uses essentially the same prompt requesting four women with different emotional expressions, including:
- Angry
- Sad
- Laughing
- Fearful
The prompt also asks for visible bruises, scars, or wounds.
This prompt is ideal for testing because it highlights exactly where the safety filter begins to interfere.
Baseline: Standard Krea 2 Output
The default Krea 2 workflow contains no additional LoRAs or custom nodes.
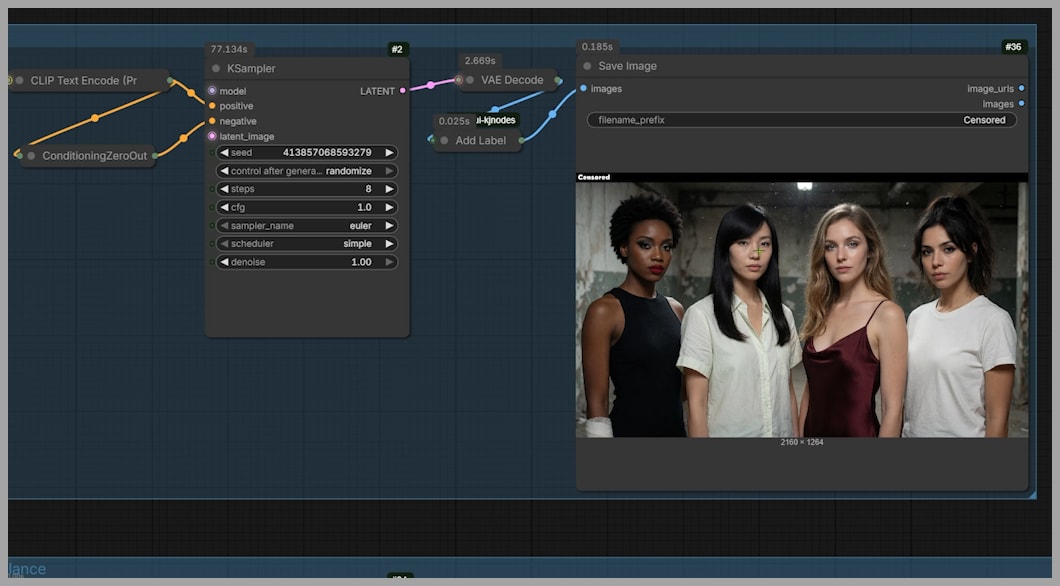
Although the generated images are technically high quality, several problems immediately appear:
- Most facial expressions become neutral.
- Bruises and scars are largely absent.
- Characters appear clean and calm.
- Emotional intensity is significantly reduced.
Importantly, this does not indicate that Krea 2 is a weak model. Quite the opposite.
Krea 2 excels at:
- Prompt comprehension
- Hand generation
- Body proportions
- Realistic anatomy
- High image quality
In many situations, the limiting factor is the safety tuning rather than the underlying model.
Building a Fair Comparison Workflow
To compare different bypass techniques fairly, every method must be tested under identical conditions.
The workflow uses 7 KSamplers, allowing 7 images to be generated simultaneously.
Download the Workflow: https://drive.google.com/file/d/1213k5WGXtgB4n5TDpqlvpvRWf_2J_RWA/
Each KSampler shares exactly the same:
- Prompt
- Seed
- Empty latent image
- Krea 2 checkpoint
Only one variable changes between outputs: the bypass method.
This controlled setup ensures that any differences in the generated images result from the tested technique rather than random variation.
Method 1 – Conditioning Layer Weighting Node
The first method introduces a custom node that modifies how conditioning information is injected into the diffusion model.
Understanding Conditioning
Diffusion models generate images by repeatedly refining noisy latent representations.
During this process, conditioning guides the model toward the desired result. Conditioning may include:
- Text prompts
- Reference images
- ControlNet inputs
- Other guidance information
The custom node changes how this conditioning flows through the model.
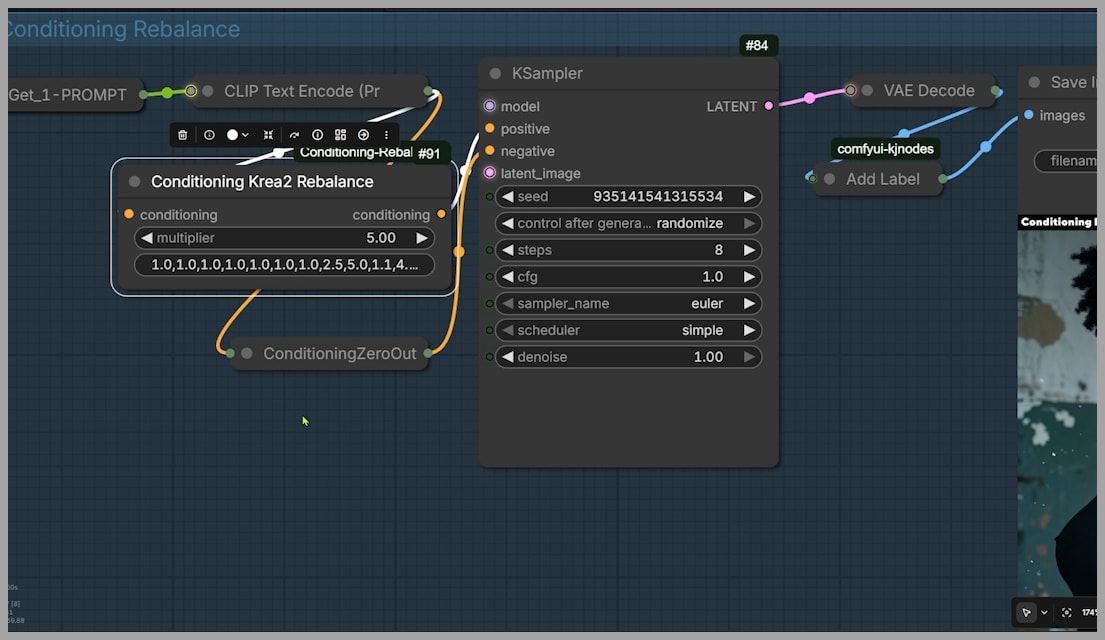
Instead of leaving all neural network layers untouched, it modifies their relative weighting.
The result behaves somewhat similarly to an IP-Adapter, while also weakening parts of Krea 2’s safety tuning.
Results
The improvements are immediately visible.
Compared to the default model:
- Facial expressions become much stronger.
- Bruises and bandages begin appearing.
- Emotional intensity increases.
However, a major problem also appears.
Instead of generating four women as requested, only 3 appear.
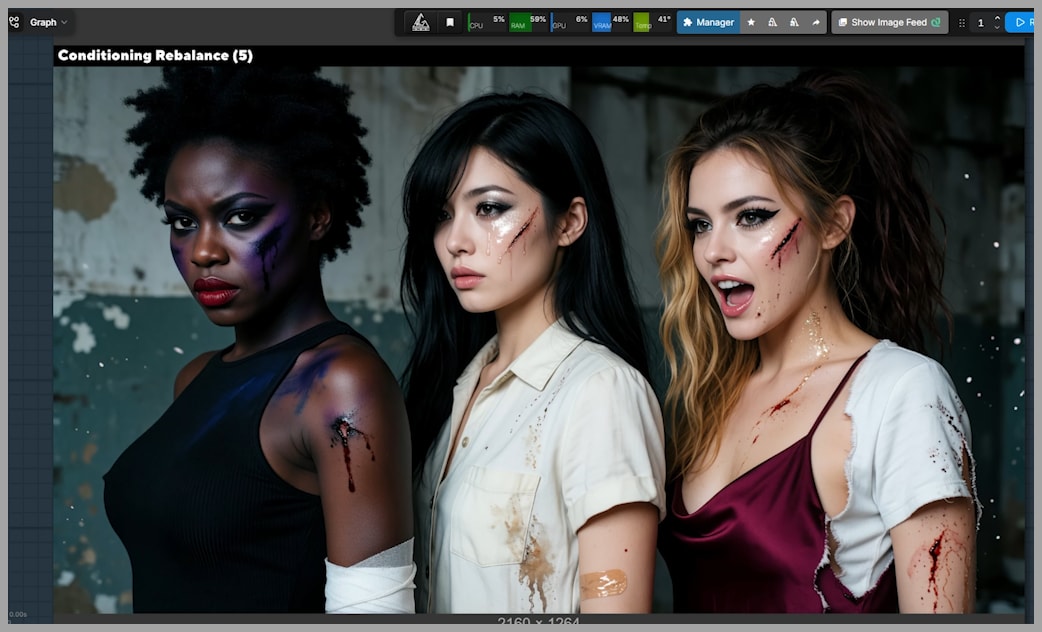
Prompt adherence suffers significantly.
Why This Happens
Krea 2 contains 12 major transformer layers.
The safety tuning primarily affects only a few of them.
This node modifies all 12 layers, including many unrelated to the safety filter.
Changing every layer introduces unintended side effects that reduce image consistency.
Recommendation
Although the node can produce more expressive outputs, prompt adherence becomes noticeably less reliable.
After extensive testing, this method is generally difficult to recommend compared to the alternatives.
Method 2 – Krea2T Enhancer Advanced
The second approach uses the Krea2T Enhancer Advanced custom node, developed by Capitan01R.
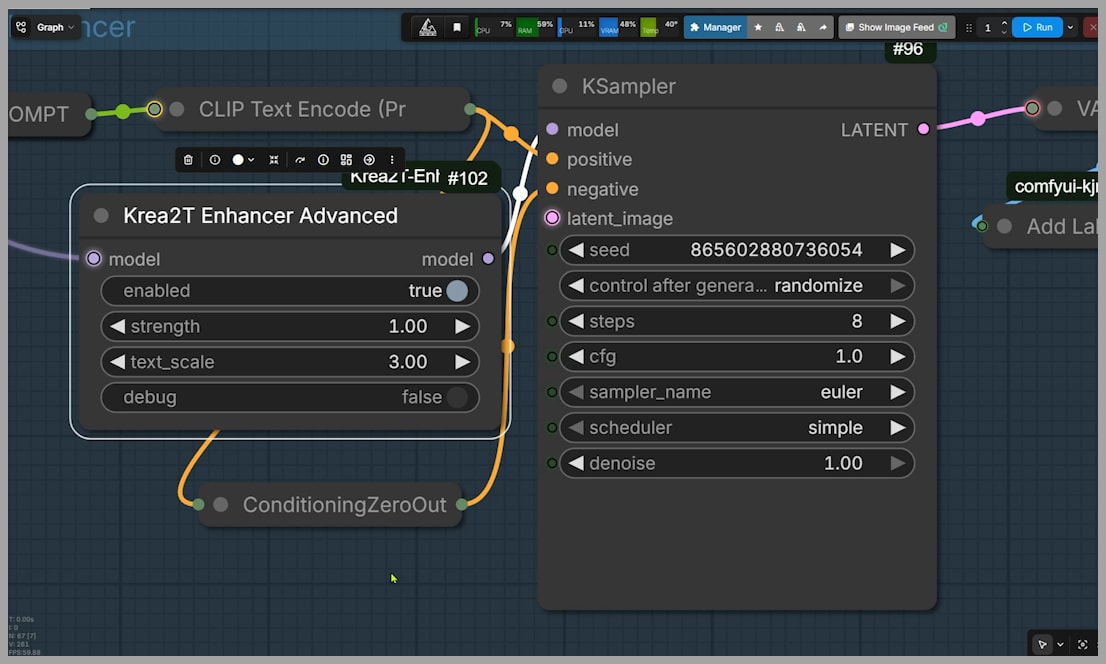
This node connects directly between the Krea 2 model and the KSampler.
Unlike the previous method, it focuses specifically on improving prompt adherence rather than broadly altering every layer.
Important Parameters
Two settings deserve particular attention.
Text Scale
This is the primary adjustment.
In the comparison, a value of 3 produces excellent results.
Strength
Strength controls how strongly the enhancement influences generation.
It can be increased up to 2, depending on the prompt.
Results
This method produces the strongest overall performance.
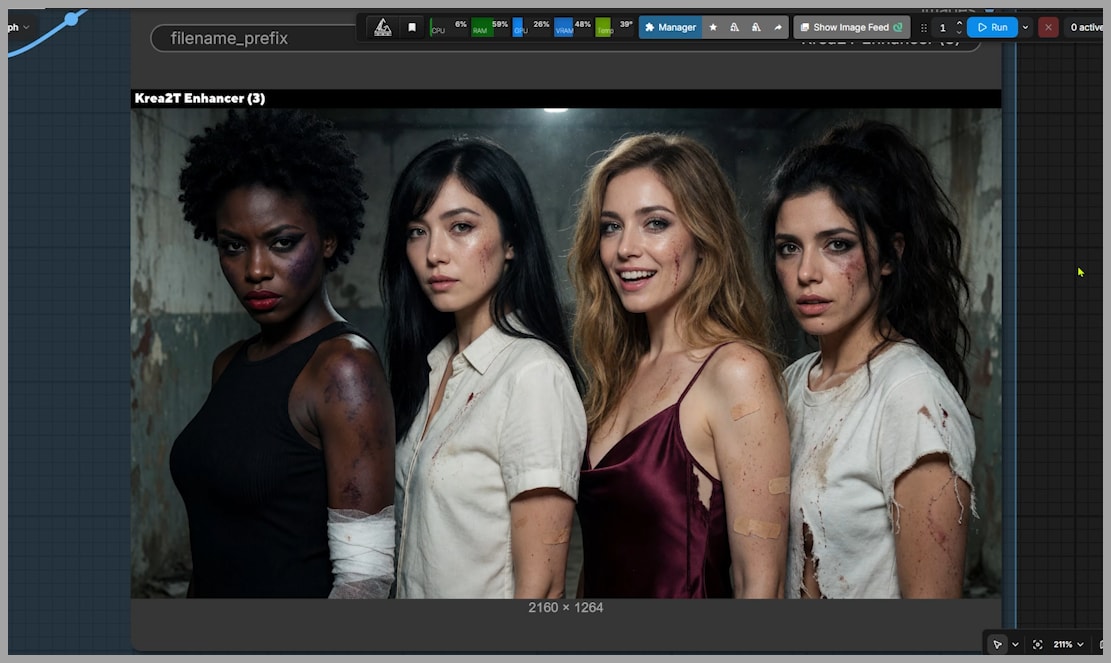
The generated images successfully include:
- All 4 requested characters
- Accurate facial expressions
- Visible bruises
- Clear wounds
- Improved emotional intensity
Prompt adherence remains strong without introducing significant artifacts.
Even during additional testing involving more challenging prompts, this node consistently delivered better results than most alternatives.
Recommendation
For most users, this is the best overall solution.
It provides the strongest balance between:
- Prompt accuracy
- Stability
- Detail
- Creative freedom
How Safety Bypass LoRAs Work
The remaining 4 methods all rely on LoRAs.
Before comparing them individually, it helps to understand why they work.
Imagine Twelve Control Knobs
Think of the diffusion transformer as a long assembly line converting text into an image.
Between your prompt and the model sits a small control panel containing 12 adjustment knobs.
Each knob influences a different aspect of how textual information affects image generation.
These may include:
- Artistic style
- Anatomy
- Prompt emphasis
- Safety behavior
Where the Safety Filter Lives
According to the explanation provided by the creator of the Fedor Bypass LoRA, Krea 2’s safety tuning is primarily embedded in layers 9 and 10.
Different bypass LoRAs modify different combinations of these layers.
| LoRA | Modified Layers |
|---|---|
| skc3vo | All 12 layers |
| Filter Bypass 3 | Layers 9, 10, 11 |
| Filter Bypass 2 | Layers 9 and 10 |
| Fedor Bypass | Only layers 9 and 10 while leaving all others untouched |
This difference largely explains the varying levels of stability between the methods.
Method 3 – Fedor Bypass LoRA
Among all LoRA options, Fedor Bypass proved the strongest overall performer.
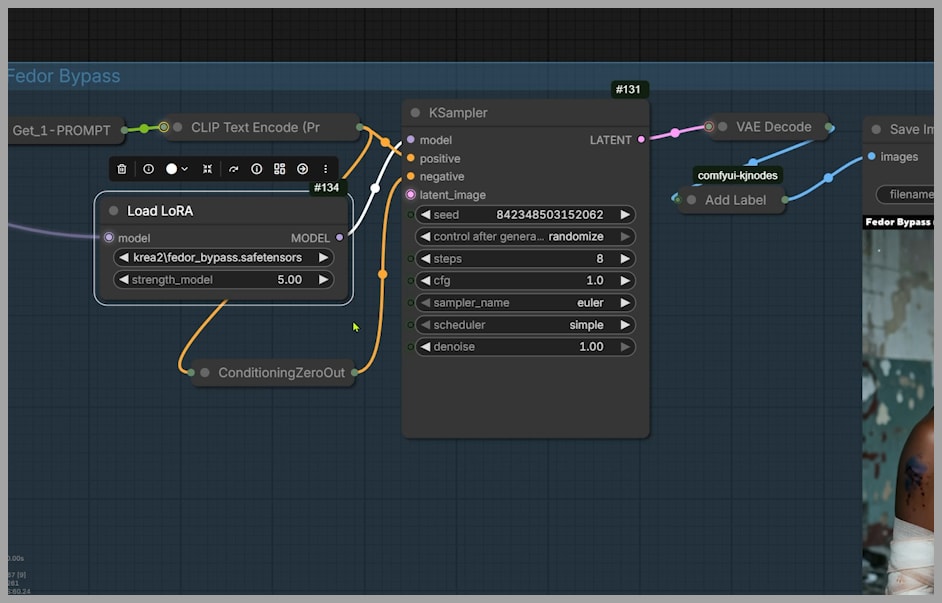
Rather than modifying every transformer layer, it focuses only on the layers directly responsible for safety tuning.
Results
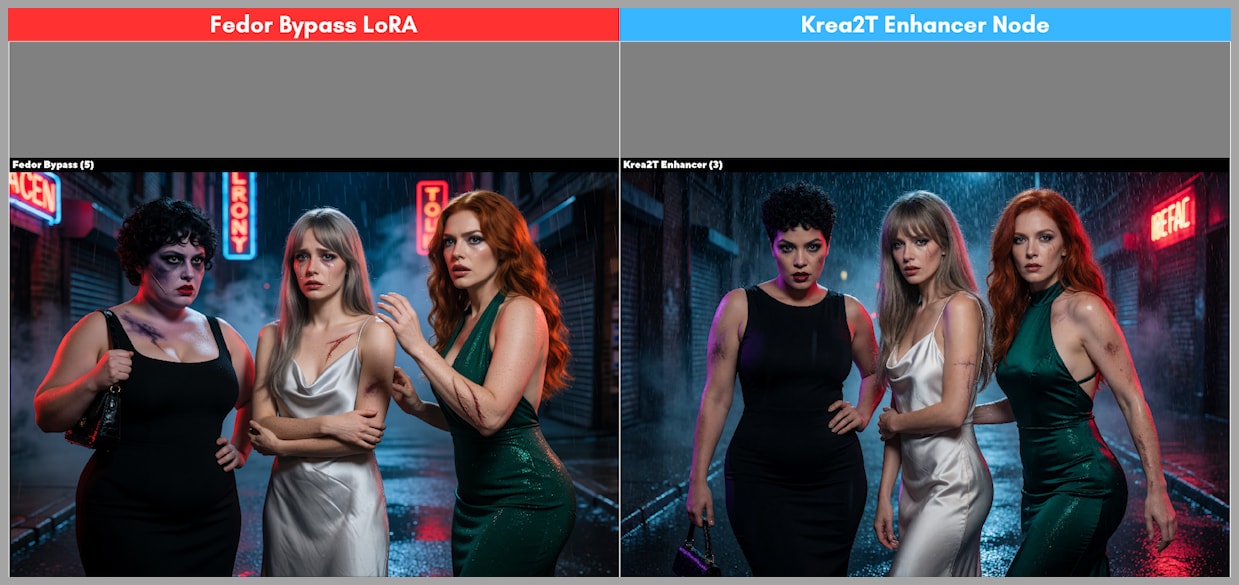
Compared with the Krea2T Enhancer output:
- Bruises appear more realistic.
- Facial expressions become stronger.
- Injuries gain additional detail.
- Prompt adherence remains high.
Multiple comparisons show improved realism without introducing many visible artifacts.
Limitations
One weakness becomes apparent during more mature image generation.
Although Fedor performs extremely well for safe-for-work prompts, it struggles more than other methods with explicit content.
Recommendation
If you prefer LoRAs instead of custom nodes, Fedor Bypass is the best starting point.
Method 4 – skc3vo LoRA
The skc3vo LoRA takes a much more aggressive approach.
Instead of modifying only safety-related layers, it changes all 12 transformer layers.
Weight Recommendation
Only a very small weight is necessary.
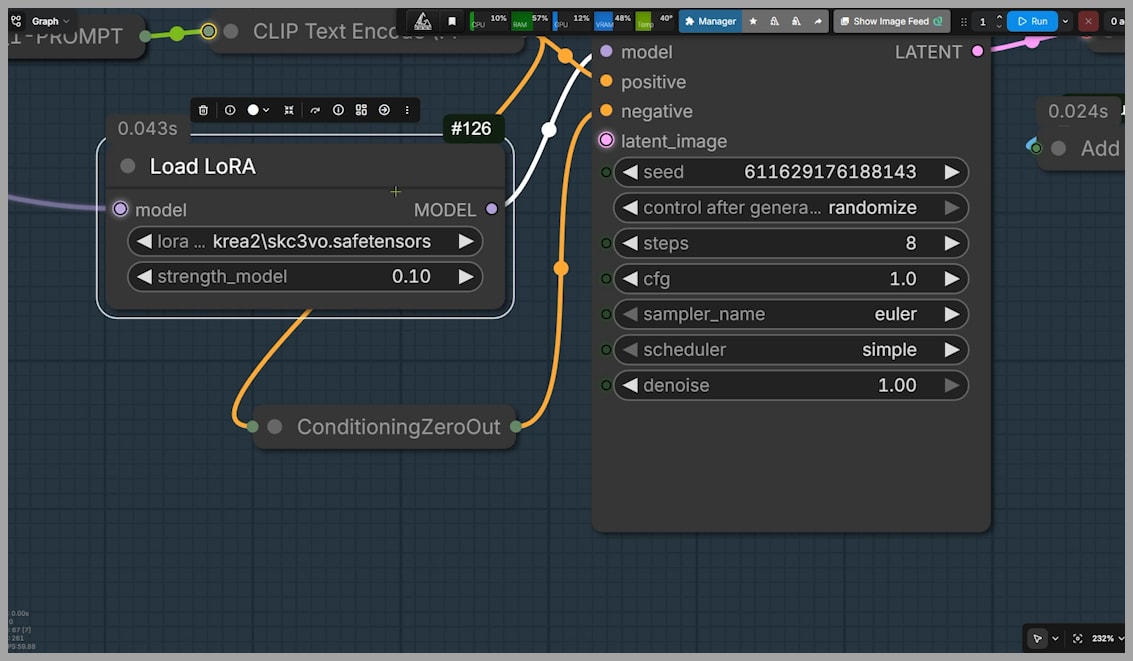
A value around 0.01 already produces noticeable changes.
Higher values are generally unnecessary.
Results
Positive effects include:
- Strong facial expressions
- Better cuts and bruises
- Improved emotional intensity
However, new problems also emerge.
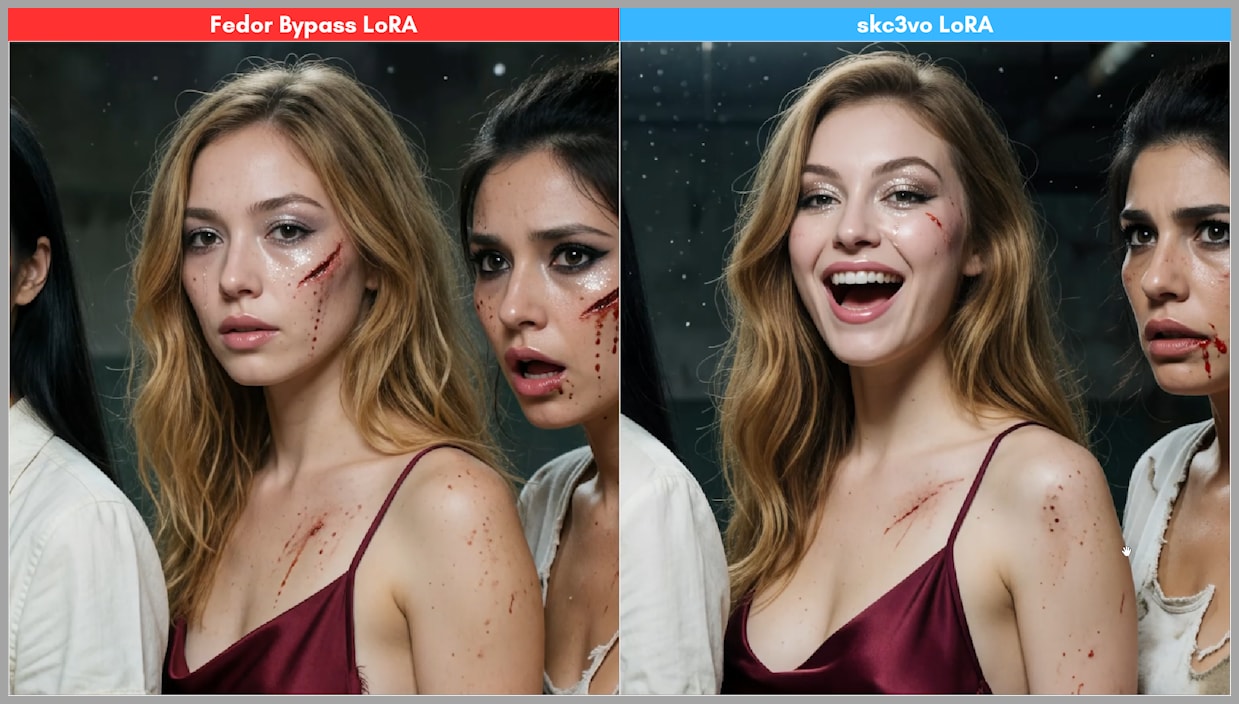
Skin textures become:
- Plastic
- Artificial
- Less realistic
Prompt adherence also becomes less consistent than with the previous methods.
Recommendation
Although capable of producing uncensored outputs, this LoRA performs less reliably overall and is generally difficult to recommend.
Methods 5 and 6 – Filter Bypass 2 and Filter Bypass 3
These 2 LoRAs were created by the same author and share a similar design philosophy.
Filter Bypass 2
Filter Bypass 2 modifies only layers 9 and 10.
This produces moderate improvements while maintaining relatively good stability.
Filter Bypass 3
Filter Bypass 3 extends the modifications to layer 11.
This increases its ability to weaken the safety filter but also introduces additional instability.
Comparison
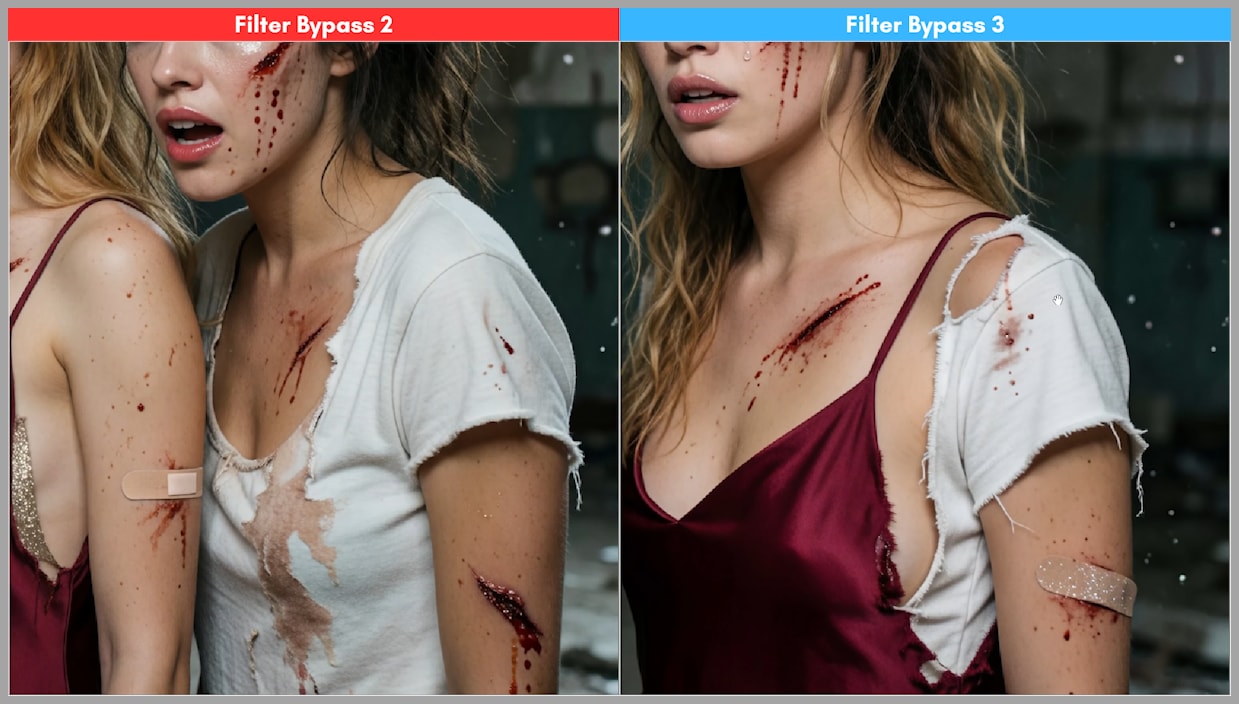
During testing, Filter Bypass 3 often produced:
- Missing characters
- Clothing artifacts
- Strange object blending
- Unexpected visual details
For example:
- A four-character prompt sometimes generated only three people.
- Clothing pieces appeared attached to the wrong character.
- Makeup textures occasionally spread onto unrelated objects such as bandages.
Although prompt adherence sometimes exceeded Filter Bypass 2, image quality became noticeably less stable.
Recommendation
Filter Bypass 3 should only be considered when stronger filtering reduction is absolutely necessary and multiple seed variations are acceptable.
Overall Comparison
| Method | Prompt Adherence | Stability | Image Quality | Recommendation |
|---|---|---|---|---|
| Default Krea 2 | Good | Excellent | Excellent | Limited by safety tuning |
| Layer Weighting Node | Moderate | Low | Moderate | Not recommended |
| Krea2T Enhancer Advanced | Excellent | Excellent | Excellent | Best overall choice |
| Fedor Bypass | Excellent | Very Good | Excellent | Best LoRA |
| skc3vo | Moderate | Moderate | Good | Generally not recommended |
| Filter Bypass 2 | Good | Good | Good | Acceptable alternative |
| Filter Bypass 3 | Good | Fair | Fair | Powerful but unstable |
Final Recommendations
After testing all six methods, several clear recommendations emerge.
Best Overall
Krea2T Enhancer Advanced
This method consistently provides the best balance between:
- Prompt adherence
- Facial expressions
- Image stability
- Creative freedom
- Overall image quality
For most users, this should be the first solution to try.
Best LoRA
Fedor Bypass
Among all LoRA-based methods, Fedor Bypass offers the best combination of realism and prompt accuracy while avoiding many of the artifacts introduced by more aggressive approaches.
It performs especially well for safe-for-work images requiring stronger emotions, bruises, scars, or realistic injuries.
Most Aggressive Option
Filter Bypass 3
When stronger safety reduction is necessary, Filter Bypass 3 can be useful.
However, users should expect additional experimentation due to increased instability and visual artifacts.
Conclusion
Krea 2 remains one of the strongest image generation models available for ComfyUI, offering exceptional realism, anatomy, and prompt understanding. In many cases, the model’s biggest limitation is not its architecture but the conservative behavior introduced by its safety tuning.
Among the six methods evaluated, Krea2T Enhancer Advanced stands out as the most balanced and reliable solution. It significantly improves prompt adherence while preserving image quality and stability. For users who prefer LoRAs, Fedor Bypass provides the strongest overall alternative, particularly for safe-for-work content that requires richer expressions, more convincing injuries, or stronger emotional impact.
Ultimately, no single technique is perfect for every scenario. Different prompts may respond differently, and achieving the best results often requires experimenting with multiple seeds, parameter values, and workflows. Understanding how each method influences Krea 2 gives you greater control over the model, allowing you to produce images that more faithfully match your creative vision.