Flux 3 Klein vs. Flux 2 Klein vs. Qwen Image 2.1: Which AI Image Editing Model Performs Best?
AI image editing models are becoming increasingly powerful, but how well can they handle tasks that require more than simply changing colors, removing objects, or replacing backgrounds?
One particularly interesting challenge is extracting clothing from a photograph of a person and transforming it into a professional e-commerce product image.
At first, this sounds like a straightforward image editing task. We provide a photograph, describe the desired result, and let the AI generate a clean product photo.
However, there’s a major challenge: parts of the clothing may be hidden behind the person’s body.
The AI must not only remove the person but also understand the structure of the garment and reconstruct areas that aren’t visible in the original photograph.
To see how well modern image editing models can handle this challenge, I tested three models using the same workflow:
- Flux 3 Klein
- Flux 2 Klein
- Qwen Image 2.1
I ran the comparisons using ComfyUI, with the same input images and prompts for all three models.
The results were surprisingly different. Some models demonstrated impressive reconstruction abilities, while others were better at preserving the original design.
In this article, we’ll explore the workflow, examine several image editing examples, compare the strengths and weaknesses of each model, and determine which one might be the best choice for different tasks.
YouTube Tutorial:
Understanding the Image Editing Challenge
Extracting Clothing from a Model Photo
The main objective of our first test is to transform a fashion photograph into a professional product image.
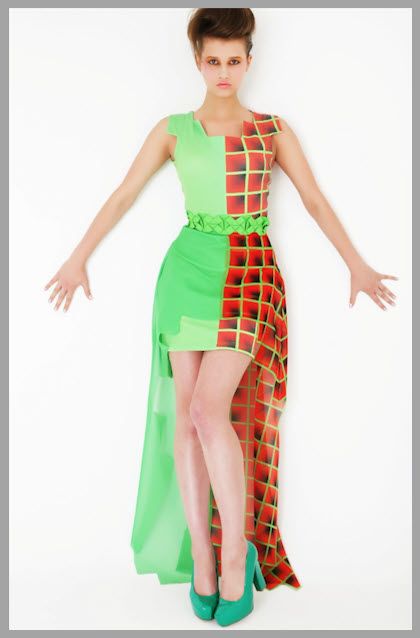
Imagine that we have a photograph of a woman wearing a dress. Instead of showing the woman, we want to present only the dress, as though it were photographed separately for an online clothing store.
The final image should have several characteristics:
- The person must be completely removed.
- The original background must be replaced with pure white.
- The dress should remain as close as possible to the original design.
- Hidden portions of the garment must be reconstructed naturally.
- The fabric should retain realistic volume, texture, and draping.
- The garment should appear centered and professionally photographed.
- No mannequin, hanger, or human body parts should be visible.
Ideally, the result should resemble a product photograph created using an invisible mannequin, sometimes called a ghost mannequin effect.
This technique is commonly used in fashion e-commerce photography because it allows customers to see the overall shape and structure of a garment without the distraction of a visible model.
Why Reconstructing Hidden Fabric Is Difficult
The most challenging part of this task is reconstructing sections of clothing that are hidden in the source photograph.
For example, in our first test image, the woman’s legs cover portions of her dress.
This means the AI cannot simply cut the dress out of the photograph. It needs to determine what the missing fabric should look like.
To produce a convincing result, the model must make several decisions:
- Identify which pixels belong to the dress and which belong to the person.
- Understand the visible shape and structure of the garment.
- Infer how the fabric continues behind the person’s body.
- Reconstruct missing sections without introducing unrealistic patterns or shapes.
- Preserve the garment’s original colors, textures, and design details.
- Present the reconstructed garment as a standalone product.
This is particularly difficult when dealing with complex garments featuring layered fabrics, ruffles, lace, transparency, or asymmetrical designs.
A model might generate a beautiful-looking dress that isn’t actually faithful to the original.
That’s an important distinction: a visually convincing reconstruction is not necessarily an accurate reconstruction.
The Three Models Being Compared
To explore these differences, I selected three image editing models.
Flux 3 Klein is particularly interesting because of its relatively small model size. In the versions used for this comparison, it has approximately 5.6 billion parameters.
Flux 2 Klein, meanwhile, has approximately 9 billion parameters, making it larger than Flux 3 Klein.
Qwen Image 2.1 is the third model in our comparison, allowing us to evaluate a different approach to image editing and visual reconstruction.
Our goal is not simply to determine which model generates the most attractive images.
Instead, we’re evaluating how effectively each model can follow instructions, preserve important details, and reconstruct missing information.
Setting Up the Image Editing Workflow on ComfyUI
To make the comparison as straightforward as possible, I built a workflow that allows all three models to process the same input image using the same prompt.
I created the workflow on ComfyUI.
The workflow is available as a free download.
Understanding the Workflow Structure
The workflow is organized into three separate groups, with one group dedicated to each model.
The structure is straightforward:
- Group 1: Flux 3 Klein
- Group 2: Flux 2 Klein
- Group 3: Qwen Image 2.1
Each group receives the same source photograph and the same editing instructions.
The models then generate their own outputs independently.
For clarity, I labeled the results and placed them next to the original photograph.
The comparison follows this arrangement:
| Position | Image |
|---|---|
| 1 | Original source photograph |
| 2 | Flux 3 Klein output |
| 3 | Flux 2 Klein output |
| 4 | Qwen Image 2.1 output |
This layout makes it easy to compare the reconstructed garments directly with the source.
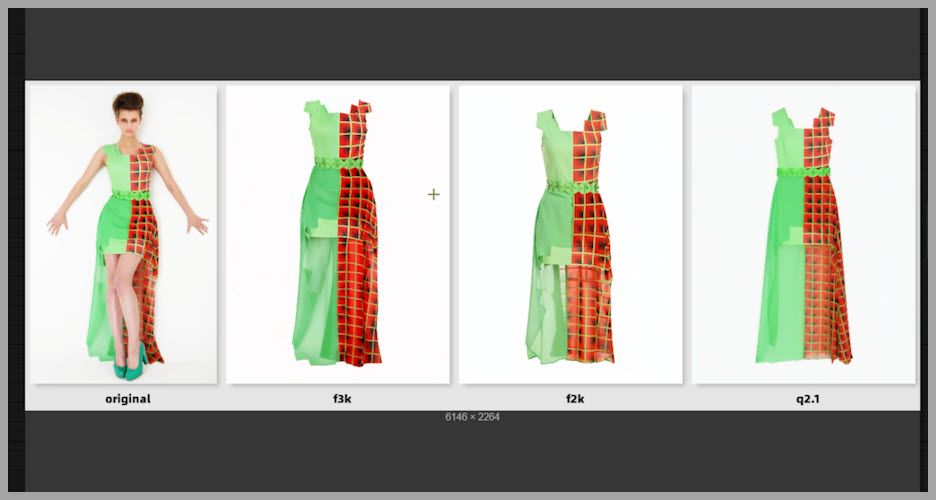
Rather than evaluating each result in isolation, we can immediately see which model preserved the original design and which introduced unexpected changes.
Creating the Garment Extraction Prompt
I used the following prompt for all three models.
Original prompt:
Extract the outfit worn by the model and transform it into a professional, front-facing e-commerce product photo on a pure white background. Completely remove the model, background, and any unrelated objects, presenting the garment as a standalone piece with a realistic invisible mannequin effect.
Naturally reconstruct any areas hidden by the model while maintaining realistic structure, volume, and fabric draping. Center the entire garment in the frame with soft, even studio lighting, ensuring a clean, high-resolution, photorealistic result with no visible mannequin, hanger, or human body parts.
This prompt contains several important instructions.
First, it defines the main editing task.
The AI must extract the outfit and convert it into a professional product photograph.
Second, it specifies what should be removed.
The model, original background, and unrelated objects must disappear completely.
Third, it defines how the garment should be presented.
The clothing should appear as a standalone object with a realistic invisible mannequin effect.
Fourth, it explicitly addresses missing details.
The instruction to naturally reconstruct hidden areas is essential because it tells the model to infer garment structure rather than simply preserve the visible pixels.
Finally, it establishes the desired photographic style.
A pure white background, centered composition, and soft studio lighting help create the appearance of a professional e-commerce product image.
First Test: Converting a Dress Photo into an E-Commerce Product Image
Let’s begin with the first example.
The original photograph shows a woman wearing a dress, with her legs covering some portions of the garment.
The task is to remove her completely and reconstruct the dress as a standalone product.
Flux 3 Klein: Strong Reconstruction but Incorrect Fabric Color
Flux 3 Klein produces a convincing overall garment.
The dress looks complete, and the model successfully reconstructs areas that were previously hidden.
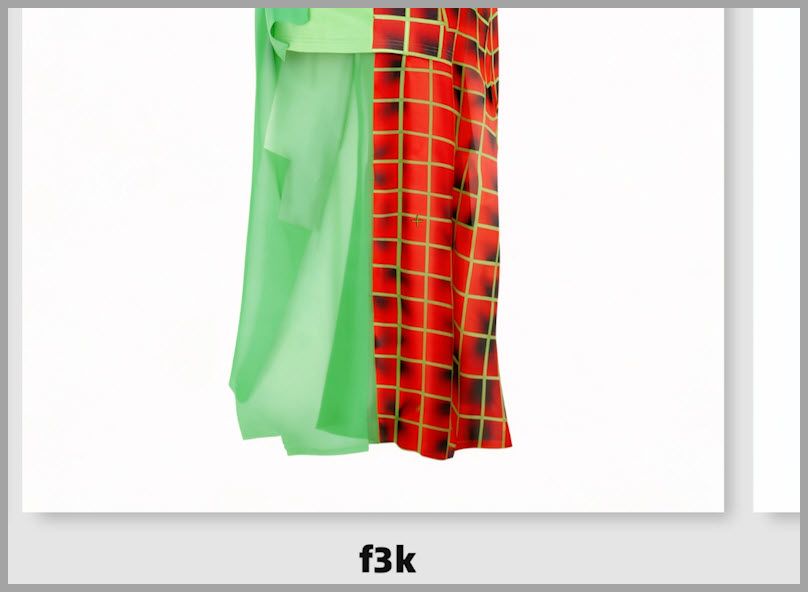
However, there’s a noticeable problem with the fabric color.
In the original photograph, the reverse side of the fabric has a lighter shade.
Flux 3 Klein instead generates part of this section in a darker color.
As a result, the reconstructed area doesn’t quite match the visible fabric in the original photograph.
This is a subtle but important error.
For an ordinary creative image editing task, the difference might not matter much.
But for an e-commerce product photograph, accurate color representation is essential.
A customer expects the product image to reflect the actual appearance of the garment.
Changing the color of a fabric section could make the generated image misleading.
So although Flux 3 Klein creates a realistic-looking result, it doesn’t perfectly preserve the material characteristics of the original dress.
Flux 2 Klein: Convincing Fabric with Possible Transparency
Flux 2 Klein handles the lighter fabric more convincingly.
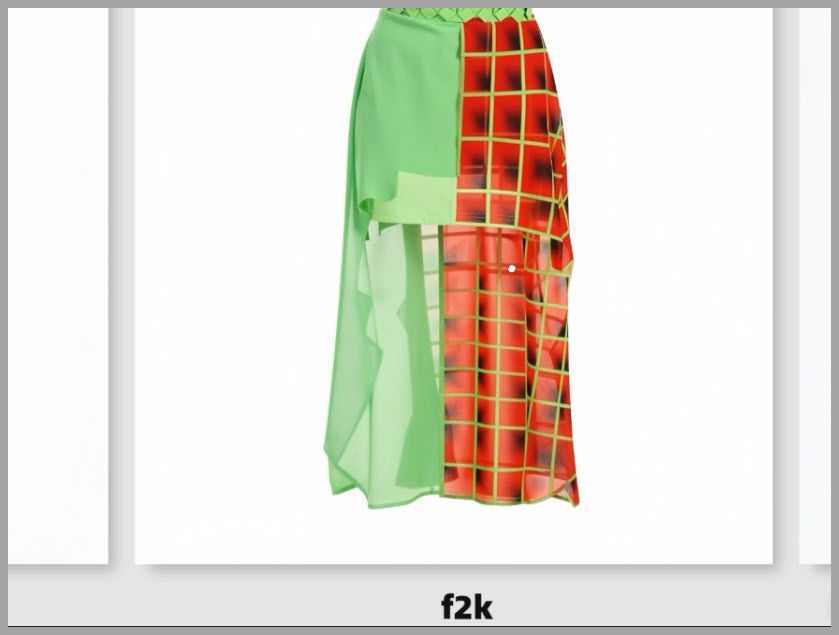
Its reconstruction appears closer to the original material, particularly in the areas where the reverse side of the dress is visible.
Interestingly, it also introduces a degree of transparency.
Some sections of the generated fabric appear slightly see-through, suggesting that the material is thin or lightweight.
This is an interesting interpretation because many delicate dress fabrics do have translucent properties.
However, there’s an important limitation.
We cannot determine from the source photograph whether the actual fabric is as transparent as Flux 2 Klein suggests.
The model may have correctly inferred the material, or it may have invented a property that wasn’t present.
This demonstrates a common challenge with AI image reconstruction.
Even when an output looks physically plausible, some of its details may be generated assumptions rather than verified characteristics of the original object.
Qwen Image 2.1: Accurate Details with a Flat-Lay Appearance
Qwen Image 2.1 produces another convincing result.
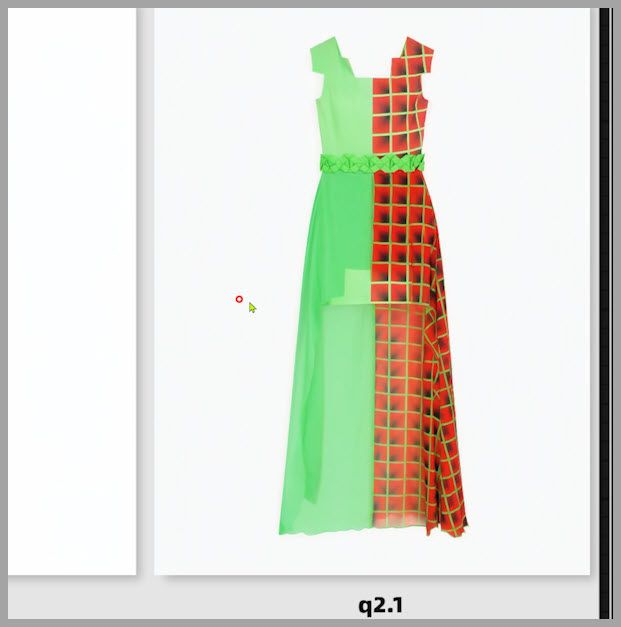
Its reconstruction of the garment looks consistent with the source photograph, including the lighter fabric sections.
However, its presentation style is noticeably different.
Rather than creating a garment with pronounced three-dimensional volume, Qwen tends to arrange the dress in a flatter configuration.
The result resembles a dress laid on the floor and photographed directly from above.
This type of presentation is common in flat-lay product photography.
It can be useful because it clearly displays the overall shape and design of a garment.
However, it isn’t quite the same as the invisible mannequin effect requested in the prompt.
An invisible mannequin photograph generally preserves some three-dimensional structure, helping viewers understand how the garment would hang when worn.
Qwen’s flatter arrangement makes the design easy to inspect, but it can reduce the sense of depth and volume.
What We Can Learn from the First Test
The first comparison reveals three different model behaviors.
| Model | Main Strength | Main Weakness |
|---|---|---|
| Flux 3 Klein | Convincing overall reconstruction | Incorrect color in part of the hidden fabric |
| Flux 2 Klein | Plausible material reconstruction | Introduces unverified transparency |
| Qwen Image 2.1 | Consistent garment appearance | Flatter presentation than the requested invisible mannequin effect |
The interesting thing is that all three models receive exactly the same prompt.
Yet each model interprets the missing visual information differently.
This suggests that garment extraction isn’t just a segmentation or background removal problem.
It also tests a model’s ability to reason about clothing structure, fabric behavior, and design continuity.
Advanced Garment Reconstruction: Comparing Additional Examples
After examining the first result, I tested several more fashion photographs using the same prompt.
These additional examples helped reveal differences that weren’t obvious in the initial comparison.
One particularly interesting case involved a dress with cascading ruffles and layered tulle.
Reconstructing Complex Ruffles and Layered Tulle
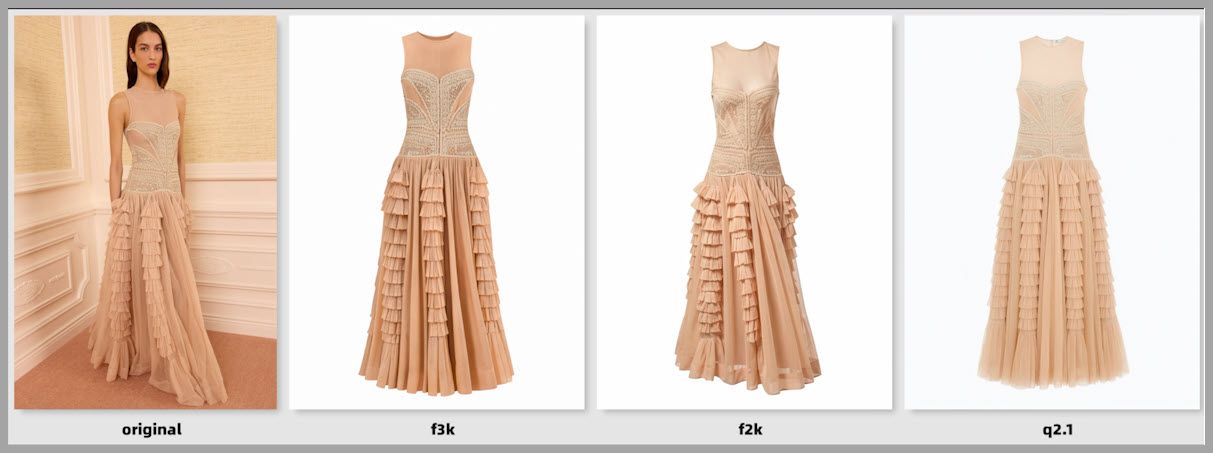
In this example, the original dress features several vertical columns of ruffled tulle extending down the skirt.
However, the lower-left portion of the dress is partially obscured.
This means the full arrangement of the ruffles isn’t visible.
The models must infer how the decorative elements continue through the hidden section.
This is more complicated than reconstructing a simple piece of fabric.
Ruffles have their own shapes, layering patterns, and spatial relationships.
A successful reconstruction needs to preserve these relationships while extending the design into the missing area.
Flux 3 Klein: Reconstructing Missing Ruffle Details
Flux 3 Klein performs impressively in this example.
Rather than merely reproducing the visible ruffles, it extends the design into the hidden portion of the skirt.
The resulting arrangement looks natural and visually coherent.
It appears to understand that the cascading ruffles should continue beyond the visible area.
This is an important strength.
When dealing with partially obscured garments, a model must sometimes make reasonable assumptions to complete the design.
Flux 3 Klein seems willing to reconstruct missing structures instead of limiting itself to what can be directly observed.
In this example, that approach produces a better result.
Flux 2 Klein: Preserving Visible Details but Limiting Reconstruction
Flux 2 Klein takes a more conservative approach.
Its output stays relatively close to the visible portions of the original dress.
While this helps preserve existing details, it also means the model doesn’t fully reconstruct the hidden ruffle arrangement.
The result is less complete than the Flux 3 Klein version.
This highlights an important trade-off.
Staying close to the source photograph can be beneficial when accuracy is the priority.
However, when substantial parts of an object are hidden, excessive reliance on visible information may produce an incomplete reconstruction.
In this example, Flux 2 Klein doesn’t extend the garment’s design as effectively as the other models.
Qwen Image 2.1: Reconstructing a Symmetrical Garment Design
Qwen Image 2.1 produces an especially interesting result.
Instead of simply extending the visible ruffles, it arranges the vertical columns of tulle symmetrically on both sides of the skirt.
This creates a balanced and coherent garment design.
When I examined the original photograph more closely, I could identify what appeared to be four columns of ruffled tulle.
Based on the visible structure of the dress, it seemed reasonable to assume that these decorative elements were sewn onto the garment in a symmetrical arrangement.
If that assumption is correct, Qwen’s reconstruction may actually be the most faithful to the original design.
Of course, we cannot confirm the exact hidden arrangement from the photograph alone.
But Qwen’s output demonstrates a useful ability: inferring a plausible overall design from partially visible structural patterns.
This makes it particularly interesting for fashion image editing, where symmetry and design consistency often matter.
Another Example: Flux 3 Klein Outperforms Qwen
The next example produces a different result.
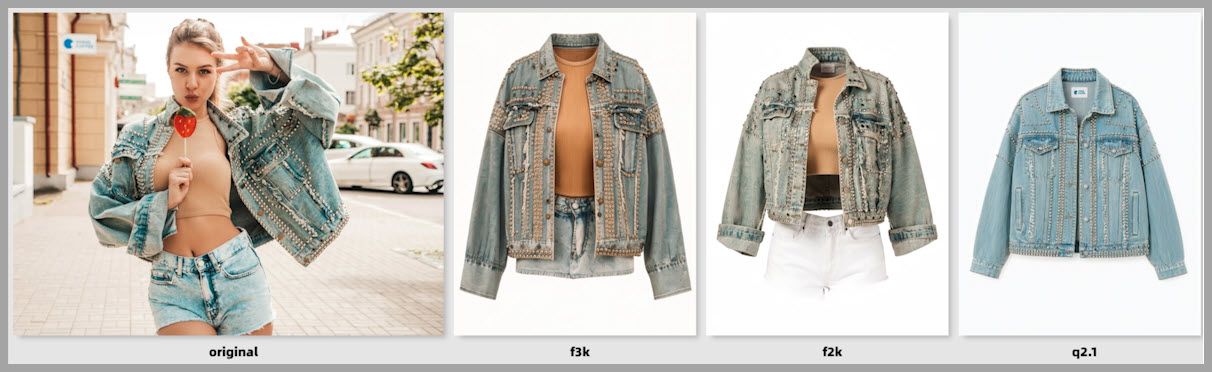
This time, Flux 3 Klein reconstructs the missing garment areas more convincingly than Qwen Image 2.1.
The reconstructed sections integrate naturally with the visible fabric, creating a coherent final garment.
Qwen, meanwhile, doesn’t reproduce some of the details as accurately.
This is a useful reminder that model rankings can change depending on the source image.
Even when one model performs consistently well across several examples, another may produce a better result on a particular task.
For this reason, I wouldn’t recommend judging a model based on a single successful or unsuccessful output.
When Flux 3 Klein Makes Mistakes
Although Flux 3 Klein performs better than I initially expected, it isn’t perfect.
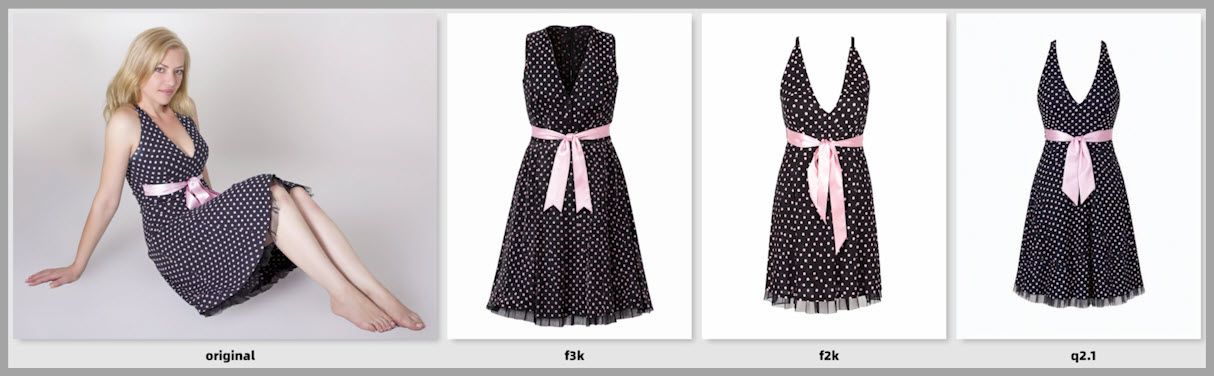
One example reveals a fairly obvious design error.
In the original photograph, the dress has a particular shoulder structure.
However, Flux 3 Klein transforms this area into wide, sleeveless, tank-style shoulders.
The generated dress still looks realistic.
In fact, someone unfamiliar with the source image might not notice anything wrong.
But when compared with the original garment, the mistake becomes clear.
The model has changed an important design feature.
This is a serious concern when the goal is accurate product representation.
A generated garment might look attractive and professionally photographed while still being inconsistent with the actual product.
For commercial garment extraction, preserving original design details is just as important as generating a photorealistic image.
Overall Garment Extraction Results: Which Model Is Most Reliable?
After reviewing the garment extraction examples, some patterns become apparent.
Qwen Image 2.1: The Most Consistent Performer
Across the examples I tested, Qwen Image 2.1 appears to have the highest success rate.
Its outputs are generally consistent with the original photographs, especially when it comes to preserving the overall structure and design of the dresses.
It also produces garments with a relatively consistent presentation style.
The clothing is usually arranged neatly, with a straight-on appearance that makes individual design elements easy to inspect.
The main limitation is that these results often resemble flat-lay photographs rather than fully three-dimensional invisible mannequin images.
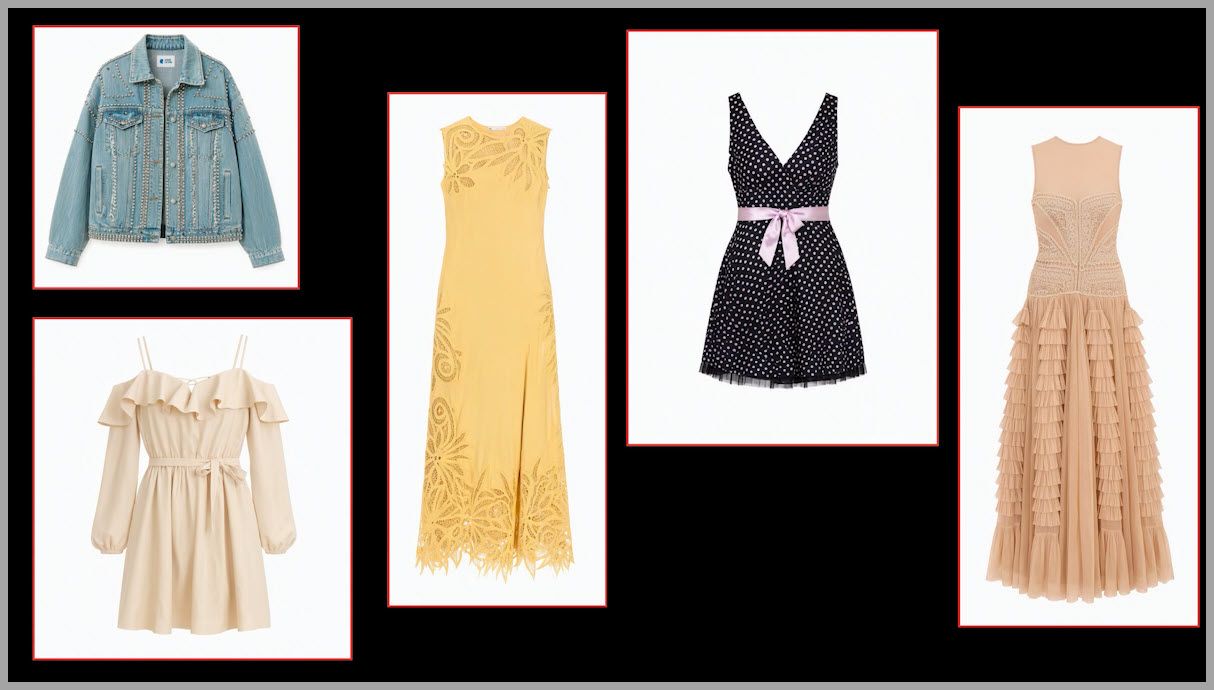
Still, for applications where design consistency matters most, this may be an acceptable trade-off.
Qwen’s biggest strength in these tests is its apparent ability to preserve the original garment’s identity while reconstructing obscured sections plausibly.
Flux 3 Klein: Impressive Reconstruction from a Smaller Model
Flux 3 Klein was the biggest surprise for me.
Before testing it, I had seen some negative feedback about the model.
As a result, I wasn’t expecting it to perform particularly well against the other two models.
However, the actual results were quite impressive.
In several examples, Flux 3 Klein reconstructs hidden garment structures more effectively than Flux 2 Klein.
It also occasionally outperforms Qwen Image 2.1.
Its most noticeable strength is reconstructing missing visual elements in a natural-looking way.
Rather than simply extending the visible pixels, it can generate plausible structures that complete the garment.
However, this strength also creates a potential weakness.
When the model makes an incorrect assumption, it may introduce details that don’t belong to the original clothing.
The altered shoulder design is a good example.
Flux 2 Klein: Good Detail Preservation with Reconstruction Limitations
Flux 2 Klein generally produces recognizable and reasonably convincing garments.
In the first test, for example, it handles the lighter fabric more accurately than Flux 3 Klein.
However, it seems less effective at reconstructing complex hidden structures in some of the more demanding examples.
Its outputs often remain closer to the visible portions of the source photograph.
That isn’t always a disadvantage.
For certain editing tasks, preserving visible details without introducing extensive new content may be desirable.
But when the objective involves substantial reconstruction of obscured areas, Flux 2 Klein doesn’t demonstrate the same level of flexibility as Flux 3 Klein or Qwen Image 2.1 in these tests.
Model Size Comparison: 5.6B vs. 9B Parameters
Another interesting aspect of the comparison is the difference in model sizes.
The versions used in this test have the following reported parameter counts:
| Model | Parameter Count |
|---|---|
| Flux 3 Klein | 5.6 billion |
| Flux 2 Klein | 9 billion |
Despite having fewer parameters, Flux 3 Klein performs better overall in my garment extraction examples.
This is particularly noteworthy because model size is sometimes treated as a rough indicator of capability.
However, a larger parameter count doesn’t automatically guarantee better results.
Model architecture, training, optimization, and the nature of the task can all influence performance.
It’s also worth noting that parameter count alone doesn’t establish actual inference speed, VRAM usage, or overall computational efficiency.
Those characteristics would require separate measurements.
What these tests do show is that the smaller Flux 3 Klein model can produce stronger image editing results than the larger Flux 2 Klein model on certain reconstruction tasks.
Community Benchmark: Comparing the Models Across 12 Editing Tasks
My garment extraction experiments weren’t the only comparison involving these models.
Another member of the ComfyUI community published an interesting evaluation on Reddit.
In that comparison, the same three models were tested across 12 different image editing tasks.
How the Community Comparison Worked
The community member evaluated the models using a series of editing challenges.
For each task, the models generated their own results.
The outputs were then scored according to their performance, and those scores were combined to determine an overall ranking.
This approach provides a broader perspective than evaluating only garment extraction.
After all, image editing includes many different types of tasks.
A model that is excellent at reconstructing clothing might not necessarily perform equally well at changing poses, preserving identities, or following precise spatial instructions.
The Community Ranking Results
The final ranking reported in the Reddit comparison was:
- Qwen Image 2.1 — First place
- Flux 3 Klein — Second place
- Flux 2 Klein — Third place
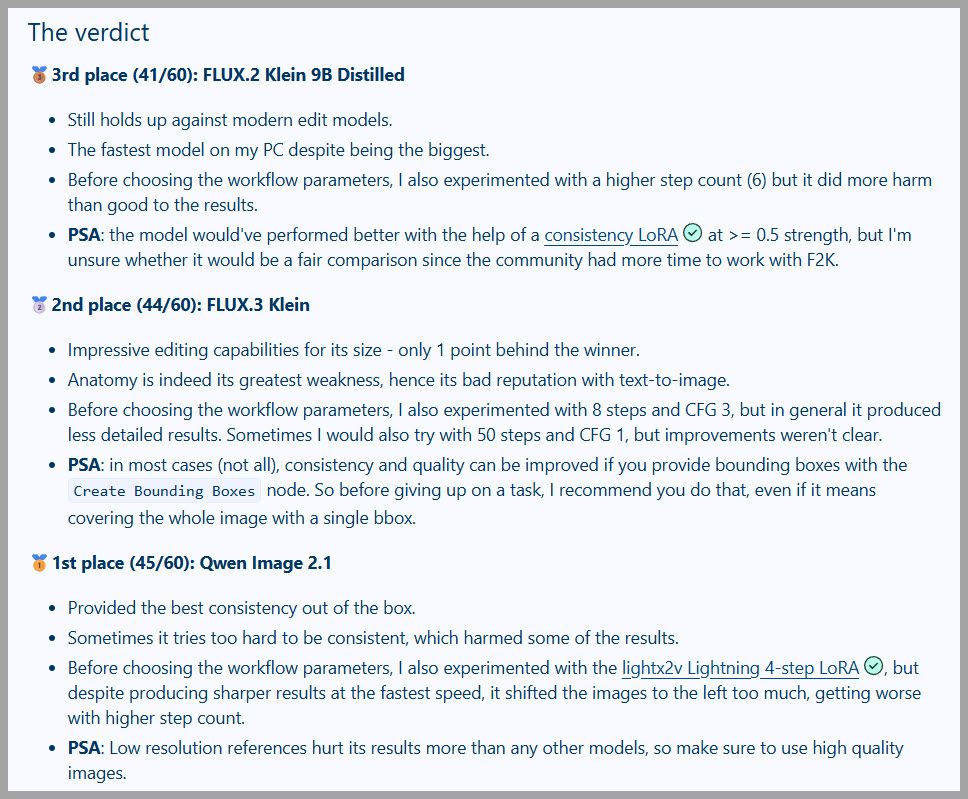
Interestingly, this is almost exactly the same ranking I reached from my own garment extraction experiments.
Qwen Image 2.1 performed most consistently overall.
Flux 3 Klein came in second, demonstrating strong capabilities despite its smaller size.
Flux 2 Klein finished third.
The agreement between the two comparisons is interesting, although it shouldn’t be treated as definitive proof that this ranking will hold for every editing task.
The community comparison uses its own tasks and scoring methodology, while my evaluation focuses primarily on garment extraction.
What the Community Results Tell Us
The community results suggest that the patterns observed in my tests may extend beyond fashion photography.
However, the most useful insight isn’t simply the overall ranking.
It’s the fact that different models can excel at different parts of an image editing task.
To explore this further, let’s examine one of the examples from the Reddit comparison.
Pose Transfer Test: Accuracy vs. Identity Preservation
One particularly interesting task in the community comparison involved pose transfer.
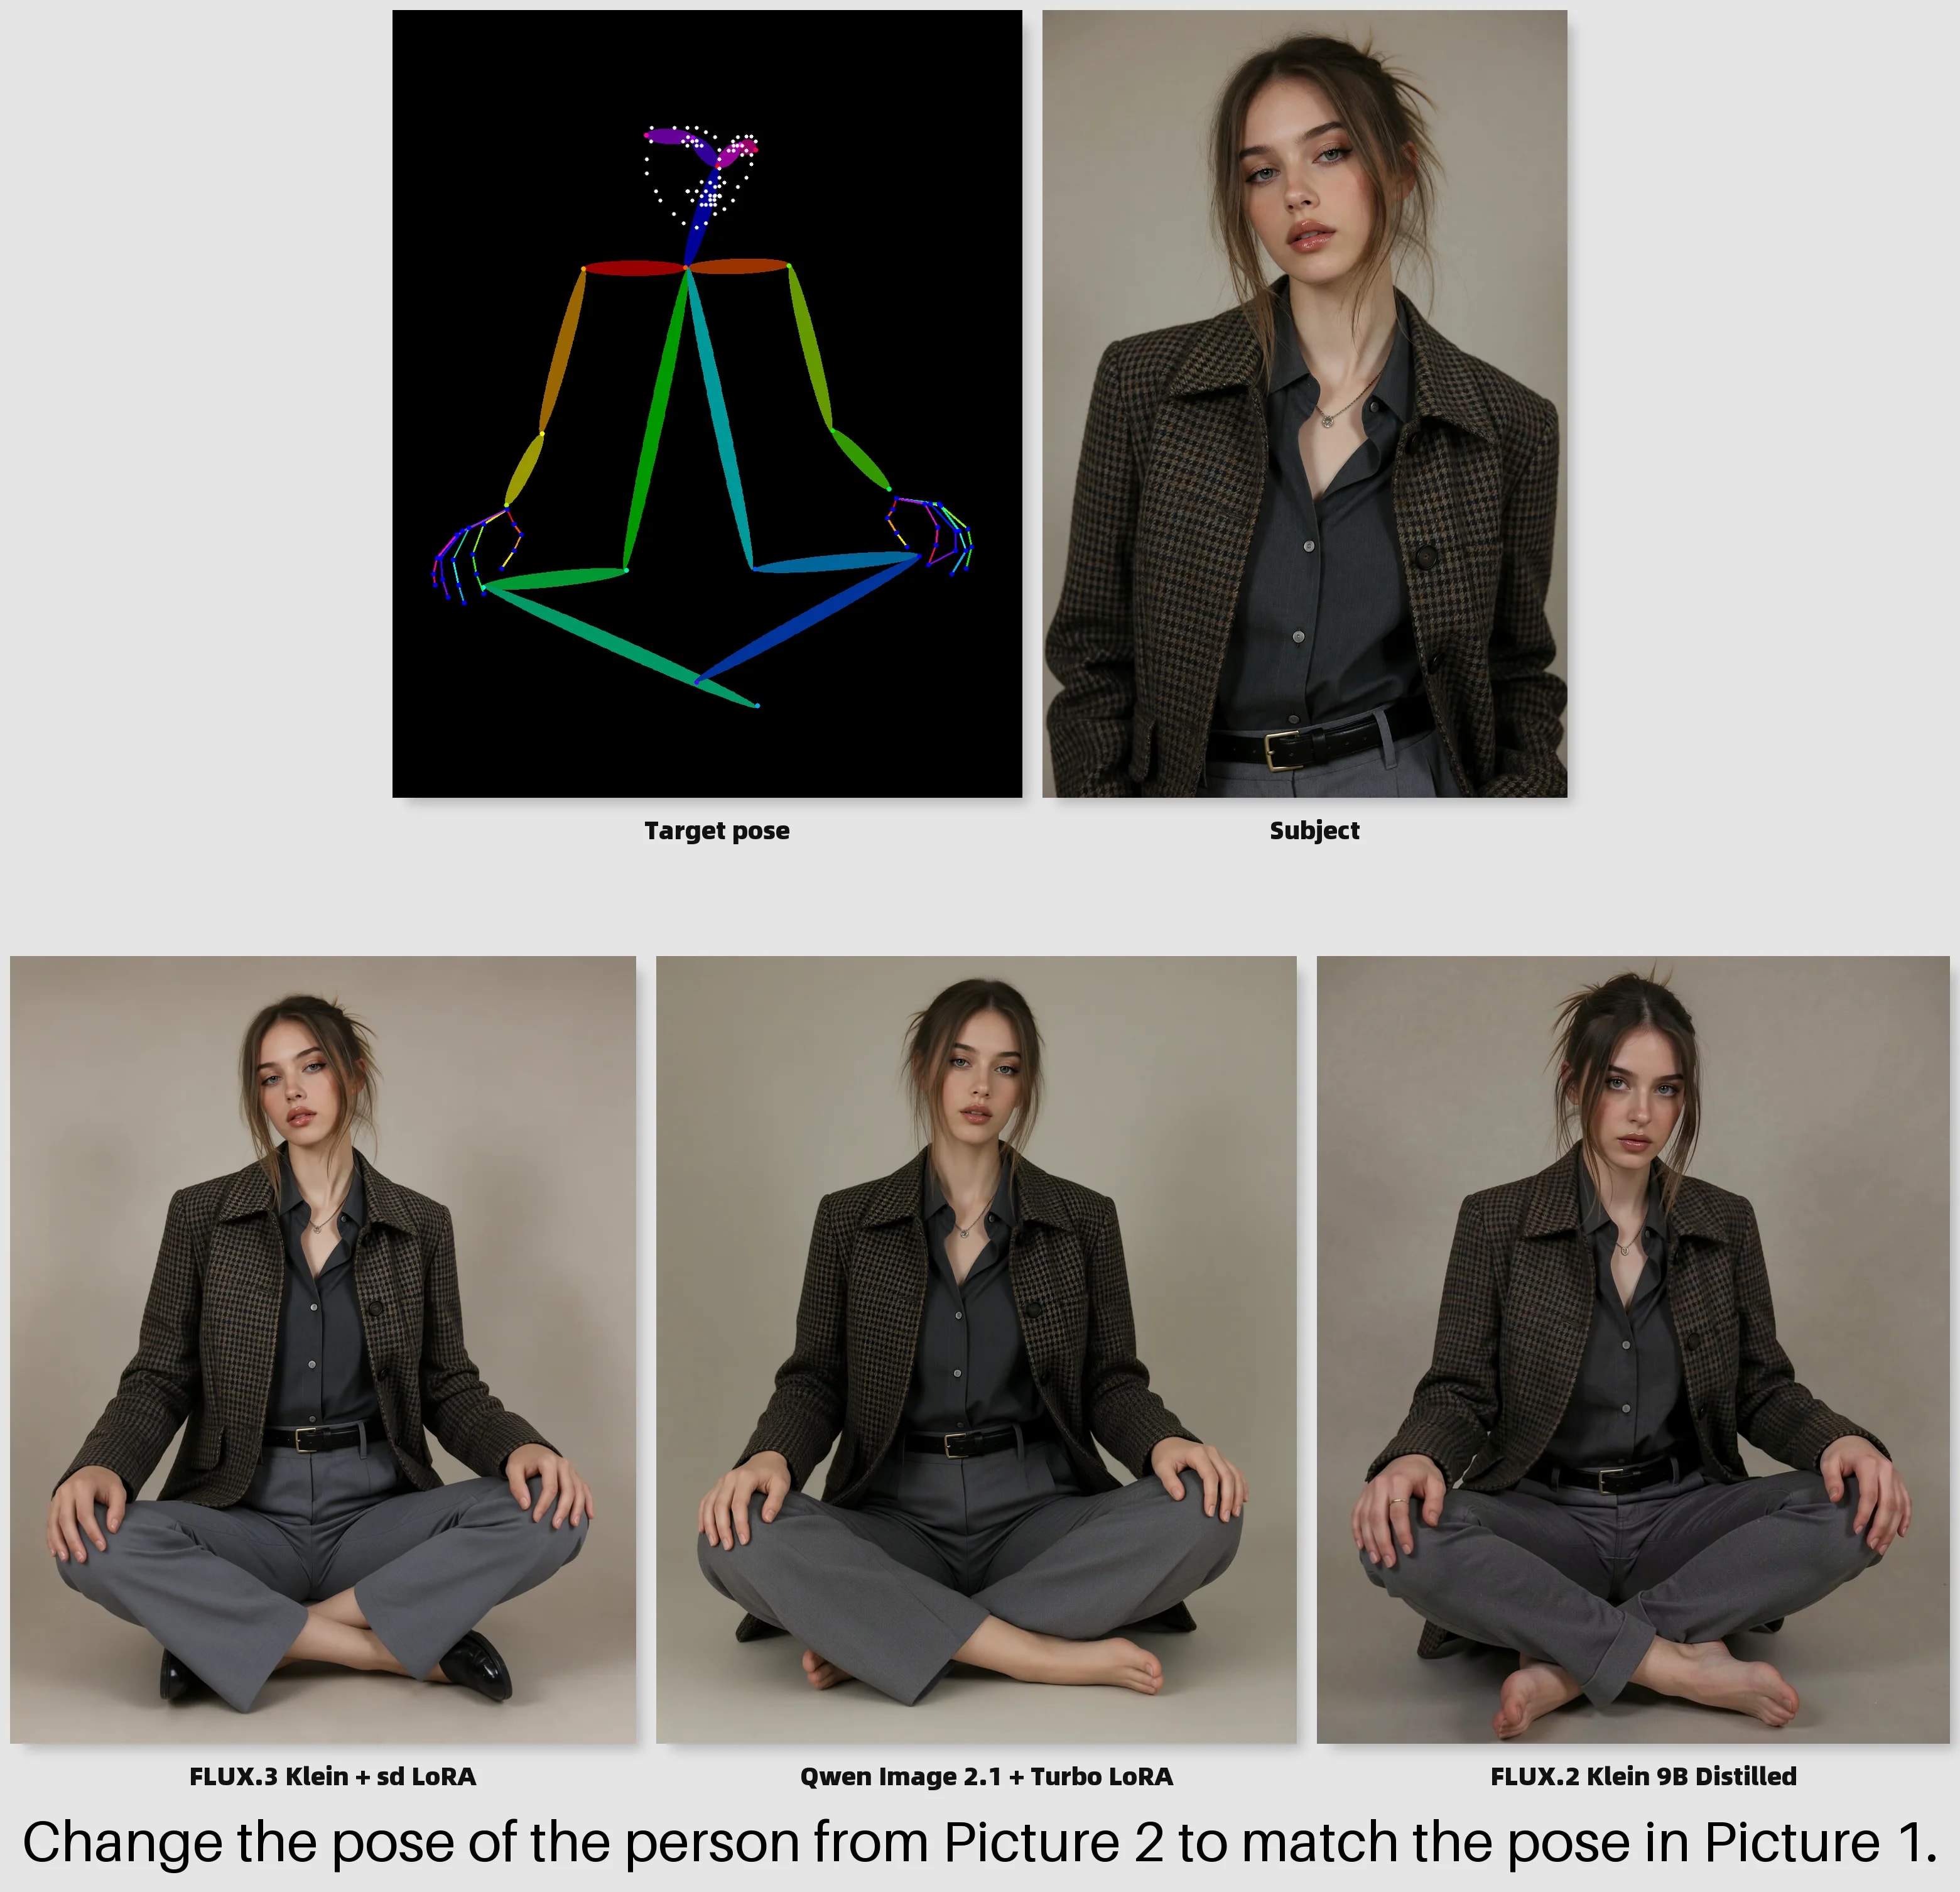
Unlike garment extraction, pose transfer requires the model to change a person’s position while preserving their original appearance.
Understanding the Pose Transfer Task
In a pose transfer workflow, we typically start with two sources of information:
- An image containing the person whose appearance we want to preserve.
- A target pose indicating how the person should be positioned.
The model must generate an image of the original person adopting the target pose.
A successful result should satisfy several requirements:
- Match the target body position.
- Preserve the person’s identity and facial features.
- Maintain realistic human anatomy.
- Reproduce the intended head orientation.
- Preserve important visual characteristics, including clothing and texture details.
- Generate a sharp, coherent final image.
This is challenging because the model must balance two objectives that can sometimes conflict.
It needs to change the pose significantly while keeping the person recognizable.
Qwen Image 2.1: Strong Pose Accuracy and Identity Preservation
Qwen Image 2.1 performs exceptionally well in this example.
It follows the target pose accurately and maintains almost perfect anatomical structure.
The person’s overall appearance remains highly consistent with the source image.
This is particularly impressive because pose changes can easily distort facial features, body proportions, or clothing details.
In this comparison, Qwen manages to preserve these characteristics while following the requested pose.
Its output demonstrates a strong balance between instruction accuracy and identity preservation.
Flux 3 Klein: Good Identity Preservation but Incorrect Head Angle
Flux 3 Klein also produces a high-quality result.
The person’s identity remains recognizable, and the generated image looks visually convincing.
However, the model makes an error in the target pose.
Specifically, the head orientation doesn’t match the reference.
While the overall body positioning may appear plausible, the head is not angled correctly.
This is an important limitation.
For creative image generation, a small difference in head angle might not be a major problem.
But for workflows requiring precise pose matching, such as character consistency or controlled fashion photography, this type of error matters.
Flux 3 Klein demonstrates strong identity preservation but isn’t as accurate as Qwen in following every aspect of the target pose.
Flux 2 Klein: Accurate Pose with Weaker Identity Preservation
Flux 2 Klein takes a different approach.
It reproduces the target pose fairly accurately.
However, its result doesn’t preserve the person’s identity as effectively as the outputs from the other two models.
The image also appears to have weaker texture detail and sharpness.
This creates another interesting trade-off.
Flux 2 Klein follows the pose instructions reasonably well, but the final image sacrifices some of the original person’s appearance.
Depending on the application, this could be a significant disadvantage.
For example, if we’re creating multiple images of the same character, maintaining a consistent identity may be more important than reproducing every pose detail perfectly.
Lessons from the Pose Transfer Comparison
The pose transfer example highlights the different priorities exhibited by the models.
| Model | Pose Accuracy | Identity Preservation | Notable Limitation |
|---|---|---|---|
| Qwen Image 2.1 | Excellent in this example | Excellent | No major issue highlighted in this test |
| Flux 3 Klein | Good, but imperfect | Strong | Incorrect head angle |
| Flux 2 Klein | Good | Weaker | Reduced identity consistency, texture, and sharpness |
This reinforces an important point: image editing quality isn’t determined by one characteristic.
A model might follow spatial instructions accurately but struggle to preserve identity.
Another might produce a beautiful, realistic image while overlooking a critical detail in the prompt.
The best model depends on which requirements matter most for the task.
Conclusion
AI image editing is advancing rapidly, but reconstructing missing visual information remains a challenging problem.
Our garment extraction experiments show that modern models can produce impressive product photographs from ordinary fashion images, even when parts of the clothing are hidden.
However, they can also make subtle mistakes involving fabric colors, transparency, garment structure, and design details.
Among the three models tested, Qwen Image 2.1 provides the most consistent results overall, while Flux 3 Klein demonstrates particularly impressive reconstruction capabilities for its size.
Flux 2 Klein remains capable, but it doesn’t match the overall consistency of the other two models in these examples.
If you’re building a ComfyUI workflow for fashion photography, garment extraction, or other image editing tasks, experimenting with multiple models can help you find the best balance between accuracy, reconstruction, and visual quality.
I hope these comparisons help you better understand what each model can do and make it easier to choose the right one for your projects.
Happy creating!