Boost Your Image Quality: Exploring DiffBIR for Low Resolution in Your ComfyUI Workflow
Welcome, creators! In this article, I am excited to introduce you to an innovative ComfyUI workflow designed to transform low-resolution images into stunning high-resolution versions.
This powerful tool not only enhances the clarity and detail of your images but also preserves the original composition, allowing you to achieve remarkable results with ease.
Let’s dive in and explore how this workflow can work wonders for your images!
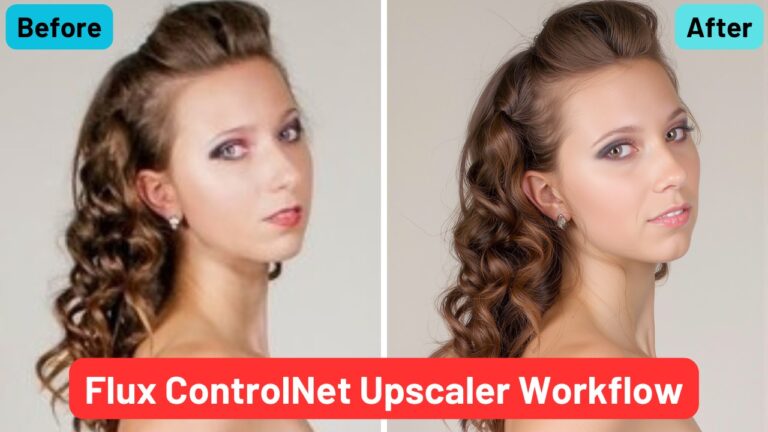
Visual Transformation: Example Images
Let’s kick things off by exploring some captivating example images generated by this remarkable workflow.
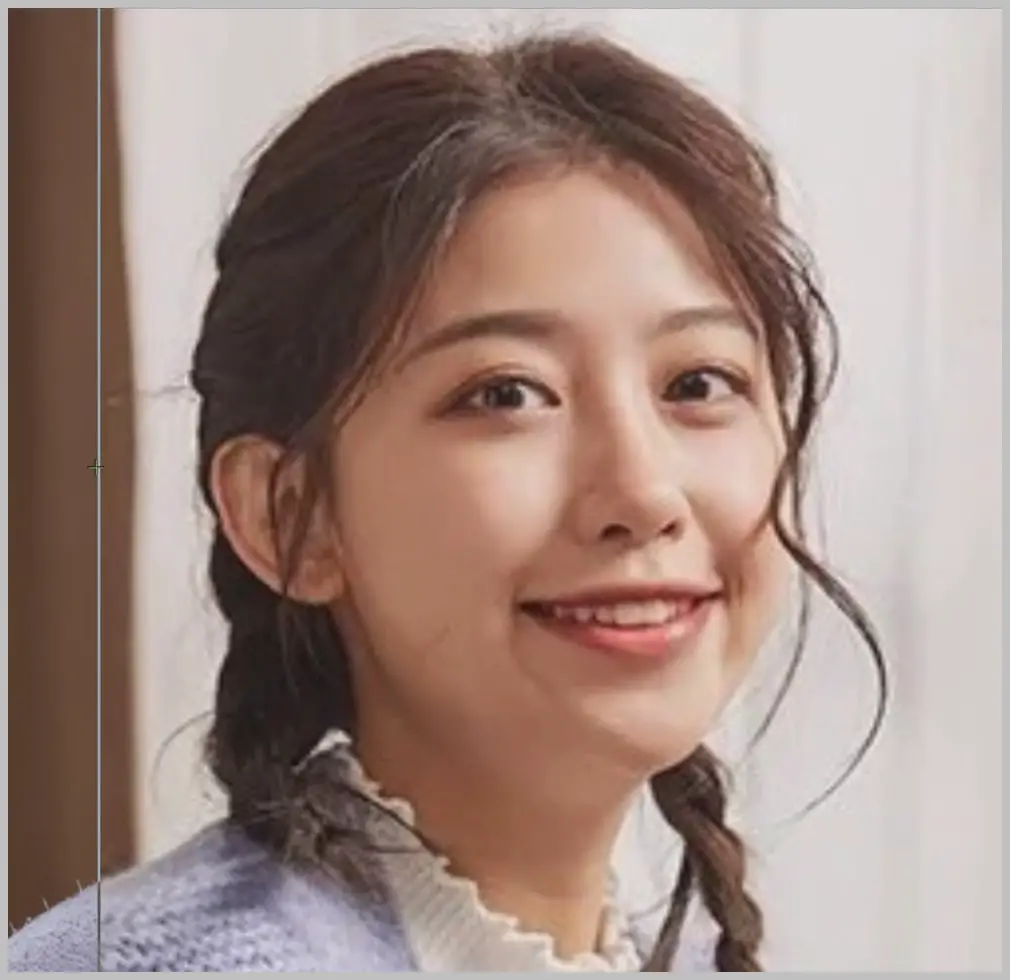
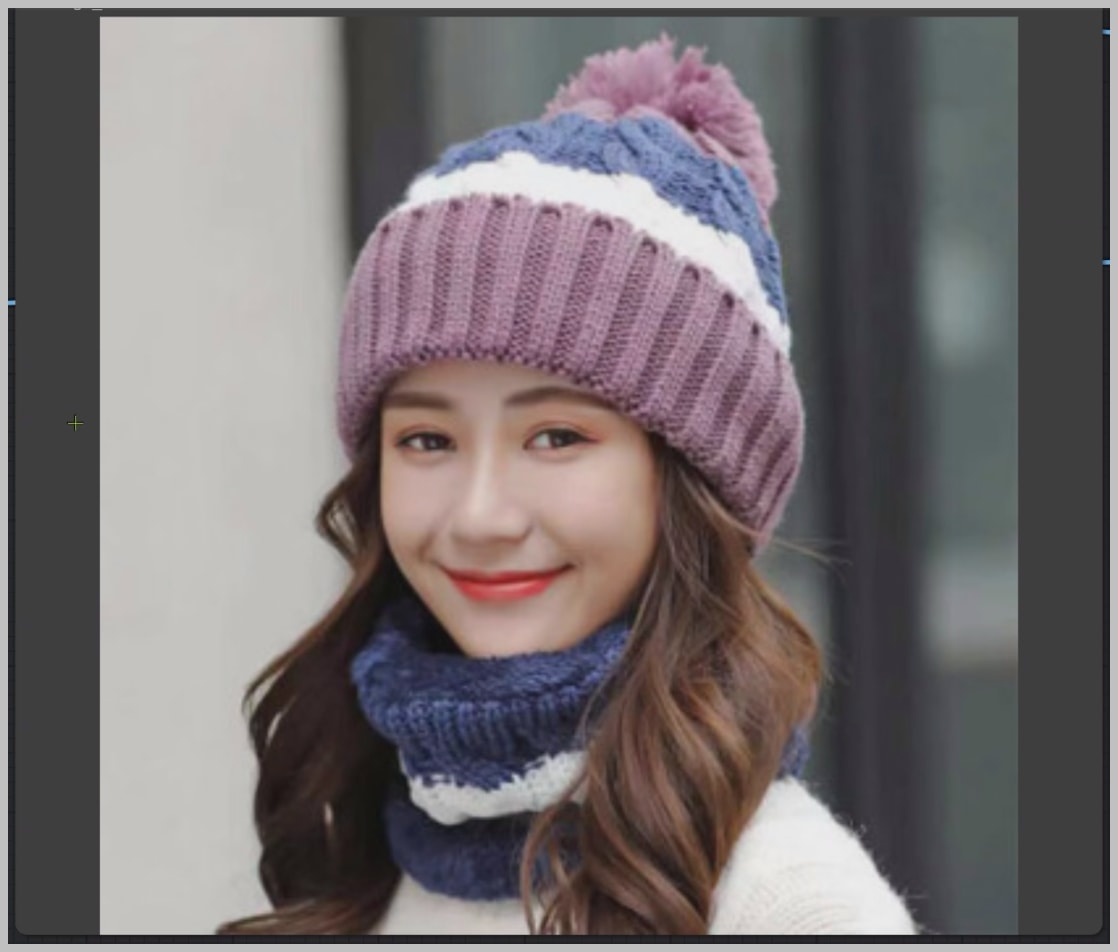
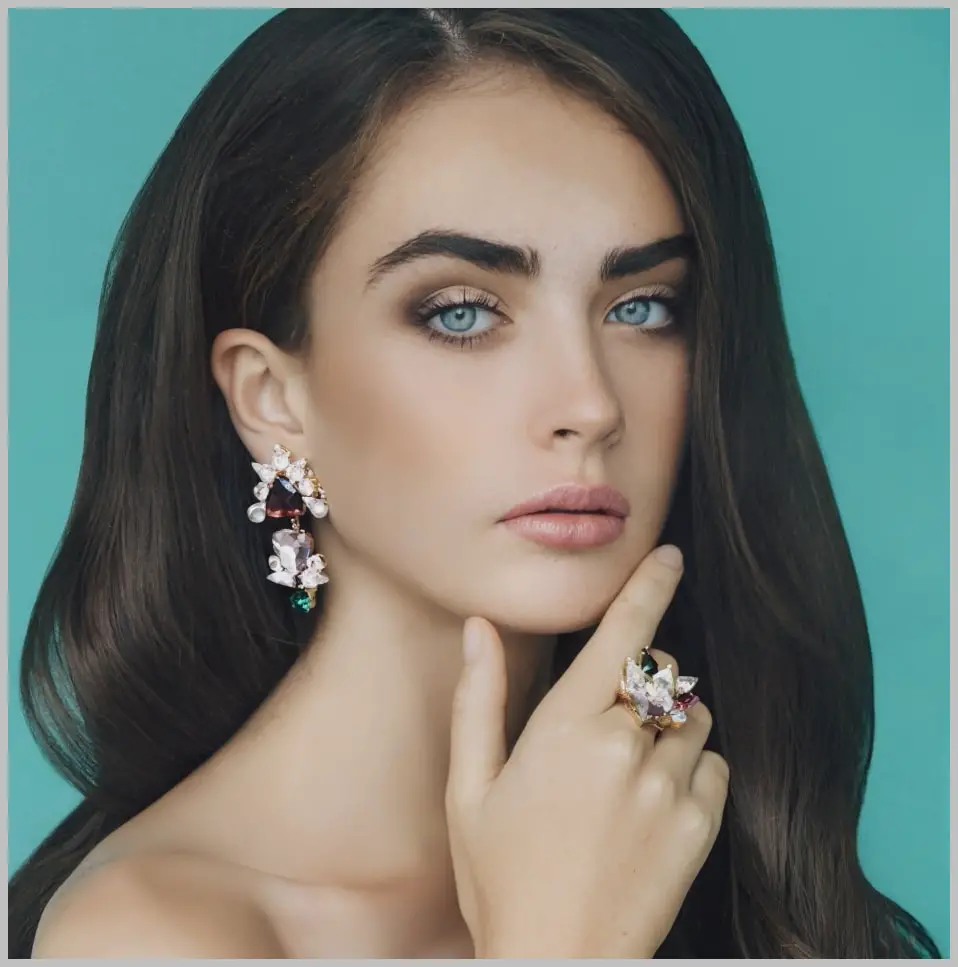
First, we have a low-resolution portrait.
As we apply the enhancement, watch how the magic unfolds!

You’ll notice that the overall composition remains intact, preserving the essence of the original image.
If we zoom in to examine her face closely, you’ll see that her facial features remain remarkably consistent, showcasing the workflow’s ability to maintain detail.

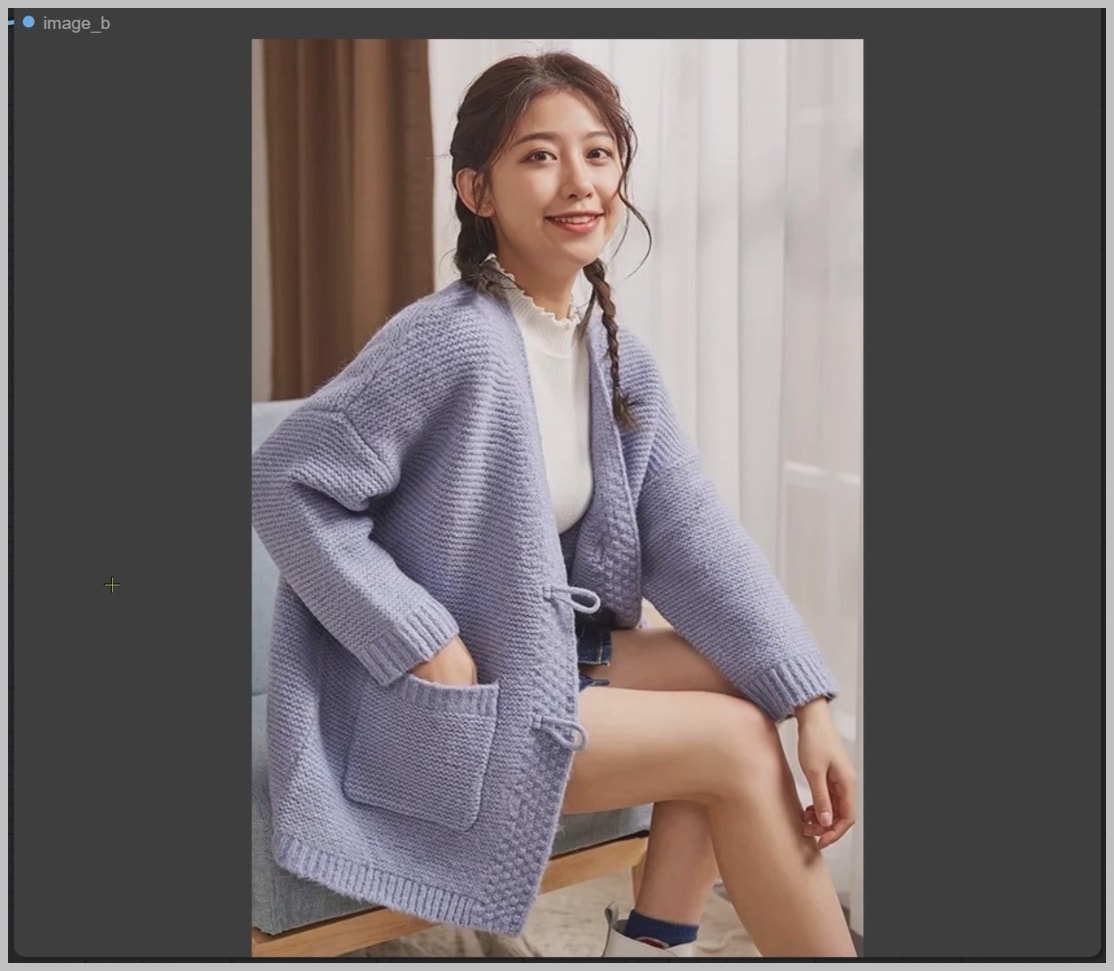
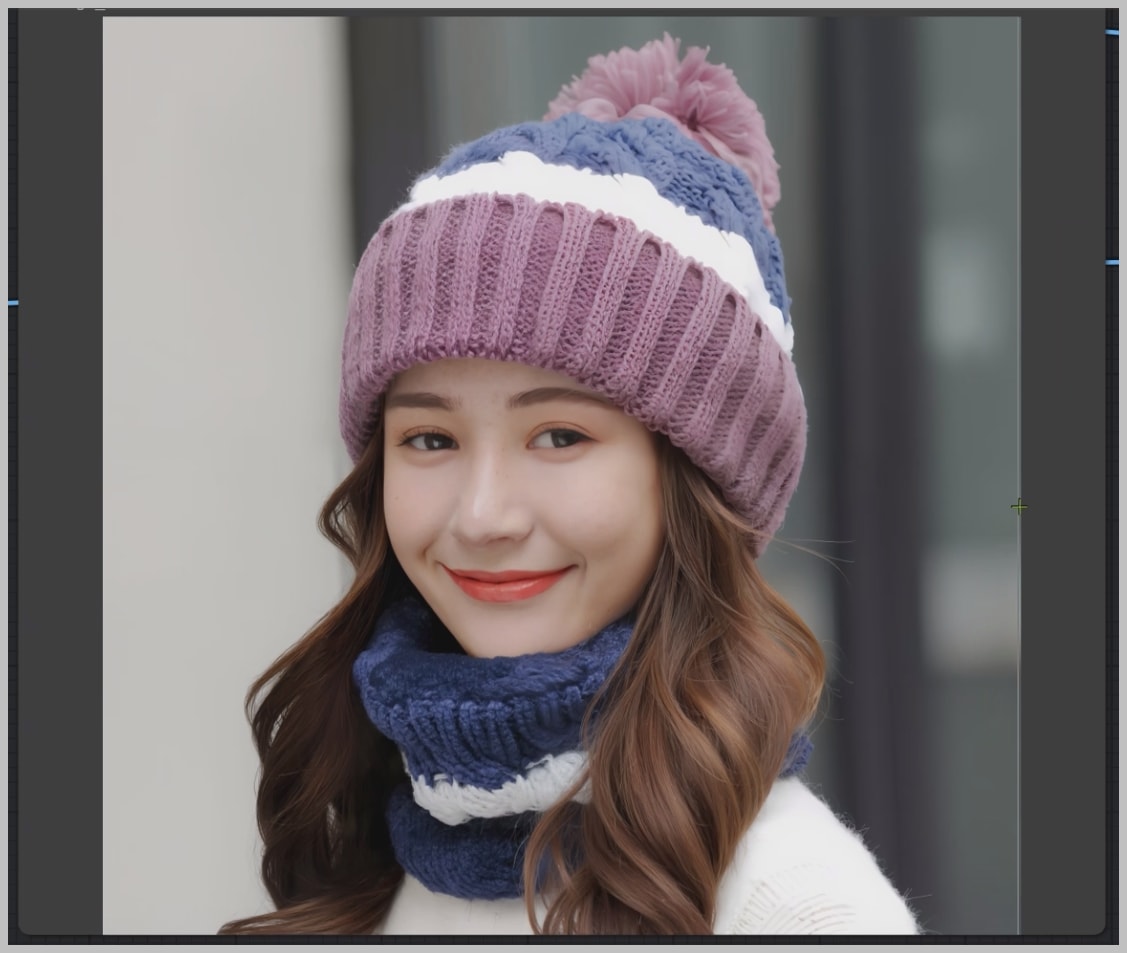
Now, let’s move on to another example. Take a look at the intricate details on her winter hat and sweater!
The original image size is a modest 350 by 350 pixels, but after processing, the final result boasts an impressive resolution of 2104 by 2104 pixels.
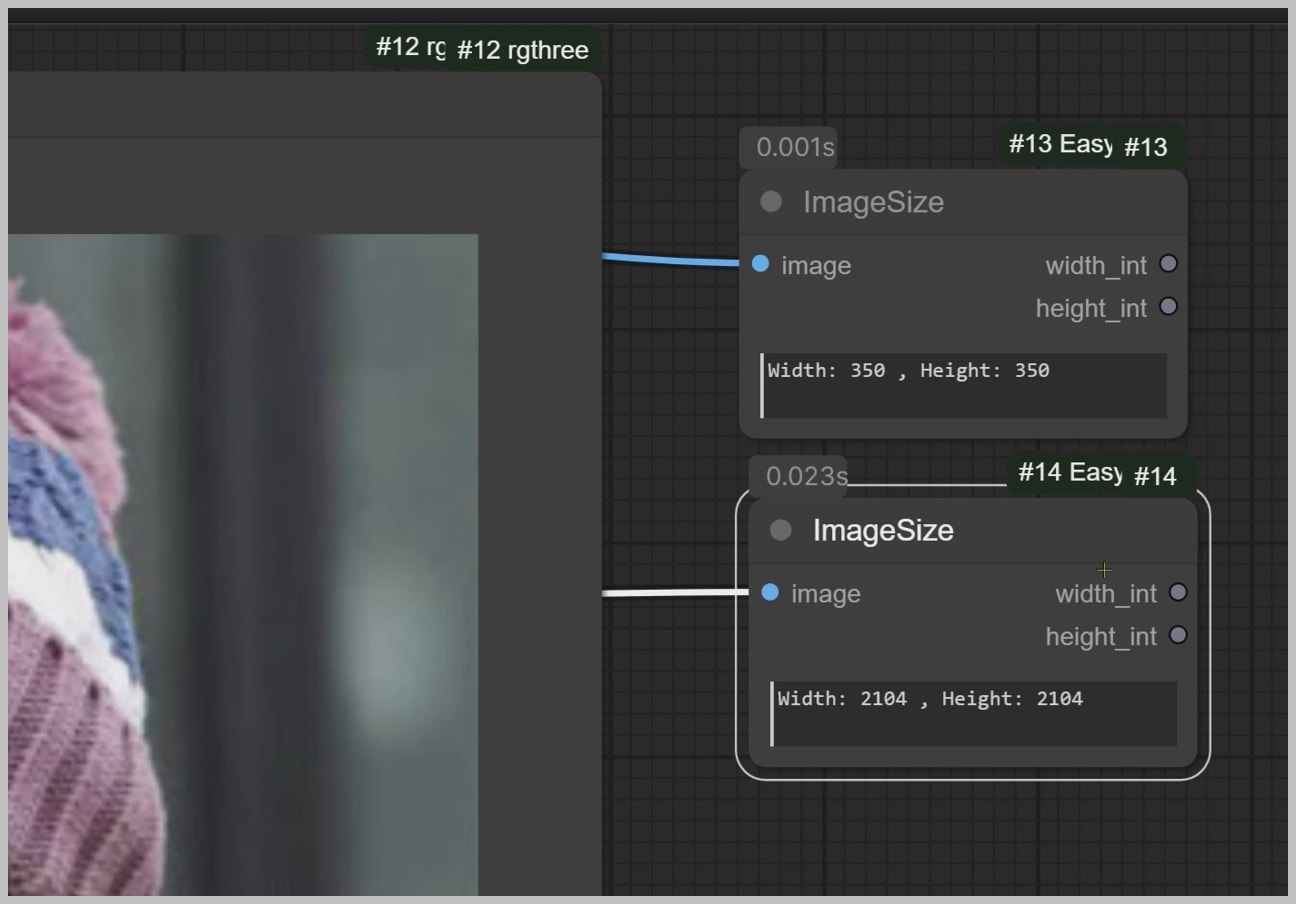
By extending the running time of this workflow, you can even achieve an even larger image, unlocking a world of possibilities!
Finally, here’s another low-resolution image, initially measuring just 448 by 448 pixels. After we apply the super-resolution restoration, the image size expands dramatically to 2688 by 2688 pixels!
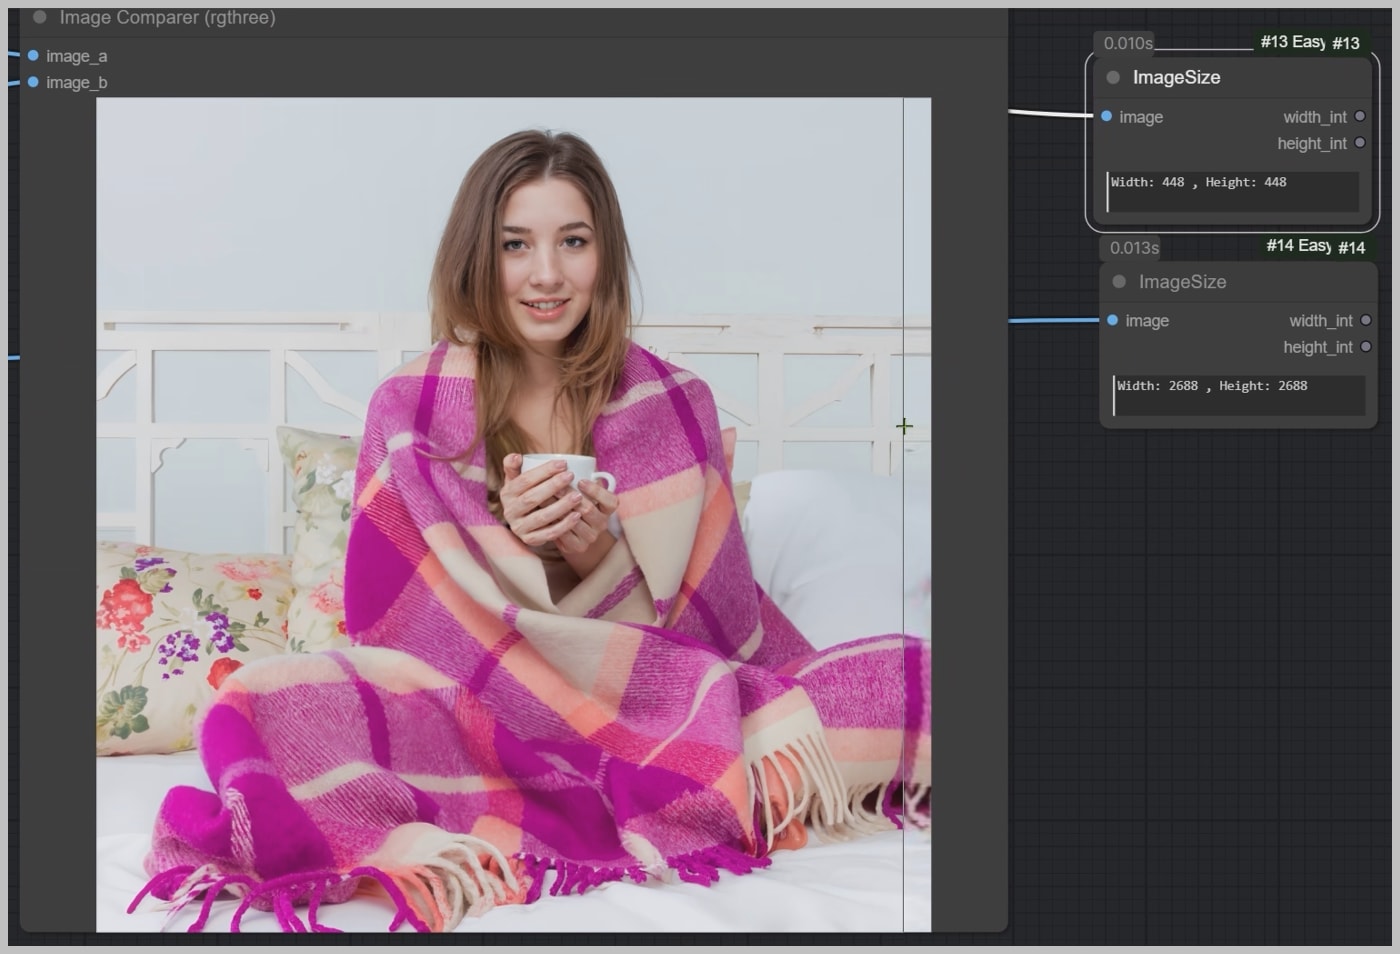
This transformation highlights the workflow’s capability to enhance not just the size but also the quality and detail of your images.
Download this workflow: https://openart.ai/workflows/eqI2GLbp6jplHBvkskT3
Video Tutorial:
Gain exclusive access to advanced ComfyUI workflows and resources by joining our community now!
Here’s a mind map illustrating all the premium workflows: https://myaiforce.com/mindmap
Run ComfyUI with Pre-Installed Models and Nodes: https://youtu.be/T4tUheyih5Q
Understanding DiffBIR
My workflow is built upon the powerful ComfyUI DiffBIR GitHub project, which I highly recommend you check out.
If you find it valuable, consider giving the project a star to support the author—it’s a wonderful way to show appreciation for their hard work!
As highlighted by the author, DiffBIR is an exceptional super-resolution algorithm that excels not only in super-resolution tasks but also in face restoration and image denoising, making it an indispensable tool for image enhancement.
Before you delve into my workflow, be sure to visit the GitHub page to install the necessary custom nodes and pretrained models.
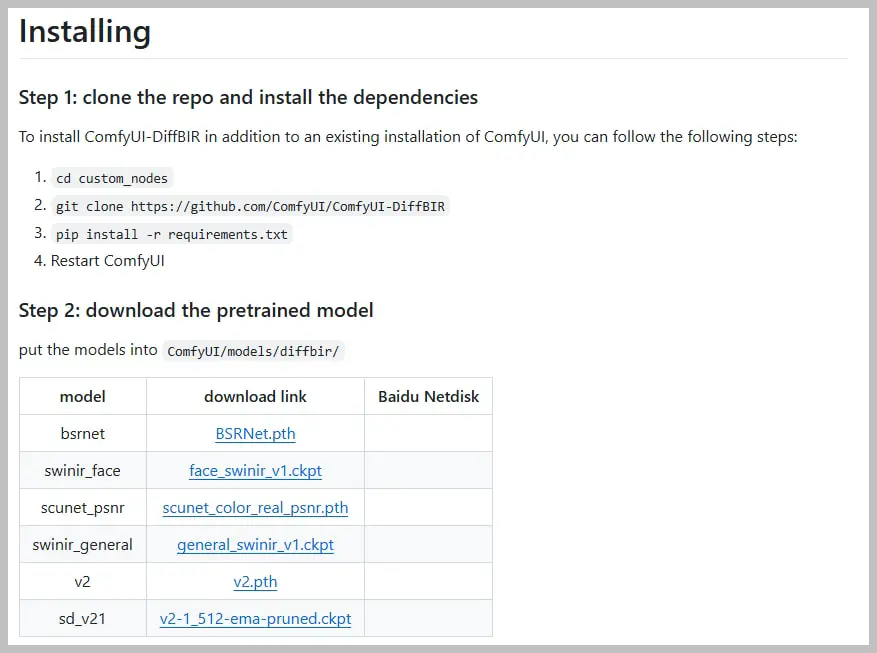
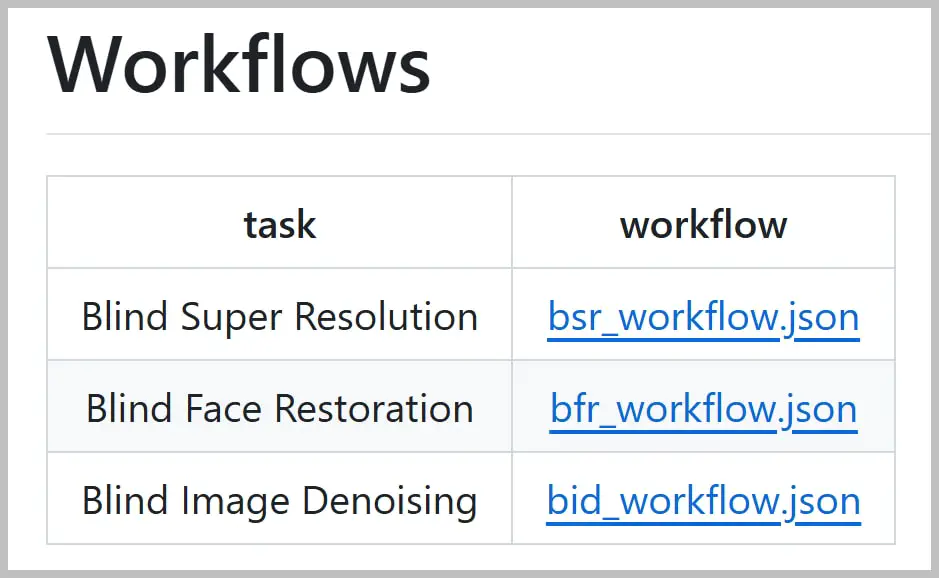
The author provides 3 basic workflows, and mine specifically utilizes the super-resolution workflow as its foundation. Additionally, you can explore the other workflows designed for face restoration and image denoising.
However, it’s worth noting that these workflows may occasionally produce images that lack fine details, particularly on skin textures. To address this, I have made adjustments to the basic workflow, enhancing those finer details and allowing you to generate even larger images through tiled upscaling.
Now, let’s explore how to effectively use my enhanced workflow!
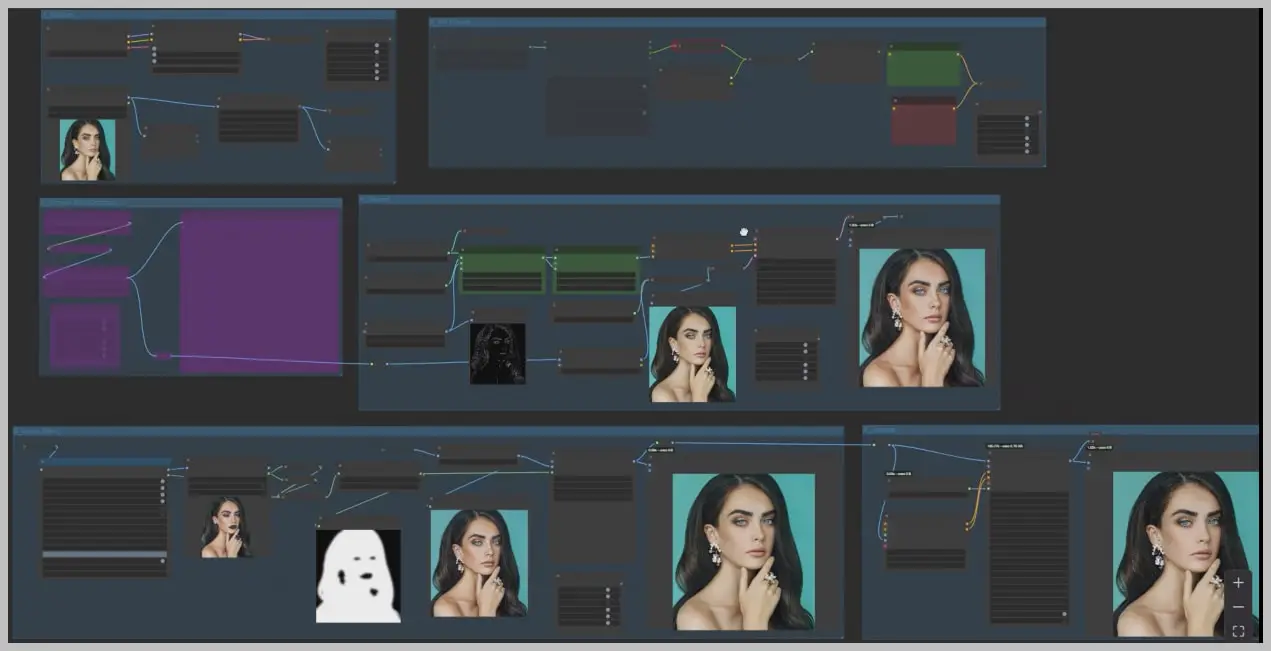
Node Group 1: Initial Settings Configuration
In the first node group, you have the option to upload your image, set the initial upscale ratio, and generate a prompt for the uploaded image.
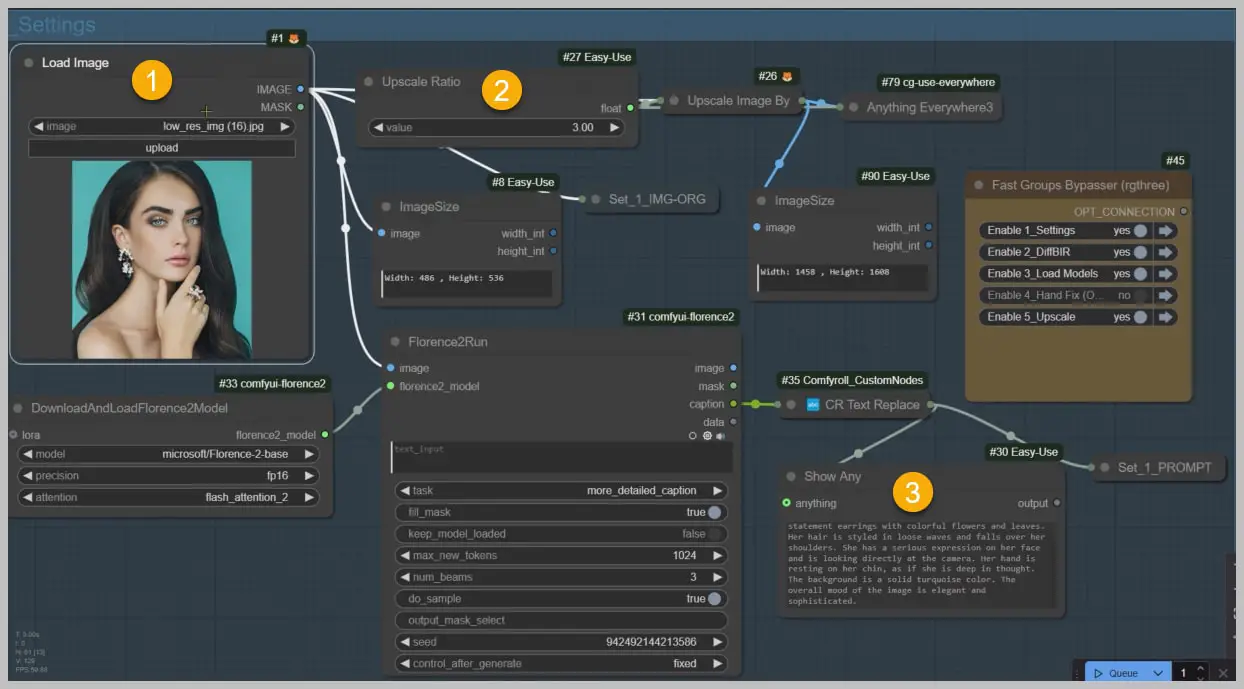
It’s important to keep in mind that the upscale ratio you configure here applies specifically to the DiffBIR process in the next group, rather than the final upscale ratio of the image.
You will have the opportunity to set a different upscale ratio in the final group, allowing you to further boost your image’s quality and resolution.
This initial configuration is a crucial step in ensuring that you achieve the best possible results in your image enhancement journey.
Node Group 2: Optimizing the DiffBIR Sampler
The second node group is where the core of the process takes place. Here, the DiffBIR sampler utilizes the upscale ratio that you set in the first node group.
This sampler features tile sampling, which is particularly beneficial for computers with limited VRAM. If you encounter VRAM limitations, you can adjust the tile size and tile stride values, or even reduce the upscale ratio from the first group to ensure smoother processing.
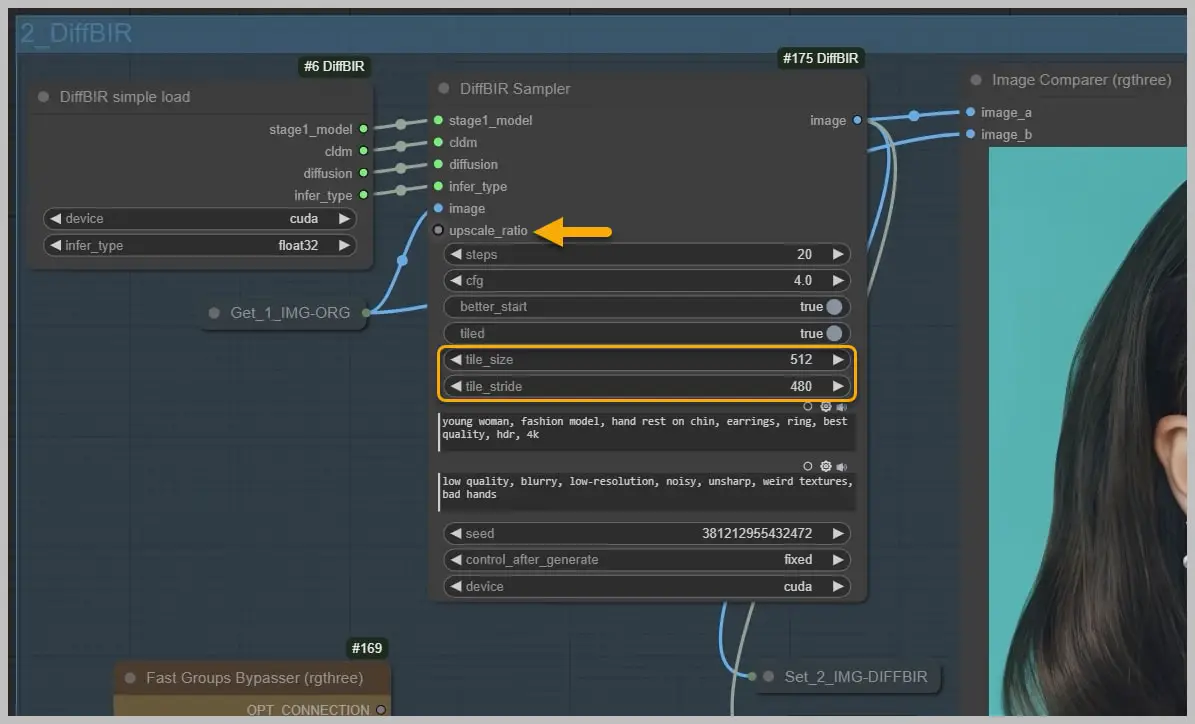
In this sampler, crafting positive and negative prompts is crucial. The blind super-resolution technique works similarly to how we infer missing details in a low-quality image based on our previous experiences. These prompts significantly enhance the accuracy of this inference process. When creating your prompts, be sure to include specific terms that help control the quality of the resulting image.
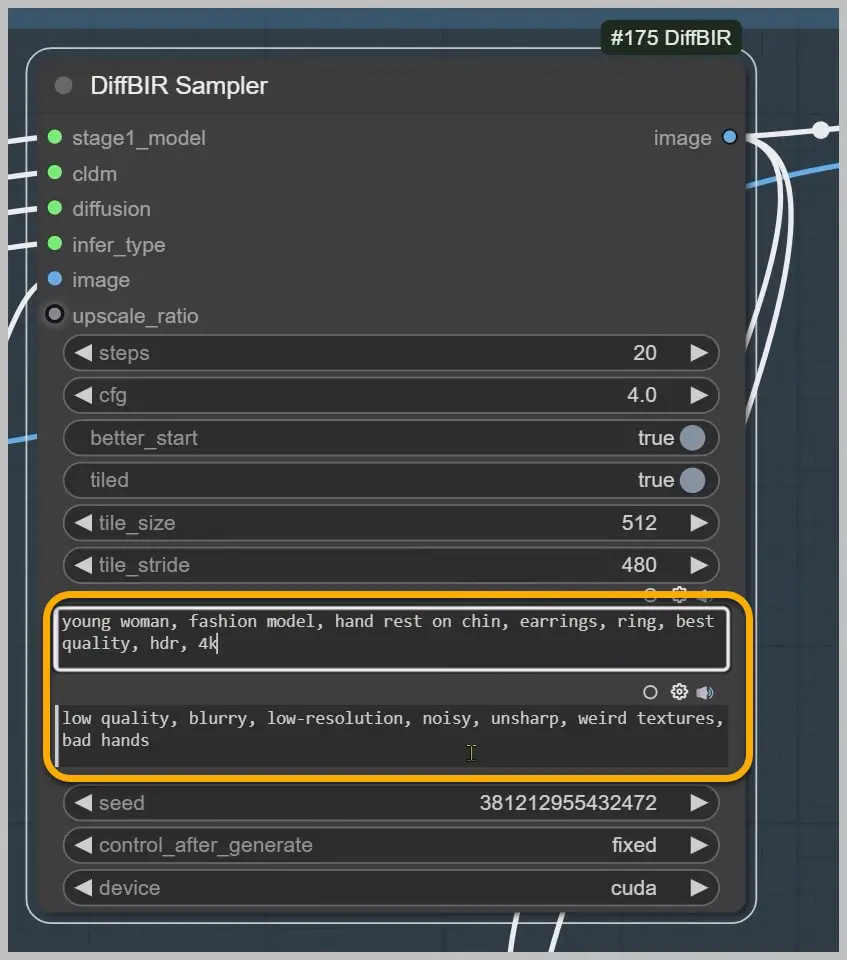
A recommended CFG value is 4. Increasing this value can reduce artifacts in the generated image; however, it may also lead to a loss of consistency with the original image, particularly affecting facial features. Conversely, lowering the CFG value might result in a blurrier image with diminished details.
Occasionally, you may still notice some artifacts in the output. If this occurs, consider changing the seed and generating a new image.

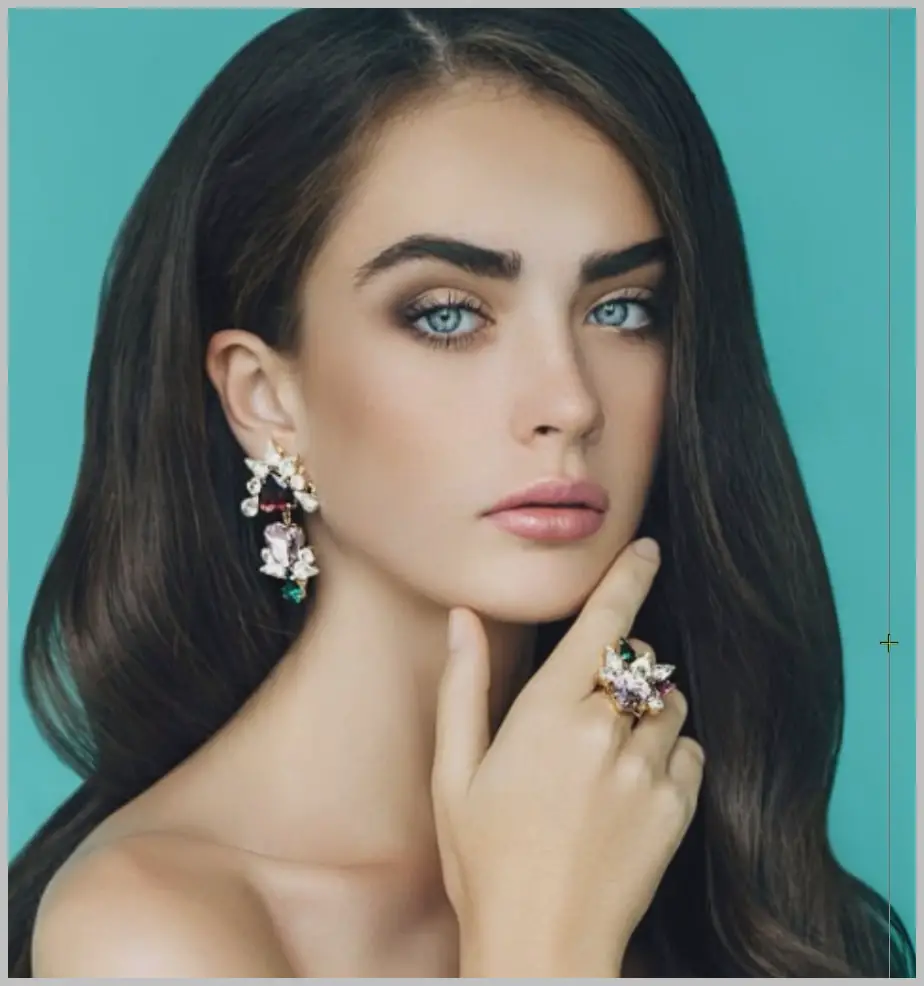
When comparing the generated image to the original, it’s evident that the DiffBIR sampler performs admirably, yet there are still numerous details that can be refined.

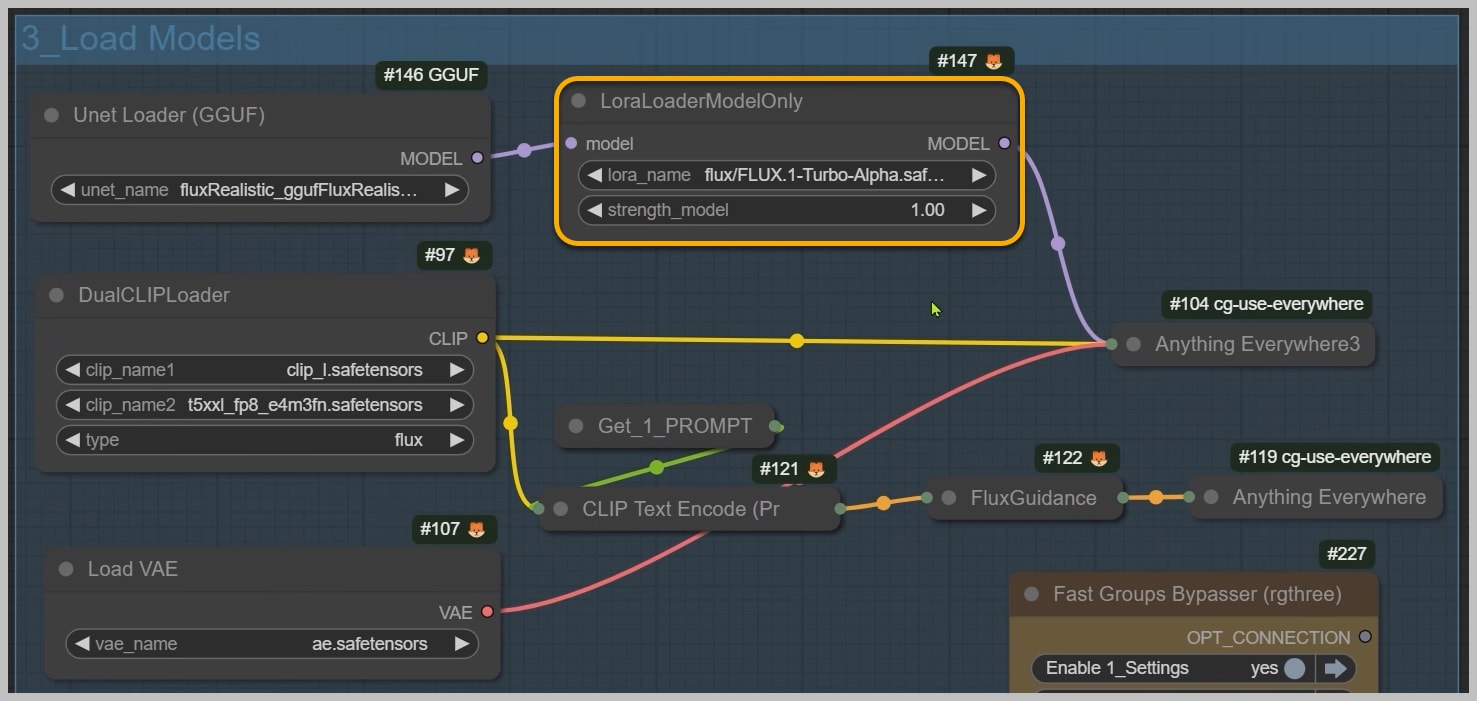
Node Group 3: Loading Essential Models
Now, let’s transition to the next node group. This is the stage where we configure the Flux models that will be utilized in the subsequent two groups. Additionally, I have incorporated a turbo LoRA to enhance the sampling speed, ensuring a more efficient workflow as you progress through the image enhancement process.
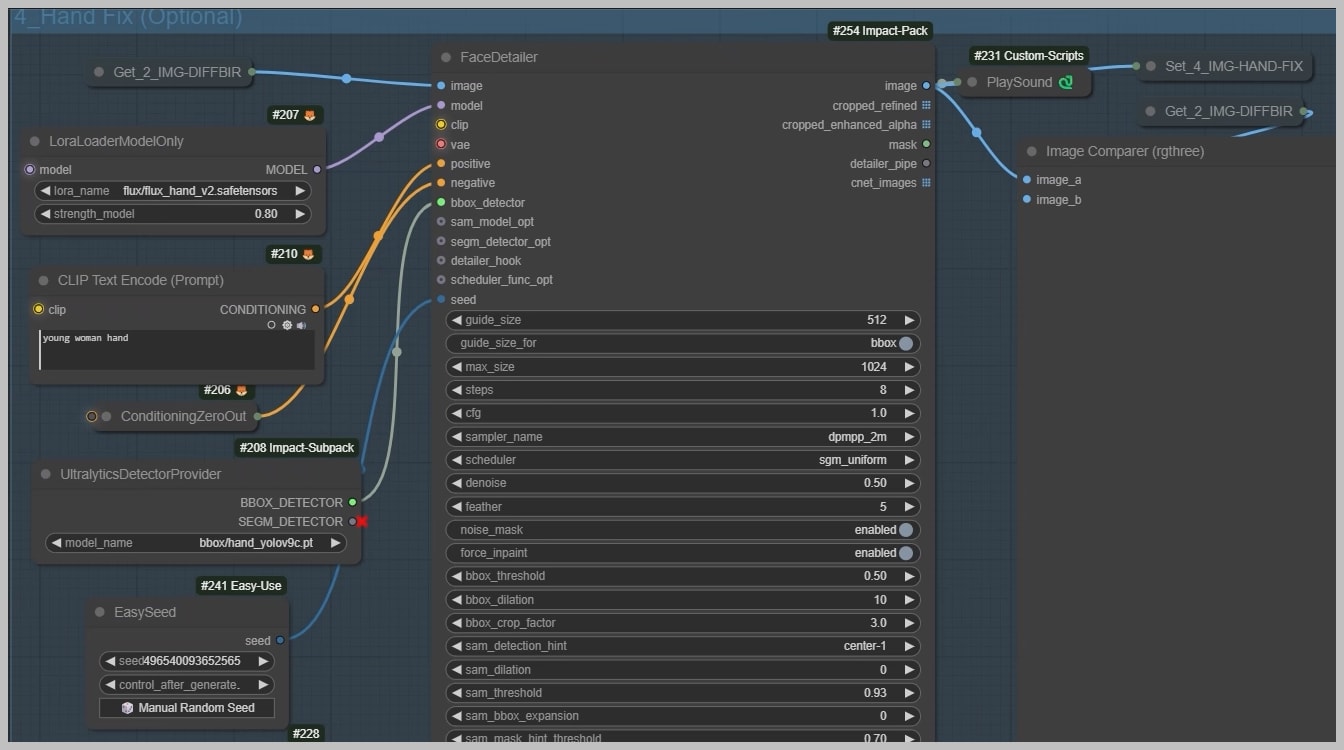
Node Group 4: Optional Hand Correction
The next node group is designed for correcting poorly rendered hands, although it is entirely optional. In this instance, the hands generated by the DiffBIR sampler appear satisfactory, allowing us to bypass this group and proceed directly to the final one.
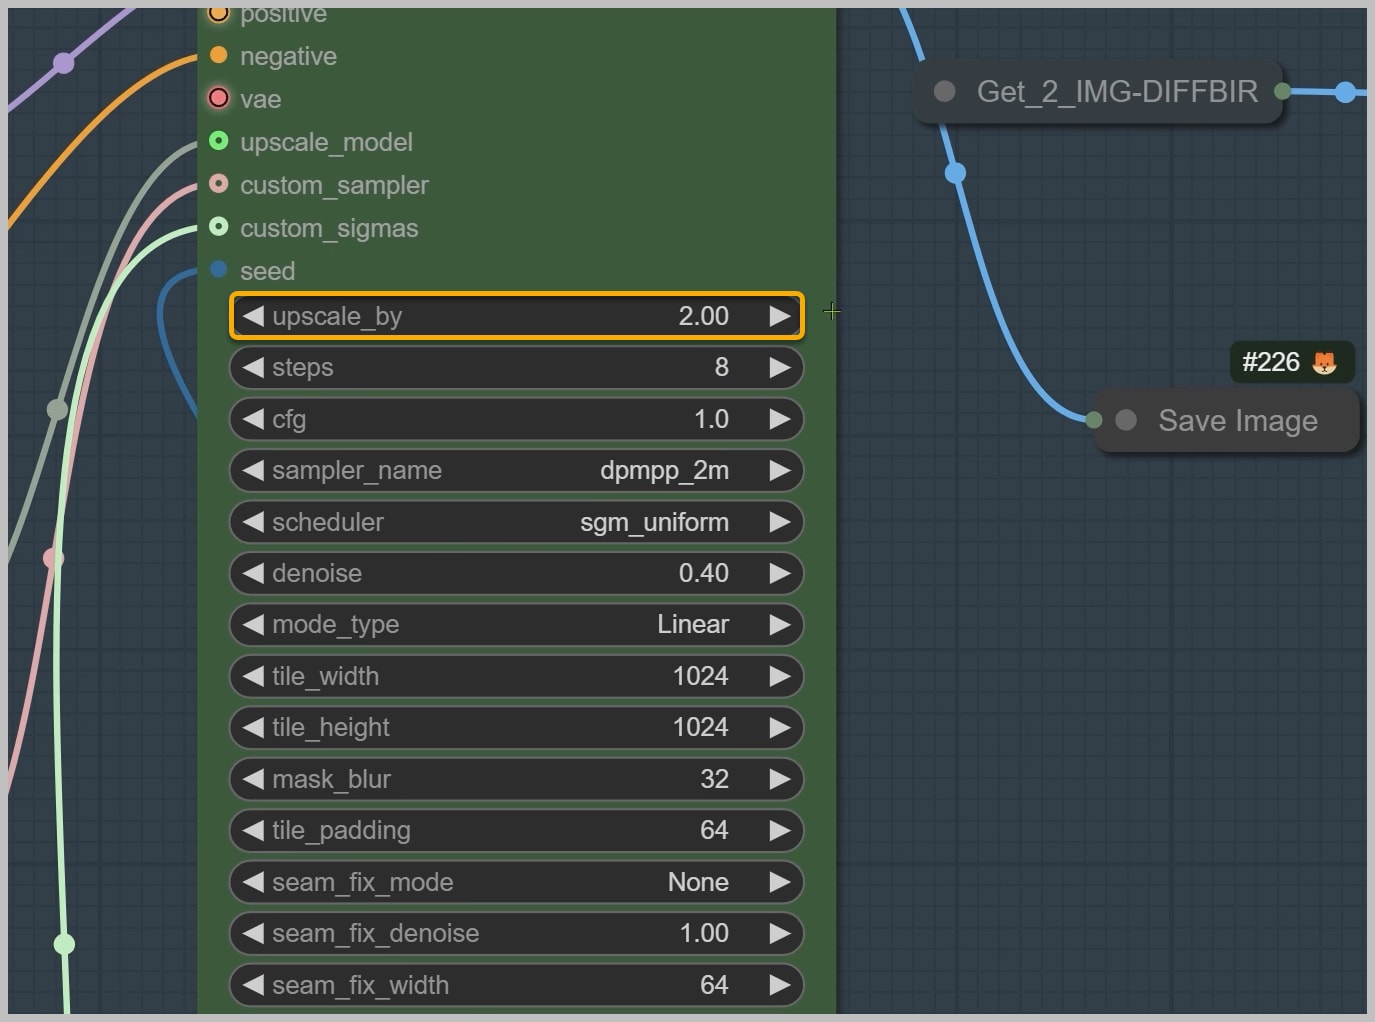
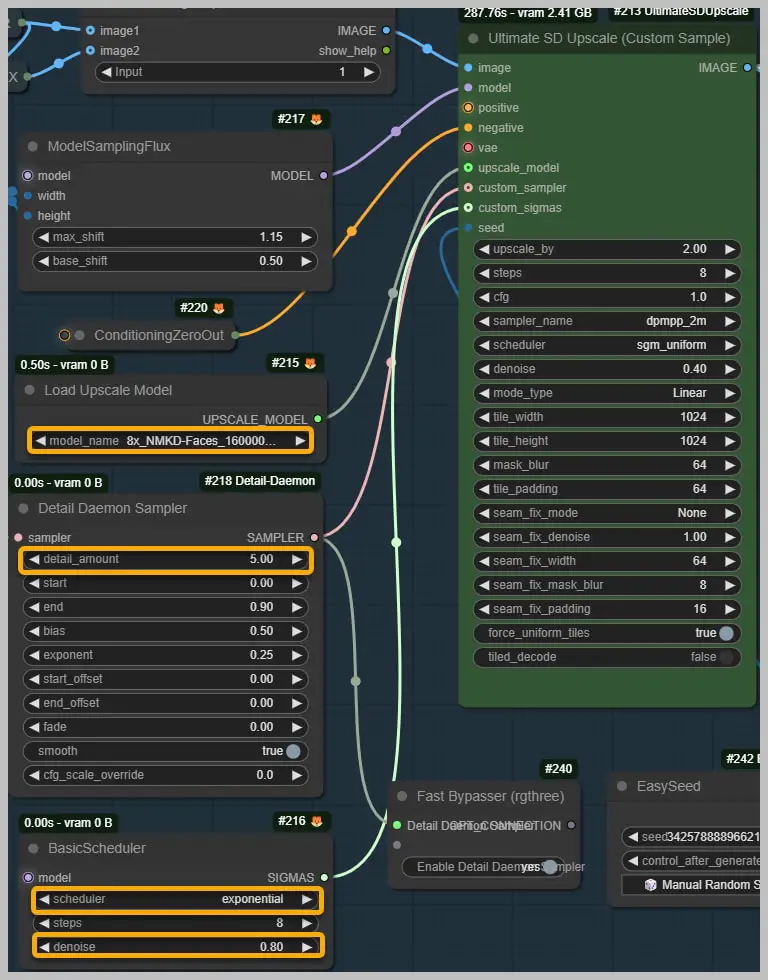
Node Group 5: Final Upscaling and Detail Enhancement
The final node group is essential for upscaling images while enhancing their details. To begin, select the image you wish to upscale.
Image 1 is the one generated by the DiffBIR sampler, while Image 2 is the version with corrected hands.
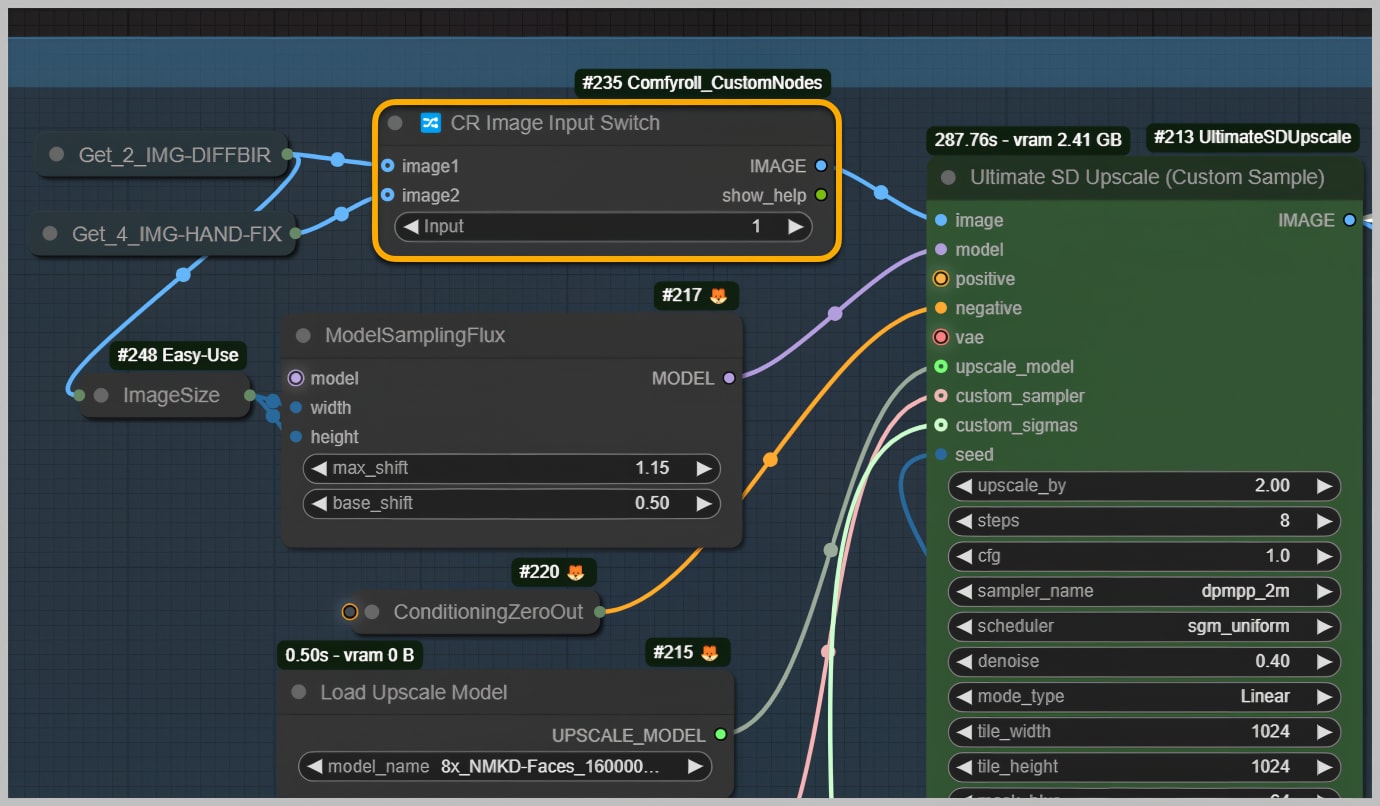
Once you’ve made your selection, you can set a different upscale ratio to further refine the image.

It’s important to note that different upscale models can significantly impact the final image’s details. Some popular models include 4xFaceUpDAT, 4xNomos8K, and 8xNMKD-Faces.

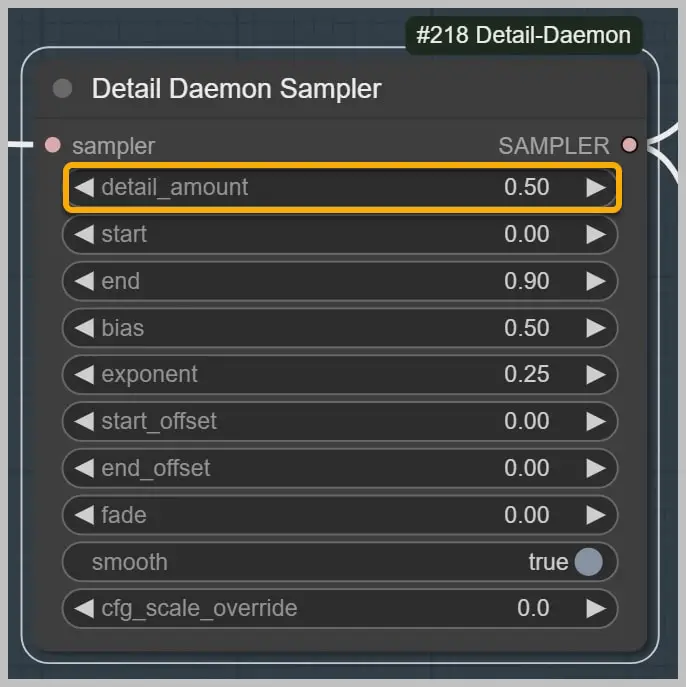
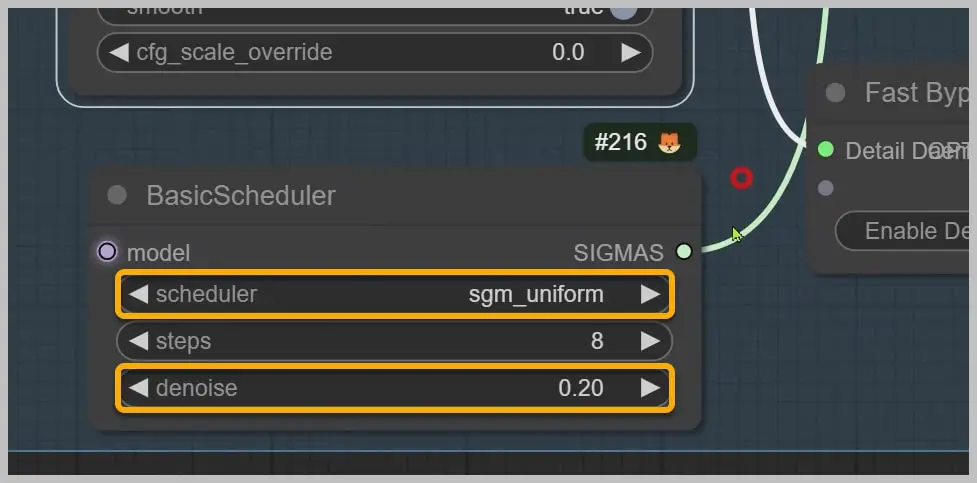
The “Detail Daemon Sampler” is specifically designed for enhancing details. You can adjust the level of detail you want by using the “detail_amount” parameter.
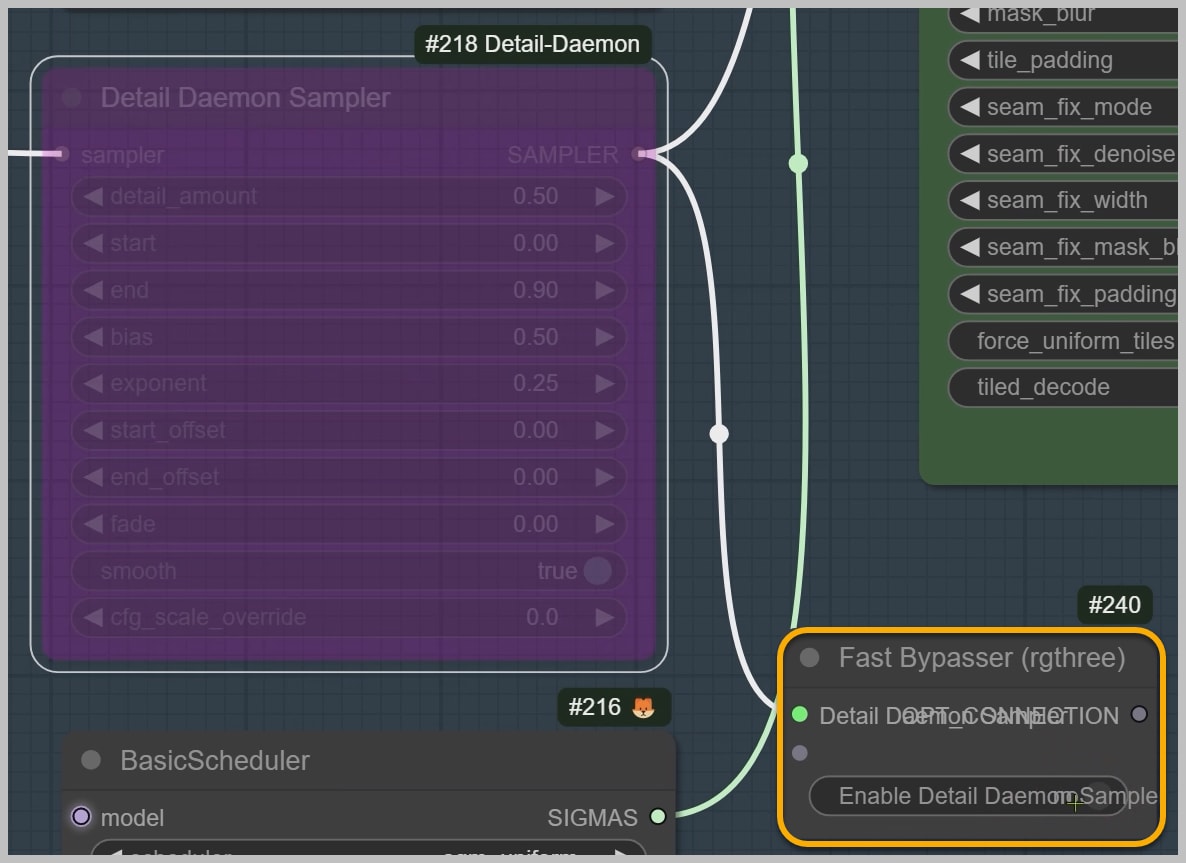
If you prefer to skip the detail enhancement altogether, you can opt for the “Fast Bypasser” node.
For the scheduler, I recommend using “sgm_uniform.” Keep in mind that this scheduler may alter the composition of the final image more than the “exponential” scheduler; however, it is more effective at enhancing details. A denoising strength of 0.2 typically yields good results, enhancing details while still maintaining a level of consistency with the original image.
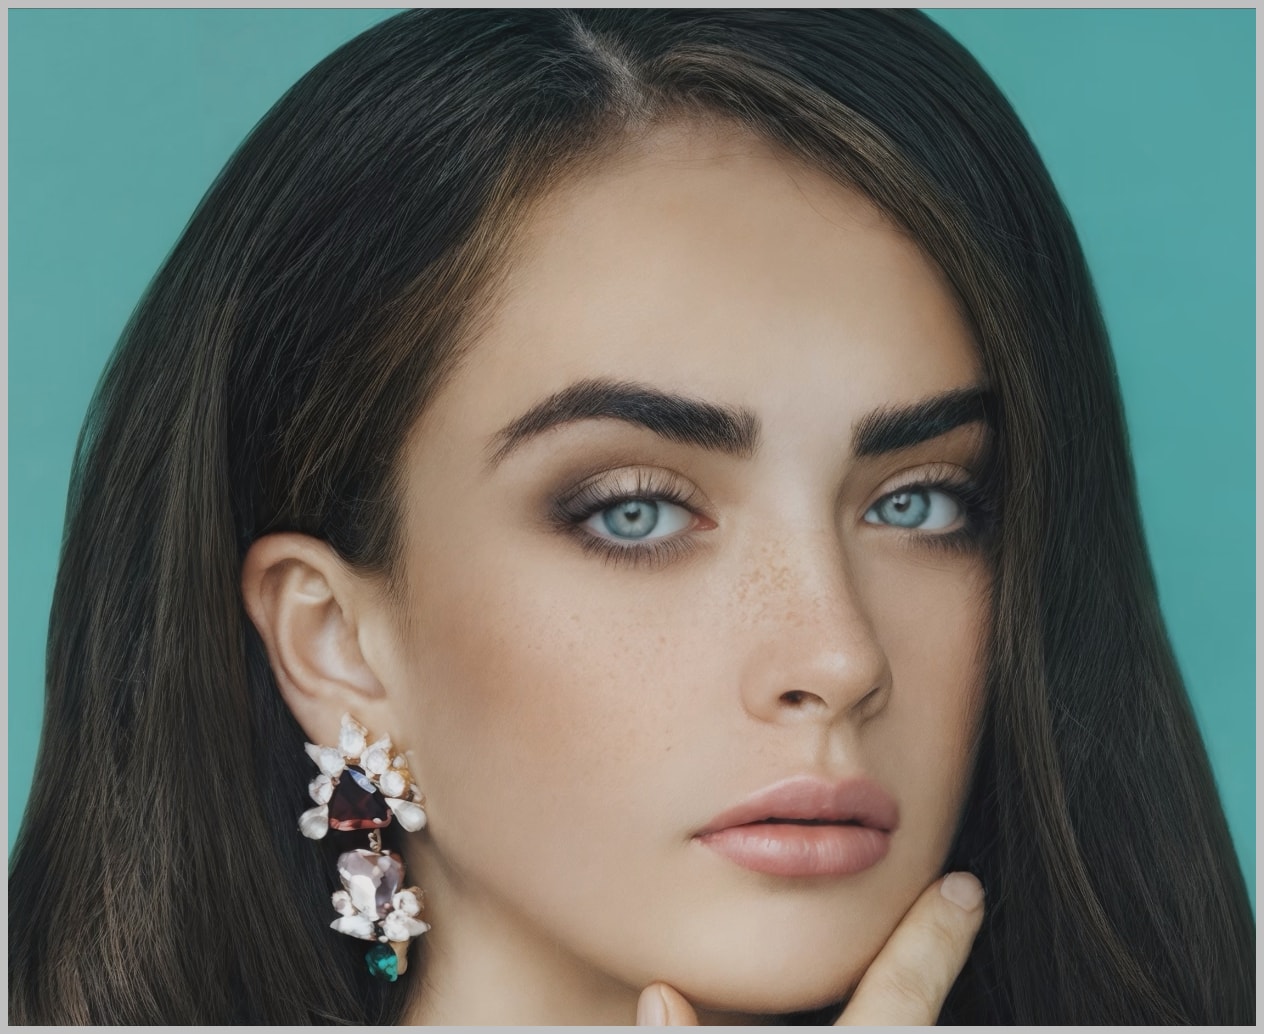
Now, let’s take a look at the final image! It appears somewhat inconsistent, with certain skin areas exhibiting a wealth of detail while others lack it. This discrepancy can arise from the level of detail in the image generated by DiffBIR and the upscale models you choose.
Addressing Minor Artifacts: Fixing Small Issues
To enhance the restoration of skin details, you can utilize a workflow I previously shared in my last article, which is specifically tailored for creating realistic skin textures.
Alternatively, feel free to experiment with different settings within this node group to achieve various skin textures!
For this demonstration, I selected “8xNMKD-Faces” as the upscale model and opted for “exponential” as the scheduler. I maximized the “detail_amount” and set the denoising strength to 0.8.
This combination is effective in providing detailed skin while maintaining a good level of consistency with the original image.
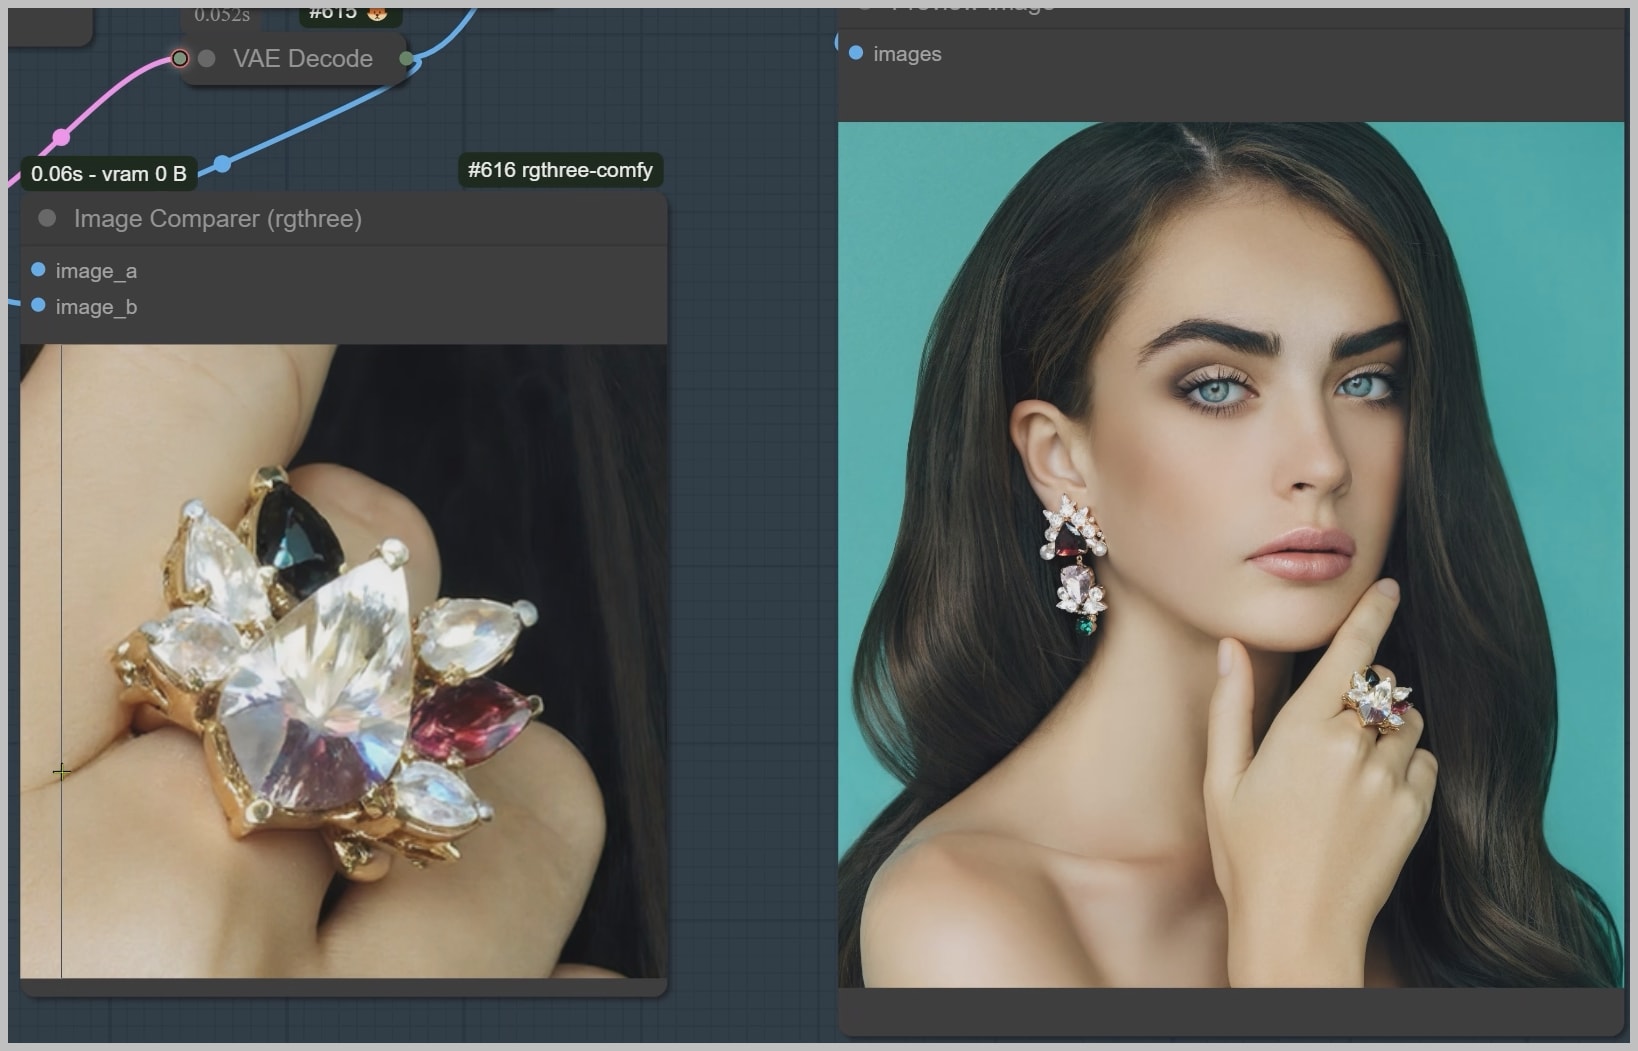
It’s essential to acknowledge that DiffBIR isn’t flawless; its predictive capabilities may not always be accurate. In this case, you might observe some artifacts on the woman’s earring and ring.
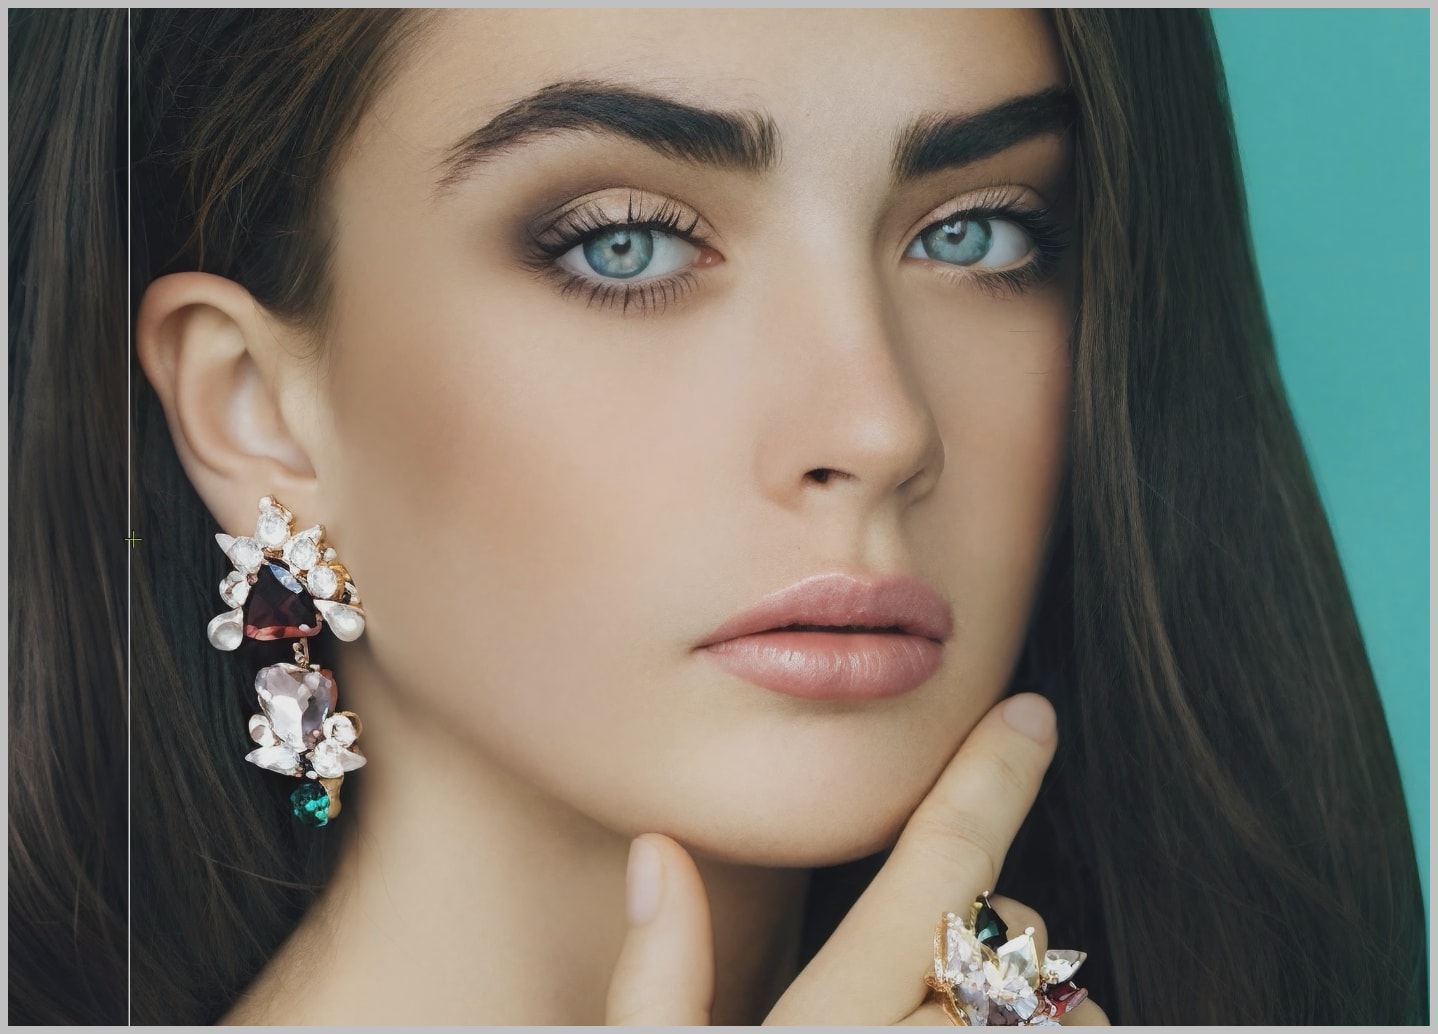
This issue arises because these items are unique, and DiffBIR may not have encountered similar examples in its training data. To resolve this, I inpainted those areas using a workflow I developed to add more realistic details.
Conclusion
In this article, we examined the node groups within ComfyUI for enhancing image quality and fixing issues like hand corrections and minor artifacts. By selecting the right upscale models and detail enhancement techniques, you can achieve impressive results while preserving the original image’s integrity.
Experimenting with different settings will help you find the ideal balance for your projects. With these tools, you’re ready to create realistic and captivating images.