Flux.2 Klein: Using LoRAs for Better Consistency and Control
If you have been working with Flux.2 Klein for image editing in ComfyUI, you have probably noticed a familiar challenge: the model can be powerful, but it does not always preserve a subject’s identity, pose, or fine details as reliably as you want.
In this article, I want to walk through a simpler method for improving consistency during edits. Instead of relying on custom nodes alone, this workflow uses two LoRAs that make the editing process more stable and much easier to control.
What makes this especially useful is that the improvement is not limited to one kind of task. These LoRAs help with pose preservation, anatomy, background replacement, mood changes, environmental effects, and even multi-image editing.
By the end of this article, you will have a clear understanding of how the workflow is set up, how the two LoRAs compare, and how to adjust them for your own projects.
Why LoRAs Help in Flux.2 Klein Workflows
When editing an image, the goal is often not to create something completely new. Most of the time, we want to change only specific parts of the image while keeping the original subject recognizable. That means preserving things like:
- Facial identity
- Body pose
- Clothing appearance
- Anatomy
- Overall composition
Without additional guidance, Flux.2 Klein can drift away from the source image too easily. A simple scene change may also alter the face. A hand edit may distort the body. A background replacement may introduce anatomy problems or lighting that no longer matches the original portrait.
This is where LoRAs become especially valuable. In this workflow, the two LoRAs help by:
- Improving consistency so the subject stays closer to the original image
- Reducing pose drift so edits do not completely reshape the character
- Improving anatomy in areas that often break, such as hands and feet
- Giving more control over how strongly the edit affects the image
- Handling more complex edit prompts more gracefully than the base model alone
In practical terms, that means fewer broken details and more usable generations.
YouTube Tutorial:
Gain exclusive access to advanced ComfyUI workflows and resources by joining our community now!
Workflow Overview in ComfyUI
Download this workflow for free: https://www.skool.com/myaiforce-5872/flux2-klein-consistency-hack-2-loras-you-need-to-try
The workflow used here is designed to make comparison easy. It includes 3 custom advanced samplers, which means it generates 3 images at once for side-by-side evaluation.
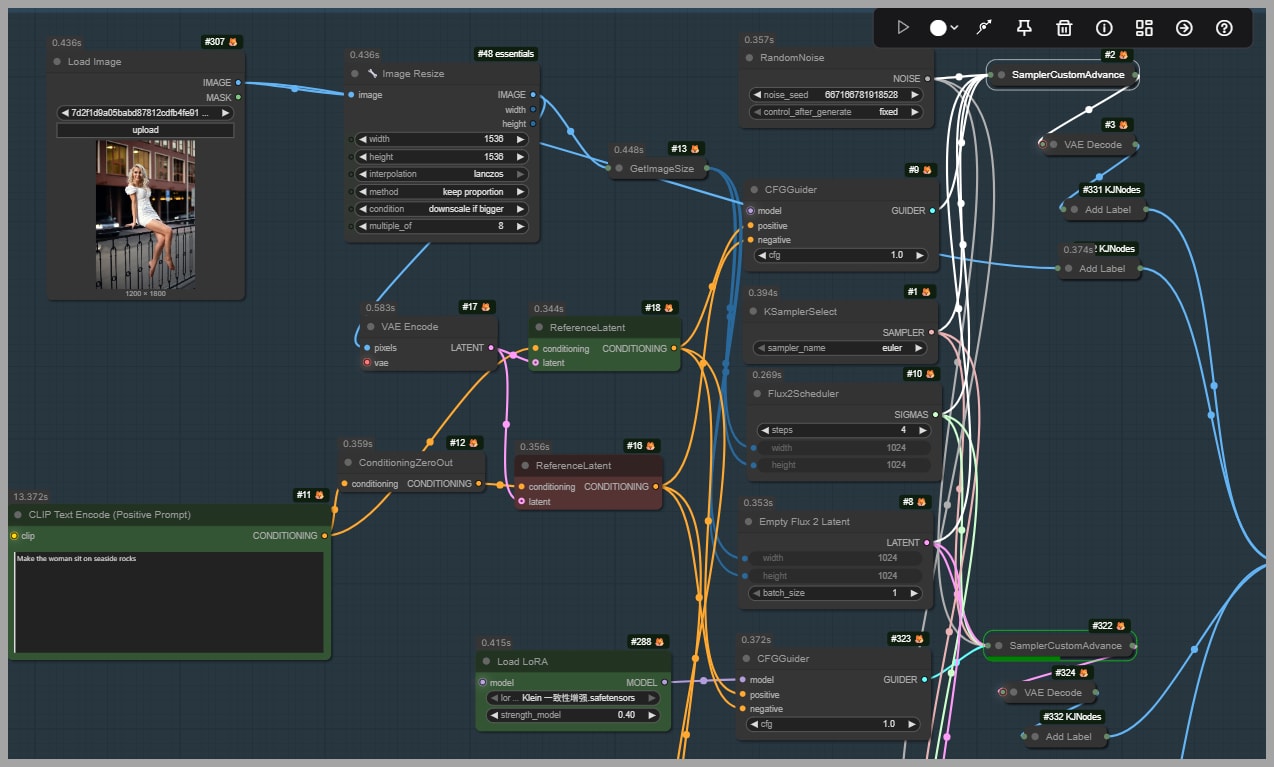
All 3 advanced samplers share the same core settings:
- The same scheduler
- The same latent setup
- The same sampler configuration
The only thing that changes between them is the model configuration, specifically whether a LoRA is used and which LoRA is applied.
This setup is useful because it isolates the effect of the LoRA. Rather than guessing whether a different result came from a changed sampler or latent setting, you can compare outputs knowing that the LoRA is the main variable.
The three outputs are:
- A version without any LoRA
- A version using the first LoRA
- A version using the second LoRA
This makes it easy to judge which option best preserves the original image while still following the edit prompt.
The Two LoRAs Used in This Article
This workflow highlights two LoRAs.
The first LoRA is created by dx8152: https://huggingface.co/dx8152/Flux2-Klein-9B-Consistency/tree/main
The file to look for is:
klein consistency.safetensors
The second LoRA is created by lrzjason: https://huggingface.co/lrzjason/Consistance_Edit_Lora/tree/main
Several versions are available, including versions for different models.
In this workflow, the version used is the latest release for Flux.2 Klein 9B.
Although both LoRAs improve consistency, they do not behave in exactly the same way. Across the examples, they produce similar structural improvements, but they can differ in:
- Lighting mood
- Amount of dramatic contrast
- Fine-detail rendering
- How strongly the edit affects local areas of the image
That makes them both worth testing. One may suit your image better than the other depending on the task.
Example Comparisons: How the LoRAs Perform
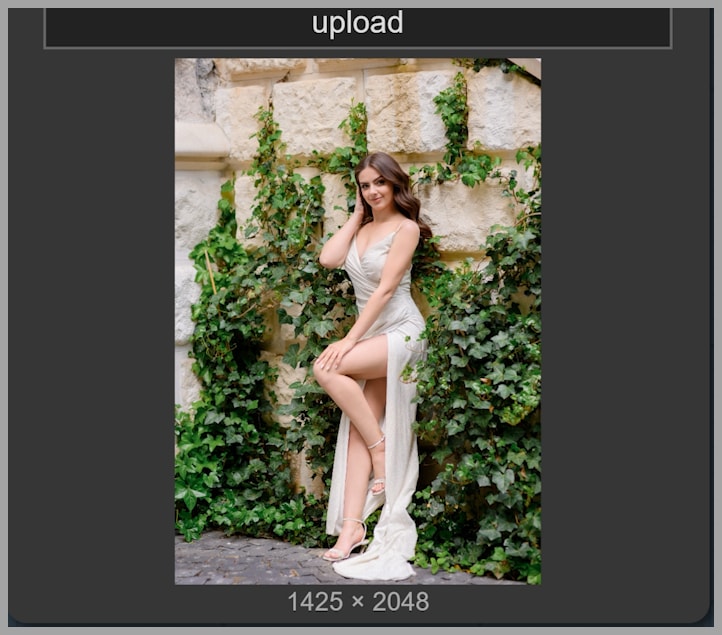
Moving the Subject to Rocks by the Sea
The first example starts with a portrait of a woman sitting on a railing on a street. The goal is to edit the image so she appears sitting on rocks by the sea.
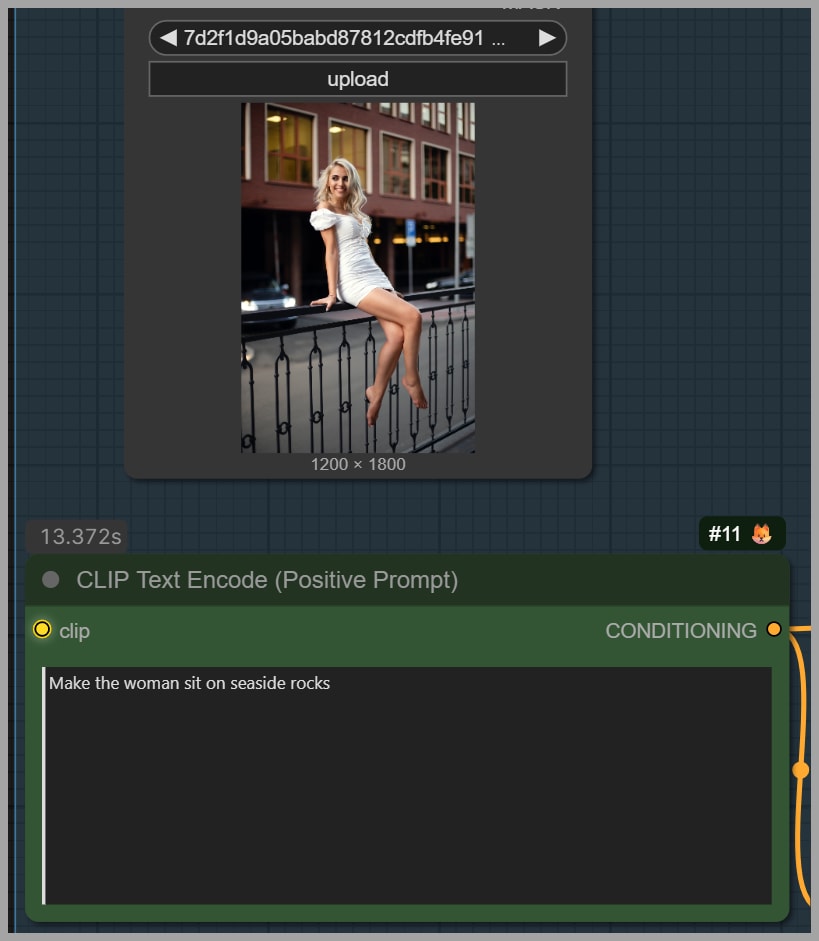
This is a good test because the edit changes the environment significantly while still requiring the model to preserve the original person and pose.
Result without a LoRA
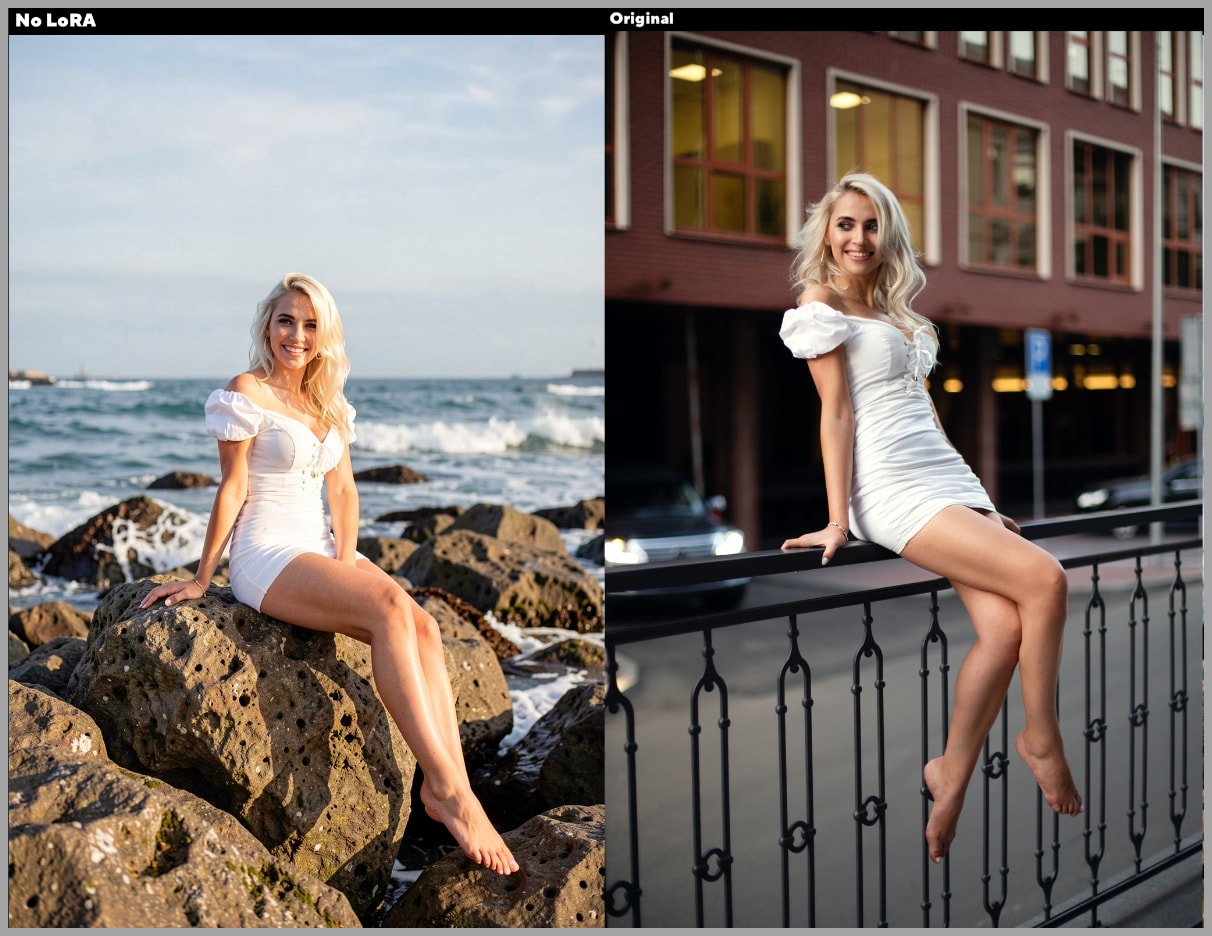
The version generated without a LoRA struggles noticeably. Compared with the source portrait:
- Her face changes too much
- Her pose shifts more than it should
- Her feet contain visible problems
This is a common issue when consistency is weak. Once the model starts changing the pose too aggressively, anatomy often breaks as well. A small edit becomes a larger reinterpretation of the image.
Result with the dx8152 LoRA
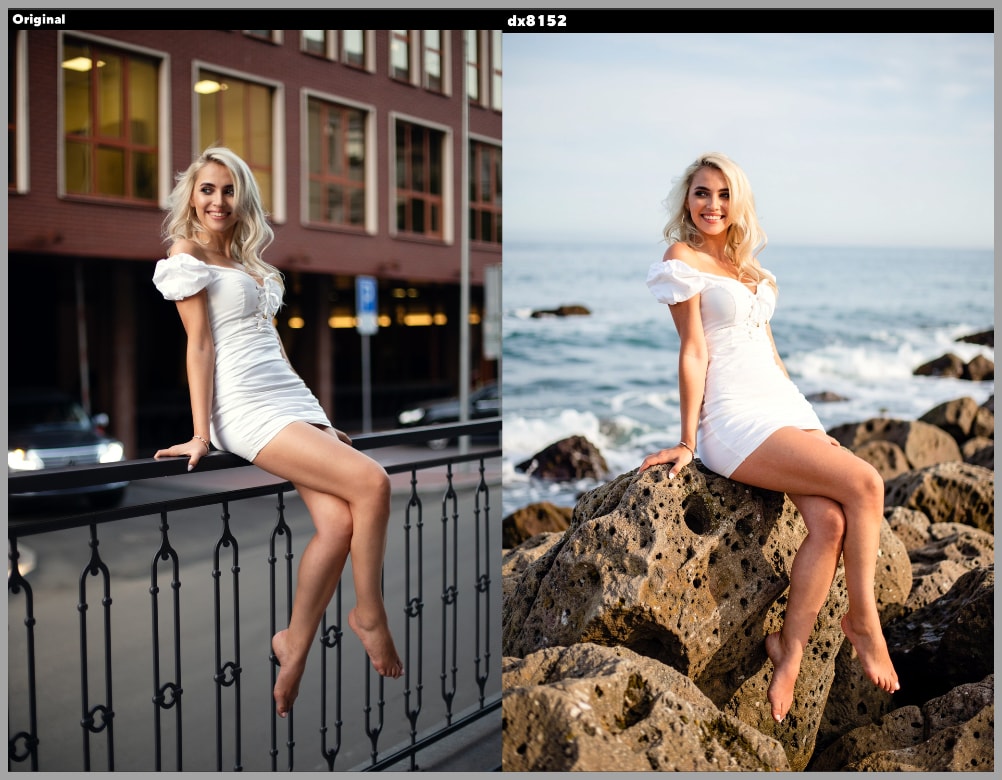
The output generated with the dx8152 LoRA is much more stable. The improvements are visible right away:
- Her pose stays much closer to the original
- The overall consistency is better
- The feet are generated correctly
This matters because preserving the pose helps protect the rest of the image. Once the body structure stays stable, the model is less likely to create secondary errors in limbs or perspective.
Result with the lrzjason LoRA
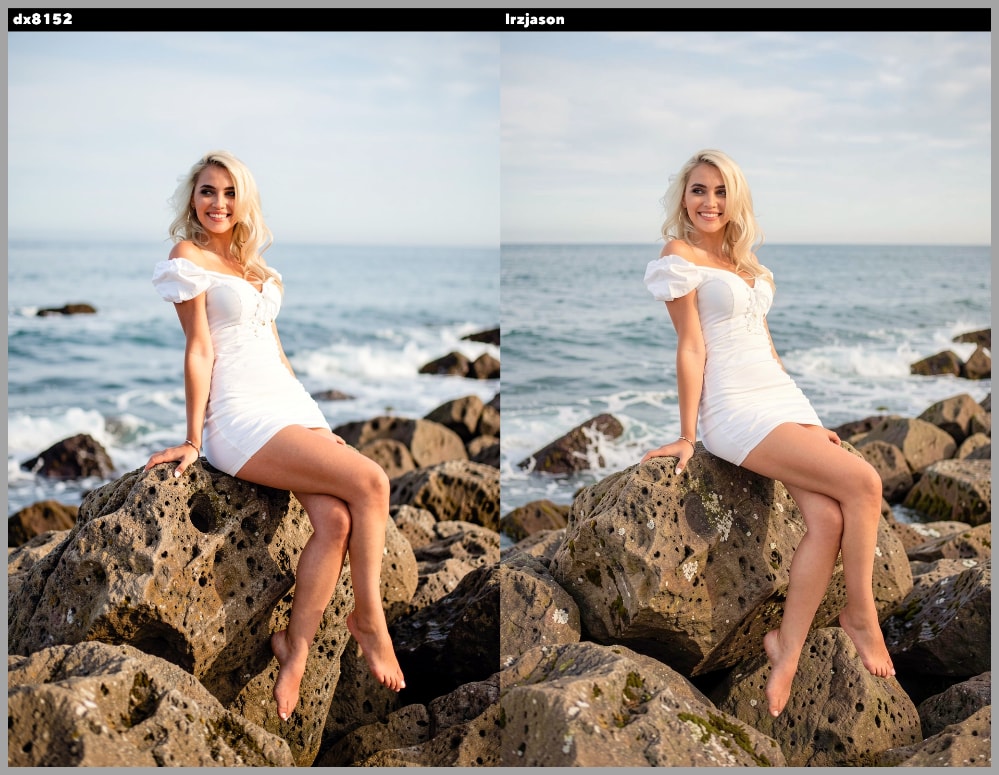
The output generated with the lrzjason LoRA is also very strong. It performs similarly in terms of consistency, but the lighting is different. This version feels more dramatic and moodier.
In this example, the LoRA strengths were not the same:
- One LoRA was set to 0.4
- The other was set to 0.6
That is an important reminder that comparisons are not only about the LoRA itself. The selected strength value also shapes the result.
Editing the Guitar Portrait at a Sunset Beach
The second example is more demanding.
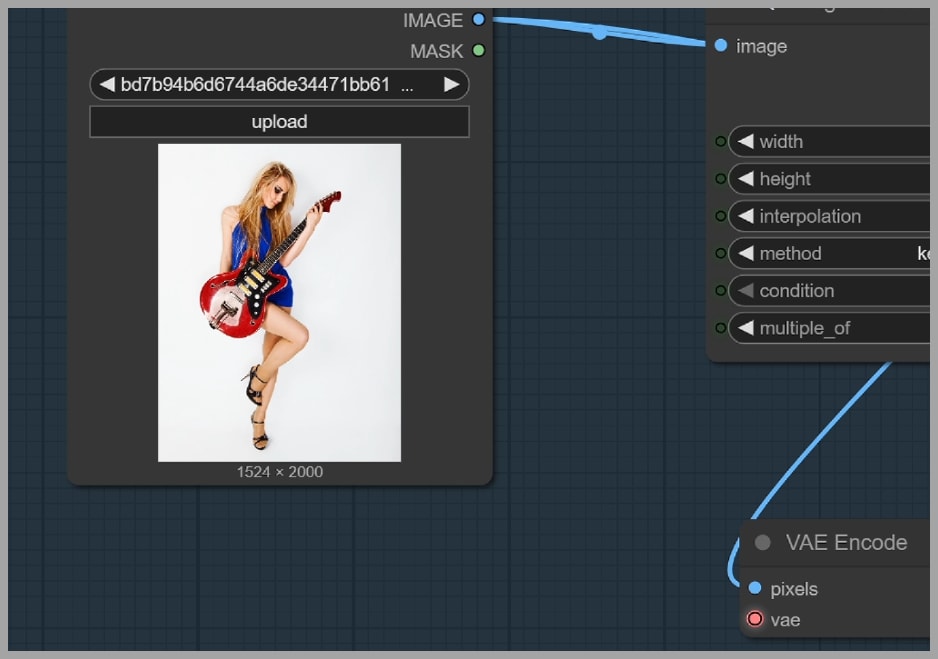
The portrait is edited with the following prompt:
Let her right hand strum the strings, remove her shoes, and change the white background to a sunset beach.
This task is harder because it combines multiple edits at once:
- Hand repositioning
- Object interaction
- Shoe removal
- Background replacement
Each of those tasks can already be challenging on its own. When combined, they become a strong test of whether the model can remain coherent.
Result without a LoRA
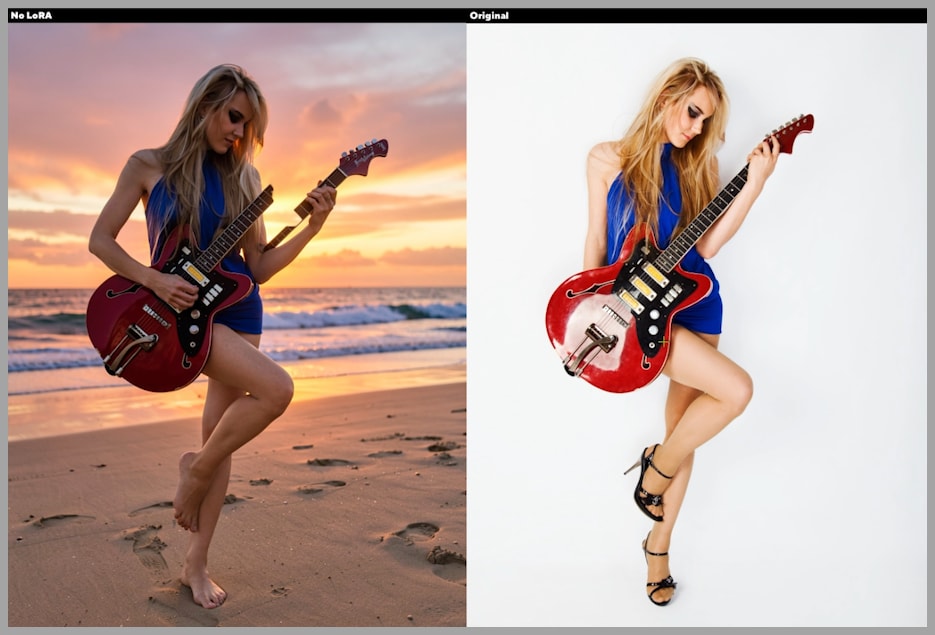
The version generated without a LoRA struggles badly with the complexity of the request. The most obvious issue is that the woman ends up breaking her electric guitar, which shows how poorly the model handles the coordinated change.
This is a great example of why a base model alone may not be enough for precise edits. The model tries to satisfy the prompt, but it loses control of the object structure and physical plausibility.
Results with the two LoRAs
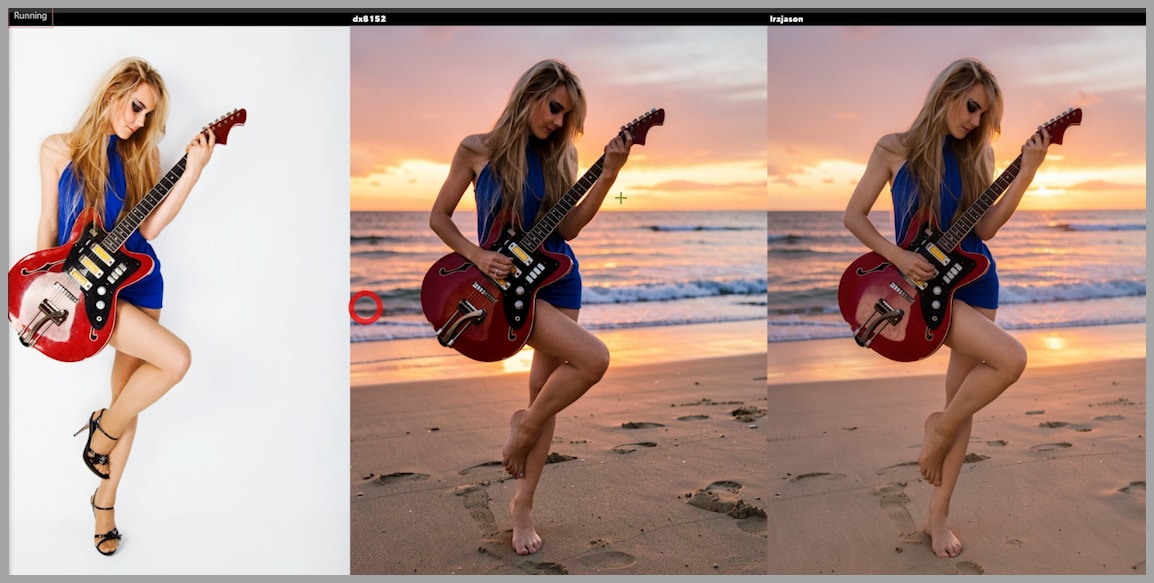
The 2 LoRA-assisted versions perform much better. With their help, Flux.2 Klein handles the task in a more controlled way.
The improvements include:
- Better preservation of the instrument
- Better handling of the hand-related edit
- More coherent integration of the new environment
The result generated with the dx8152 LoRA appears to have:
- More detail
- More dramatic lighting
In this example, the LoRA strengths were again different:
- One was set to 0.3
- The other was set to 0.4
That difference may partly explain why one result feels stronger or more stylized.
Changing the Scene to Nighttime
The next task focuses on transforming the scene into nighttime. This is a useful test because lighting changes can easily overpower the original look of a portrait.

Result without a LoRA
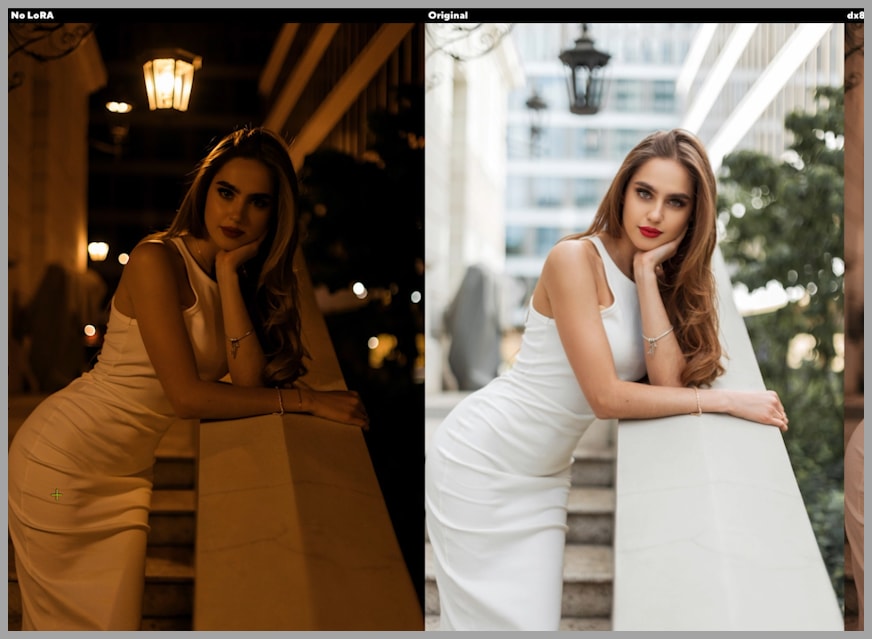
Without a LoRA, the model changes too much. The problem is not only the lighting. Even the color of her dress changes, which shows that the model is not simply editing the scene but reinterpreting the image more broadly.
This is a classic sign of low control: a targeted environment change causes unrelated parts of the image to drift.
Results with the LoRAs
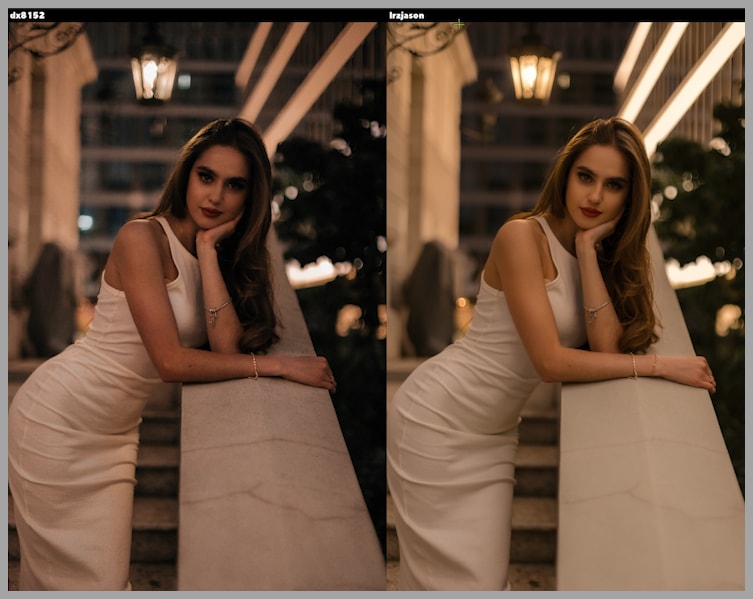
With the LoRAs applied, the edits become much more controlled. The outputs preserve the original appearance better while still shifting the scene toward nighttime.
That balance is important. A good edit should make the requested change without unnecessarily rewriting the subject.
Compared with the no-LoRA version, the LoRA-assisted outputs do a better job of preserving:
- The original clothing appearance
- The subject’s overall look
- The intended level of scene transformation
Noise and cleanliness
A closer look at the outputs also reveals a quality difference. One of the images contains too much noise, while another looks noticeably cleaner.
This is another reason to compare LoRAs instead of assuming one is always best. In some cases, both may preserve consistency well, but one may produce a cleaner or more polished image.
Adding Snow with Better Control
The next example tests an atmospheric effect: adding snow to the scene.
This kind of edit may seem simple at first, but it is actually a great test of control. The model needs to introduce a visible change without overwhelming the original image.
Result without a LoRA
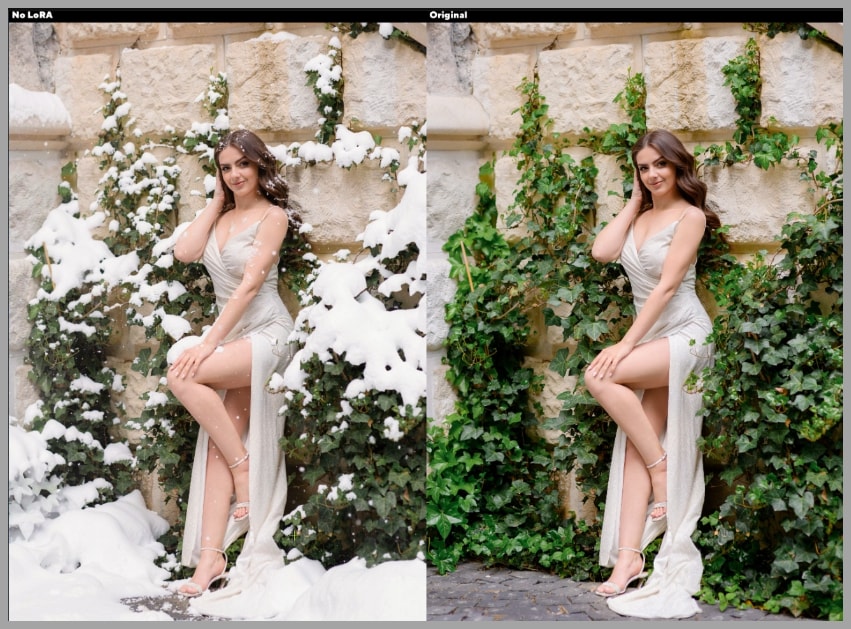
Without a LoRA, the image ends up with too much snow. The effect becomes excessive rather than controlled.
That kind of overshooting is a common issue when the model does not have enough guidance. Instead of applying the effect in a measured way, it pushes the scene too far.
Results with the LoRAs
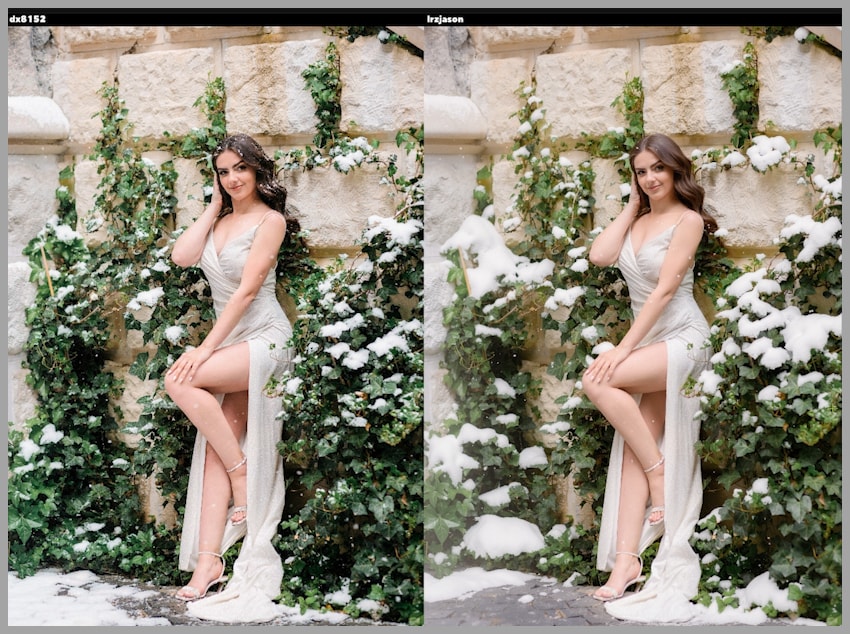
With the LoRAs, the amount of snow becomes easier to manage. Both outputs show better control, but they do not distribute the snow in exactly the same way.
For example:
- One output places less snow on the leaves
- Another places less snow on her hair
This is a subtle but important distinction. Even when both results are good, they may emphasize different parts of the image. That gives you more options depending on the style you want.
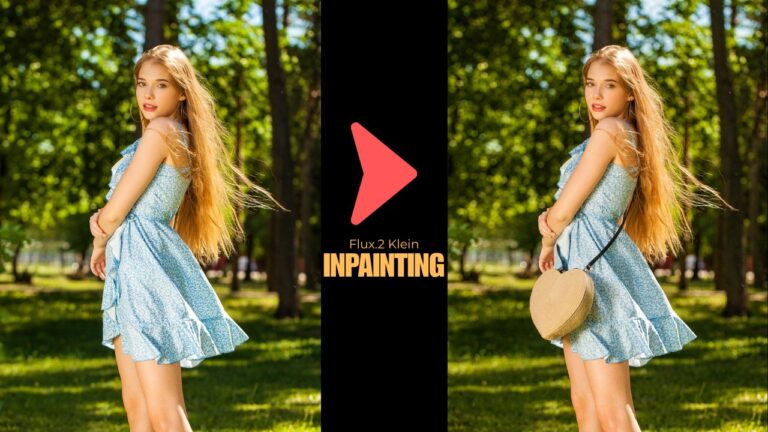
Testing Multi-Image Editing with a Handbag
Up to this point, the examples focused on editing a single image. The final test asks a different question: can these LoRAs also help with multi-image editing?
In this task, the goal is to make the woman carry a handbag by its handle using only one hand. A separate handbag image is provided as reference.
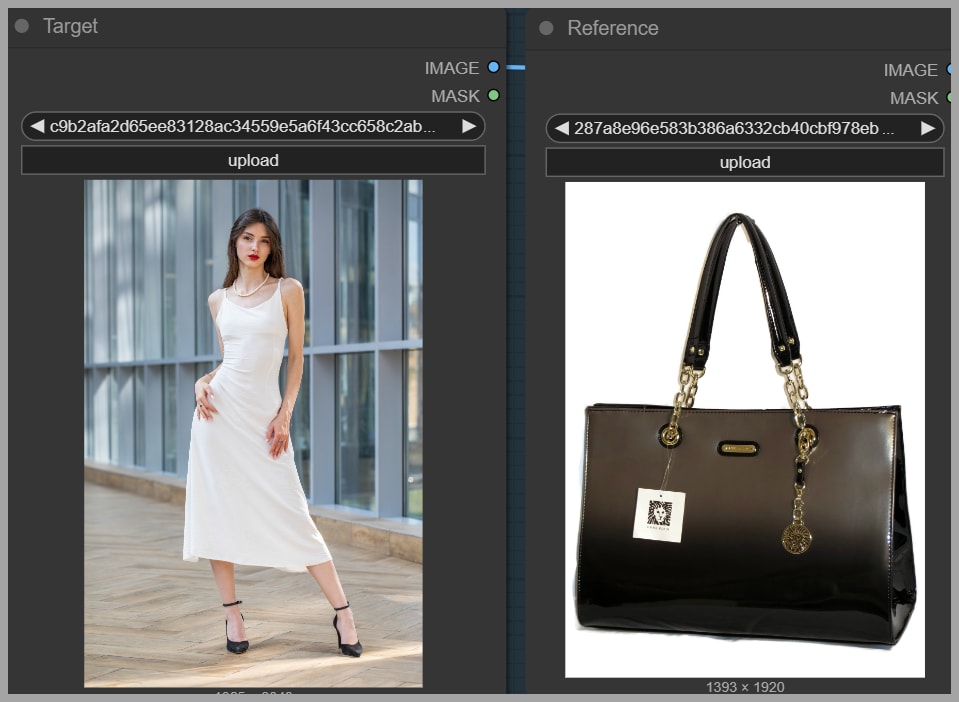
This is a more advanced scenario because the model must combine:
- The original portrait
- The reference handbag
- A pose constraint
Comparing the outputs
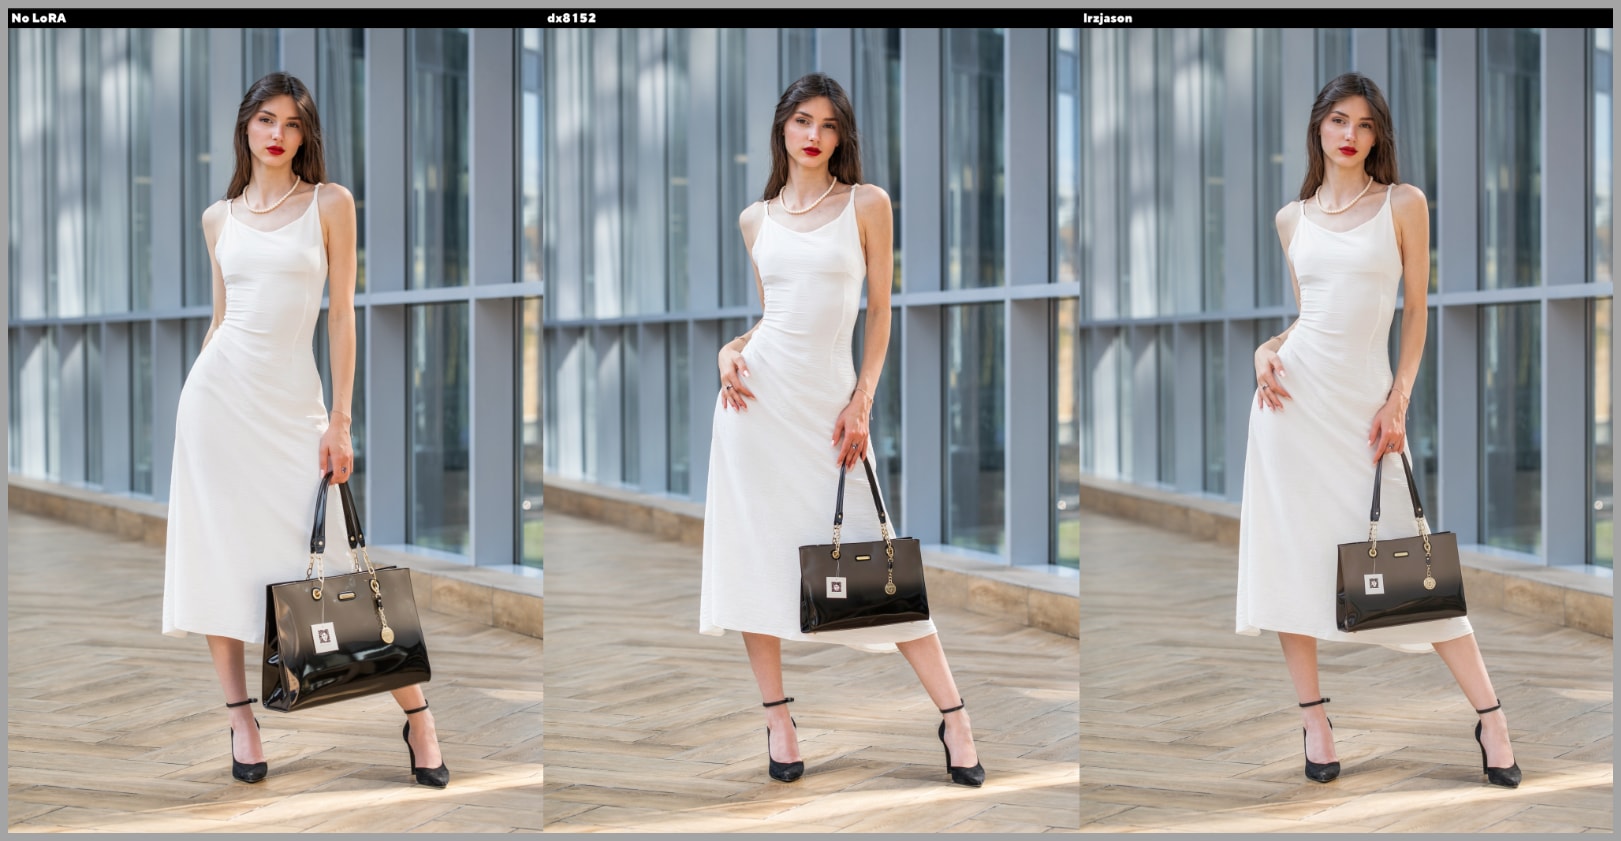
All of the results place the bag in her left hand, so the general instruction is being followed. However, the quality of the pose preservation differs.
The version generated without a LoRA does not preserve the original pose very well. In the source portrait, her hand should still be touching her waist, but that relationship is not maintained convincingly.
One LoRA-assisted result keeps the hand closer to the original pose. However, it also makes the bag-carrying position feel a little unnatural.
The other LoRA-assisted result introduces a pose with 3 bent fingers, while the remaining two fingers stay closer to the original hand shape. That result feels more natural and more visually convincing.
Final Thoughts and Resources
These examples make a strong case for using LoRAs when editing images with Flux.2 Klein in ComfyUI. Compared with the base model alone, both featured LoRAs do an excellent job of improving control and consistency.
At the same time, they are not identical. One may produce more dramatic lighting, another may look cleaner, and another may handle a specific pose more naturally. That is why the best approach is not to choose one blindly, but to try both and compare.
Gain exclusive access to advanced ComfyUI workflows and resources by joining our community now!