How to Create Massive, Highly Detailed 40 MP Images in ComfyUI with Iterative and Tiled Upscaling
If you love images packed with tiny textures, realistic surfaces, and extremely fine details, this workflow is designed for exactly that.
In this article, I’ll walk through a three-pass ComfyUI workflow that combines iterative upscaling, dedicated super-resolution models, and tiled Krea 2 refinement to generate extremely large images without overwhelming your GPU.
The idea is simple: instead of asking the model to create one massive image all at once, we gradually increase the resolution, preserve the original composition, add details step by step, and finally divide the image into smaller tiles for high-resolution refinement.
This approach makes it possible to produce very large images with impressive realism while avoiding the VRAM limitations that normally appear when working at huge resolutions.
The original workflow was built on RunningHub, where the required models and custom nodes are already installed, which can save quite a bit of setup time.
YouTube Tutorial:
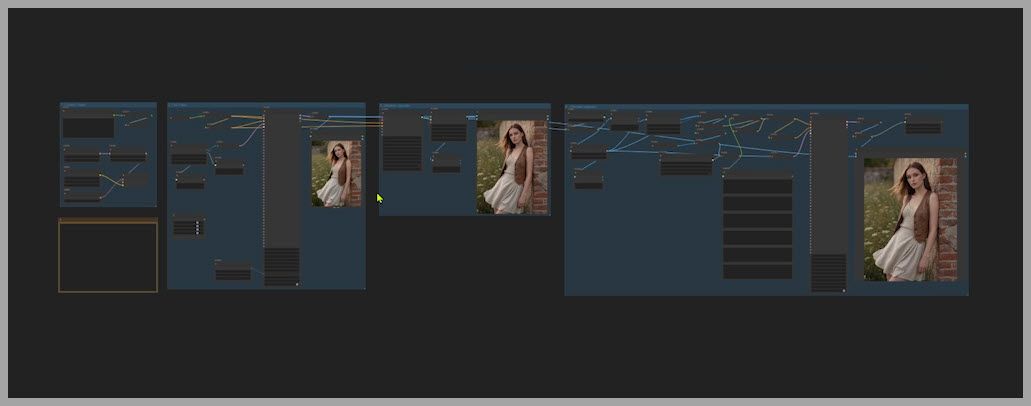
1. Understanding the Three-Pass Workflow
Before looking at individual nodes, it helps to understand the overall structure.
The workflow uses 3 main passes:
- Generate a small preview image
- Upscale it gradually using iterative upscaling
- Perform a larger model-based upscale and tiled Krea 2 refinement
Each stage has a different purpose.
The first pass is about composition.
The second pass is about controlled enlargement and detail preservation.
The third pass is about high-resolution texture, realism, and final detail generation.
By separating these jobs, we avoid wasting GPU resources on bad compositions while also giving the model several opportunities to introduce more detail.
2. The Most Important Detail Control: Turbo LoRA Strength
Before getting into the 3 passes, there is one parameter you should understand first.
If you want to control how much fine detail appears in the image, the most important setting in this workflow is the Turbo LoRA strength.
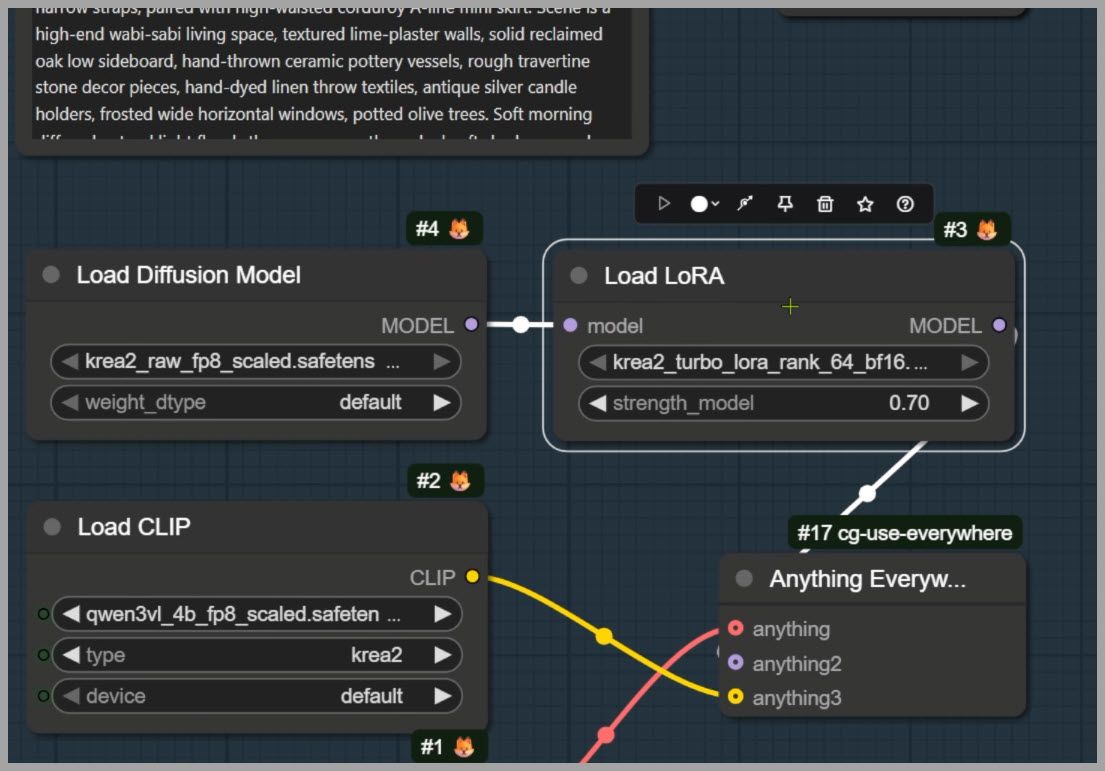
This parameter has an enormous effect on the final look.
I recommend using the raw model instead of the Turbo model itself.
There are two main reasons.
First, the raw model tends to provide a wider variety of starting seeds. That means you can get more diverse compositions and less repetition between generations.
Second, using the raw model allows you to treat the Turbo LoRA strength almost like a detail-control slider.
As the LoRA strength increases:
- Fine details become more noticeable.
- Textures become denser.
- The final image gradually begins to resemble the characteristic output of the Turbo model.
However, this parameter is extremely sensitive.
You should not make large changes.
Even something as small as:
+0.05
or:
-0.05
can noticeably change the amount and character of detail in the final image.
Because of that, I strongly recommend tuning this value in very small increments.
3. Pass 1: Generate a Small Composition Preview
The first pass creates a relatively small image.
At this stage, image resolution is intentionally kept low.
The goal is not to generate the final-quality image yet.
Instead, we simply want to answer a few important questions:
- Is the composition good?
- Is the subject positioned correctly?
- Is the camera angle working?
- Is the pose interesting?
- Does the overall image feel worth continuing?
There is no reason to spend a lot of GPU memory generating a huge image before we know whether we even like the composition.
By working at a small resolution, generation becomes much faster. You can quickly cycle through seeds and compositions until you find something worth developing.
The settings used here are essentially the same as the first stage of the two-pass Krea 2 workflow discussed in the previous article.
That earlier workflow was already very effective at extracting texture, realism, and detail from Krea 2.
The main limitation was VRAM.
Once the image became too large, the GPU could no longer process the entire image at once.
This new workflow solves that problem by adding iterative upscaling and tiled processing.
For the first pass, you can use either:
- SDXL models
- Standard Stable Diffusion 1.5 models
The exact model is less important here because the main goal is simply to establish a strong composition.
4. Pass 2: Iterative Upscaling
Once you have a composition you like, the image moves into the second stage.
This is where iterative upscaling begins.
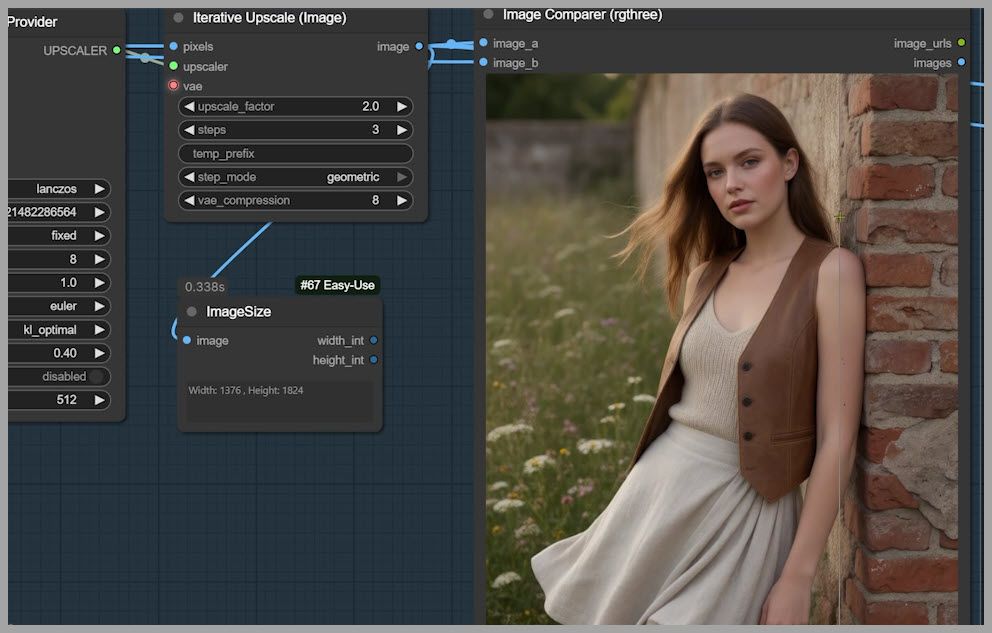
Look for the node called:
Iterative Upscale
Instead of immediately jumping from a small image to a very large image, this node enlarges the image gradually.
That gradual process helps preserve both structure and texture.
4.1 Setting the Upscale Factor
The first important setting is the upscale factor.
In this workflow, I use:
Upscale Factor = 2
You can increase it to:
3
or even:
4
if you want.
However, there usually is not much reason to use a very large value here.
Remember that the image will be enlarged substantially again during the third pass.
In fact, the final stage can easily upscale the image by another four times or more.
Because of that, a relatively modest value such as 2× is usually enough for this stage.
4.2 Setting the Number of Iterative Steps
I use:
Steps = 3
This means the upscale process is divided into three smaller stages.
Instead of performing one aggressive enlargement, the node gradually works toward the target resolution.
This controlled progression is important because sudden large resolution changes can sometimes damage textures, simplify details, or slightly distort the original image structure.
Iterative upscaling reduces that risk.
It helps preserve:
- Fine textures
- Small visual details
- Subject structure
- Original composition
- Surface characteristics
The result becomes a better foundation for the final high-resolution pass.
5. Simple vs. Geometric Step Mode
The Iterative Upscale node provides two step modes:
Simple
and:
Geometric
After testing both modes across multiple generations, I consistently found that Geometric mode produced better results.
So for this workflow, I recommend:
Step Mode = Geometric
Geometric progression gives the enlargement process a more natural resolution transition and generally produces stronger intermediate details.
6. Configuring the Upscaler Provider
The next important component is the Upscaler Provider.
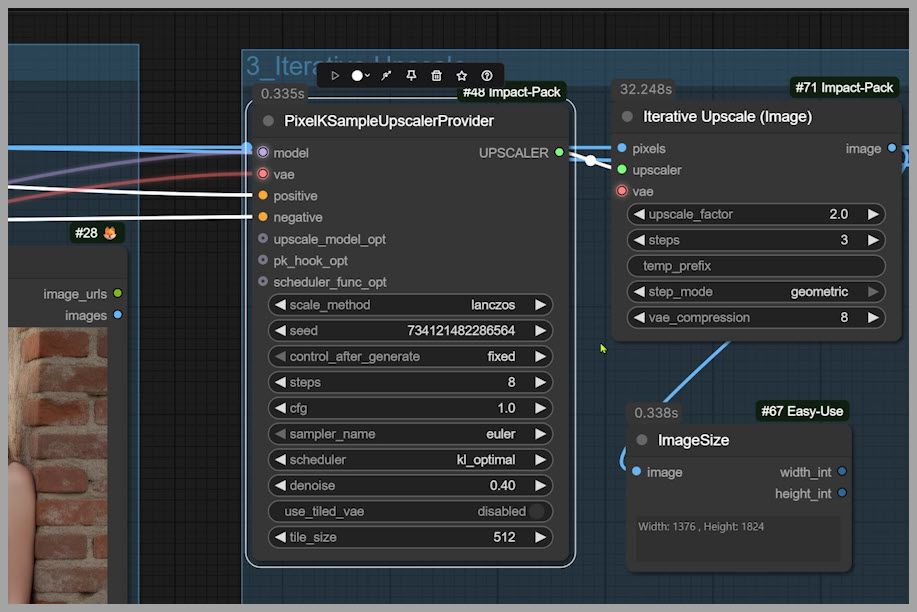
You can think of this node as functioning somewhat like a standard KSampler.
It gives you control over several familiar settings, including:
- Sampler
- Scheduler
- Tile size
The tile size is particularly important because it allows the image to be processed in smaller sections rather than all at once.
This dramatically reduces GPU memory requirements.
Without tiled processing, sufficiently large images can easily trigger an out-of-memory error.
6.1 Recommended Sampler
For this stage, I keep the sampler simple:
Sampler = Euler
There is no need to use a complicated sampler here.
The goal is controlled enlargement rather than aggressive reconstruction.
Euler works perfectly well for this part of the workflow.
6.2 Recommended Scheduler
For the scheduler, I recommend:
Scheduler = KL Optimal
This scheduler performs especially well when it comes to preserving the original composition during the upscale process.
That matters because at this stage we do not want the model redesigning the image.
We want it to maintain the existing structure while gradually improving resolution and detail.
7. Pass 3: Dedicated Model-Based Upscaling
Now we reach the final group of nodes.
At first glance, this section may look intimidating because there are quite a few nodes.
Fortunately, you do not need to understand every node individually in order to use the workflow effectively.
Conceptually, this stage performs two jobs.
First, it enlarges the image using a dedicated upscaling model.
Second, it divides the enlarged image into tiles and sends those tiles through Krea 2 for additional high-resolution refinement.
Let’s start with the dedicated upscale model.
8. Using 4x FFHQ DAT
For portrait images, I like using:
4xFFHQDAT
This model performs especially well on faces.
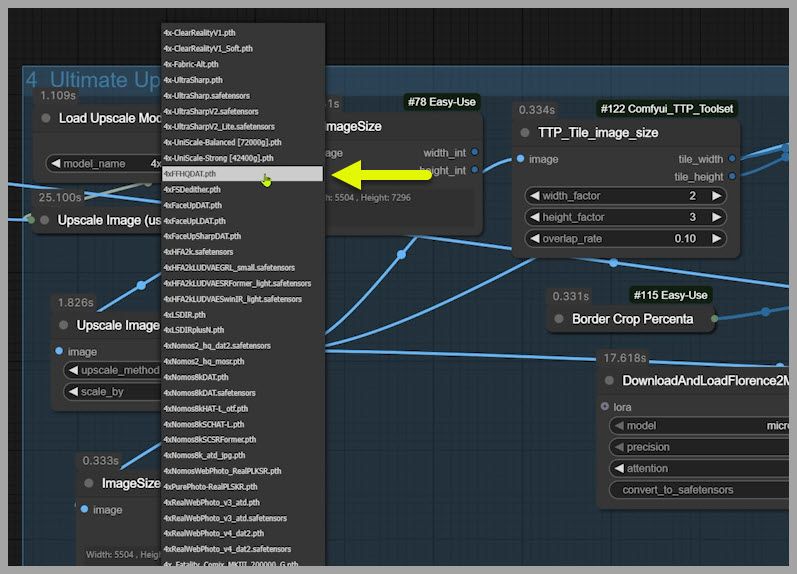
The 4x in the name means that the model is designed to upscale the image by approximately four times.
So if you feed the output of the previous stage into this model, the image becomes significantly larger before the final tiled diffusion process even begins.
There is also a separate Scale By value that allows you to adjust the overall enlargement.
For example, if you use a 4× upscale model and set:
Scale By = 2
the overall upscale ratio can effectively reach around:
8×
relative to the image entering that stage.
This is one reason the second-pass iterative upscale does not need an especially aggressive scale factor.
The final stage is already capable of producing a massive image.
9. 4x FFHQ DAT vs. 4xUltraSharpV2
Of course, FFHQ DAT is not the only upscale model you can use.
Another popular option is:
4xUltraSharpV2
Both models are useful, but they produce noticeably different textures.
When comparing them, I found that each model has its own strengths.
9.1 UltraSharpV2 and Skin Texture
When zooming into the face, UltraSharpV2 can sometimes create slightly unnatural skin texture.
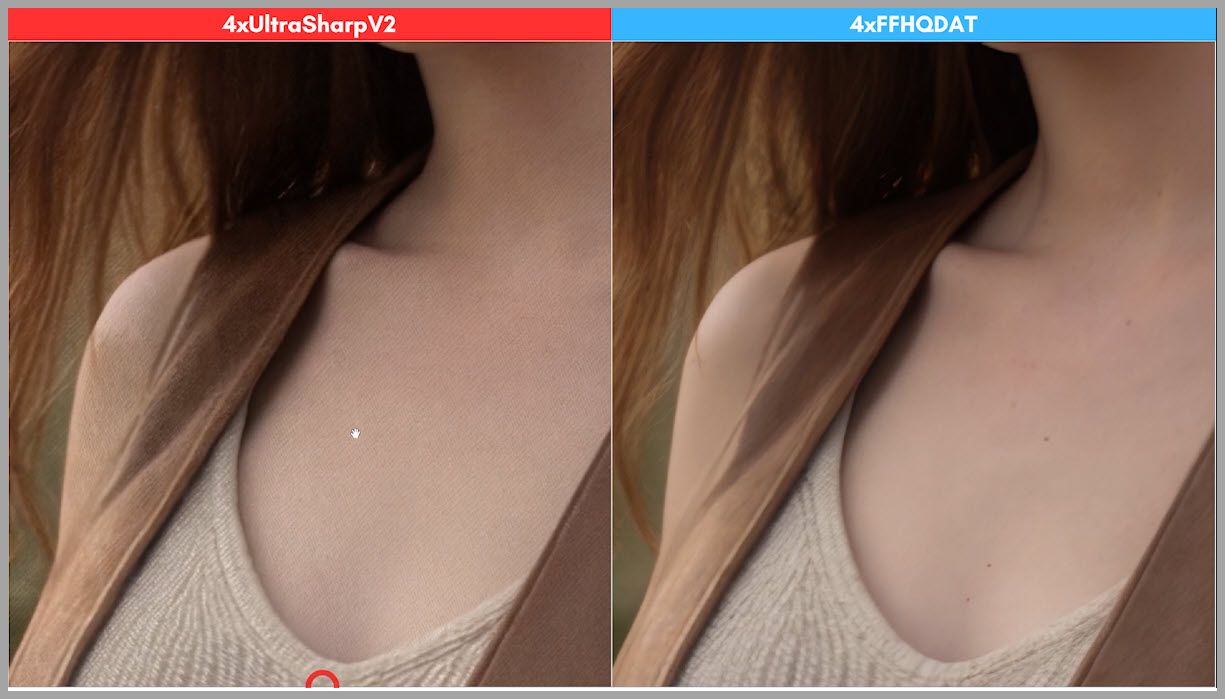
The result may become overly sharp or introduce surface details that do not look entirely realistic.
For portrait work, this can be a problem.
Skin usually needs a careful balance between detail and softness.
Too much microtexture can quickly make a face look artificial.
9.2 UltraSharpV2 and Fabric Texture
However, UltraSharp performs extremely well on clothing.
When looking at fabrics, seams, folds, woven materials, and clothing surfaces, I often prefer the result from UltraSharp.
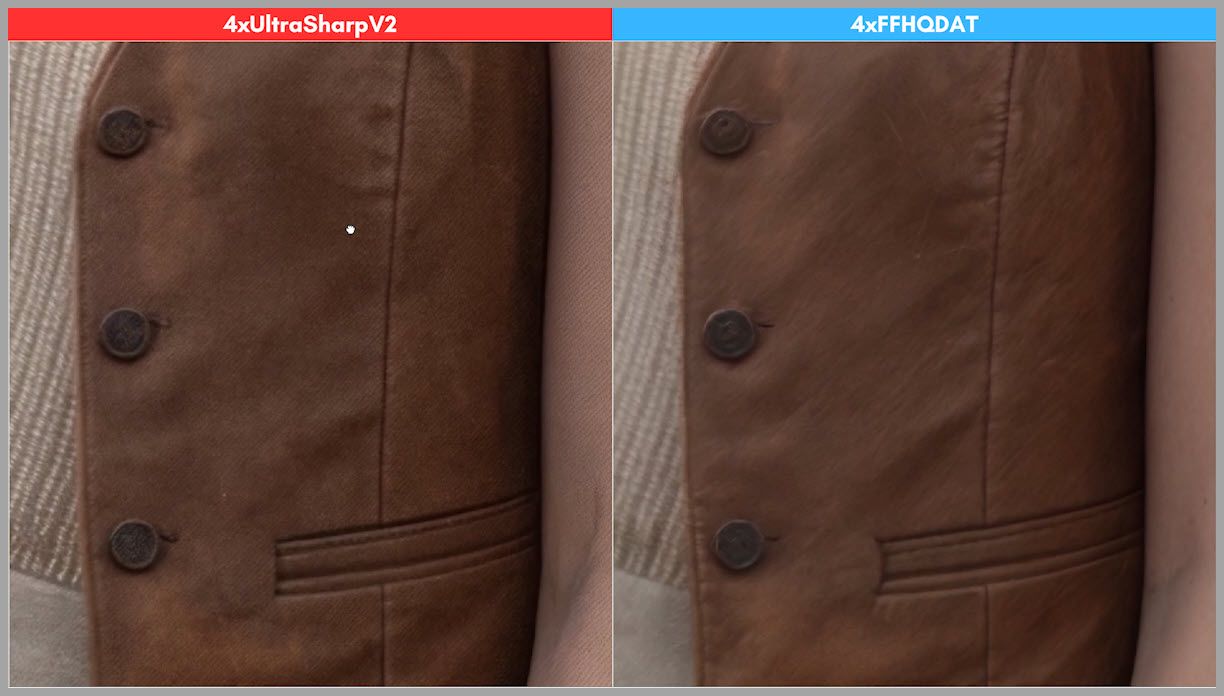
The textures can appear:
- Sharper
- More dimensional
- More tactile
- Better defined
So while FFHQ DAT may produce stronger facial results, UltraSharp may produce more convincing clothing textures.
9.3 Combining 2 Upscale Models
This leads to a useful advanced technique.
If you want the best possible result for both skin and clothing, you can upscale the same image twice.
Use this approach:
- Upscale the image using 4x FFHQ DAT.
- Upscale the original image again using 4xUltraSharpV2.
- Compare both versions.
- Use the FFHQ version for skin and facial areas.
- Use the UltraSharp version for fabrics and clothing.
- Blend the strongest parts together in image editing software.
This gives you much more control than expecting one upscale model to be perfect for every type of surface.
10. Why the Final Image Must Be Tiled
After all of this upscaling, the image can become enormous.
At that point, trying to send the full-resolution image directly through a diffusion model may exceed your GPU’s VRAM.
This is where the final tiled section becomes essential.
Instead of processing the whole image, the workflow divides it into smaller regions.
Each region can then be processed independently.
This makes it possible to refine extremely large images even on GPUs that could never handle the complete resolution at once.
11. Automatically Generating Prompts for Every Tile
The tiling process does more than simply crop the image.
After the large image is divided into smaller sections, the workflow generates a separate text prompt for each tile.
This helps the model understand what is contained in that specific part of the image.
For example, different tiles might contain:
- A face
- Hair
- Clothing
- Hands
- Background architecture
- Furniture
- Decorative objects
Instead of applying one generic prompt blindly across the entire image, the workflow provides more localized information.
Those tile-specific prompts are then passed into the final sampler along with the corresponding image tiles.
Once all tiles have been processed, the workflow assembles them back into the original image layout.
The result is a massive image containing significantly more local detail.
12. Configuring the Tile Grid
The number of tiles is controlled using width and height factors.
In this example, I use:
Width Factor = 2
and:
Height Factor = 3
To calculate the total number of tiles, simply multiply the two values:
2 × 3 = 6
So the image is divided into 6 separate tiles.
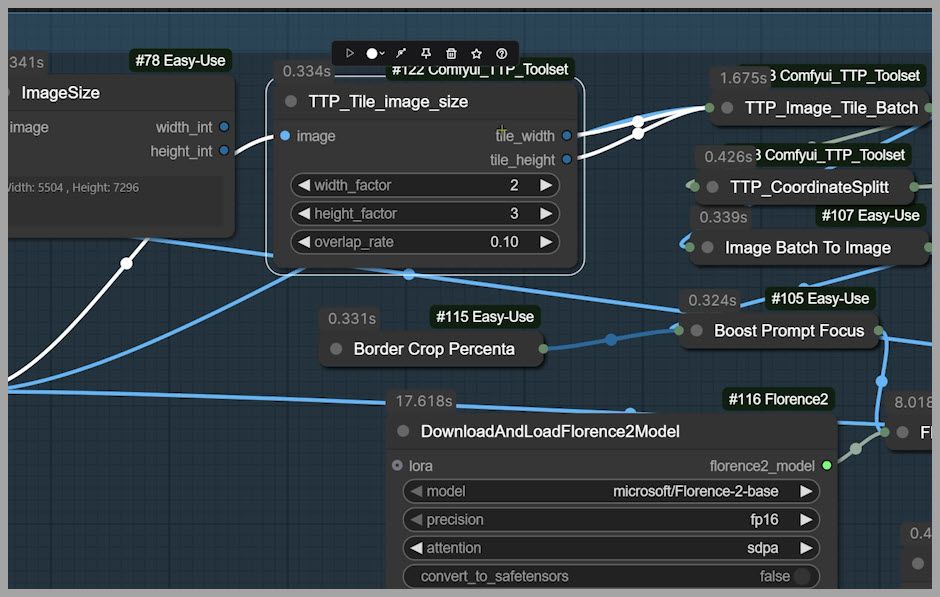
Each tile can be processed independently before everything is reassembled.
You can freely adjust these values depending on your image and available VRAM.
For example:
Width Factor = 3
Height Factor = 3
would create:
9 tiles
A larger number of tiles generally means that each individual tile is smaller and therefore easier on GPU memory.
However, you do not necessarily want to create an excessive number of tiny tiles.
Your goal is to find a reasonable balance between:
- VRAM usage
- Tile size
- Local context
- Processing efficiency
13. Choosing the Final Sampler
Sampler choice becomes more important during the final refinement stage because this is where a significant amount of new texture is generated.
I tested several samplers.
The one that consistently gave me the best overall result was:
DEIS 2M
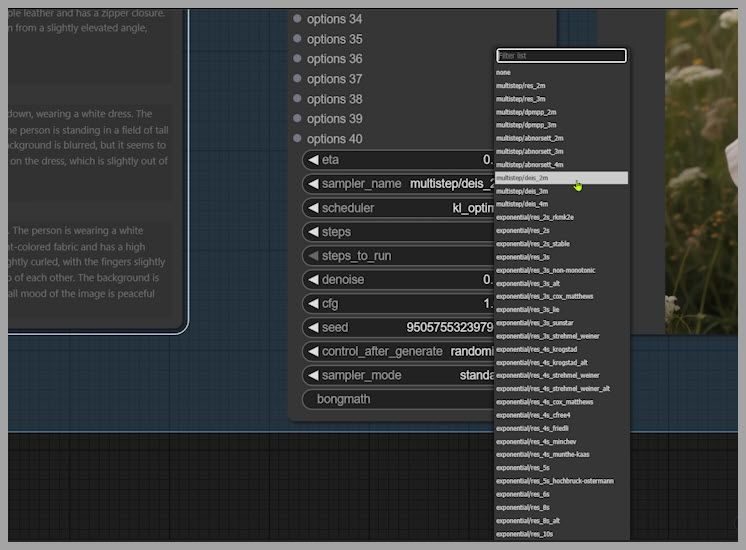
It produced a good balance between:
- Fine texture
- Realistic skin
- Clean details
- Artifact control
- Overall image consistency
For this workflow, DEIS 2M is my preferred starting point.
14. Comparing DEIS 2M with Abnorsett 2M
I also tested:
Abnorsett 2M
This sampler can generate stronger skin texture.
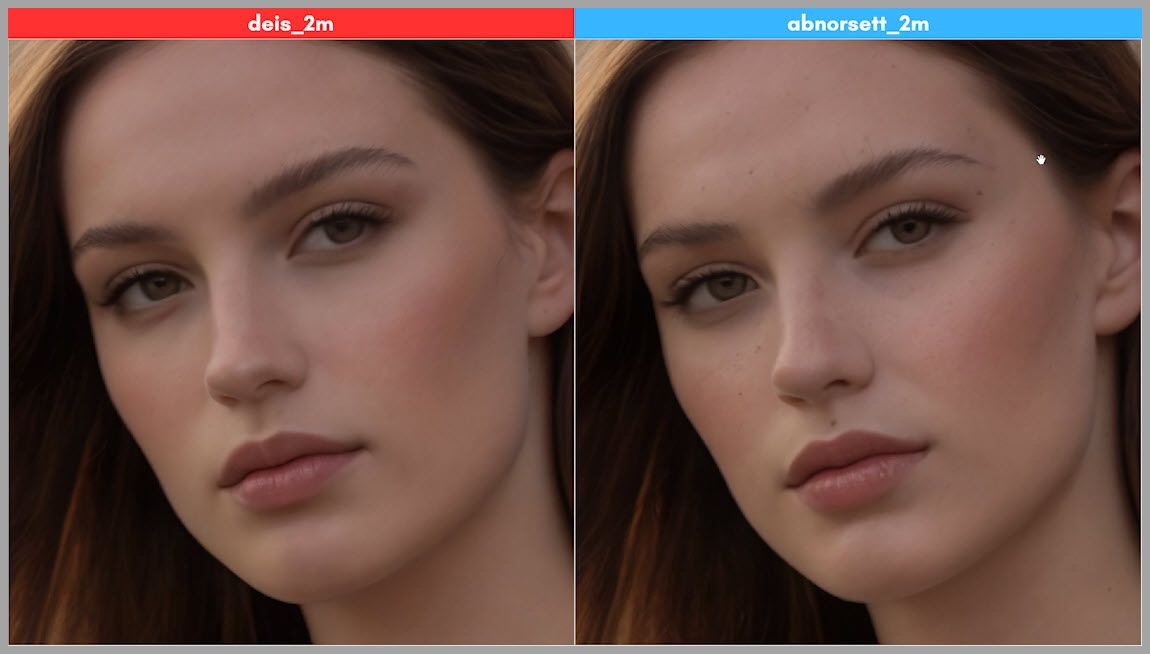
At first glance, that may sound like an advantage.
However, the additional texture sometimes comes with unwanted artifacts.
For example, I observed small stray hairs appearing above the eyebrow.
These kinds of details may seem minor at normal viewing distance, but they become very noticeable when working with extremely high-resolution images.
That is why I still prefer DEIS 2M overall.
It tends to produce a cleaner and more reliable result.
15. Comparing DEIS 2M with RES 4S Munthe-Kaas
Another good option is:
RES 4S Munthe-Kaas
This sampler can also produce strong results.
The output is detailed and generally quite attractive.
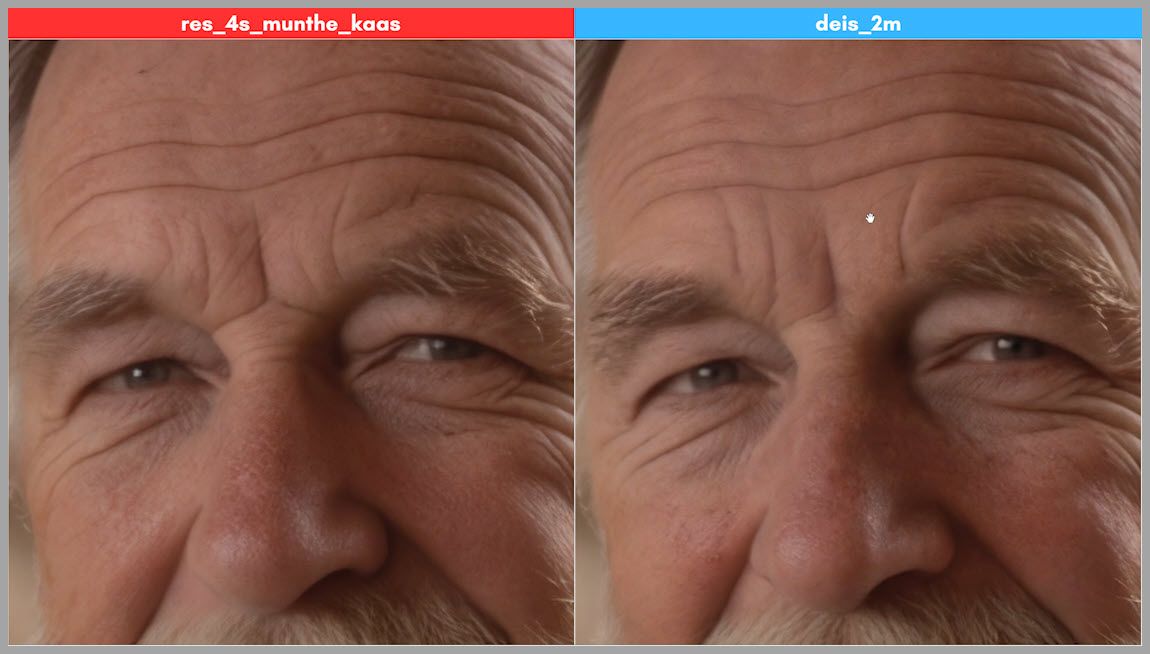
However, after comparing the results side by side, I still prefer DEIS 2M.
That does not mean Munthe-Kaas is bad.
Different image styles may respond differently, so it is absolutely worth experimenting with.
But if you just want a reliable starting point, I would begin with:
DEIS 2M
16. Controlling Final Detail with Denoising Strength
There is another major parameter in the final group that directly affects image detail.
That parameter is the denoising strength on the ClownShark Sampler.
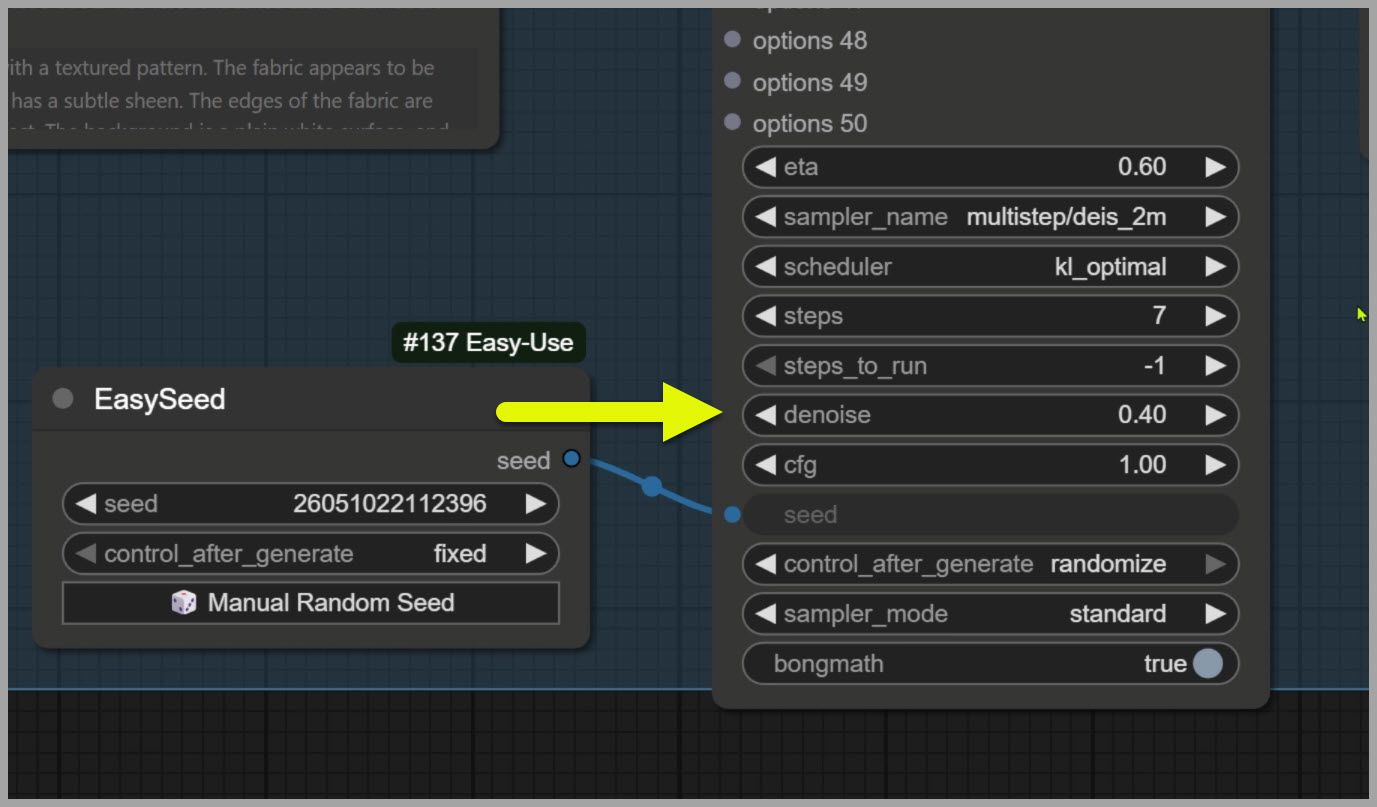
For this workflow, a useful range is:
0.4–0.6
This gives the model enough freedom to generate additional detail without completely changing the original image.
17. Using ETA to Reduce Artifacts
Another useful parameter in the final sampler is:
ETA
Increasing ETA can help clean up certain small artifacts.
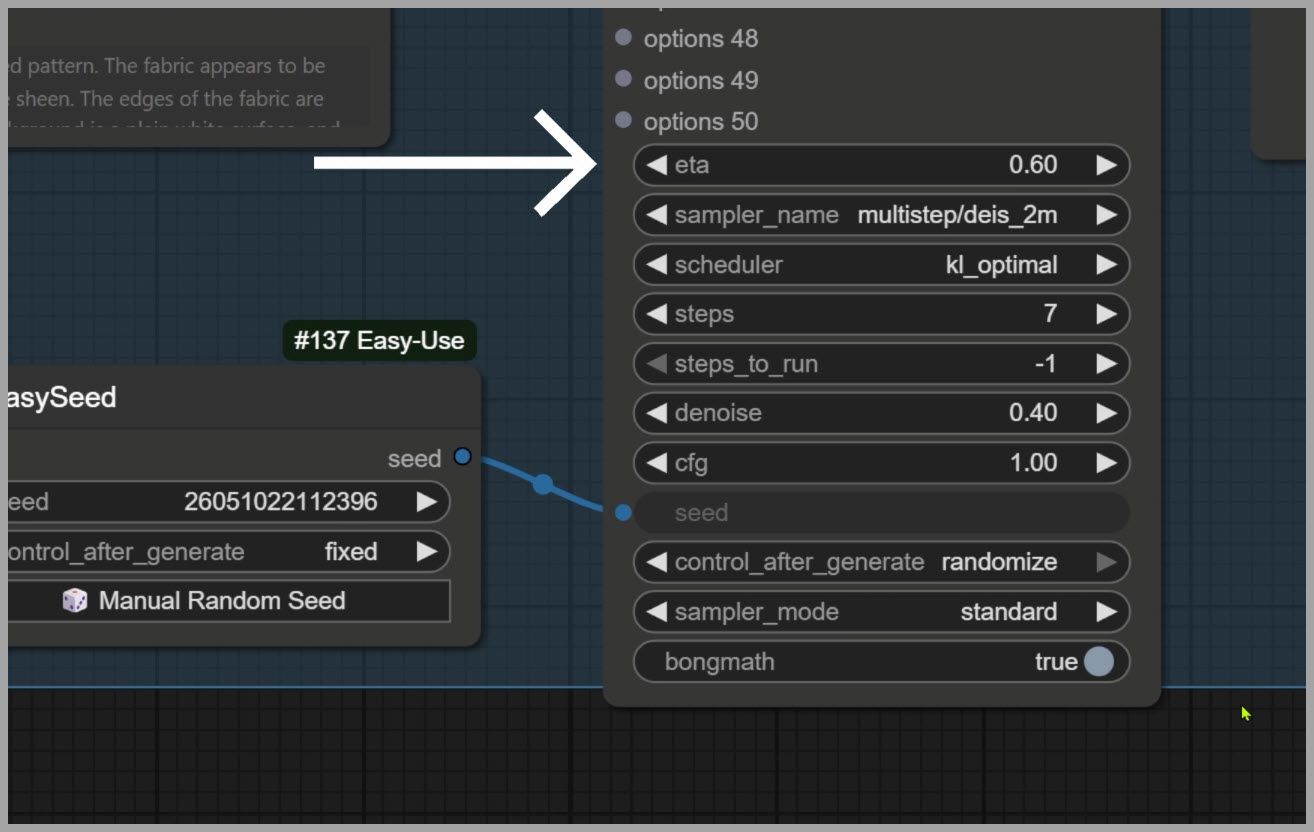
For example, it may reduce issues such as:
- Stray hairs around eyebrows
- Small sampling artifacts
- Strange facial textures
- Unnaturally smooth patches of skin
This is one of the reasons I like using the ClownShark sampler in this workflow.
It gives us another useful way to control the final image.
However, there is an important trade-off.
If ETA becomes too high, some of the fine detail may start to disappear.
The image can become cleaner, but also slightly flatter.
So ETA should be adjusted carefully.
Think of it as a balance between:
Artifact Reduction
        ↕
Detail Preservation
Do not increase ETA simply because higher sounds better.
Raise it only when you actually see artifacts that need to be corrected.
18. Final Thoughts
This workflow may look complicated when you first open the node graph, especially because the final group contains quite a few nodes.
But you do not need to understand every single connection before you can start using it.
Focus on the few parameters that actually have the biggest visual impact:
- Turbo LoRA strength
- Iterative upscale settings
- Upscale model
- Tile dimensions
- Final sampler
- Denoising strength
- ETA
Once you understand how these settings interact, the workflow becomes surprisingly straightforward.
Start small.
Lock in the composition.
Increase resolution gradually.
Use a dedicated upscale model to create a strong high-resolution base.
Then let tiled Krea 2 refinement bring out the final layer of microtexture and realism.
With a little experimentation, you can generate massive ComfyUI images filled with intricate details without requiring your GPU to process the entire image at once.
And most importantly, adjust one parameter at a time.
That will make it much easier to understand exactly how each setting affects your final image—and eventually build your own preferred high-resolution workflow.