Control AI Character Poses in ComfyUI with Krea 2
Did you know you can use a reference image to control the pose of an AI character generated with Krea 2?
In this article, I’ll show you exactly how to do that inside ComfyUI.
The basic idea is simple: we take a pose reference image, convert it into an OpenPose skeleton map, and then feed that pose information into Krea 2. The result is a newly generated AI character that follows almost the same body pose as the reference image.
At the same time, the character’s appearance, clothing, environment, and overall visual style can still be controlled independently through your text prompt.
I’ll walk you through two versions of the workflow:
- A simpler OpenPose-based workflow that is easy to understand and use.
- An advanced workflow that combines OpenPose and depth control for much better pose accuracy and higher-resolution output.
YouTube Tutorial:
Let’s start with the simple version.
Part I: The Simple OpenPose Workflow
1. Load the Basic Models
The first node group in the workflow is responsible for loading the basic models required for image generation.
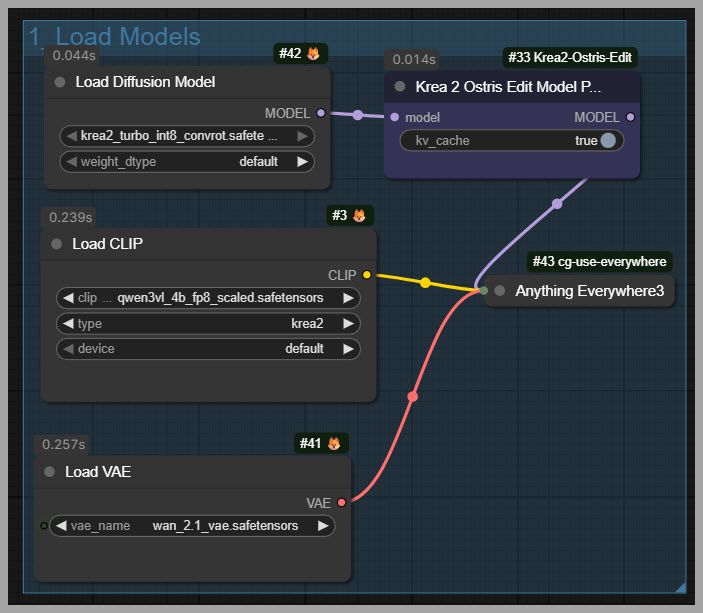
This section prepares the model environment before we start processing the pose reference.
Once the models are loaded, we can move on to the reference image itself.
2. Load the Pose Reference Image
The next step is to load the image containing the pose you want the AI character to follow.
This image does not necessarily need to contain the same person, clothing, or visual style you want in the final result.
We mainly care about the body position.
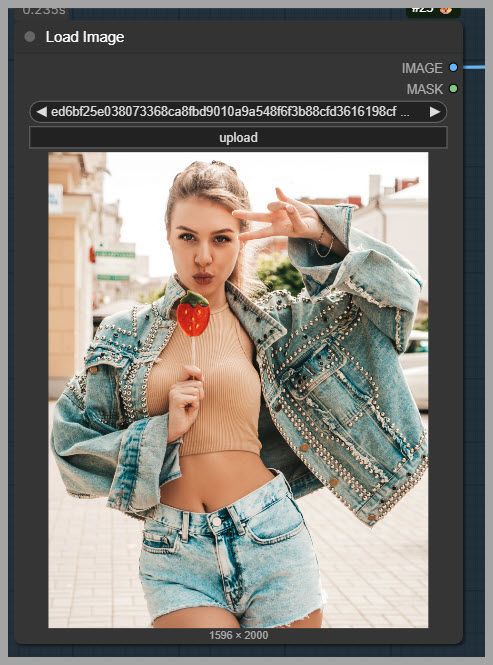
For example, you could use a photograph of a real person as the pose reference and then generate a completely different AI character wearing fantasy armor, standing in a futuristic city, while still keeping approximately the same pose.
3. Remove the Background
After loading the reference image, the workflow removes its original background.
The background is then replaced with white.
This gives us a cleaner image to work with and makes the later pose-processing steps more predictable.
The important information here is the character’s body position, so removing distracting background elements helps isolate the subject.
4. Add Extra Space with the Image Pad Node
Next, I use an Image Pad node to add additional white space around the edges of the reference image.
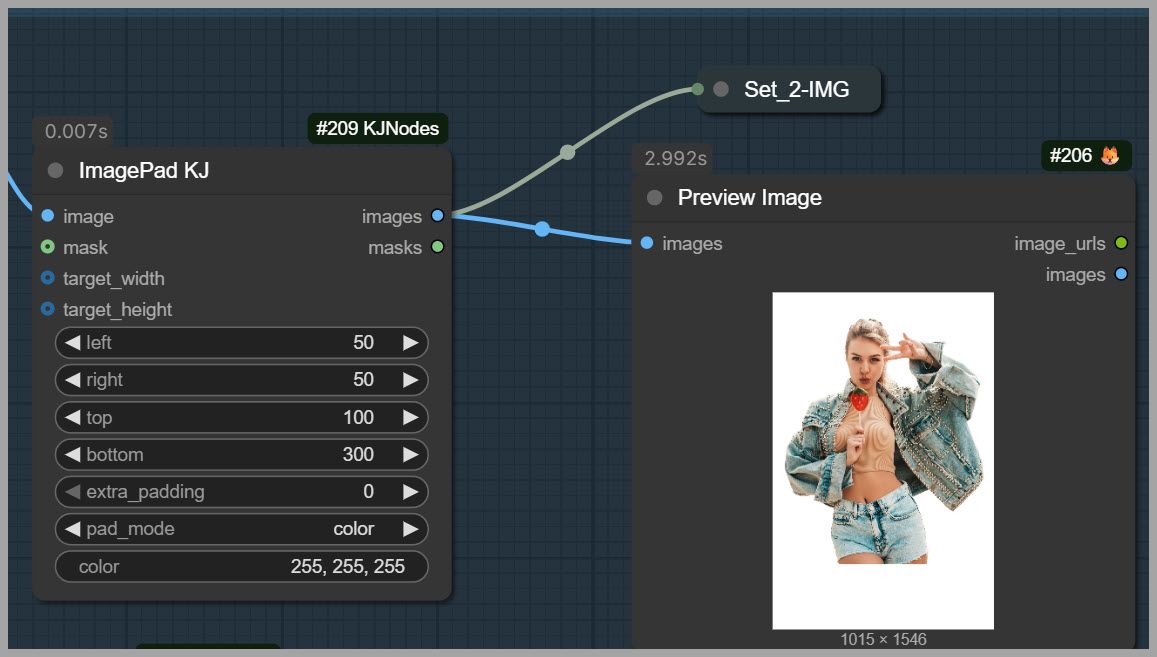
This may look like a minor step, but it can have a noticeable effect on the final composition.
Imagine that your original pose reference is tightly cropped.
Perhaps there is almost no space above the person’s head, and most of their legs are outside the frame.
If we use that reference exactly as it is, the generated character may also end up feeling cramped inside the final image.
By adding padding, we create more breathing room around the pose.
For example:
- Add extra white space above the head.
- Add space around the left and right sides if necessary.
- Add more room toward the bottom if the original legs are heavily cropped.
- Use the padded image as the new pose-processing input.
This can help the final generated character appear more naturally positioned within the image.
In my example, the original reference had very little room above the subject’s head and much of the legs were cropped.
After applying the Image Pad node, the final output had comfortable space above the head and showed much more of the character’s legs.
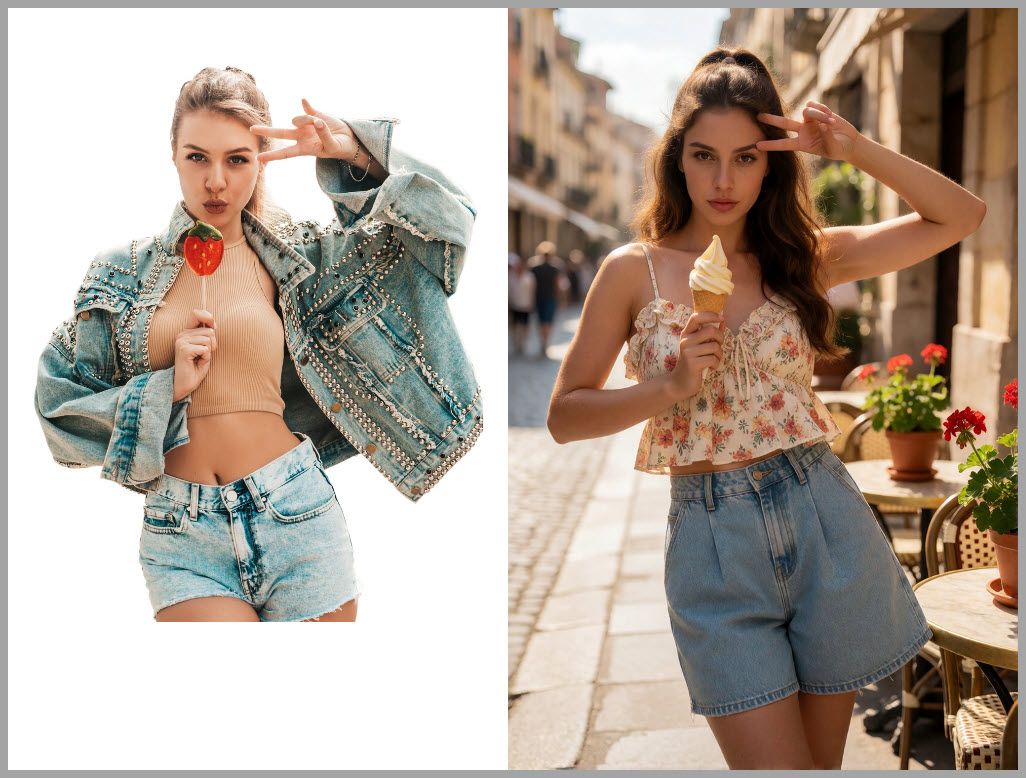
So padding is not only about image size. It is also a useful composition-control tool.
5. Generate a Text Description of the Pose
The next part of the workflow includes a helper node that generates a text description of the character’s pose.
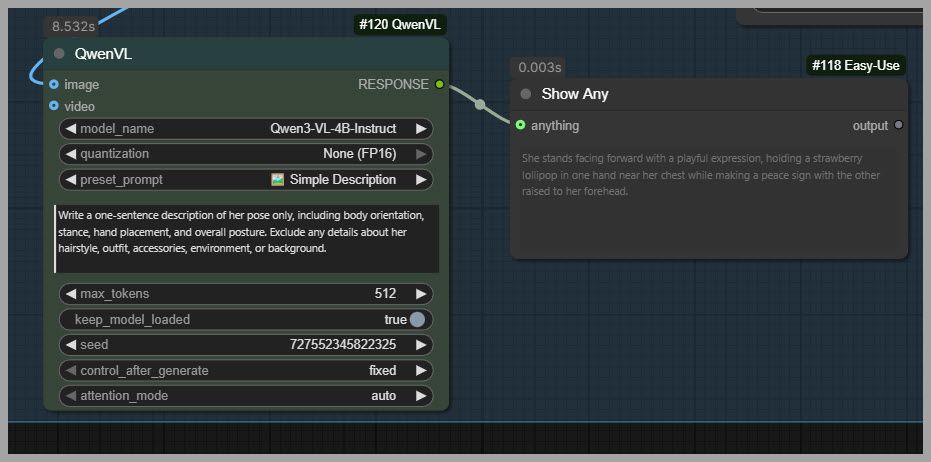
This is extremely useful because describing a complicated pose manually can be tedious.
Instead, the node analyzes the reference and produces a text description that you can copy and paste into your main generation prompt.
For example, the description might explain:
- Which direction the character is facing.
- How the arms are positioned.
- Whether one leg is bent.
- How the torso is rotated.
- Whether the person is standing, leaning, sitting, or crouching.
You can then combine that pose description with your creative prompt.
The text prompt can define everything else, such as:
- Character appearance.
- Hair style.
- Clothing.
- Lighting.
- Environment.
- Camera style.
- Art direction.
This means the pose reference controls the structure, while the text prompt controls the visual identity.
6. Convert the Reference into an OpenPose Skeleton
The workflow then converts the prepared reference image into an OpenPose skeleton map.
An OpenPose map simplifies the human figure into lines and joints.
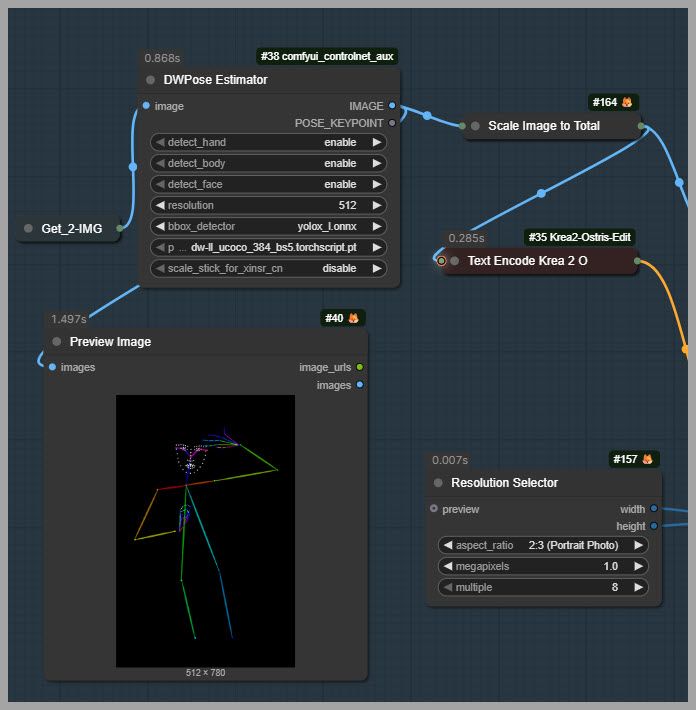
Instead of showing skin, clothing, textures, and background information, it represents the body using a basic skeletal structure.
This makes it easier to extract the essential body position.
However, there is one important problem.
Krea 2 normally cannot understand a pose skeleton image by itself.
If you simply feed an OpenPose skeleton into Krea 2 without additional support, the model may not know how to interpret it as pose-control information.
That is where the OpenPose Control LoRA comes in.
7. Use an OpenPose Control LoRA
A community-trained LoRA allows Krea 2 to understand OpenPose skeleton maps.
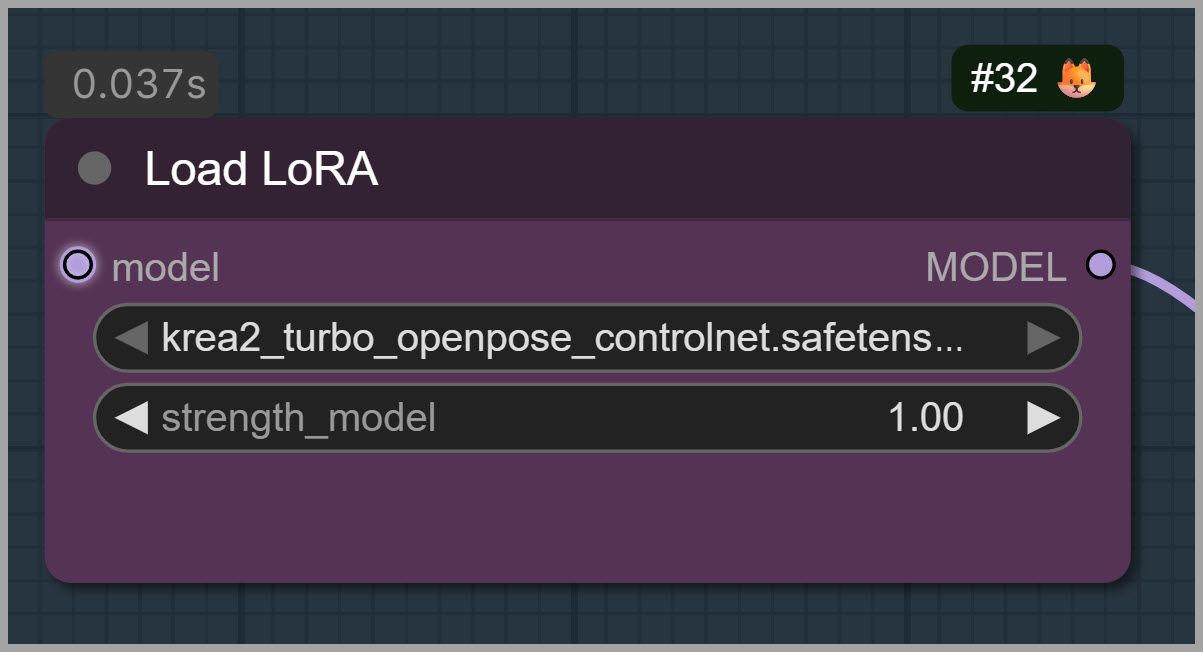
With this LoRA enabled, the skeleton image becomes meaningful pose guidance rather than just an unusual image made of lines.
The workflow sends the pose skeleton into the image-generation process together with the text prompt.
Krea 2 can then generate a completely new character while following the structure defined by the skeleton.
This is what makes the workflow so useful.
You are not copying the reference character.
You are borrowing the pose.
8. Set the Aspect Ratio
The workflow also gives you control over the aspect ratio of the final image.
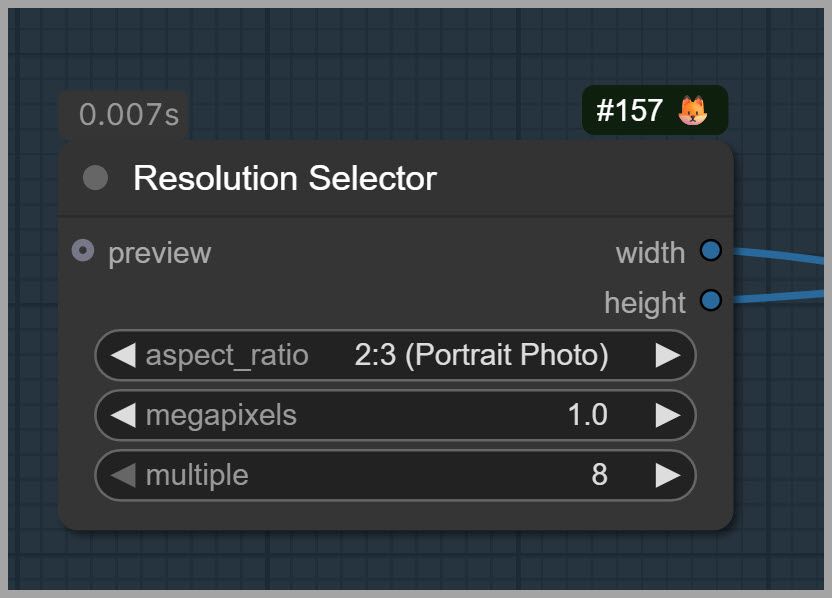
You should choose an aspect ratio that matches your intended composition.
For example:
- A tall portrait ratio works well for full-body characters.
- A square format may work better for centered compositions.
- A landscape format can provide more room for environmental scenes.
Keep in mind that the aspect ratio and the padding of the pose reference work together.
If your target image is much taller or wider than the source pose reference, you may want to prepare the reference accordingly.
9. Keep the Initial Resolution Around 1 Megapixel
For the megapixel setting, I usually keep the workflow at around 1 megapixel.
There is a practical reason for this.
If you push the initial generation resolution much higher, Krea 2 can begin producing unusual anatomy or pose errors.
At lower resolutions, the model generally has an easier time maintaining the body structure.
So for the simple workflow, 1 megapixel is a reliable starting point.
Download the simple workflow:
https://drive.google.com/drive/folders/1k9pyXr4PGbznwzmSmWk5cjc8K65bxtEw
Part II: Where the Simple Workflow Starts to Fail
The simple workflow works surprisingly well for many poses.
However, it has two important limitations.
First, it is not ideal for directly producing clean 2-megapixel images.
Second, a simple skeleton does not always capture the full three-dimensional complexity of a human pose.
Let’s look at why.
10. OpenPose Does Not Always Show Front and Back Relationships
Consider a pose where one arm is held tightly behind the person’s back while gripping the other arm.
A normal photograph makes this relationship obvious.
You can clearly see that the arm is behind the torso.
But when we convert the image into a simple skeleton, that information becomes ambiguous.
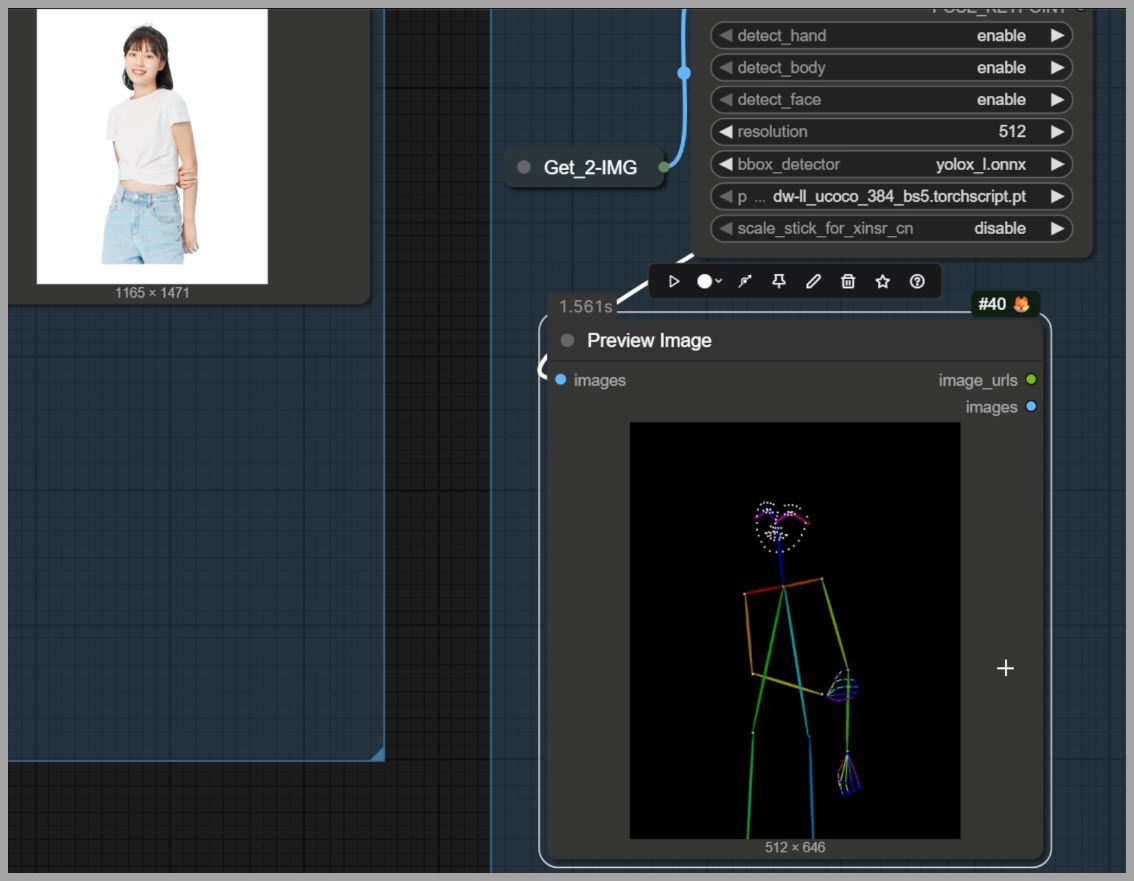
The skeleton may show the elbow and wrist positions, but it does not clearly communicate whether the arm passes:
- In front of the torso, or
- Behind the torso.
From the skeleton alone, both interpretations may look plausible.
This creates a serious problem for image generation.
11. The AI Can Misinterpret the Pose
When I tested this kind of reference with the simple workflow, Krea 2 failed to reproduce the pose correctly.
Instead of placing the arm behind the back, it moved the arm across the front of the character’s stomach.
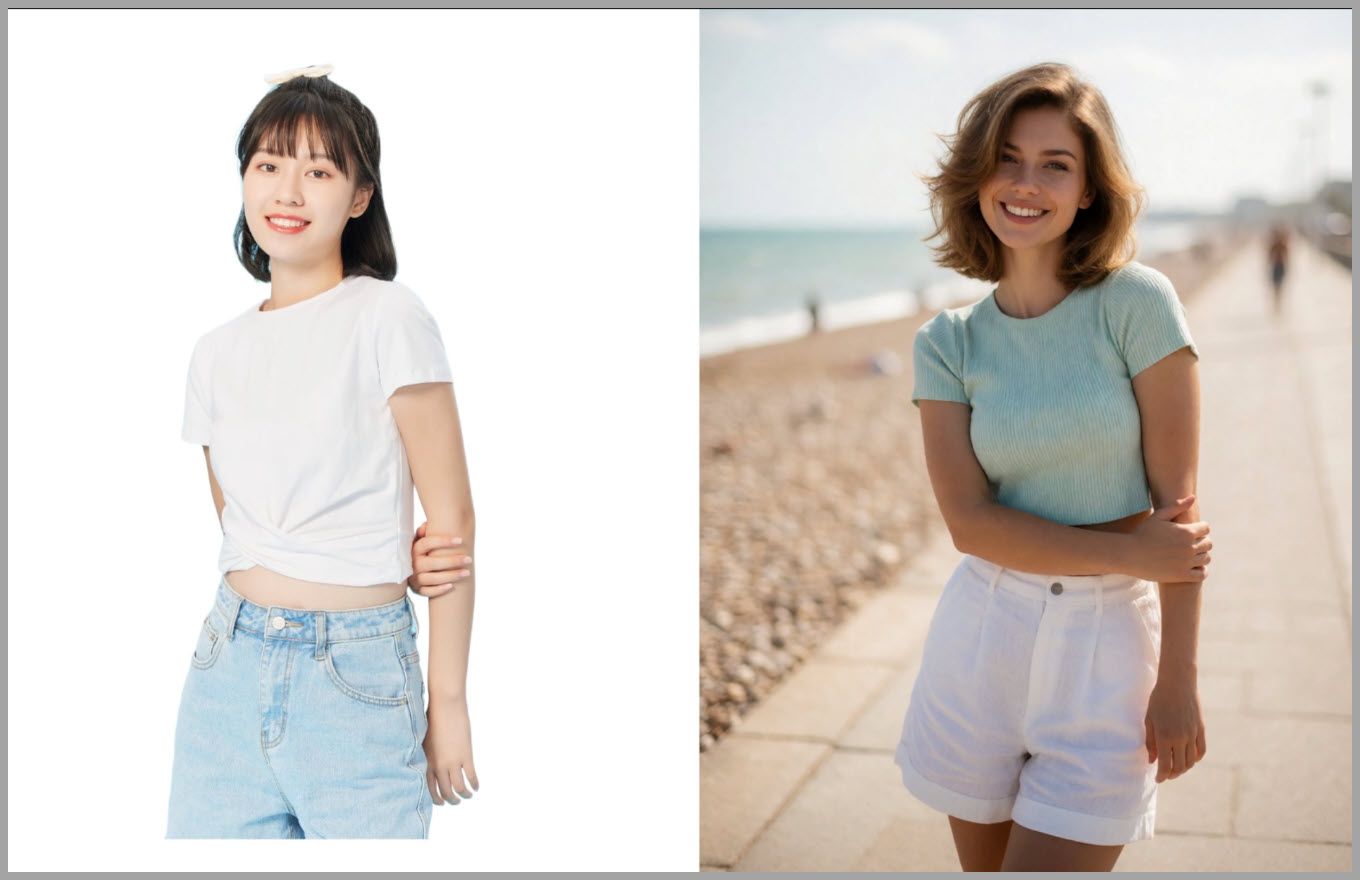
The joint positions were somewhat related to the skeleton, but the three-dimensional relationship was wrong.
This illustrates one of the biggest weaknesses of OpenPose-only control.
OpenPose is excellent at showing where body joints are located in two-dimensional image space.
But it is much weaker at describing depth.
12. Increasing the Resolution Can Make Things Worse
You might think that increasing the generation resolution would solve the problem.
Unfortunately, it often does the opposite.
When I increased the workflow to around 2 megapixels, the pose became even more unstable.
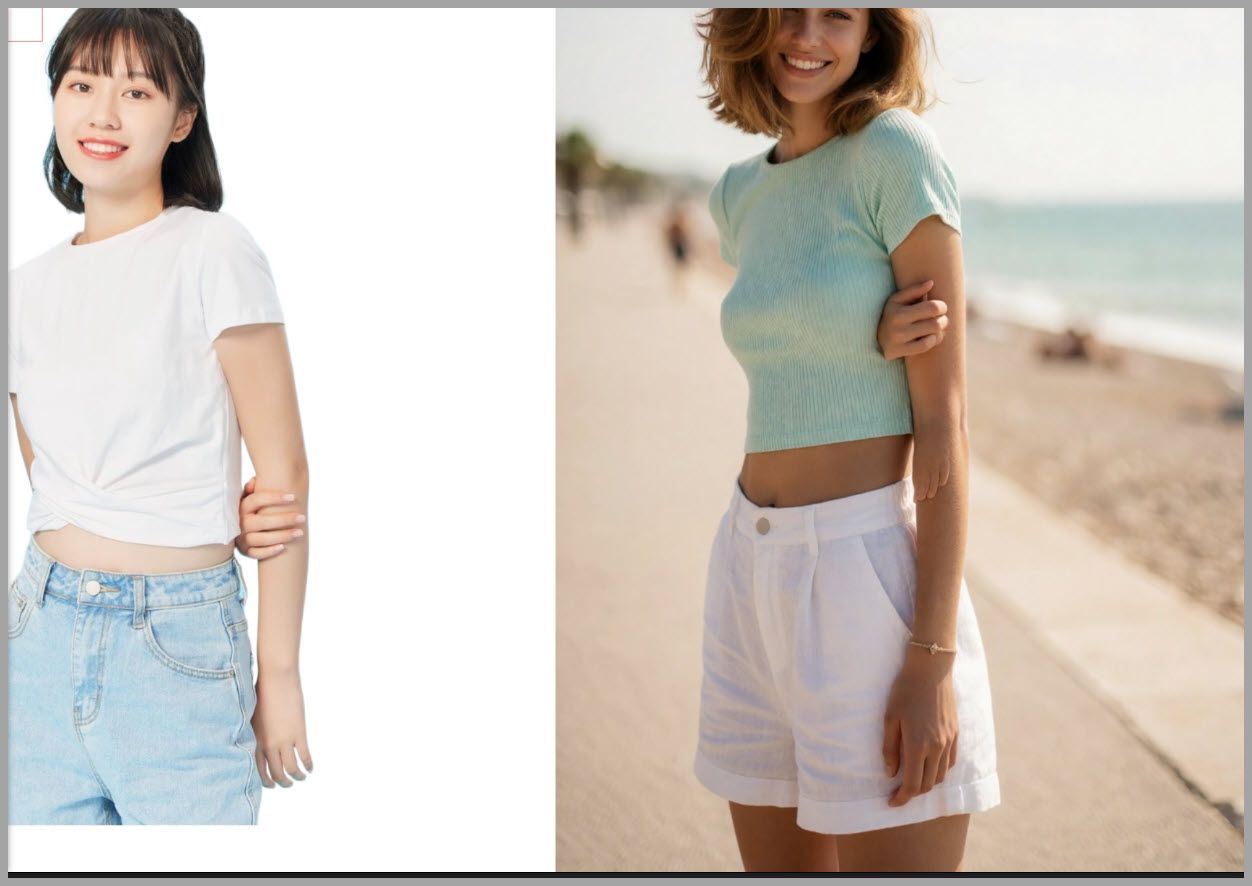
Anatomy problems started appearing.
For example, you may see:
- Random fingers blending into an arm.
- Extra finger-like shapes.
- Distorted wrists.
- Strange elbows.
- Merged limbs.
- Inconsistent body proportions.
The generated image may have more pixels, but those extra pixels do not guarantee better structure.
This is exactly why I created the advanced workflow.
Part III: The Advanced OpenPose + Depth Workflow
The advanced version adds a second type of structural guidance: depth control.
Instead of relying entirely on the OpenPose skeleton, we generate both:
- An OpenPose-controlled version.
- A depth-controlled version.
We then combine the strengths of both.
This produces much better results for complicated poses.
In my example, the advanced workflow correctly placed the character’s arm behind the back while also producing a much larger final image at approximately 1776 × 2368 pixels.
So how does it work?
13. Add a Depth Control Node Group
The advanced workflow contains a secondary control branch built around a Depth Control LoRA.
A depth map represents how far different parts of the image are from the camera.
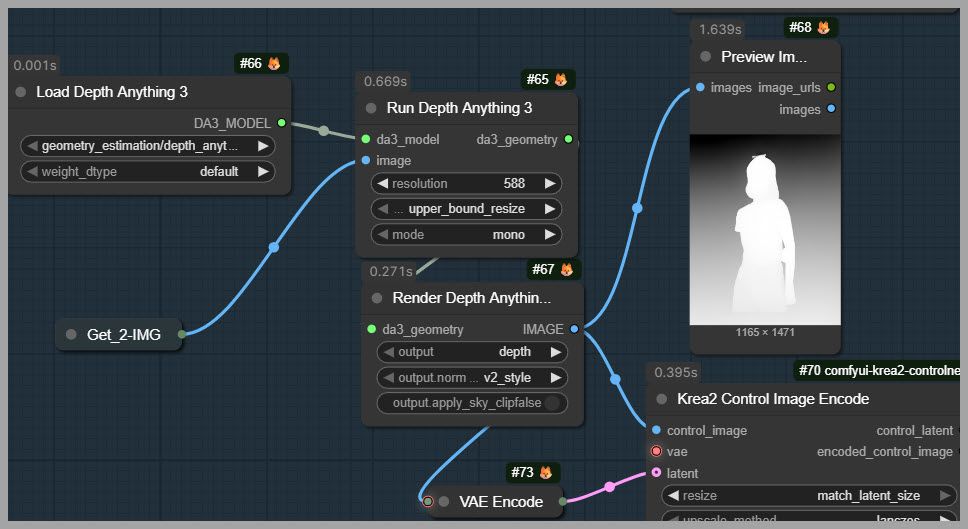
Instead of showing only joints, it describes the three-dimensional structure of the subject.
Objects closer to the camera are represented differently from objects farther away.
This gives the model information that an OpenPose skeleton cannot provide.
For complex human poses, that information can be extremely valuable.
If an arm is behind the torso, the depth map has a better chance of preserving that relationship.
14. Send the Depth Map into the Advanced KSampler
The generated depth map is fed into an advanced KSampler.
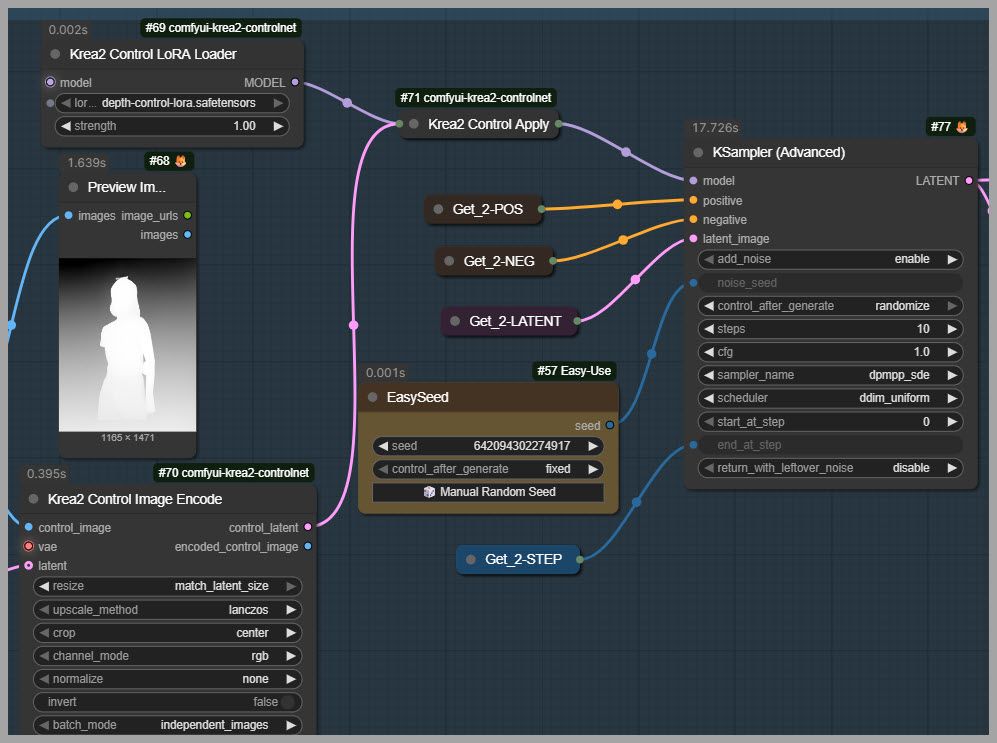
In this setup, I configure the total number of sampling steps to 10.
However, the depth branch does not actually finish all 10 steps immediately.
Instead, the sampling process is intentionally stopped early.
The ending step is set to 4.
This means we are creating a partially sampled result rather than a finished image.
That is important because we are going to combine this partial result with another partially sampled image from the OpenPose branch.
15. Examine the Depth-Controlled Intermediate Result
When we preview the result from the depth branch, we can see that it gets one important part of the pose correct.
The arms are positioned behind the back.
That is a major improvement over the simple OpenPose result.
However, there is another problem.
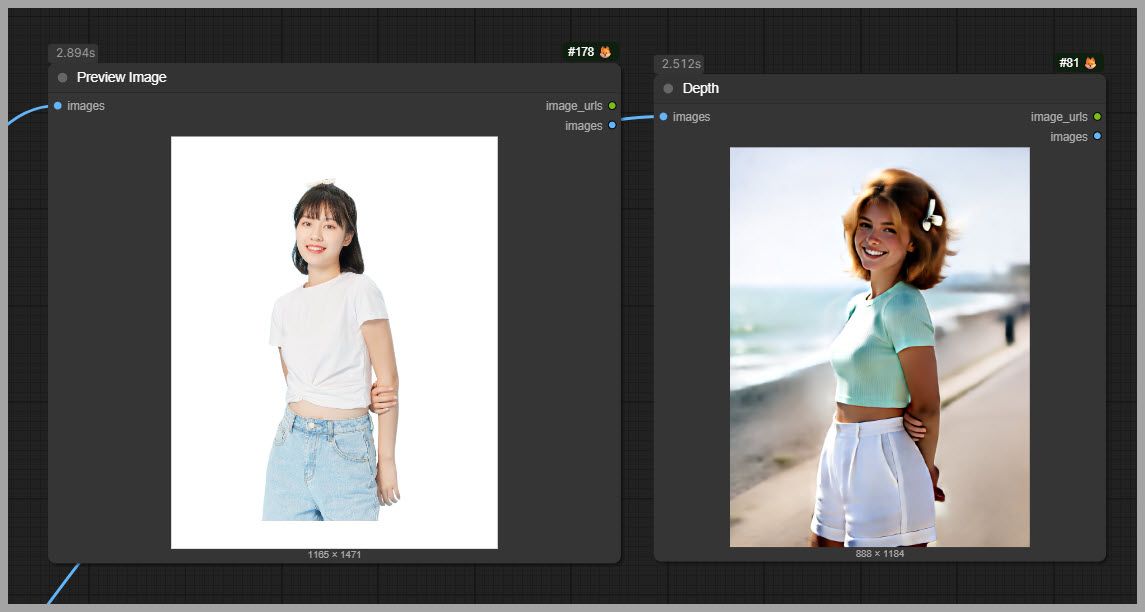
The character’s torso is rotated too far toward the right side.
The original pose reference is facing the camera more directly.
So the depth-controlled image solves the arm-placement problem but introduces a body-direction problem.
This means depth control alone is still not perfect.
16. Examine the OpenPose-Controlled Intermediate Result
Now let’s look at the OpenPose control branch.
This branch is also stopped early at step 4.
Like the depth result, it is technically incomplete.
However, the pose is already recognizable.
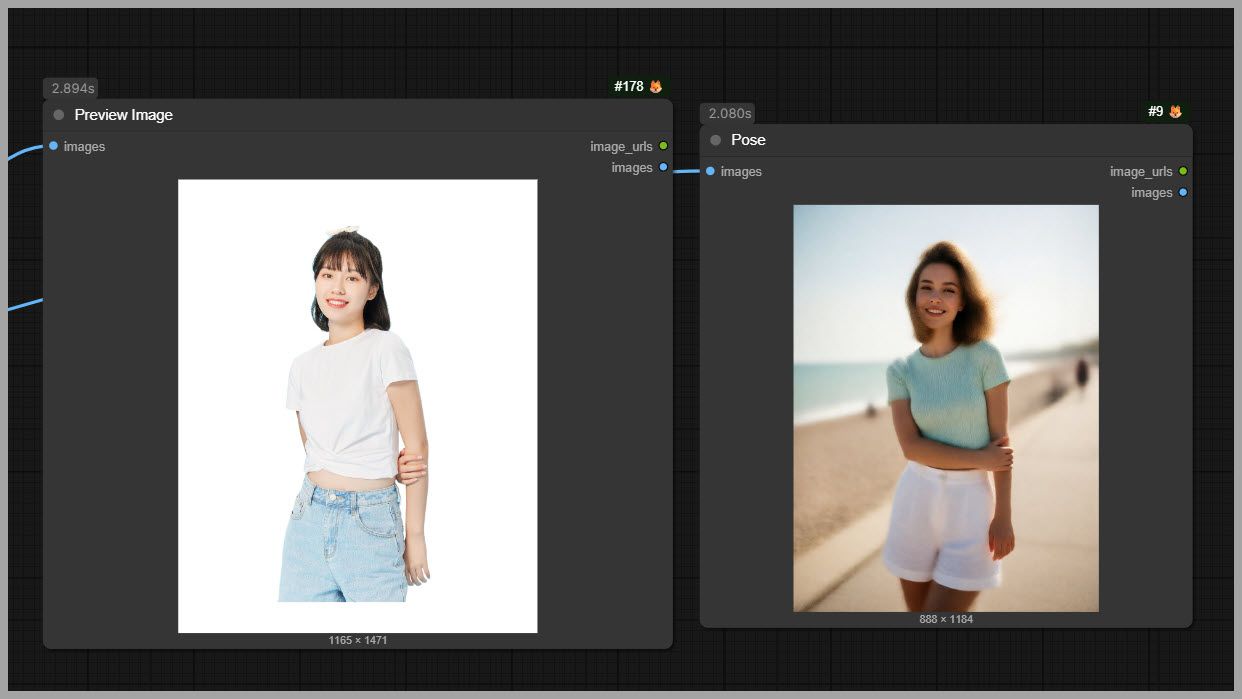
This time, the character’s torso is facing the camera much more accurately.
That part matches the original reference better than the depth-controlled version.
Unfortunately, the arm is wrong.
Instead of going behind the character’s back, it bends across the front of the torso.
So now we have two incomplete images, each with different strengths.
The depth branch gives us:
- Better arm placement.
- Better front-versus-back understanding.
The OpenPose branch gives us:
- Better body direction.
- Better overall pose alignment.
This creates an interesting opportunity.
Instead of choosing one result or the other, we can combine them.
Part IV: Blend the Two Latent Images
17. Use the Latent Blend Node
To combine the two branches, I use a Latent Blend node.
This node takes the two partially generated latent images and mixes them together.
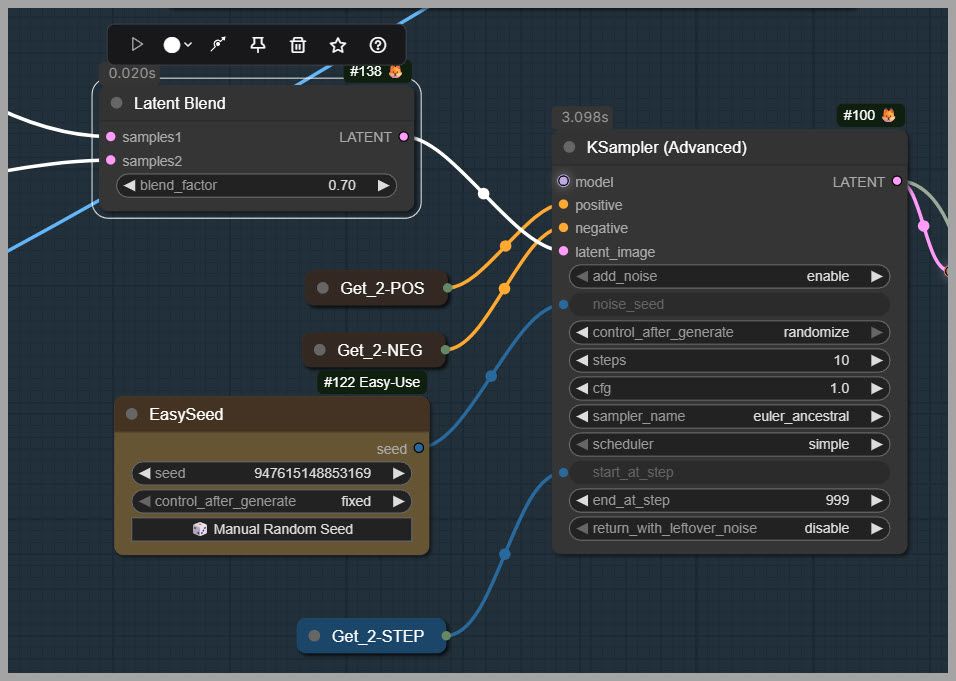
Because the images are still in latent form, we are combining their structural information before the image-generation process is fully completed.
This is much more powerful than simply blending two finished images together in an image editor.
We are effectively giving the generation process a hybrid structure.
One latent contributes better body orientation.
The other contributes better depth relationships.
The final image can benefit from both.
18. Set the Blend Factor
The Latent Blend node allows you to control how much influence each latent image contributes.
In my example, I use a blend factor of 0.7.
This means the blend is approximately:
- 70% OpenPose latent.
- 30% depth latent.
The reason this works well is that the OpenPose version already has the better overall body orientation.
We want to preserve most of that structure.
At the same time, we borrow enough information from the depth latent to correct the arm placement.
The resulting pose is much closer to the original reference.
19. Adjust the Blend Depending on the Pose
A blend factor of 0.7 is not a universal rule.
Different poses may require different values.
If OpenPose is already doing a good job and only needs a small amount of depth correction, you may want a stronger OpenPose contribution.
If the pose contains a lot of overlapping limbs or complicated front-versus-back relationships, you may want to give the depth branch more influence.
The best approach is to experiment.
For example, you could test:
- A 0.8 blend for stronger OpenPose influence.
- A 0.7 blend as a balanced starting point.
- A 0.6 blend for more depth influence.
- A 0.5 blend if both branches are contributing equally useful information.
The goal is to identify which branch has the stronger structure for your particular pose and weight the blend accordingly.
Part V: Upscale and Refine the Image
Once the blended pose looks correct, we can move on to the final refinement stage.
This is where we increase the resolution and add more visual detail.
20. Upscale the Image by 2×
The first step in the final node group is to upscale the blended image by 2 times.
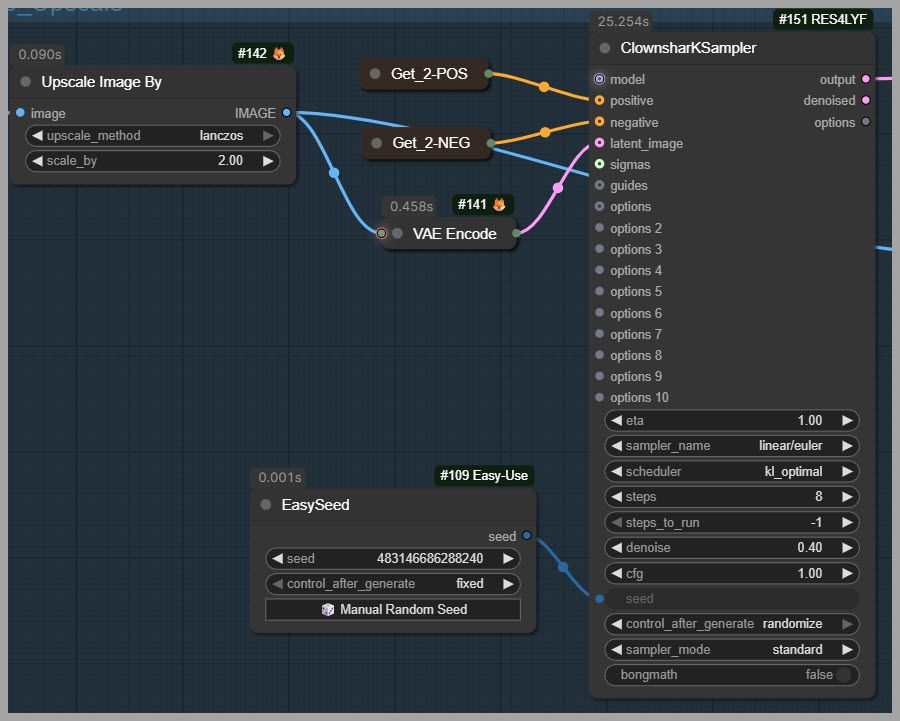
Instead of trying to generate the entire image at a very high resolution from the beginning, we first establish the correct pose at a more stable resolution.
Then we enlarge it.
This approach is much safer for anatomy.
The basic strategy is:
- Generate a structurally correct lower-resolution image.
- Blend the pose-control information.
- Upscale the successful result.
- Resample it to add detail.
This helps separate structural generation from high-resolution refinement.
21. Resample the Upscaled Image
After upscaling, the image is passed through another sampling process.
The purpose of this stage is not to redesign the pose.
Instead, we want to add fine detail while keeping the established composition stable.
This refinement step can improve:
- Skin detail.
- Hair strands.
- Clothing texture.
- Fabric folds.
- Lighting transitions.
- Facial features.
- Environmental detail.
However, we need to be careful because additional sampling can sometimes change the image too aggressively.
22. Use the KL Optimal Scheduler
For the refinement stage, I use the KL Optimal scheduler.
One of the main reasons I like this scheduler here is that it helps preserve the pose while adding detail.
At this point in the workflow, the pose has already required a lot of work to get right.
We do not want the final refinement pass to destroy it.
The scheduler helps keep the image structurally stable while allowing the upscaled version to gain more detail.
23. Increase Eta to Reduce Unnatural Skin Details
There is one issue that can sometimes appear during refinement.
The resampling process may introduce too many small skin details.
Instead of realistic skin texture, you might get:
- Excessive blemishes.
- Strange pores.
- Uneven skin artifacts.
- Unnatural micro-textures.
- Random marks.
To reduce this problem, I increase the eta value.
The default value is around 0.5.
In this workflow, I increase it to 1.
This helps smooth out some of the excessive detail and produces cleaner-looking skin.
Again, this is a setting you can adjust depending on the result.
If your image already looks smooth enough, you may not need to push eta as high.
If the refinement stage creates too many strange details, increasing eta can help.
Part VI: The Final Result
After the final upscale and resampling process, we end up with a much more detailed image.
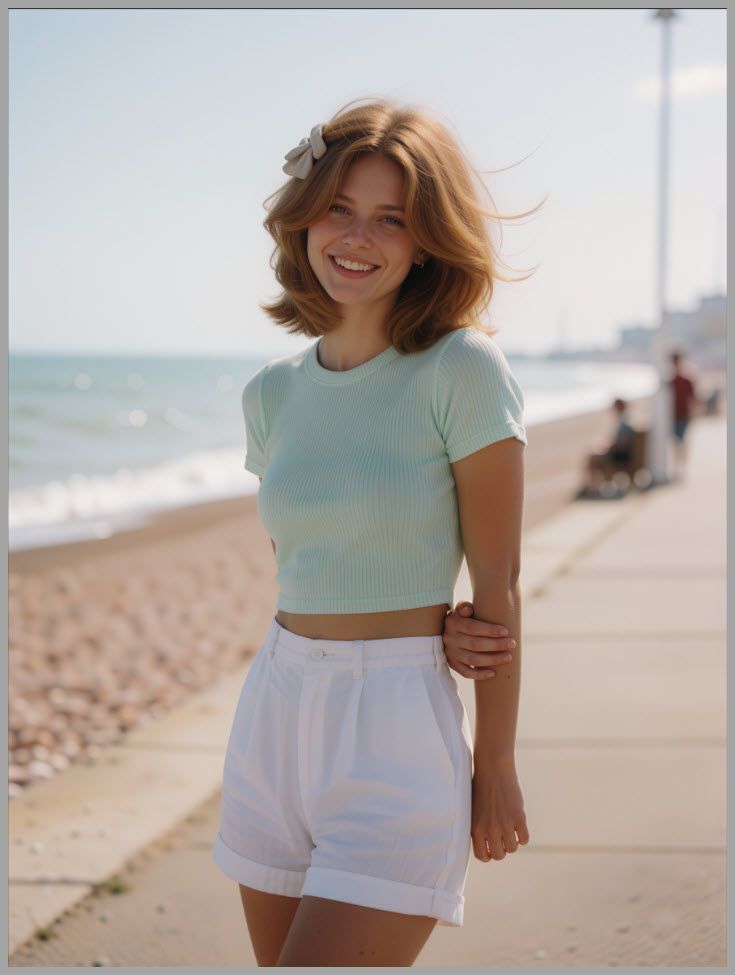
In my example, the final resolution is approximately:
1776 × 2368 pixels
More importantly, the difficult pose is preserved.
The arm stays correctly behind the character’s back, while the torso remains much closer to the direction shown in the original reference.
The final image also gains noticeably more detail from the upscaling and refinement process.
This gives us the best of both worlds:
- Strong pose fidelity.
- Higher-resolution output.
Final Thoughts
Using a reference pose with Krea 2 becomes much more powerful once you go beyond basic image prompting.
A simple OpenPose workflow already gives you a practical way to transfer body positions from one image to a completely different AI character.
But for difficult poses, especially those involving overlapping limbs or important depth relationships, OpenPose alone can struggle.
That is where the advanced workflow becomes useful.
By combining an OpenPose Control LoRA, a Depth Control LoRA, partial sampling, Latent Blend, and controlled upscaling, you can preserve complicated poses much more reliably while still producing a detailed, high-resolution final image.
If you are experimenting with AI character generation in ComfyUI, this workflow gives you a flexible way to separate pose, appearance, and composition while maintaining much tighter control over the final result.
Gain exclusive access to advanced ComfyUI workflows and resources by joining our community now!