Face Swapping with Stable Diffusion Latest Model in A1111: IP-Adapter Face ID Plus V2
In the realm of AI art generation, Stable Diffusion’s A1111, augmented by its powerful extension ControlNet, emerges as a pinnacle of innovation and control.
Among its array of control types, the IP Adapter shines as a beacon of versatility.
Not only does it facilitate operations similar to Midjourney’s “Image Reference” but it also excels in the art of transforming portraits through face swapping.
The evolution of IP Adapter models has been a journey of continuous improvement, with earlier versions like Plus Face laying the groundwork for what has become a transformative tool in digital artistry.
The introduction of the Face ID Plus V2 model marks a significant leap forward, showcasing enhanced capabilities that I, through personal experimentation, found to outshine its predecessors.
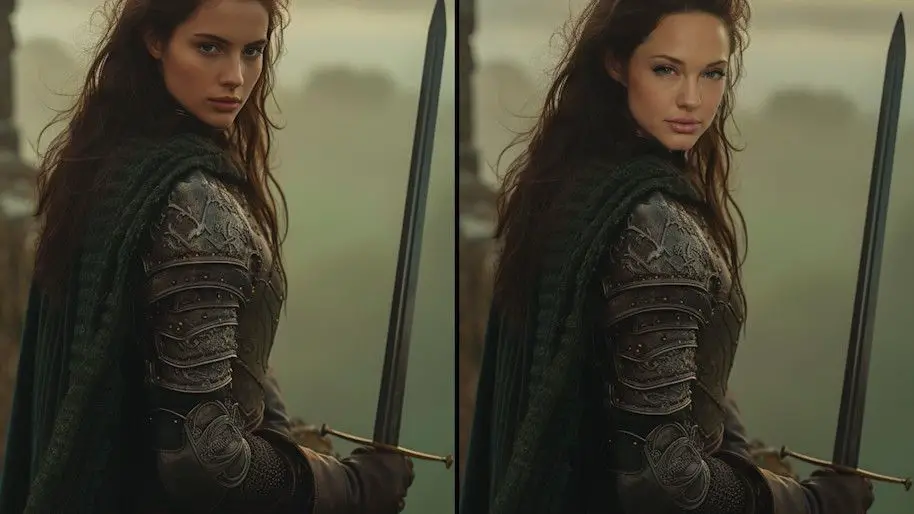
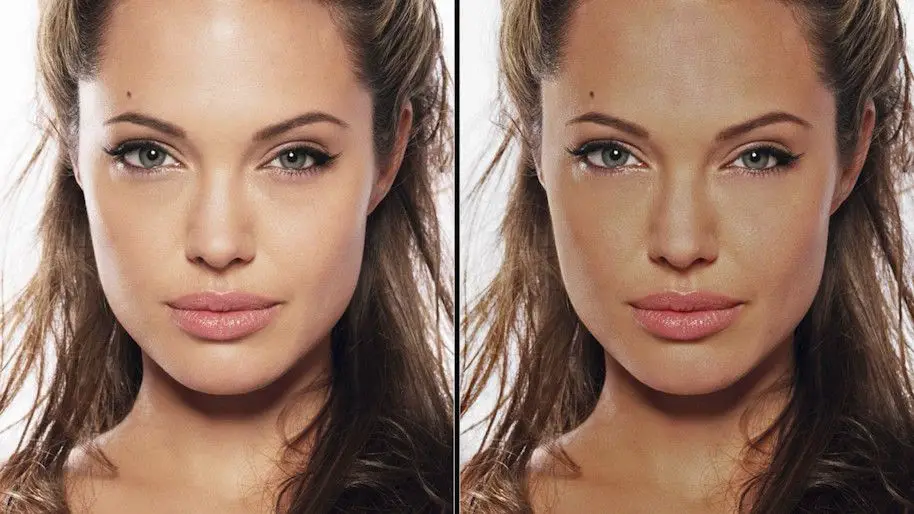
My endeavor to merge the visage of the iconic Hollywood actress Angelina Jolie with various characters generated by Midjourney resulted in creations that were nothing short of captivating.
Impressive, isn’t it? Allow me to guide you through the installation and utilization process of this remarkable model within the A1111.
For those who love diving into Stable Diffusion with video content, you’re invited to check out the engaging video tutorial that complements this article:
Preparing for the Transformation
Our adventure begins with the IP Adapter in ControlNet and the incorporation of OpenPose to preserve the original character’s head pose.
Arriving later to the scene, the IP Adapter necessitates an up-to-date version of ControlNet for those wielding older installations. To embark on this journey, the following treasures must be acquired:
- Open Pose Model
- IP-Adapter FaceID Plus V2 model and Lora
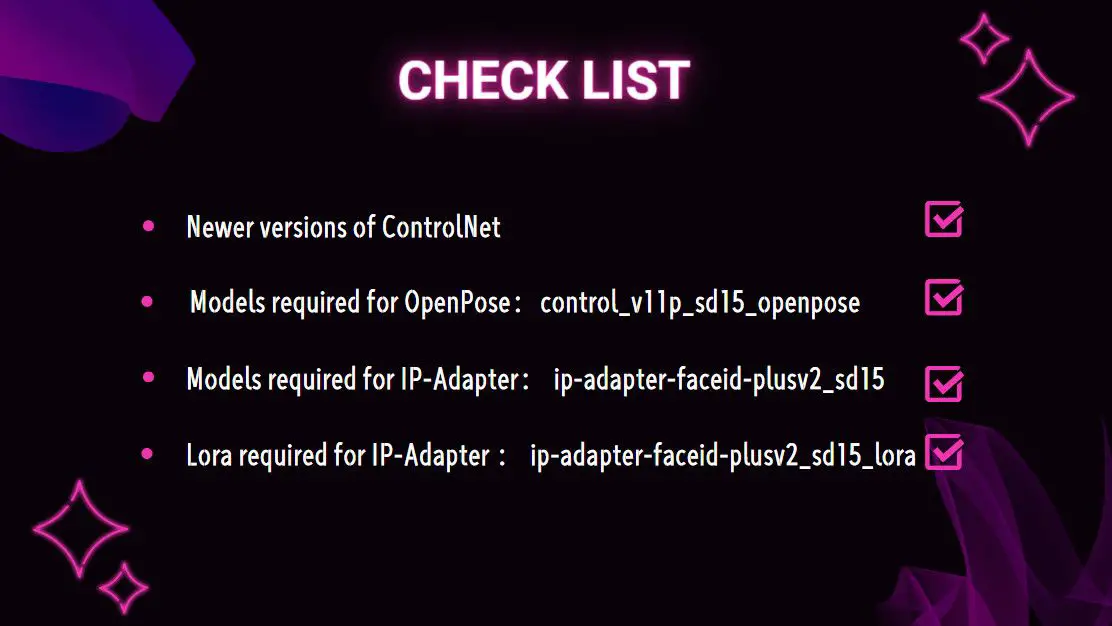
These files play pivotal roles: the IP Adapter for the face alteration, OpenPose for maintaining the head pose, and Lora for ensuring facial ID consistency. These files reside on HuggingFace, ready for your retrieval.
Securing the Models and Lora
Acquiring the Open Pose Model
1️⃣ Begin by navigating to the HuggingFace webpage dedicated to Control Net models (HuggingFace’s ControlNet Page). Here, you’ll find a comprehensive listing of all Control Net base models alongside their respective configuration files.
2️⃣ As you explore the page, direct your search towards entries tagged with “Open Pose.” This will lead you to the specific resources necessary for your endeavor.
3️⃣ Within the search results, you’ll encounter two distinct file types: the .pth files, which are the actual model files, and the .yaml files, serving as model configuration guides. Given that the .yaml configuration is typically pre-included in the Control Net setup, your primary focus should be on obtaining the .pth model files.
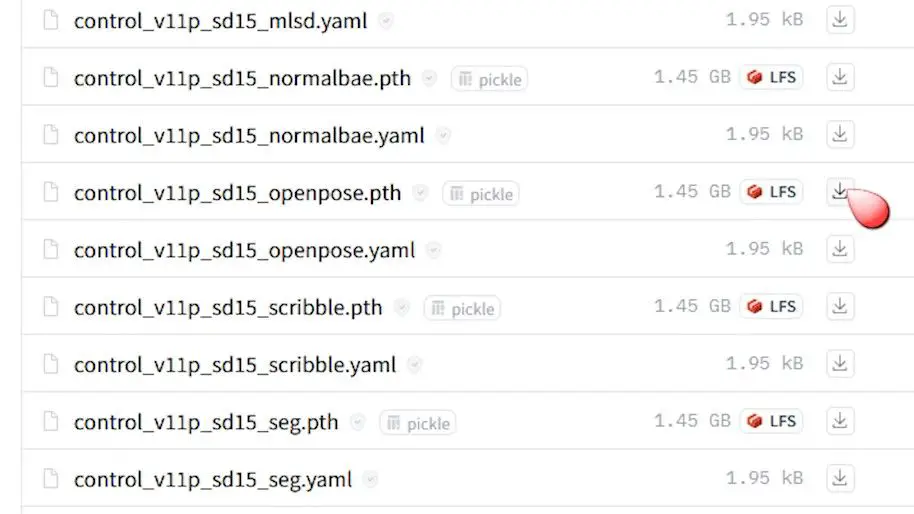
4️⃣ Proceed by clicking the “Download” button. This action initiates the download of the crucial .pth file, marking a pivotal step in your setup process.
5️⃣ Upon the successful download, integrate the file into your system by placing it in the stable-diffusion-webui\extensions\sd-webui-controlnet\models directory. This ensures the model is correctly positioned within the framework, ready for activation and use.
Fetching the Face ID Model and Lora for IP Adapter
1️⃣ Begin by accessing another crucial HuggingFace download page, specifically tailored for the IP Adapter Face ID Plus sd15 and sd15 lora files (HuggingFace’s IP-Adapter FaceID Page). These files are meticulously crafted for the sd 1.5 version, ensuring optimal performance and compatibility across various Control Net functionalities.
2️⃣ Engage with the “Download” button to initiate the acquisition of these essential files. It’s noteworthy that the ‘sd15’ designation indicates their suitability for the SD 1.5 model iteration, distinguishing them from any SDXL version counterparts.
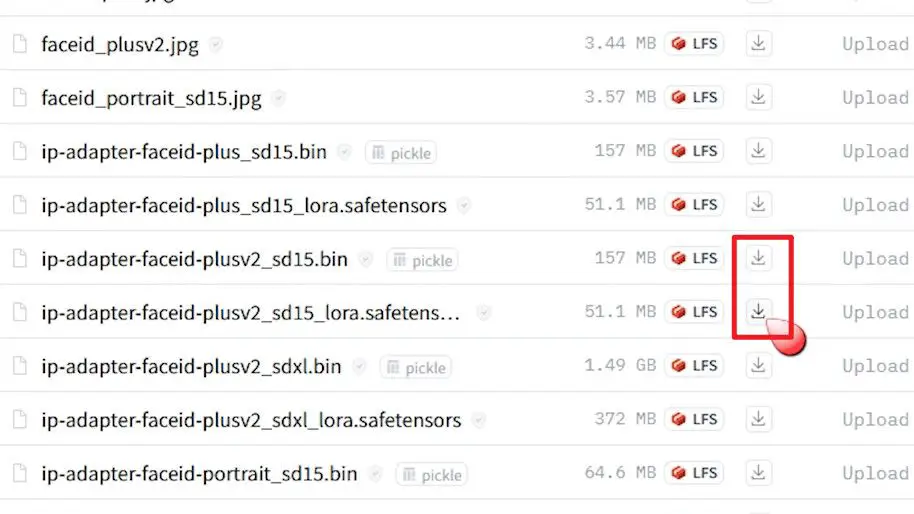
3️⃣ The Lora files, distinguished by their role in enhancing facial ID consistency, are instrumental in refining the natural appearance and effectiveness of face swap outcomes. Their integration is pivotal for achieving seamless and authentic visual transformations.
4️⃣ Following the successful download, proceed to allocate the .bin model files within the stable-diffusion-webui\extensions\sd-webui-controlnet\models directory. This step ensures their proper integration and readiness for use.
5️⃣ Similarly, the .safetensors Lora files should be positioned in the stable-diffusion-webui\models\Lora folder, completing the setup for enhanced consistency in facial recognition and swapping processes.
Implementing InsightFace
When integrating FaceID into your Stable Diffusion projects, you might come across a hiccup indicated by the terminal message: No module named 'insightface'. This error signals the absence of a crucial component required by many face-swapping extensions, including the notable Reactor.
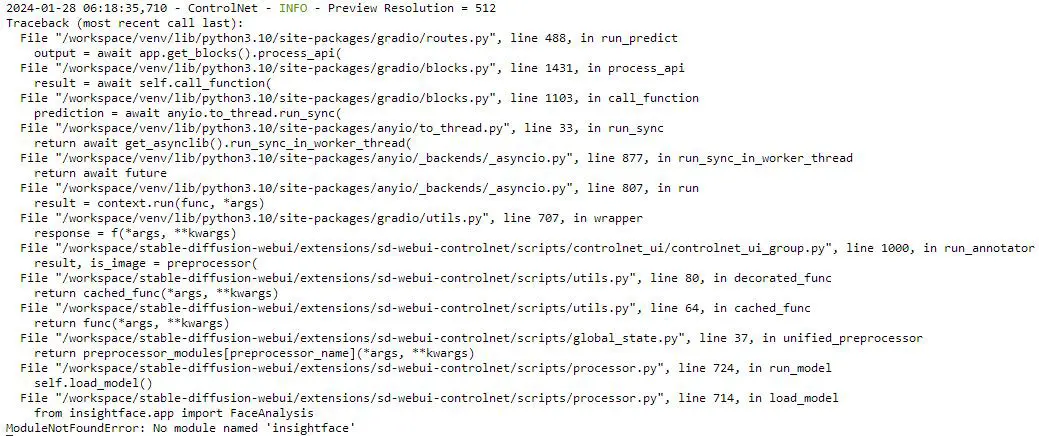
To navigate this challenge, a solution has been shared on GitHub, addressing the need to install InsightFace. Here’s a streamlined approach to ensure a smooth installation:
- Obtaining the Insightface Package: Start by downloading the pre-compiled Insightface package suitable for your Python environment. For those on Python 3.10, the package is available at this link for Python 3.10 users. Alternatively, if your setup runs on Python 3.11, head over to this link for Python 3.11 users.
- Installation Preparation: Once the download is complete, place the package in the root folder of stable-diffusion-webui, specifically where the “webui-user.bat” file resides. This ensures that the package is in the correct location for installation.
- Activating the Virtual Environment: Launch your command line interface (CLI) and activate the virtual environment for Stable Diffusion by executing the command
.\venv\Scripts\activate. This step prepares your system for the installation of new packages. - Pip Upgrade: To avoid any compatibility issues during the installation, upgrade your pip installation tool with the command
python -m pip install -U pip. This ensures that pip is at its latest version, capable of handling the newest packages. - Installing InsightFace: Finalize the setup by installing the InsightFace package. Choose the command that corresponds to your Python version: for Python 3.10, use
pip install insightface-0.7.3-cp310-cp310-win_amd64.whl, and for Python 3.11,pip install insightface-0.7.3-cp311-cp311-win_amd64.whl.
Embarking on a Face-Swapping Adventure
Embarking on the journey of face swapping requires more than just the initial setup; it demands a careful preparation of the images involved. Let’s dive into the meticulous process of preparing a headshot for face swapping, using the Web UI, and showcasing this transformation with a detailed example.
Addressing Brightness for Realism
- Selecting the headshot: Angelina Jolie’s headshot was chosen for its iconic features, but its luminance was not perfectly suited for our purpose.
- Balancing Brightness: To counteract this, I employed Photoshop as a tool to subtly adjust the brightness, aiming for a balanced exposure that maintains the natural essence of the headshot. Highlights were carefully toned down to ensure the swapped face retains its realism without succumbing to overexposure.
Choosing the Right Model
- Accessing the Web UI: Begin by entering the refined realm of Stable Diffusion’s Web UI, the gateway to your creative endeavor.
- Model Selection for Realism: It’s imperative to select an SD 1.5 model that specializes in generating realistic styles. My preference leaned towards the
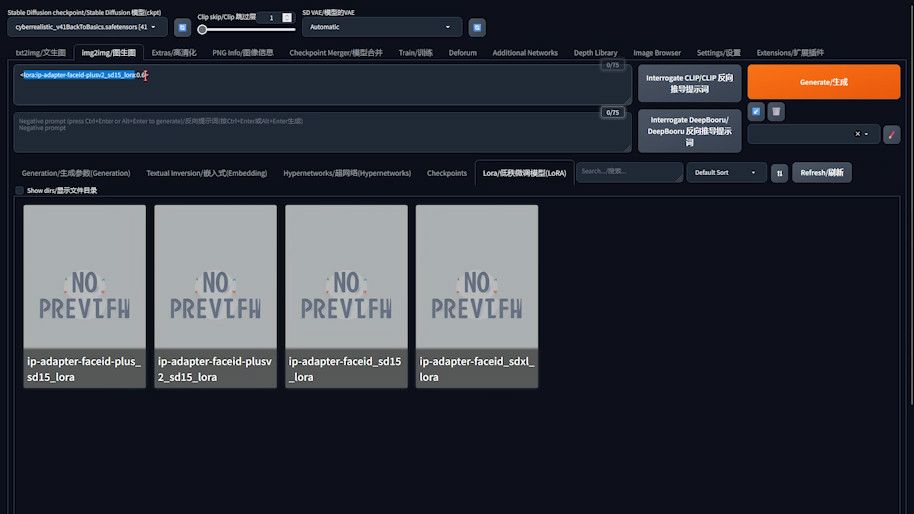
cyber realisticmodel for its nuanced portrayal of reality, though you’re encouraged to explore various models to discover which best suits your artistic vision. - Bypassing the Prompt: Initially, leave the prompt area untouched; our focus at this juncture is on leveraging the Lora file previously acquired, which plays a pivotal role in ensuring facial consistency.
- Incorporating Lora: Navigate to the “Lora” section and select the
face_id_plus_v2_sd15_lorafile. This action integrates Lora into the prompt input box, symbolizing a crucial step towards achieving facial harmony in the generated images. - Fine-tuning Lora’s Influence: With the Lora file in place, its weight becomes our next focus. By holding the Ctrl key and adjusting with the down arrow key, aim to set the weight within the recommended range of 0.5 to 0.7. This delicate balance enhances the consistency of facial features without overpowering the original image’s essence.
Inpainting Adjustments
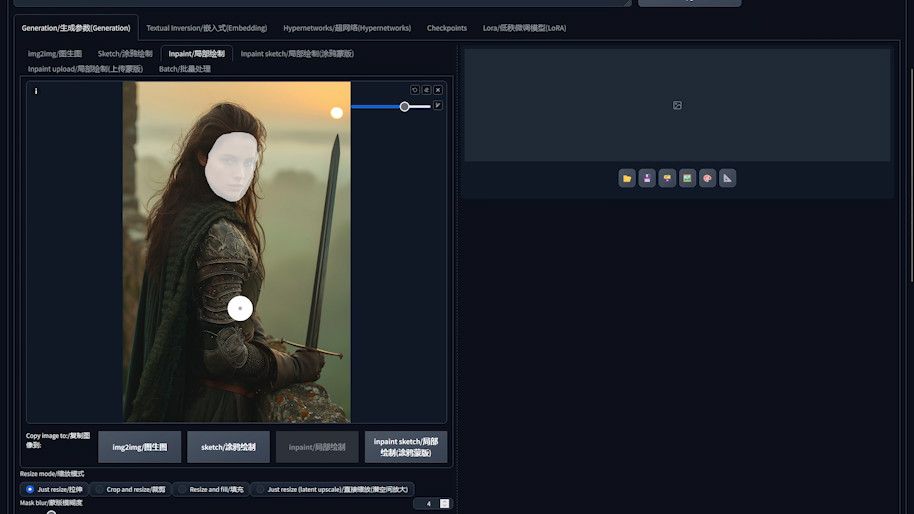
- Activating Inpaint: Your next action involves engaging the “inpaint” option. This pivotal feature empowers Stable Diffusion to zero in on particular sections of the face, ensuring that the repainting process is meticulously concentrated where it’s most needed.
- Preparing the Image: With the feature activated, proceed to upload the image designated for the face swap. Utilize the brush tool to delineate the facial region of the character. This marked area should be generously defined to facilitate an optimal blending effect, ensuring the new facial features merge smoothly with the original image.
By completing these preparatory steps, including the preprocessor adjustments for the avatar and configuring the Web UI settings, we’re now poised to embark on the transformative journey. The stage is set to harness the formidable capabilities of Stable Diffusion, aiming to bestow upon Angelina Jolie a visage reborn through the art of digital face swapping.
Let’s proceed to witness the alchemy of AI in crafting a new identity, blending technology with creativity to redefine the boundaries of digital artistry.
Configuring ControlNet: IP-Adapter
Optimizing the inpaint settings in Stable Diffusion is akin to fine-tuning an instrument—each adjustment can significantly elevate the harmony and realism of the face swap. Here’s how to orchestrate these settings to achieve a masterpiece:
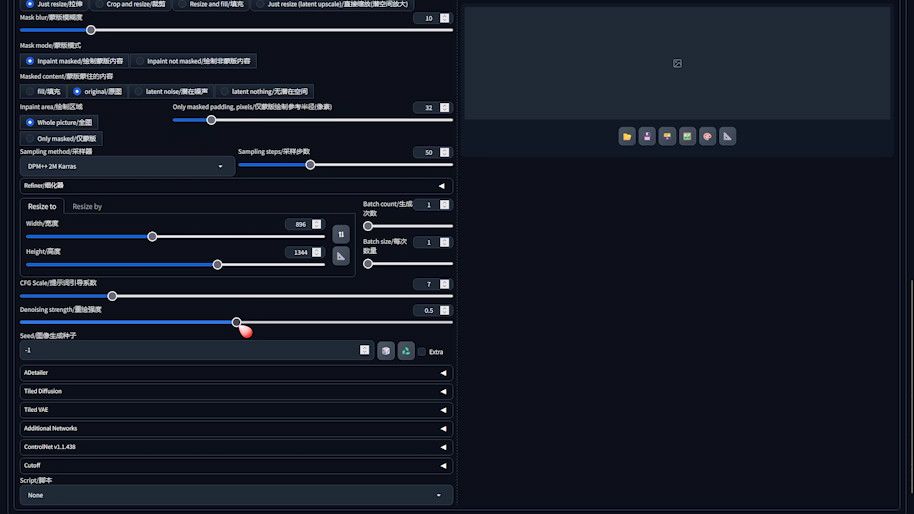
- Mask Blur: Introducing a touch of “Mask blur” acts as the smoothing agent, effectively softening the edges and diminishing any stark seams post-swap. This ensures that the new facial features meld seamlessly with the backdrop of the original image.
- Sampling Method: Selecting the right sampling method is critical. Aim for one that aligns with the realistic model you’re employing, as this coherence is what will make the final image resonate with your envisioned style.
- Sampling Steps: Elevating the number of sampling steps is akin to adding layers of detail to your canvas. An appropriate increase here enhances the image’s quality, imbuing it with depth and crispness that breathe life into the details.
- Width and Height: Maintaining the original image’s dimensions is fundamental to preserving its essence. This consistency is key to ensuring that the face swap doesn’t distort the image’s original scale and proportions.
- CFG Scale: Setting this parameter between 6 and 8 offers a sweet spot, finely balancing the generated content’s fidelity with the overarching consistency of the swap.
- Denoising Strength: Adjusting the denoising strength to a range between 0.4 and 0.6 allows you to fine-tune the intensity of the inpainting. This calibration is crucial for achieving the perfect blend, where the new facial features are neither too faint nor overwhelmingly dominant.
Configuring ControlNet: OpenPose
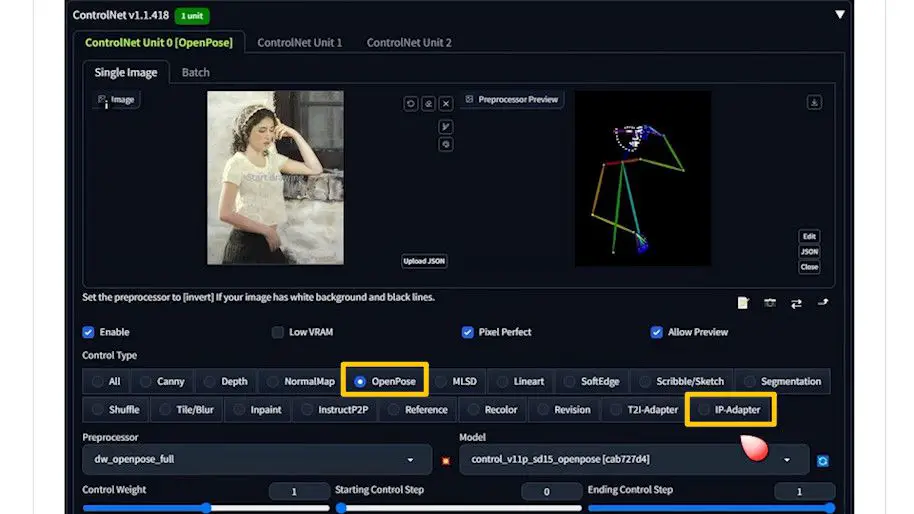
The configuration of the IP-Adapter within ControlNet is a pivotal step towards achieving precision in face swapping, ensuring the newly applied facial features are recognized and matched accurately. Here’s how to seamlessly integrate the IP-Adapter for a flawless transformation:
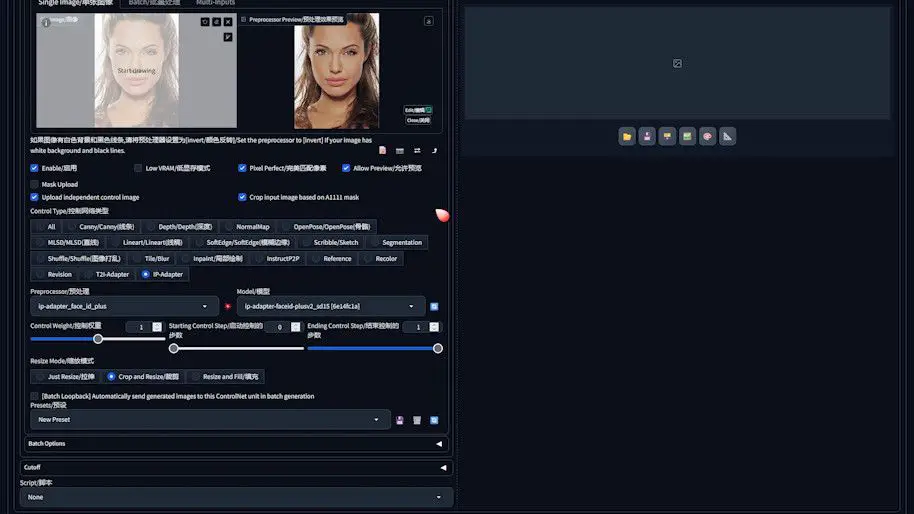
- Activating Control Net: Begin by navigating to the Web UI’s Control Net settings. Here, you’ll find the “enable” option which needs to be checked. This action activates the ControlNet framework, setting the stage for the IP-Adapter’s functionality.
- Opting for Pixel Perfection: To enhance the fidelity of your generated images, select the “Pixel perfect” option. This setting is designed to refine the accuracy of the image output, ensuring the finest details are preserved and accurately rendered.
- Uploading the Control Image: Proceed to the Upload area within the interface. Here, you’ll upload Angelina Jolie’s headshot, chosen as the control image, directly from your file browser. This image will serve as the template for the face swap, guiding the AI in applying the desired facial features.
- Selecting the Control Type: Within the “Control type” menu, choose IP Adapter.
- Matching Preprocessor and Model: It’s imperative to ensure coherence between the preprocessor and the model you’re employing. Select “ip_adapter_face_id_plus” as the Preprocessor and pair it with the “ip_adapter_face_id_plus_v2_sd” model. This harmonization ensures the IP Adapter’s capabilities are fully leveraged, without any hindrance.
- Previewing the Effect: Before proceeding further, utilize the preview button—often depicted as an explosion icon—to gauge the effect of the IP Adapter on your control image. This preview is a vital checkpoint, confirming that the setup is correctly poised for the face swap operation.
Integrating OpenPose
After setting up the IP-Adapter, the next critical step involves incorporating OpenPose through the second ControlNet. This process is vital for preserving the natural head pose of the character, ensuring that the face swap maintains alignment with the original image’s posture and expression.
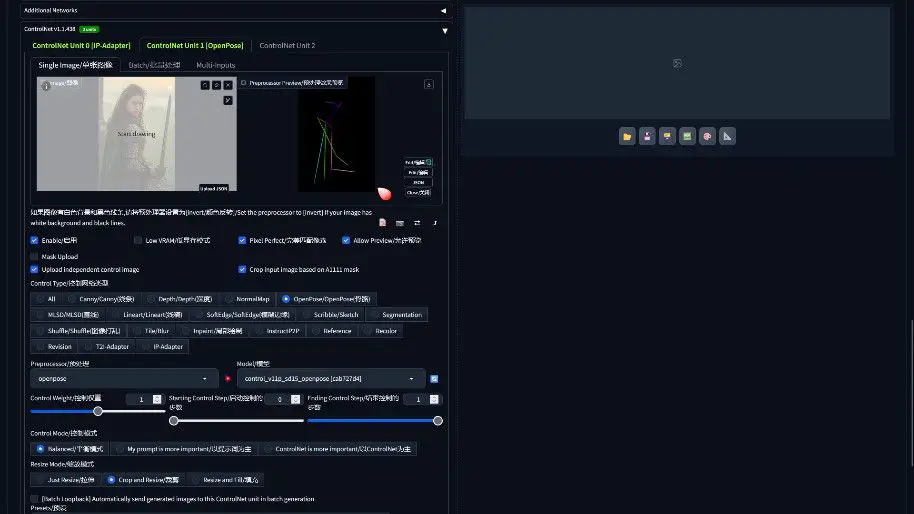
- Activating Control Net Unit 1: In the Web UI, navigate to the “Control Net Unit 1” section. It’s crucial to ensure the “enable” checkbox is marked.
- Uploading the Control Image: Use the upload area to select the target image—the one you wish to transform—with the chosen control image from your file repository.
- Choosing Open Pose as Control Type: Within the “Control type” dropdown, opt for Open Pose.
- Selecting Preprocessor and Model: To ensure the system correctly interprets the pose data, select “openpose” as the Preprocessor and pair it with the “sd15 openpose” model.
- Previewing the Open Pose Effect: Before finalizing, click on the Preview button—often represented by an explosion icon—to visualize the Open Pose effect. This preview is instrumental in confirming that the skeleton map is correctly generated, indicating that the AI has accurately captured the pose data without any discrepancies.
Generating the Final Image
- Begin by navigating to the upper section of the Web UI page, where the “Generate” button resides.
- Patience is key as the generation unfolds. Initially, you’ll witness the formation of a new skeletal framework, a precursor to the magical reveal. Following this, the essence of the transformation becomes visible—the seamless face swap, complete with the recalibrated angles and the harmonious interplay of light and shadow.

Evaluating and Refining the Outcome
The fruit of our labor is a breathtaking image that captures the distinctive features of Angelina Jolie—her iconic eyelashes arching like delicate crescents, her eyes a mesmerizing blend of blue and green, and her lips, a testament to sensuality, all faithfully rendered.
Yet, the journey to perfection may necessitate further refinement. Should any minor imperfections linger within the final image, tools like Photoshop stand ready to finesse the details, ensuring the outcome aligns flawlessly with our artistic vision.
Through the strategic application of OpenPose and the IP-Adapter within ControlNet, we’ve not only achieved a visually arresting face swap but also ensured an unparalleled consistency with the original image. This fusion of accuracy in pose and expression with the aesthetic appeal elevates the face swap effect from a mere digital manipulation to a high-caliber artistic revelation.
This process underscores the remarkable potential of combining AI with creative insight, offering a window into a future where art is bound only by the limits of imagination.