How to Train a Highly Convincing Real-Life LoRA Model
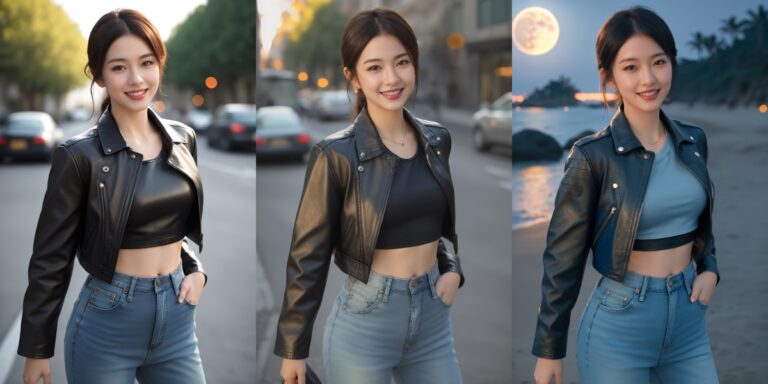
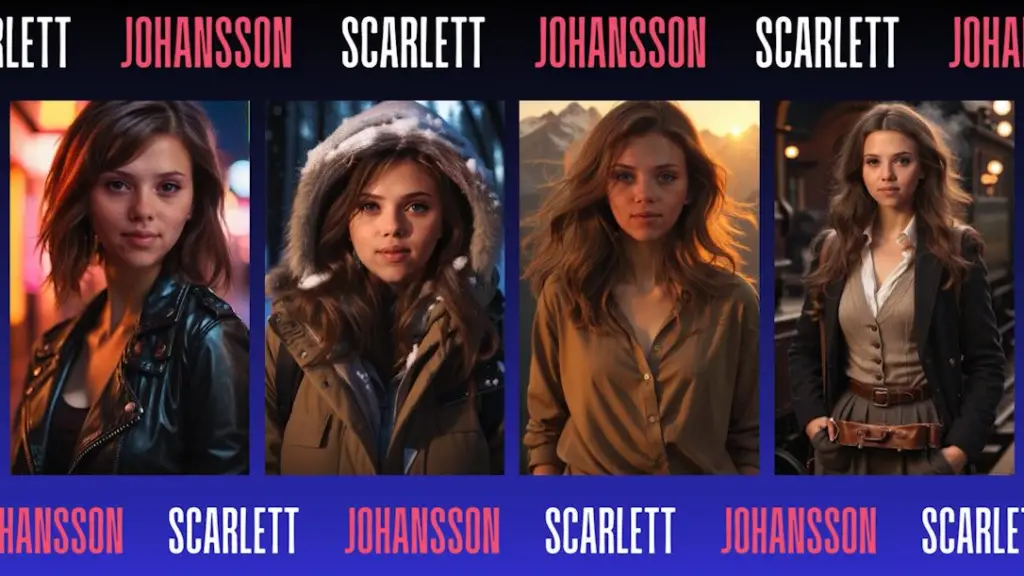
In this post, we’ll delve into the nuances of training a LoRA model that seamlessly integrates a beloved personality into any scenario, ensuring remarkable consistency. Through LoRA, we can craft incredibly lifelike portraits, as showcased by the LoRA model I developed featuring Scarlett Johansson.
So, let’s embark on the journey of mastering LoRA training. For those who love diving into Stable Diffusion with video content, you’re invited to check out the engaging video tutorial that complements this article:
Gain exclusive access to advanced ComfyUI workflows and resources by joining our community now!
Kohya Trainer
Among the myriad of tools at our disposal, the Kohya trainer stands out for its extensive capabilities—not only in training LoRA but also in DreamBooth and Text Inversion. The installation of Kohya is straightforward, with a comprehensive guide available on the project’s GitHub page (https://github.com/bmaltais/kohya_ss).
LoRA Training Flow
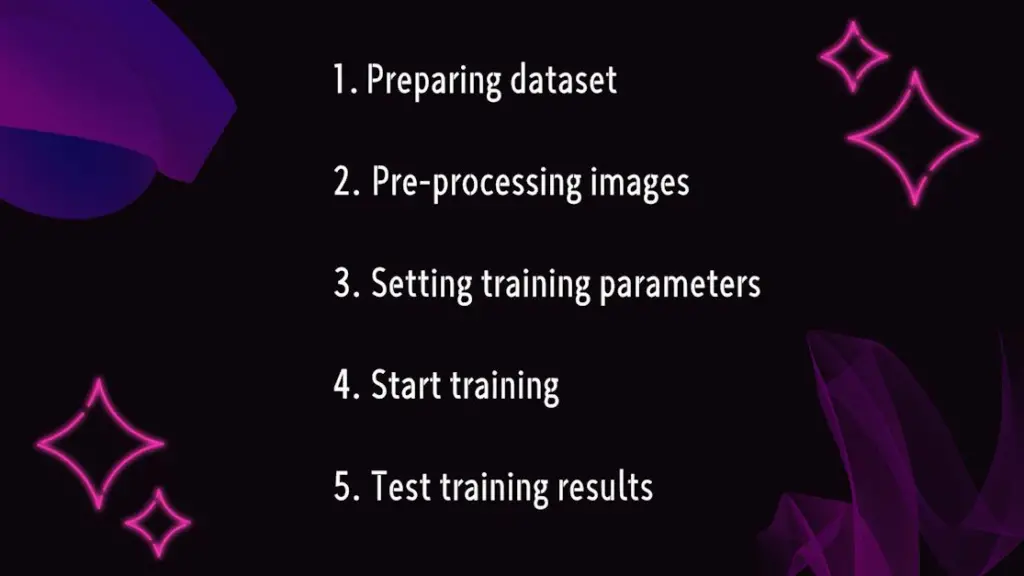
Training a LoRA model involves several critical steps:
1️⃣ Dataset Preparation: Select images that are ideal for training.
2️⃣ Image Preprocessing: Engage in cropping and captioning, adding appropriate captions or prompts to images.
3️⃣ Training Parameters Setup: Configure settings within the Kohya trainer.
4️⃣ Initiate Training: Monitor progress through the command line.
5️⃣ Evaluate Training Outcomes: Choose the LoRA file demonstrating the best results for further testing.
Principles Behind LoRA Training
To dispel any uncertainties, let’s delve deeper into the principles underpinning LoRA training. This exploration will provide a clearer understanding of the process involved in training a high-caliber LoRA model.
LoRA Training Overview
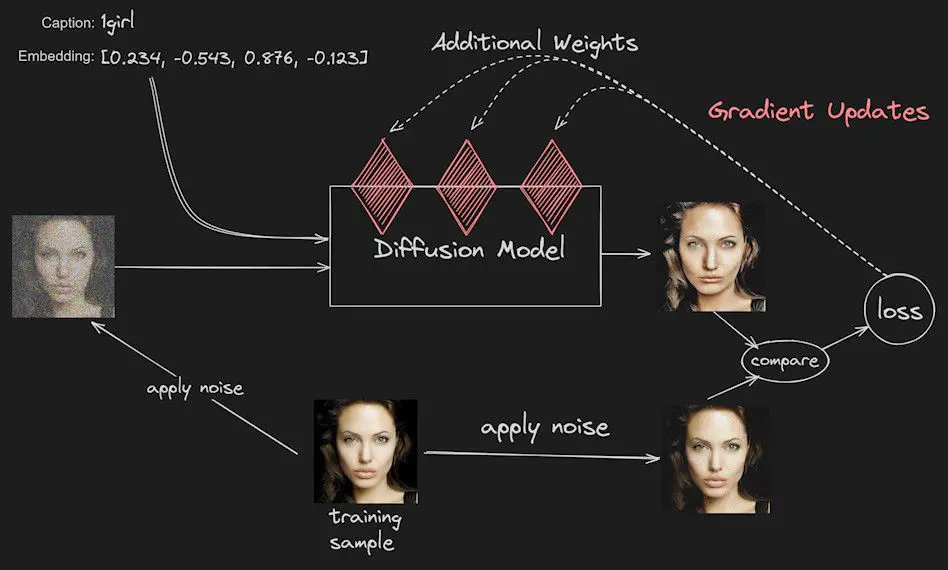
The essence of training a LoRA model lies in generating images that bear a striking resemblance to the original training images. This is achieved by introducing additional weights to the Diffusion model, stored in a separate LoRA file. Consider the LoRA file as an extension of the Diffusion model, fine-tuning weights throughout the training to mirror the original images closely.
The Training Process
- Initial Noise Addition: The first step involves injecting some initial noise into the training images to mimic the Diffusion process’s noise addition and removal, enhancing the model’s generalization capabilities.
- Captioning and Denoising: Following noise addition, the model denoises the images based on their captions (e.g., “1girl”), underscoring the importance of captions in guiding the training.
- Loss Value Calculation: Post-denoising, a new image is compared with its pre-noise counterpart, calculating the Loss value, which quantifies the disparity between the two. This metric guides the AI in adjusting the Diffusion model’s weights to narrow the gap between the denoised image and the original.
- Iterative Optimization: This cycle of adjustment and optimization repeats, gradually refining the LoRA file’s training efficacy. The total number of iterations is defined by the “Max train steps” in the Kohya trainer.
- Repeats and Epochs: Each image undergoes multiple training cycles, termed Repeats, contributing to an Epoch. The Kohya trainer also sets this parameter.
This training methodology ensures a high similarity between the generated and original images, offering a comprehensive insight into LoRA model training.
Launching LoRA Training: A Scarlett Johansson Case Study
With a solid grasp of LoRA training principles, we’re ready to embark on the actual training process. Let’s use the renowned Scarlett Johansson as our subject. Here are detailed steps and tips for a successful LoRA model training.
Step 1: Dataset Preparation
The cornerstone of effective LoRA training is a high-quality dataset. Here are tips for assembling a suitable dataset:
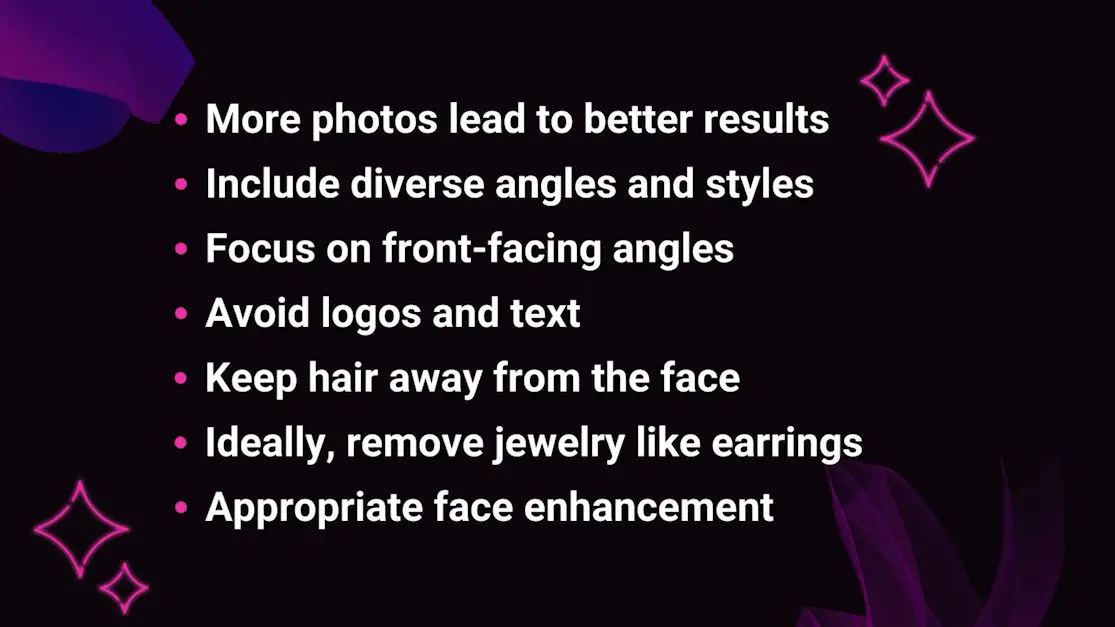
Selecting appropriate images for the training set is pivotal. The dataset’s quality directly influences the training outcomes.
Step 2: Image Preprocessing
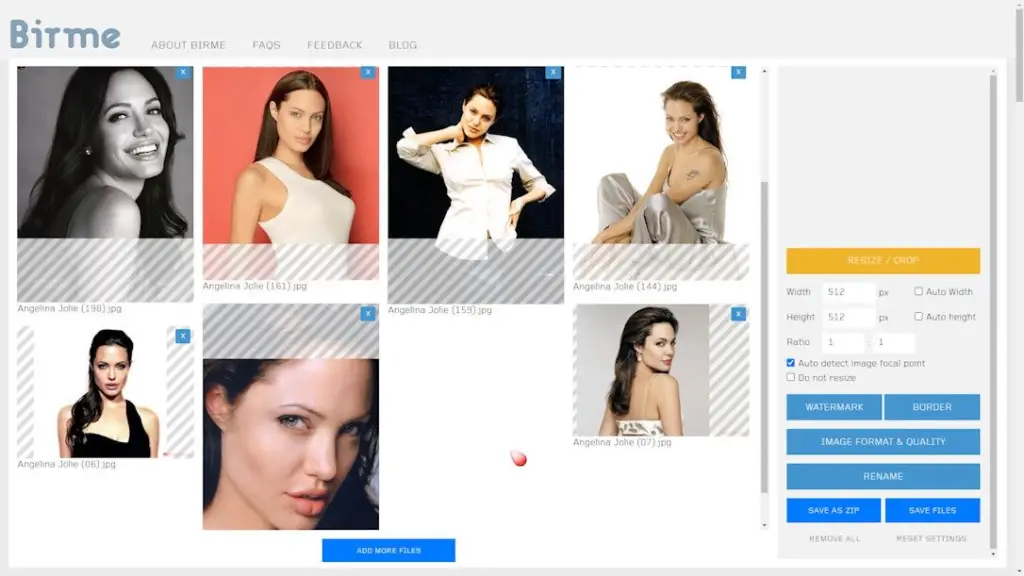
Cropping
To enhance the AI’s understanding of a character’s facial nuances, it’s advisable to crop images to a 1:1 aspect ratio, centering primarily on the head while potentially including a modest portion of the shoulder area.
This cropping methodology is instrumental in creating more lifelike LoRA images, as it enables the AI to deeply absorb the facial characteristics of the character, thereby producing LoRA images that closely mirror the original.
The focus on headshots does not limit the application of these images; indeed, it opens up creative avenues. For instance, after generating full-body images of various characters, the meticulously trained LoRA headshots can be seamlessly integrated through face swapping, offering a broad canvas for creativity.
This approach was pivotal in crafting the Scarlett Johansson images showcased here. It underscores the versatility at your disposal, allowing for a rich diversity in style and composition.

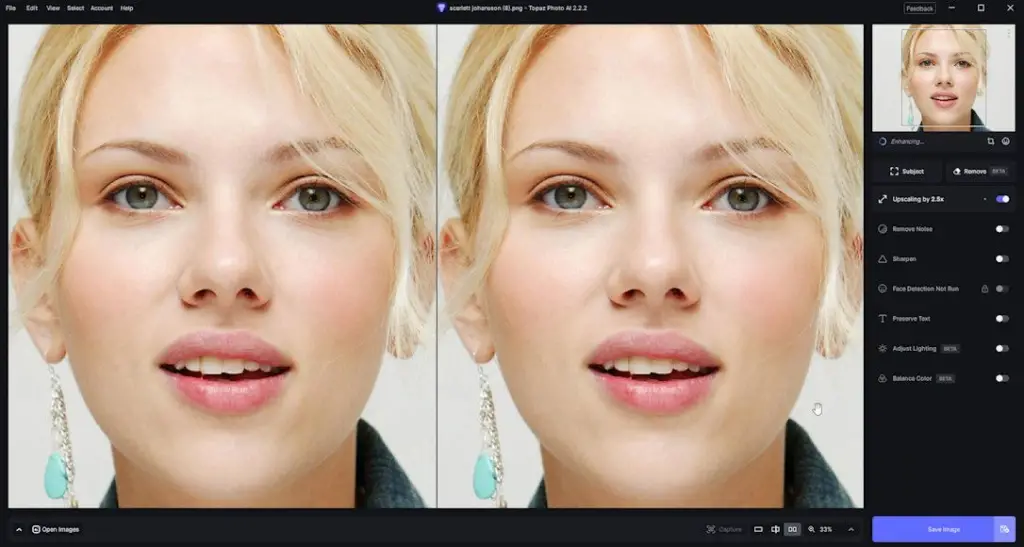
Enlargement
Given the often low resolution of online images, it may be necessary to enhance the cropped image’s resolution to at least 512×512 pixels, or ideally, 768×768 pixels. Image enlargement not only sharpens details but also provides richer training data.
Topaz software or the StableSR script in A1111 are advisable for image enlargement. Topaz, in some cases, may deliver superior outcomes.
Post-enlargement, a final cropping may be conducted. A highly recommended online cropping tool was discussed in a previous article, which you may find useful.
Step 3: Captioning
- The Role of Captioning: As highlighted earlier, captioning plays a crucial role in guiding the model to accurately learn and replicate the target’s features. Proper captioning can significantly enhance the model’s ability to recognize and recreate specific character traits.
- Captioning Methodology: Detailed captioning techniques have been outlined in my last article. For a deeper dive into captioning nuances, refer to this resources.
By adhering to these preparatory steps, you’re setting the stage for successful LoRA model training, paving the way for the creation of striking character images.
Understanding Core LoRA Training Parameters
With image preprocessing complete, we transition to configuring the Kohya trainer—a critical phase in LoRA training. This section aims to demystify the Kohya interface and essential setup options, ensuring a smooth training experience.
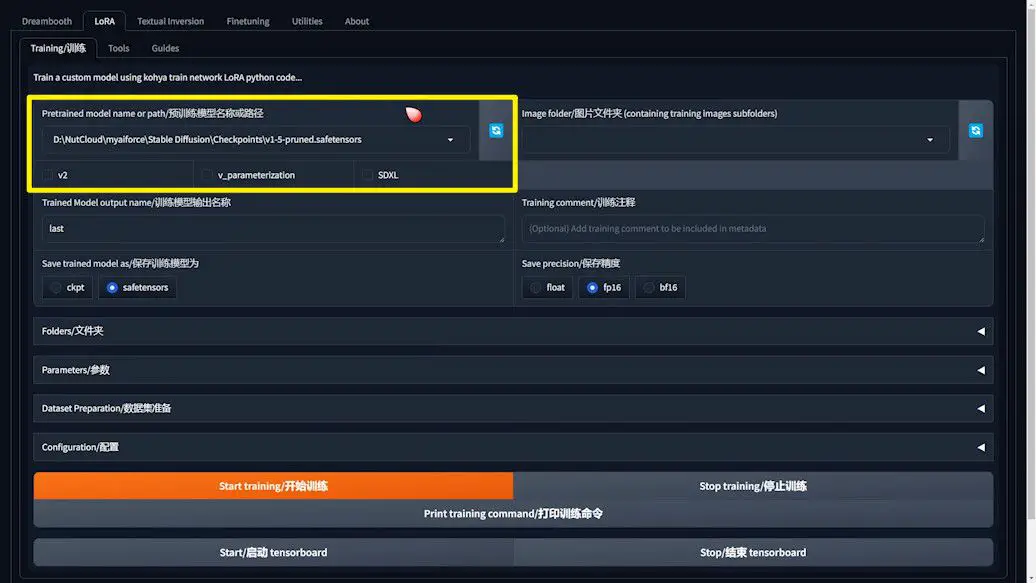
Selecting a Pretrained Model
- Model Selection: Initially, specify the base model, i.e., the pre-trained Diffusion model, which serves as the foundation for LoRA training through weight fine-tuning.
- Model Recommendation: The first-generation SD1.5 model is favored for its superior performance compared to the SDXL model. Directly specifying the model path ensures accurate loading.
- Other Options: Upon selecting the base model, several options appear; it’s advisable to leave these unchecked.
Setting Up the Training Project Folder
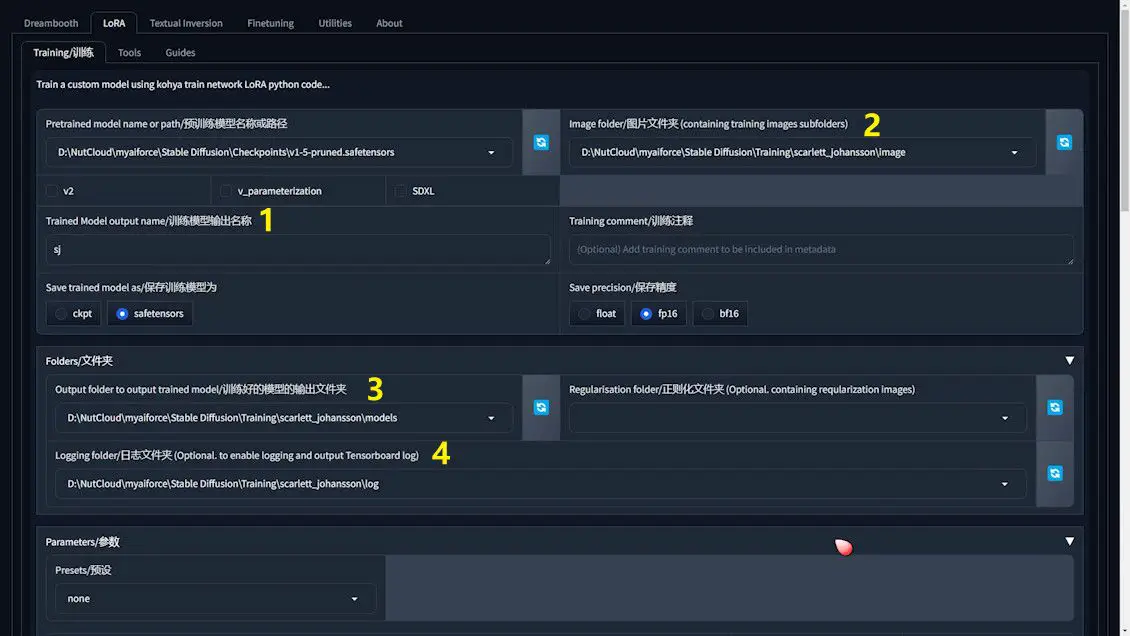
1️⃣Naming the LoRA File: Assign a name to the LoRA file for easy identification and use in subsequent testing.
2️⃣Image Folder Path: Designate a folder for the training images, ensuring the path is correctly set.
3️⃣LoRA File Output Path: Define the storage location for the LoRA training outcomes for later testing and application.
4️⃣Training Logging Folder Path: Choose a folder for the training log files, aiding in progress monitoring and troubleshooting.
Other Considerations
- Regularization Images Folder: Typically used for specific artistic styles, this setting is less relevant for facial or anime character training and can be overlooked.
Setting Up a New Training Project Folder
Before diving into the specifics of file paths for your training project, it’s essential to establish a well-organized project folder. Here’s how to lay the groundwork for a successful training endeavor:
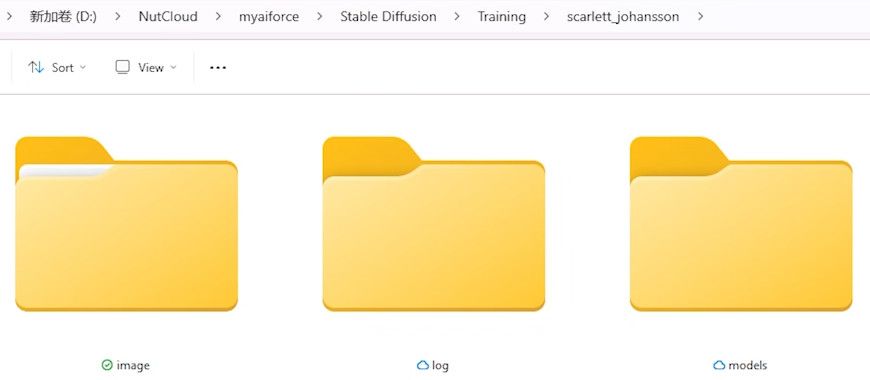
1️⃣ Creating a Project Folder: Begin by crafting a new folder dedicated to your training project. For instance, you might name this folder scarlett_johansson, indicating both the project’s focus and organizational intent.
2️⃣ Structuring Essential Subfolders: Within this primary project folder, you’ll need to set up three key subfolders: image, models, and log. These are vital for organizing your training materials effectively:
- The
imagefolder will house your carefully prepared training dataset. - The
modelsfolder is designated for storing the LoRA model files generated during the training process. - The
logfolder will capture and store logs generated throughout the training, facilitating monitoring and troubleshooting as needed.
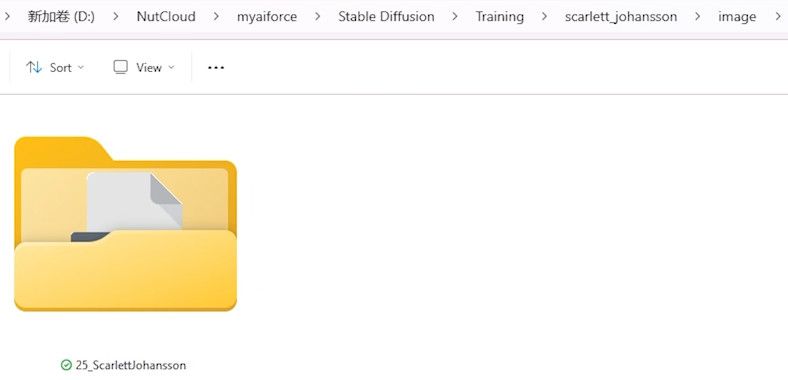
3️⃣ Incorporating Dataset and Captioning Files: Drill down into the image folder to add another layer of organization. Here, create a subfolder, such as 25_ScarlettJohansson, designed for storing the specific dataset and associated captioning files. The prefix 25 in this example represents the recommended number of training cycles (or Repeats) each image will undergo, ideally ranging from 10 to 30. This numeric value provides a hint at the intensity of training each image will receive. The remainder of the folder’s name should echo the training’s thematic focus, encapsulating the essence of your project, such as the character’s name you’re centering your model on.
Note on Path Configuration
- Copying Paths: To copy the desired folder path, click on the address bar in the file browser and use
Ctrl+C, then paste it into the corresponding field in the Kohya trainer. - Avoid Concept-Specific Paths: When configuring dataset paths, aim for the
imagefolder level rather than a concept-specific folder like25_ScarlettJohansson.
Detailed Parameter Insights
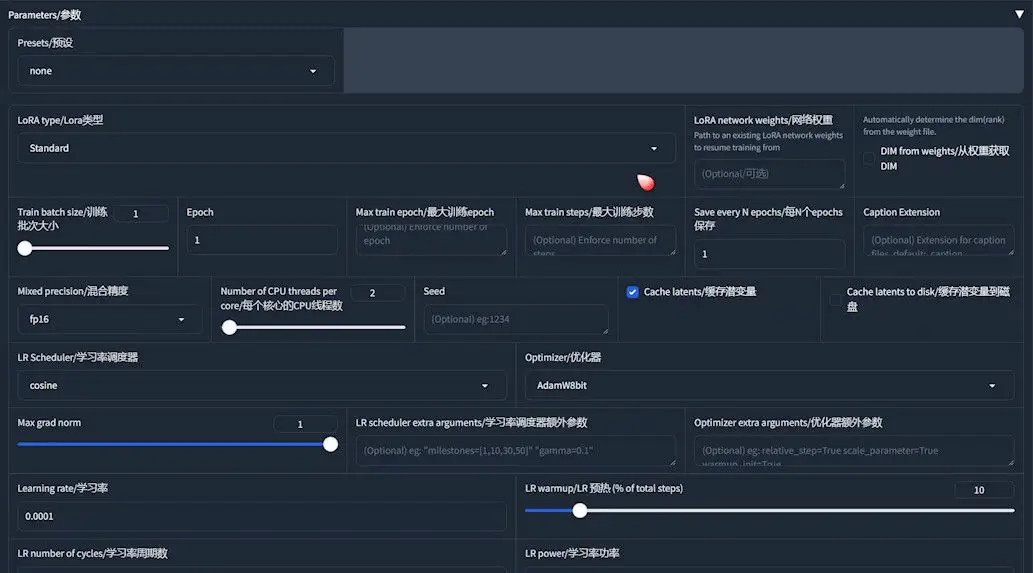
- LoRA Type: In the trainer, the first decision involves choosing the LoRA type. For facial training, select “Standard”. Alternative types may be better suited for anime characters.
- Train Batch Size: Generally set to 1, indicating that images are processed individually, which accommodates most memory configurations.
- Max Train Steps: This parameter defines the training’s depth, with a typical range of 3000 to 5000 steps, impacting the training quality directly.
- Epochs: This denotes how many times the dataset is completely processed, with a sensible range being 5 to 10 epochs, balancing depth and overfitting prevention.
- Repeats: Indicates the frequency of training for each image within an epoch, determined by dividing the maximum training steps by the product of the number of images and epochs.
Calculating Repeats
To calculate the number of repeats per image:
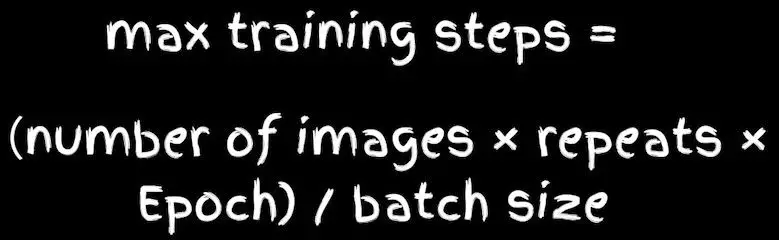
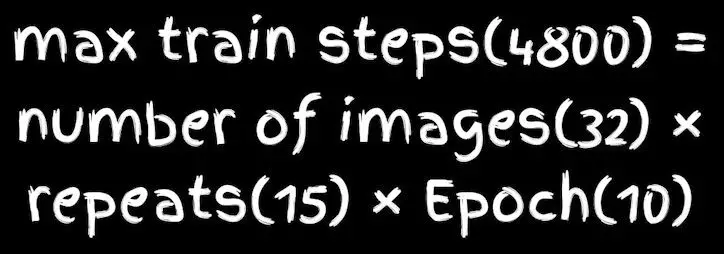
For instance, with 4800 max training steps, 32 images, and 10 epochs, each image will be trained 15 times within each epoch. This calculation guides the naming of your dataset folders.
Then we go back and rename the training set folder.

Additional Parameters
- Save Every N Epochs: This parameter is pivotal as it dictates the frequency at which your trained LoRA model is saved. Setting this to 1 ensures that the model is saved after every epoch, providing a comprehensive snapshot of the model’s evolution.
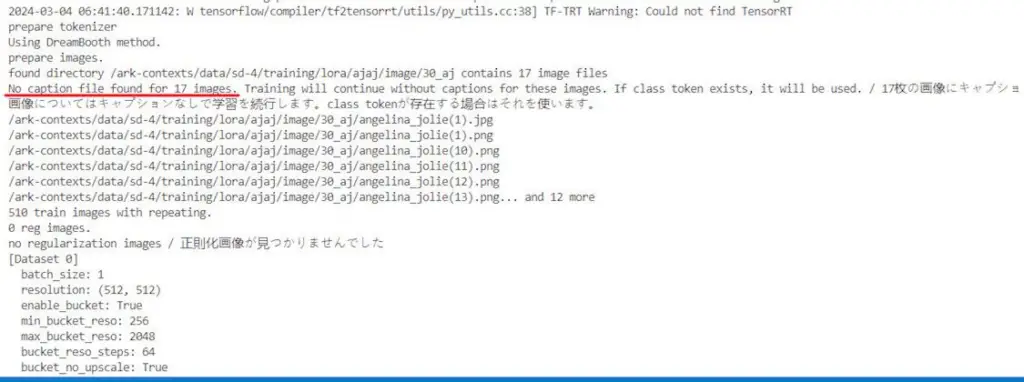
- Caption Extension: Specifying the extension for your caption files, typically “.txt”, is crucial to prevent the “no caption file found” error during training.
- Precision Settings: Opting for “fp16” as your precision setting is a strategic choice. This setting optimizes the use of video memory, making your training process more efficient while also speeding up computations.
- Caching Latents: Enabling this option allows for all images to be cached directly into video memory simultaneously. This method can significantly accelerate the training speed by minimizing the time spent loading images from disk.
Advanced LoRA Training Parameter Adjustments
As you progress in LoRA training, mastering advanced parameters becomes crucial for enhancing training efficiency and output quality. This section offers insights into selecting and fine-tuning these parameters to optimize training results.
Learning Rate and Optimizer
- Learning Rate: This parameter acts as the pulse of the learning process, analogous to setting the temperature for baking bread. A higher learning rate accelerates the learning, akin to a hotter oven that bakes bread swiftly but risks overcooking or, in machine learning terms, overfitting. Conversely, a lower rate mimics a cooler oven, resulting in slower learning that might never reach the desired outcome, referred to as underfitting in machine learning.
- Learning Rate Scheduler: Employed to dynamically fine-tune the learning rate throughout the training process.
- Optimizer: Plays a crucial role in updating the model’s weights based on the loss function’s feedback.
- Max Resolution: This setting ensures that if a training image exceeds the specified resolution, it will be scaled to match the set resolution. For instance, if your images are cropped to 768×768, adjust this setting accordingly. If working with 512×512 images, no adjustment is necessary.
- Enable Buckets: Training images in LoRA do not need to be uniform in size; however, mixing different sizes directly in training is impractical. Enabling buckets allows Kohya to categorize images by size, grouping similar ones together for efficient scaling and processing. However, it’s recommended to avoid using this feature if possible, as it can negatively affect training quality and speed. A more effective strategy is to standardize the size of all training images from the start.
- Network Rank: This parameter dictates the complexity of the neural network by setting the number of neurons in the hidden layers that carry additional weights. A higher network rank means more capacity for learning details, enhancing the model’s ability to capture intricate features. However, it’s essential not to set this too high to avoid overly large LoRA files and potentially poorer quality outputs. For most facial training tasks, a network rank of 128 strikes a good balance, offering sufficient complexity without compromising efficiency or output quality. When training anime characters, a lower setting, such as 64, may suffice.
- Network Alpha: Ideally set at half or less of the Network Rank value.
Advanced Features
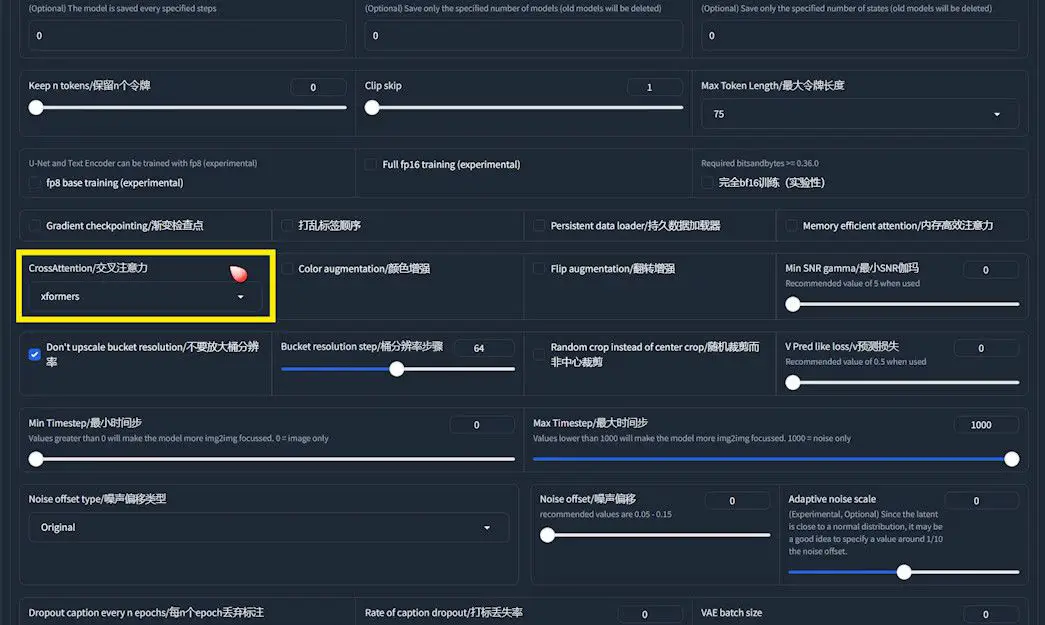
- Cross Attention: Activating
XFormersreduces memory usage and speeds up training.
Tuning Options
Static Learning Rate
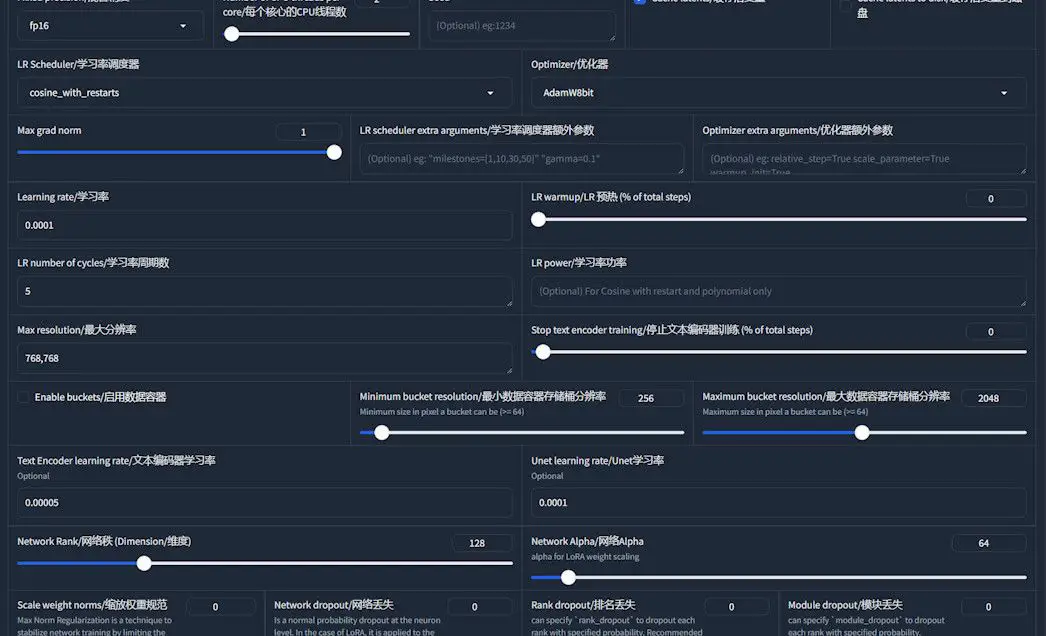
- Learning Rate: Follow Kohya’s documentation for setting both “Text Encoder Learning Rate” and “U-net Learning Rate”.
- Optimizer:
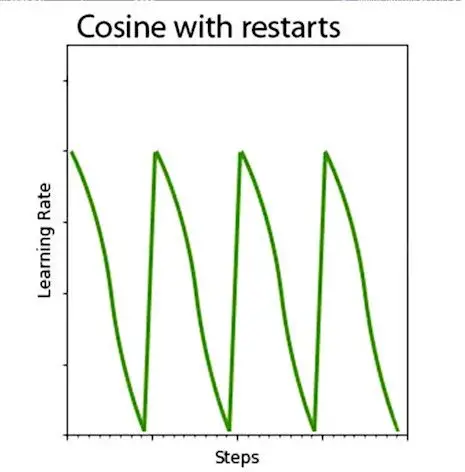
AdamW8bitis a stable choice. - Learning Rate Scheduler: “cosine with restarts” allows for multiple peaks and valleys in the learning rate, fostering thorough dataset learning.
- LR Number of Cycles: Setting this between 3 and 5 balances learning efficiency and early optimization trapping.
Dynamic Learning Rate
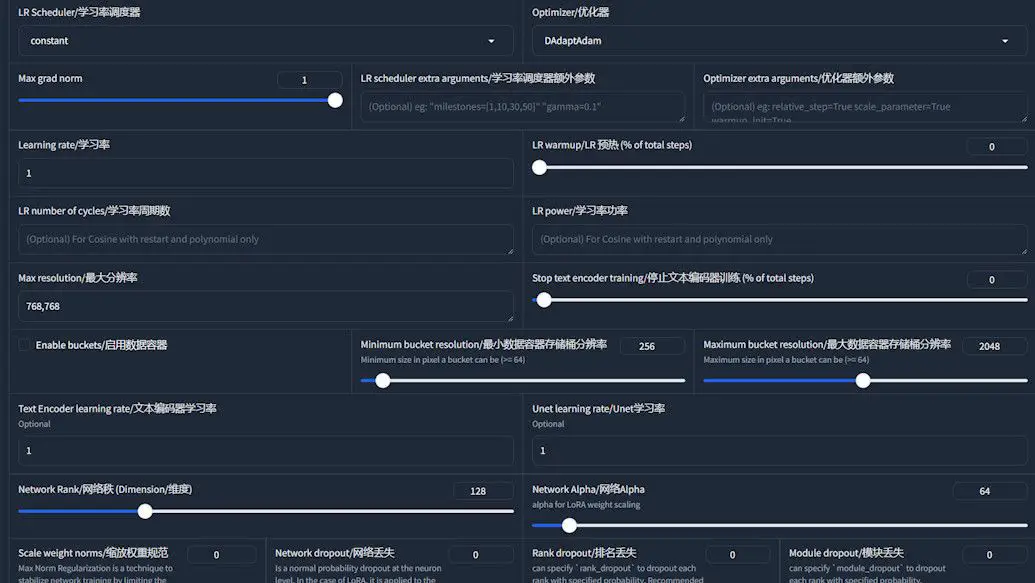
- Optimizer: The heart of the dynamic learning rate strategy lies in selecting the right optimizer.
DAdaptAdamandAdafactorstand out as two robust options.DAdaptAdamis notable for its requirement of at least 6GB of video memory, making it suitable for systems with ample RAM. For setups with limited memory resources,Adafactorpresents a more feasible alternative. - Optimizer Extra Arguments:
- When opting for
DAdaptAdam, you’ll need to configure it with specific arguments:--optimizer_args "decouple=True" "weight_decay=0.01" "betas=0.9,0.999". - For
Adafactor, the recommended arguments are--optimizer_args "relative_step=True" "scale_parameter=True" "warmup_init=True".
- When opting for
- Adaptive Learning Rate: The cornerstone of this option is the adaptive nature of the selected optimizers. Both
DAdaptAdamandAdafactorare capable of auto-adjusting the learning rate in response to the training’s current phase and effectiveness. This adaptive adjustment serves to mitigate the risk of overfitting by fine-tuning the learning intensity as needed. Consequently, you can simplify the learning rate configuration by setting related parameters to 1, relying on the optimizer to manage the rate dynamically.
Monitoring the Training Process
Once training commences, effective monitoring is key to understanding progress and ensuring model efficacy.
Training Initiation and Monitoring
1️⃣ Starting the Training: With all settings finely tuned in the Kohya trainer, the next step is to bring your training to life. Simply click the “Start training” button. This action signals the beginning of a process where your meticulously prepared data starts transforming into a sophisticated LoRA model.
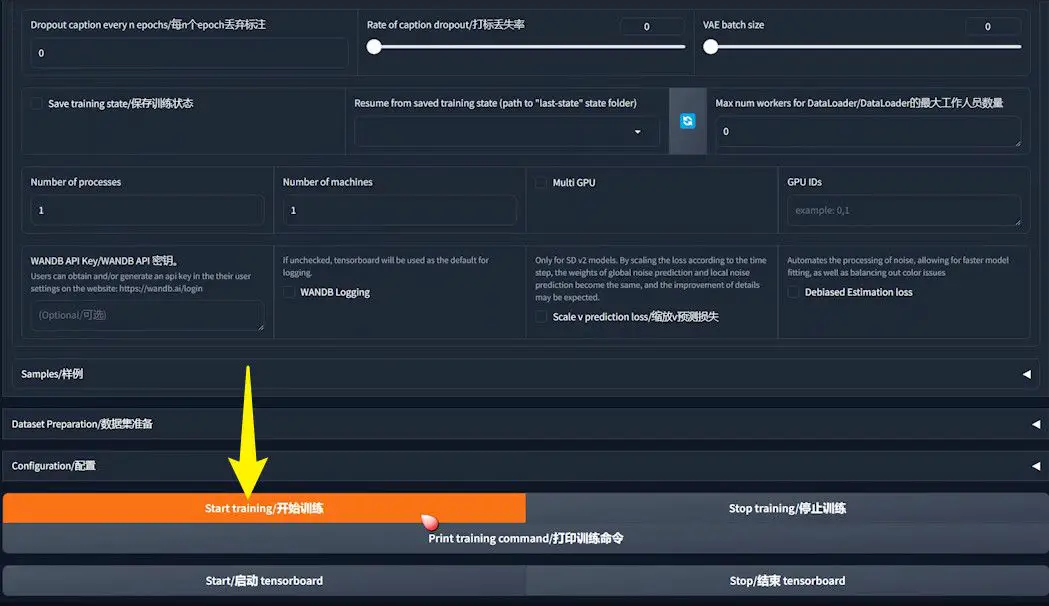
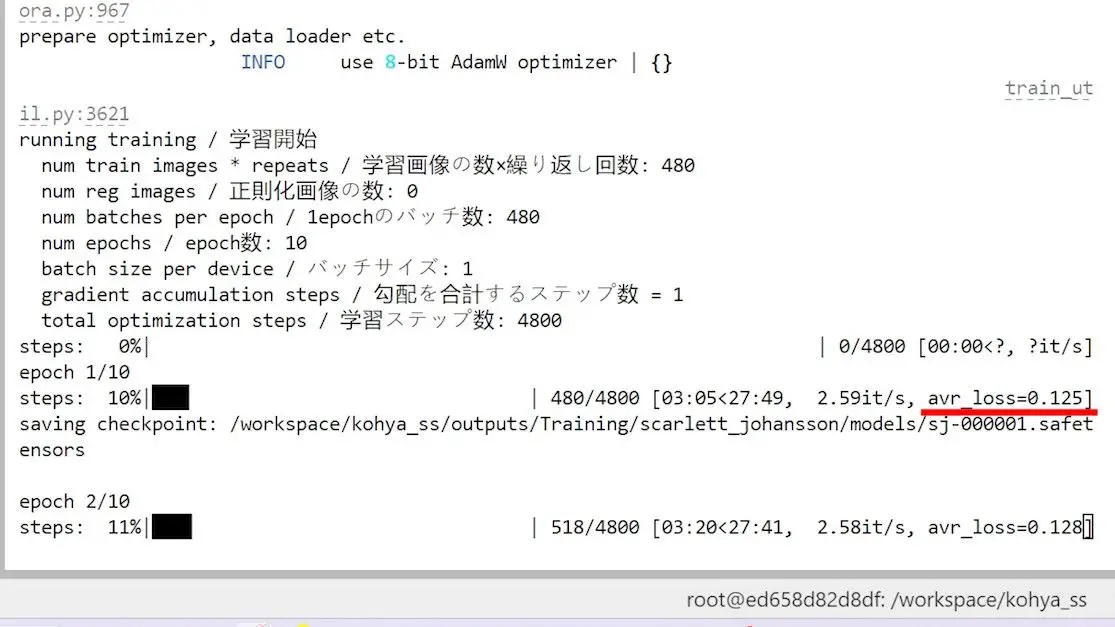
2️⃣ Monitoring Training Status: The initiation of training is your cue to switch gears from setup to supervision. Transition to a command line window or terminal to observe the training’s live status. This window, which springs to life alongside the Kohya trainer, serves as your dashboard, offering real-time insights into the heart of the training operation. Depending on your operating system or whether you’re running this locally or on a server, the appearance of this interface might vary. Yet, its core function remains the same: to provide you with a transparent view into the ongoing training dynamics, allowing you to monitor progress, adjust parameters if necessary, and ensure that your training journey is on the right track.
Key Metrics Interpretation
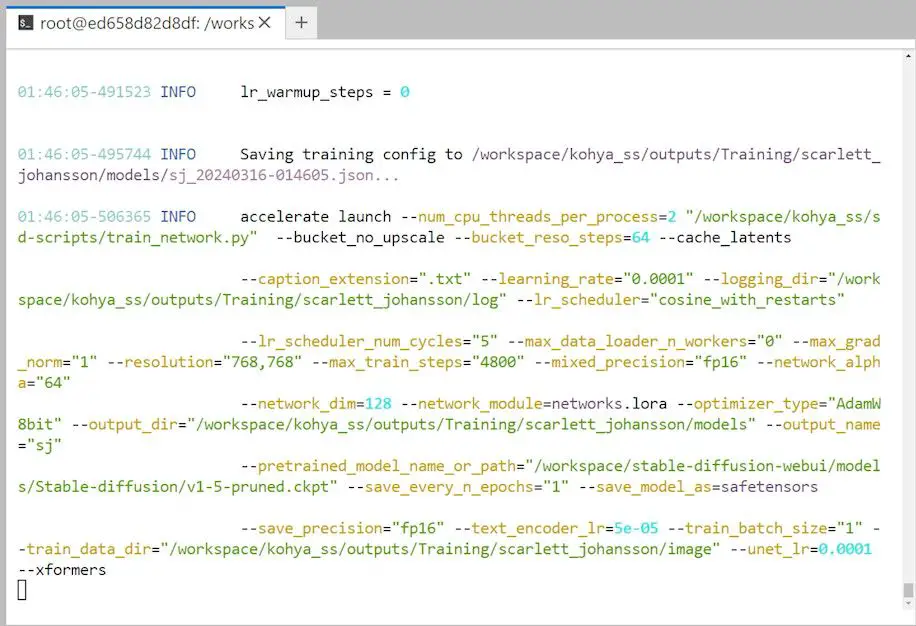
1️⃣ Display Parameters: At the outset, the terminal showcases all active parameter settings, serving as a crucial checkpoint to ensure your training configuration aligns with your intended setup.
2️⃣ Max Train Steps: This metric signifies the total number of steps the training will undertake, directly correlating with the training’s comprehensiveness.
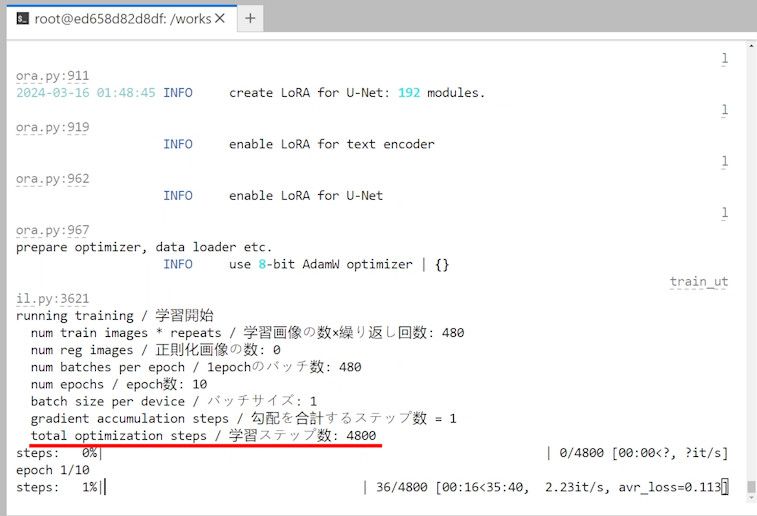
3️⃣ Progress Bar & Epoch: The progress bar, coupled with the epoch indicator, offers a dynamic view of the training’s advancement.
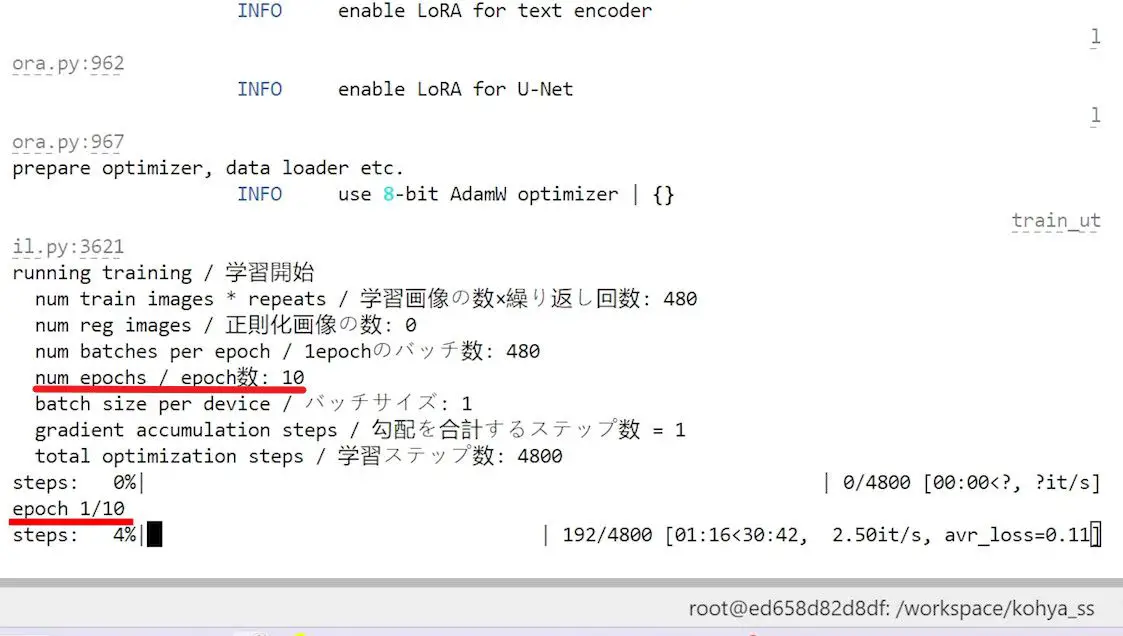
4️⃣ Estimated Time: Positioned alongside the training metrics, the estimated completion time is a forward-looking indicator that aids in planning and managing the training process.
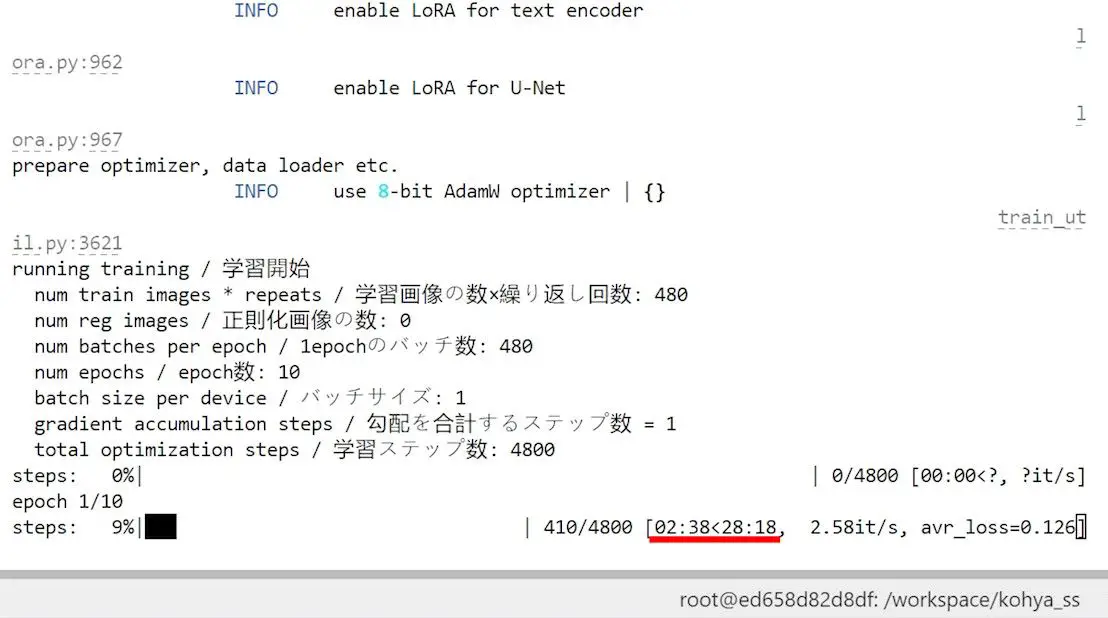
5️⃣ Loss Value: Arguably one of the most critical metrics to monitor, the loss value quantifies the discrepancy between the model’s output and the target goal. An effective training process is characterized by a gradual reduction in the loss value, signaling continuous improvement and adaptation by the model.
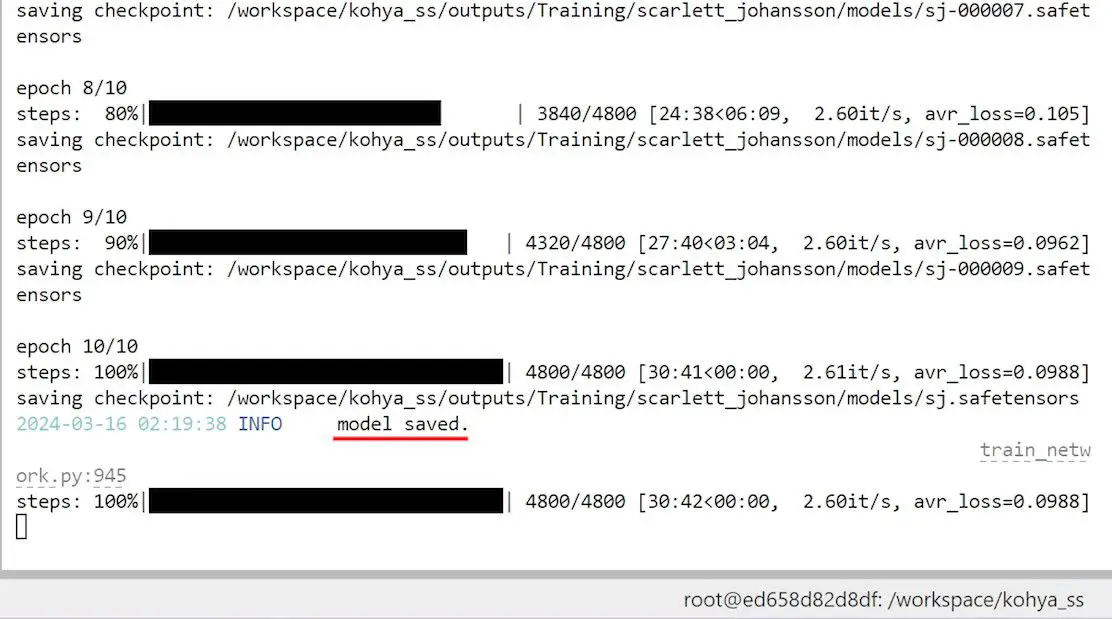
Confirming Completion and Model Preservation
Upon observing the “model saved” notification in the command line, it’s an affirmation that your LoRA model has been successfully archived. The frequency of saved iterations, dictated by your “Save every N epochs” configuration, determines the number of LoRA model files you’ll encounter within the designated folder.
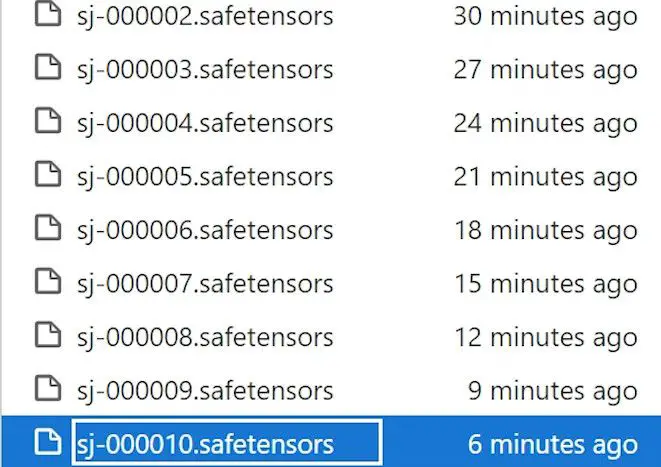
Retrieving Output Files
Post-training, your next step involves visiting the predetermined Model output folder. This repository will contain all the LoRA files generated throughout the training. Setting the training for 10 epochs, for instance, should yield 10 distinct model files, each mirroring a critical snapshot within the training timeline.
Finding the Best LoRA Model
Post-training, a critical examination of the effectiveness of the LoRA models is imperative. This stage is where you discern which model aligns most closely with your expectations and project goals. Here’s a streamlined process to systematically evaluate each model through intuitive image generation tests.
Organizing the LoRA Files
1️⃣ File Renaming for Clarity: Begin by renaming the last generated LoRA file for better management and analysis. Labeling it as “LoRA #10”, for instance, clarifies its position in the sequence of saved models, facilitating easier comparison and evaluation.
2️⃣ Centralizing LoRA Files: Migrate all the LoRA files into a commonly accessed LoRA folder within the A1111. This step ensures smooth access to each model during the testing phase, allowing for a seamless transition between different models.
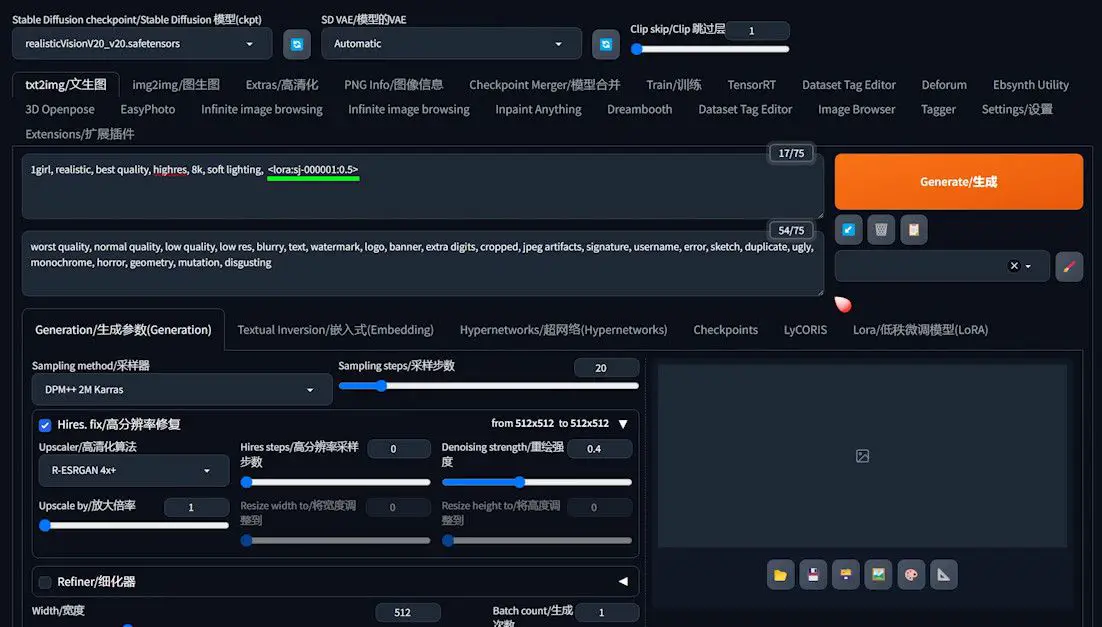
Executing Tests on A1111
1️⃣ Prompt Setup: Access the A1111 interface and input the desired prompt for image generation, adjusting the basic settings to suit your testing parameters.
2️⃣ Selecting LoRA Models for Test: Kick off the testing phase by selecting one of the freshly trained and migrated LoRA files, for example, “LoRA #1”.
3️⃣ Engaging in Comparative Testing with “XYZ Plot”:
- Utilize the “XYZ plot” function available in the script options at the page’s bottom.
- For the “X Type”, opt for “prompt search/replace” and sequentially enter different LoRA file numbers into “X Value”. This ensures the generation of images from the specified LoRA files in an orderly manner.
- Similarly, choose “prompt search/replace” for “Y Type” and populate “Y Value” with varying LoRA weights, examining how each file responds to these adjustments.
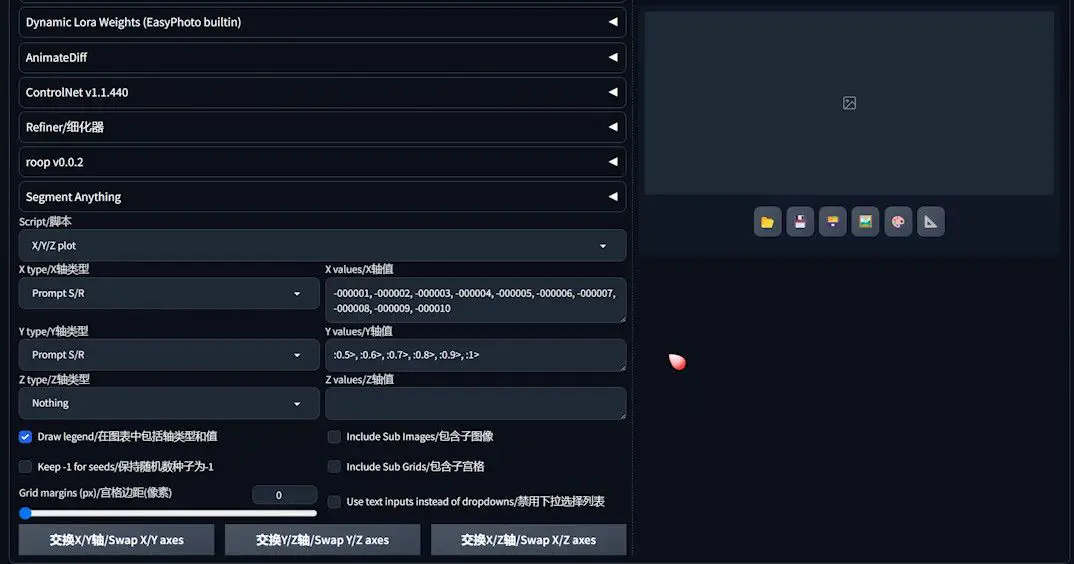
4️⃣ Image Generation and Analysis: With all parameters set, initiate the image generation by hitting the “generate” button. This action produces a plot showcasing the performance of each LoRA file under the distinct weights, as preconfigured.
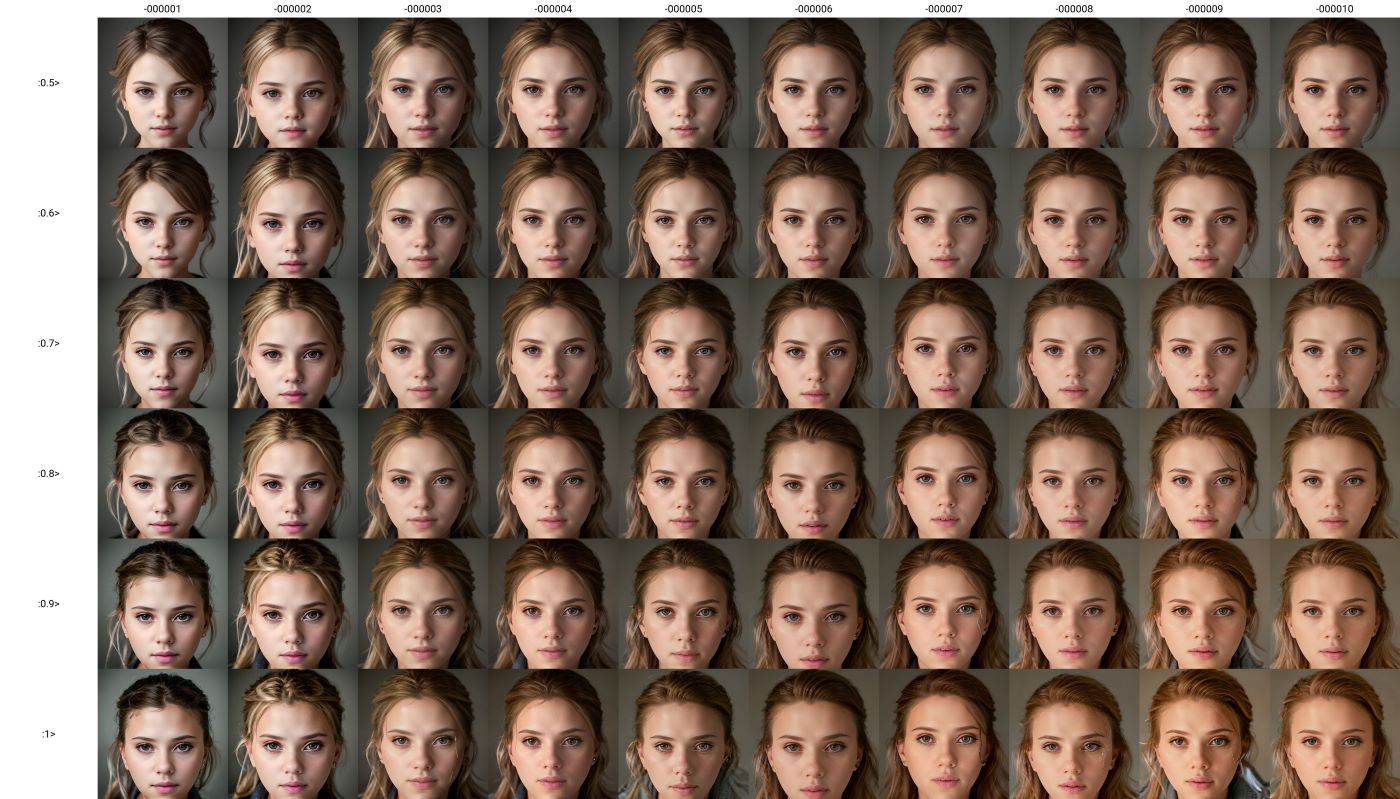
Evaluating the Outcomes
- Horizontal Examination: Study the generated plot for a side-by-side comparison of the different LoRA files. This analysis helps identify the model that most accurately captures the intended character’s features and achieves the highest image quality.
- Vertical Analysis: This approach focuses on the performance of individual LoRA files across various weight settings. It’s instrumental in pinpointing the most effective weight parameters for each model.
Conclusion
This comprehensive guide equips you with the knowledge to train a high-quality real-life LoRA model. As you navigate the intricacies of dataset preparation, parameter tuning, and result evaluation, remember that the landscape of LoRA training is ever-evolving. Embrace this guide as a foundation for creating visually stunning images, and share your successes with the community. Your support and engagement fuel this journey, and together, we can push the boundaries of what’s possible with LoRA.