The Ultimate Guide to Train Your Face with Text Inversion Training in Stable Diffusion
The allure of Stable Diffusion lies in its unparalleled capacity for customization. It doesn’t just generate images out of thin air; the true enchantment unfolds when we tailor it to conjure visuals that align precisely with our vision. Let’s delve into how we can fine-tune its outputs to resonate with our individual preferences.
Among the myriad ways to achieve this, Text Inversion stands out for its simplicity and efficacy. This method is notably more accessible than Lora training, and the best part? It doesn’t demand a high-quality dataset, which makes it a perfect starting point for novices.
The process of Text Inversion bears resemblance to Lora training, laying a solid groundwork that simplifies the leap to mastering Lora training in the future. And yes, akin to Lora, it empowers you to replicate any face or generate any portrait you set your sights on.
Reflecting on the past year, you might remember stumbling upon numerous tutorials on this topic. However, with the evolution of the Automatic1111, there’s a possibility of encountering some confusion.
Moreover, recent times have seen the emergence of innovative techniques in dataset manipulation. This development spurred me to craft a new article, aiming to demystify Text Inversion with a comprehensive exploration of its foundational principles.
In this article, our focal point will be the training process using a photograph of the illustrious Hollywood actress, Angelina Jolie.
For those who love diving into Stable Diffusion with video content, you’re invited to check out the engaging video tutorial that complements this article:
You might question the necessity of training an embedding for Angelina Jolie, given Stable Diffusion’s familiarity with her appearance, thanks to its training on 600 million publicly accessible images. However, not all these images are of optimal quality, nor do they necessarily coincide with our personal perception of Angelina.
By handpicking our preferred photos for training, we can sculpt a rendition of Angelina that mirrors our personal vision. This is where the true potency of training manifests.
Observe these before-and-after training images.
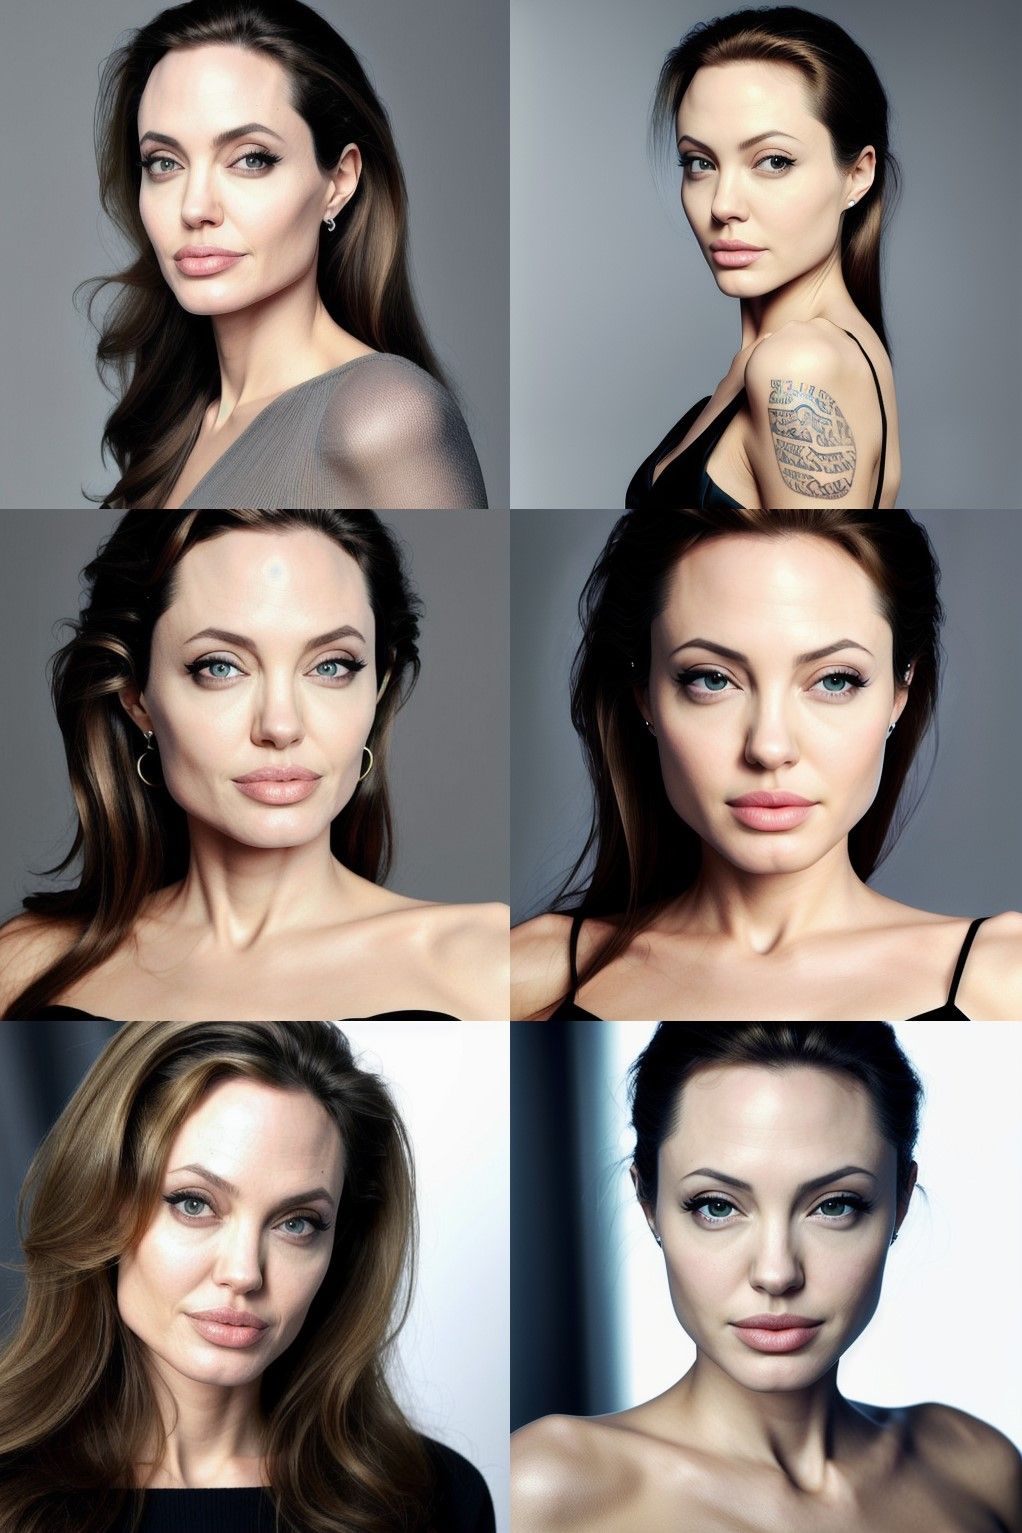
To the left is the original portrayal of Angelina, and to the right, the Angelina I’ve meticulously trained. The transformation is remarkable.
In the ensuing sections, I will guide you through the comprehensive process of training an embedding on Angelina Jolie. This journey will encompass everything from dataset preparation and image pre-processing to the actual training and the evaluation of results.
To enrich your understanding, I will interweave foundational principles throughout the training process.
These principles, shared with both Lora and DreamBooth training, are pivotal in understanding the broader methodology at play.
Before diving into the training journey, it’s imperative to meticulously prepare our dataset—the assortment of images destined for training. This preliminary step is paramount, as it profoundly impacts the caliber of our end product.
Gain exclusive access to advanced ComfyUI workflows and resources by joining our community now!
Dataset Preparation
Embarking on the training journey necessitates a pivotal initial step: the meticulous preparation of your dataset. This phase is instrumental, casting a significant impact on the caliber of the imagery your model will ultimately produce. Adherence to two cardinal principles during this stage ensures the dataset’s quality:
- Emphasis on Image Quality: The axiom “quality over quantity” reigns supreme here. Opting for high-resolution, clear images takes precedence over amassing a voluminous collection of subpar ones.
- Championing Diversity: Endeavor to curate a collection that showcases the subject from multifarious angles, sporting various expressions, and set against diverse backdrops. This variety furnishes the AI with a holistic understanding of the subject’s features from every conceivable perspective.
A compilation of at least 10 facial images is advisable, supplemented by upper body or full-body photographs to acquaint the AI with the subject’s physique and posture nuances. It’s imperative to ensure these images are devoid of watermarks to sidestep any adverse impacts on the final output.

To illustrate the significance of dataset quality, observe these comparative results. The images derived from a lower-quality dataset are displayed on the left—a discernible contrast is evident when juxtaposed with the outcomes on the right, wouldn’t you agree?
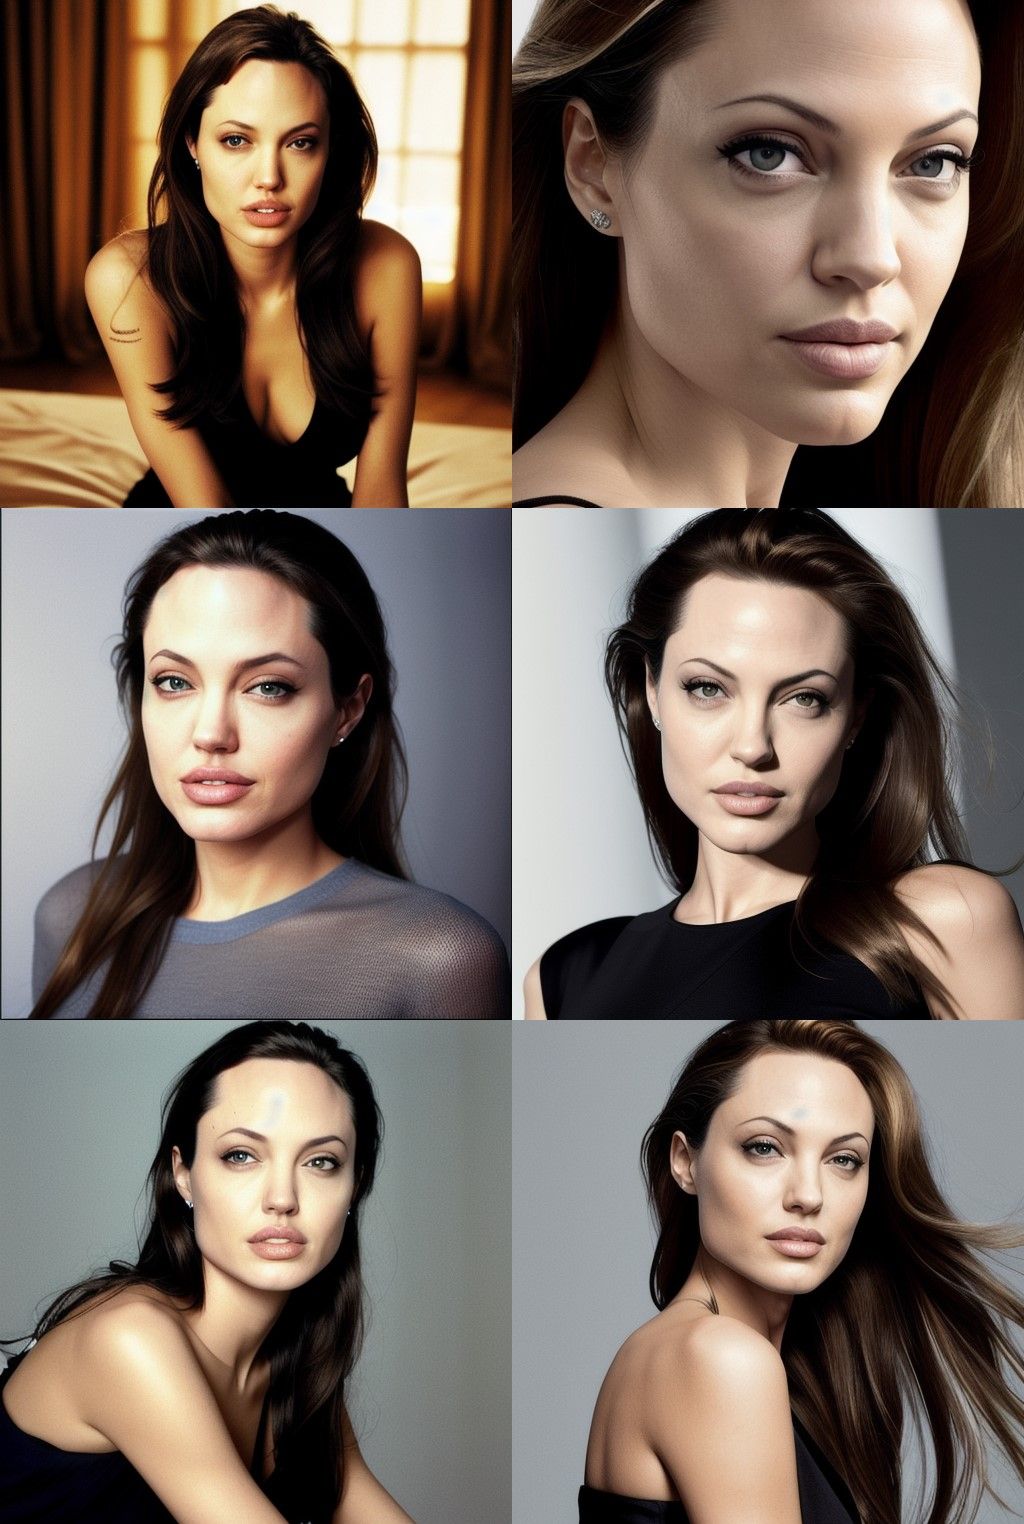
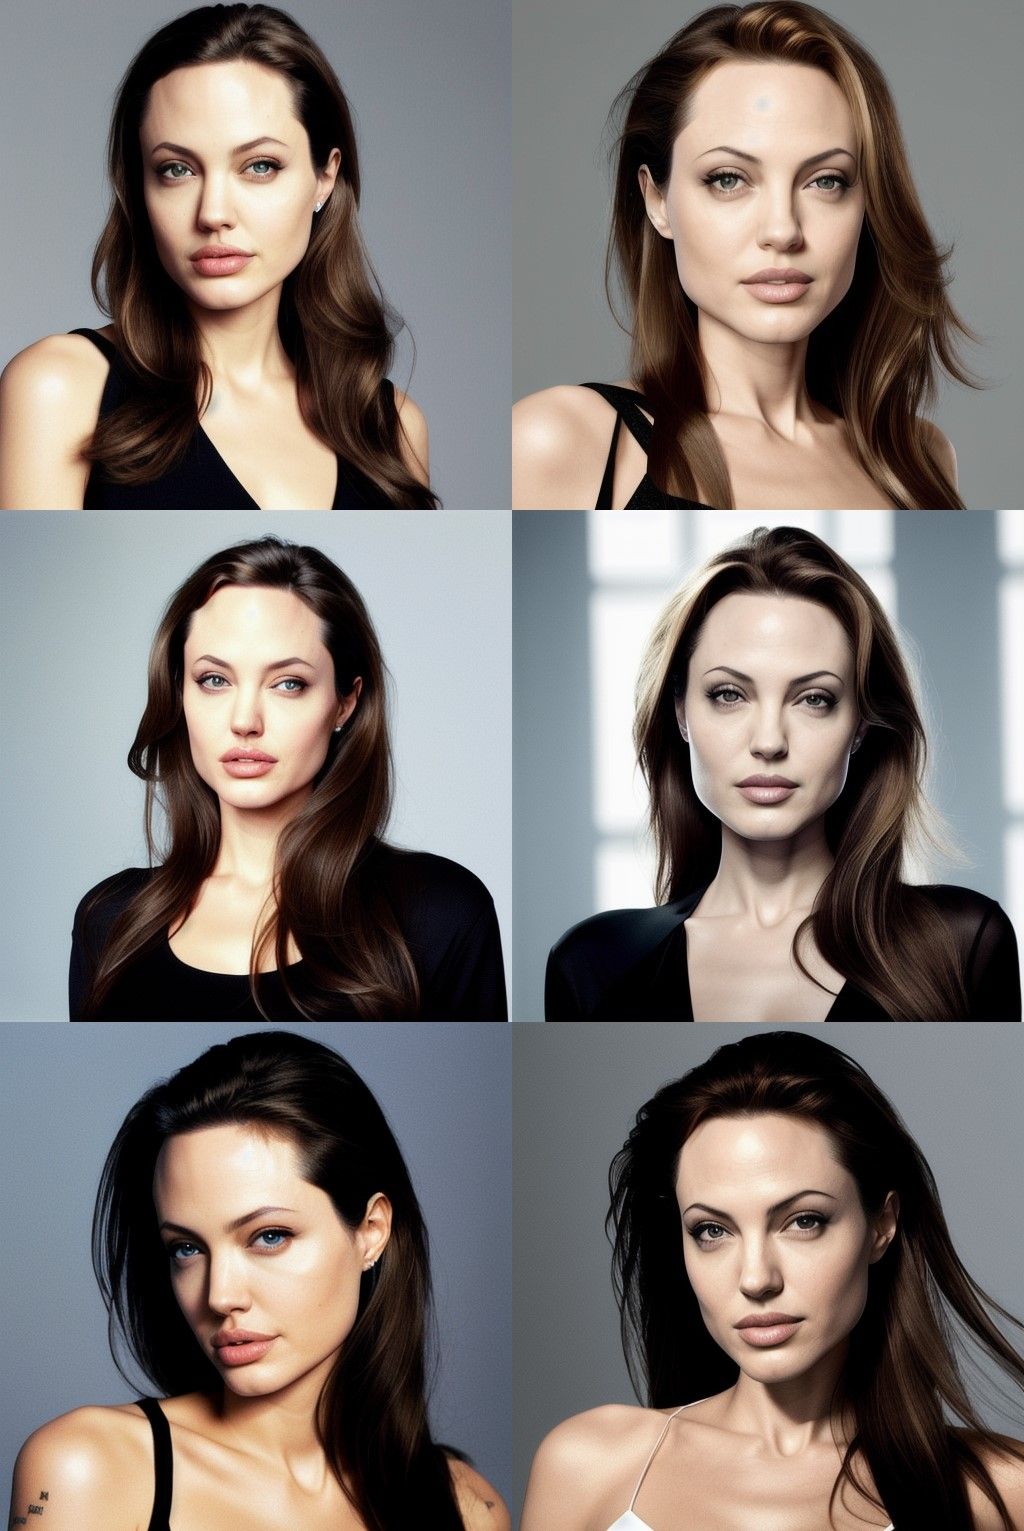
Image Preprocessing
Following the selection and preparation of your images, we embark on a crucial phase known as image preprocessing. This involves cropping and captioning to achieve a uniform resolution across all images, ideally adhering to the recommended size of 512×512. This step is pivotal in enhancing the training efficacy and elevating the quality of the resultant images. Here’s a breakdown of the detailed preprocessing steps:
1️⃣ Selecting the Appropriate Tool: With the “Image Preprocessor” function now absent from the latest version of A1111, an external tool is necessary for this task. I advocate for a user-friendly online batch image processing website, accessible at:
https://www.birme.net/?target_width=512&target_height=512
2️⃣ Uploading Images:
- Navigate to the aforementioned batch image processing website.
- Initiate the process by clicking the “BROWSE FROM YOUR COMPUTER” button, opening your file explorer.
- Locate the folder with your chosen images, use
Ctrl + Ato select all, and click “Open”.
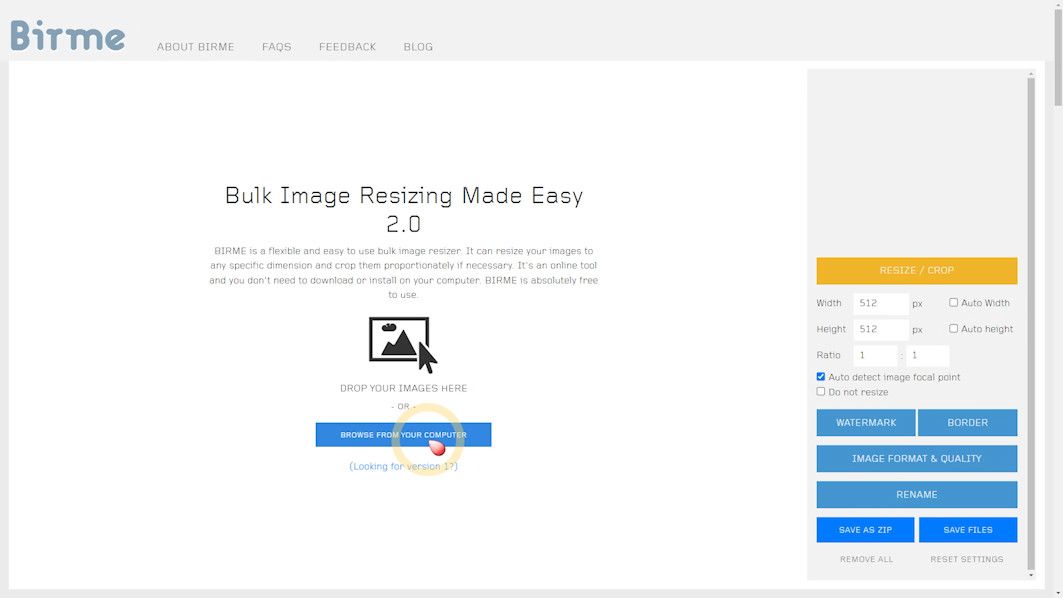
3️⃣ Automated Cropping and Focus Detection:
- Upon upload, the website automatically identifies the focal point of each image—typically the face—to ascertain the cropping’s precision.
- Ensure the “Auto detect image focal point” feature is activated.
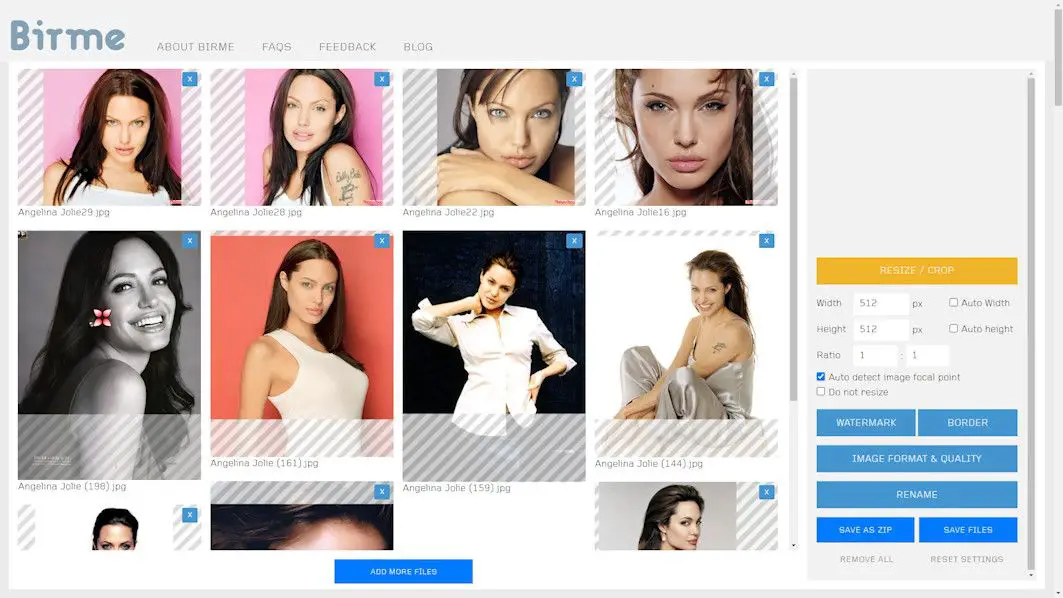
4️⃣ Manual Adjustments:
- Review the automated processing outcome and make manual corrections to the cropping area for any inaccuracies. If, for instance, a face is inadequately cropped, rectify it by modifying the crop box.
5️⃣ Saving and Downloading:
- Finalize your adjustments and click the “SAVE AS ZIP” to compile your processed images into a ZIP file.
- Select a save location to conclude the batch cropping and preprocessing of your images.
By adhering to these steps, we ensure that each image in our dataset is precisely cropped and captioned, setting a solid groundwork for the forthcoming training process. Though this may seem like a straightforward procedure, its influence on the quality of the final imagery is monumental.
Captioning
The backbone of Stable Diffusion’s training lies in the vast array of images accompanied by descriptive texts. These descriptions empower us to craft specific imagery through prompts. As such, the precision of your image captions can dramatically elevate the quality and pertinence of the images you generate.
1️⃣ Extension Setup: Begin by ensuring the Tagger extension is integrated into A1111. Should it be absent, it’s available for download on Github at https://github.com/toriato/stable-diffusion-webui-wd14-tagger.
2️⃣ Batch Processing Images: Within A1111, navigate to the Tagger tag page and opt for “Batch from directory,” then input the directory path of your images. This path will vary based on your operational environment, whether it be local or on a server.
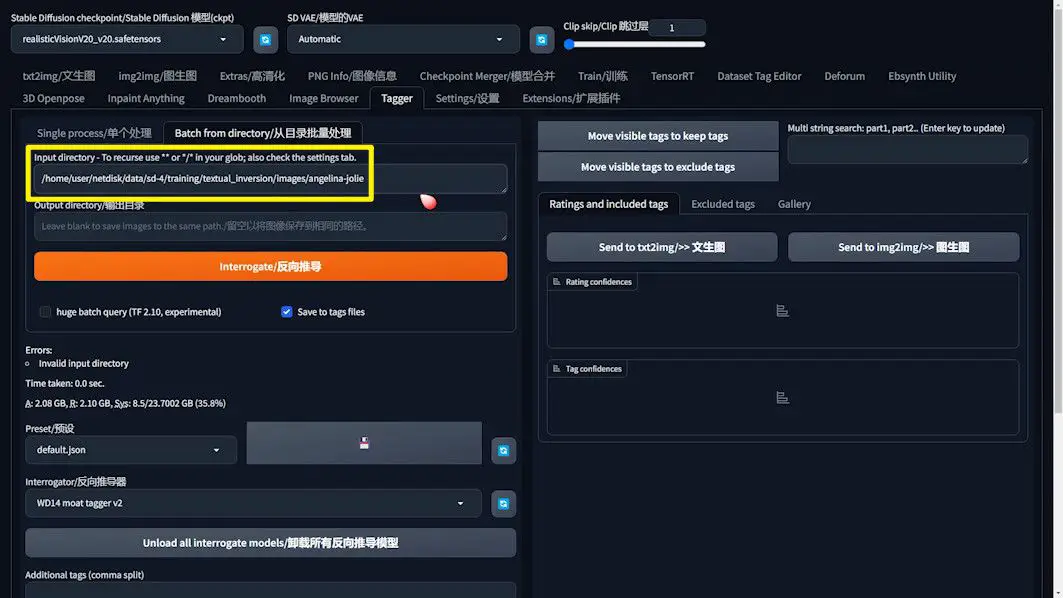
3️⃣ Model Selection and Parameter Tuning:
- From the “Interrogator” menu, choose a suitable model. The “ViT v2” model is often recommended for portraits.
- The Weight threshold adjustment allows you to fine-tune the caption detail level. A lower threshold yields more detailed captions but may introduce a higher volume of nonsensical captions, necessitating additional manual corrections.
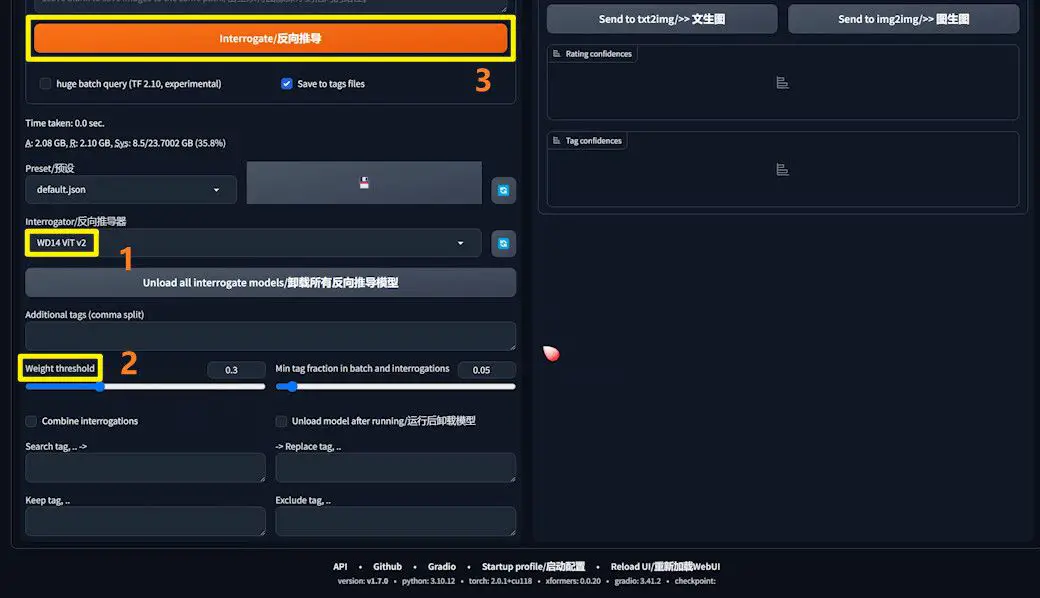
4️⃣ Initiating Captioning: Post parameter adjustments, hit “Interrogate” to commence the captioning. Upon completion, each image in the output directory will be associated with a text file, encapsulating the generated prompt.
Refining and Perfecting Captions
After completing the captioning process, it’s essential not to overlook the critical step of scrutinizing and refining the prompts within these text files. While automated captioning serves as a significant time-saver, the irreplaceable value of manual inspection and adjustment shines when striving for the pinnacle of training outcomes.
- Exploring and Modifying Text Files: Navigate to your dataset’s folder, where you’ll discover numerous text files bearing the names of the corresponding images. Open any file to review the prompt it contains.
- Enhance with Precision: Amend or enrich the prompts as necessary to ensure they encapsulate the essence of the image with utmost precision. The fidelity of your captions directly influences the efficacy of Text Inversion training, making this step indispensable for crafting high-quality, relevant outputs.
By dedicating time to this meticulous refinement, you elevate the potential for generating images that are not only striking but also profoundly aligned with your envisioned outcomes.
Streamlining Caption Modification
Fine-tuning the captions of images before proceeding with Text Inversion training is not just beneficial for enhancing the training outcomes; it’s also a strategic move to streamline the entire process. Here’s a comprehensive walkthrough on employing specialized tools for mass caption modification efficiently.
Leveraging the Dataset Tag Editor Extension
To expedite and simplify the process of editing image captions, the Dataset Tag Editor extension proves invaluable. Here’s how to effectively use this tool:
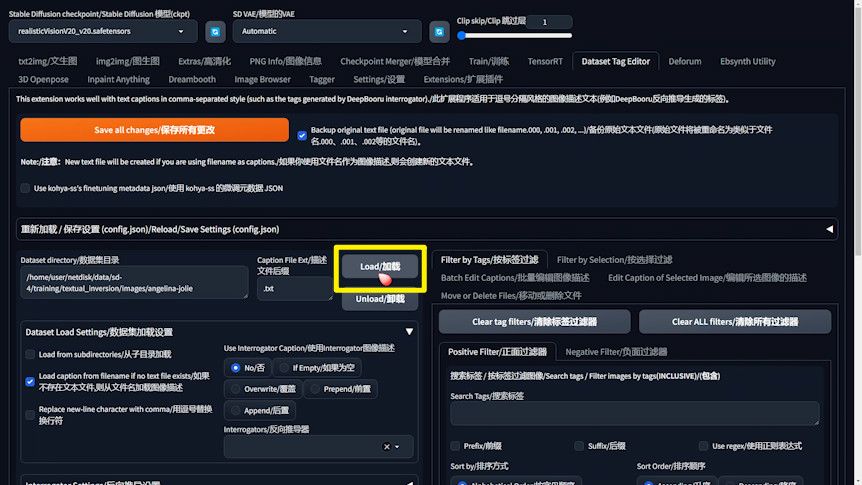
- Extension Installation: Ensure the Dataset Tag Editor extension is set up on your system. If it’s yet to be installed, it’s available for download on Github at https://github.com/toshiaki1729/stable-diffusion-webui-dataset-tag-editor.
- Importing Images and Tags: Within the Dataset Tag Editor, input the path to your images and tag files, then click the “Load” button. Post-load, you’ll see all images and associated tags displayed.
The Paradox of Captioning
When delving into the specifics of captions, a seemingly paradoxical situation arises, especially with unique features like Angelina’s lips. Contrary to initial assumptions, explicitly mentioning “lips” may not be as crucial as one might think.
The AI’s learning mechanism is predominantly visual, similar to how humans perceive and understand images. Just as describing the specifics of Angelina’s lips might not suffice for a painter without visual references, the AI leans heavily on the images rather than the textual descriptions. Text serves primarily as a directive tool for interfacing with the AI, highlighting the importance of intuitive understanding over literal interpretation.
Batch Caption Editing
1️⃣ Tag Selection and Removal: The Dataset Tag Editor facilitates the easy identification and selection of specific tags for removal, allowing you to cleanse your dataset of unnecessary descriptors like “lips” or “nose,” while retaining relevant background tags to prevent unwanted associations.
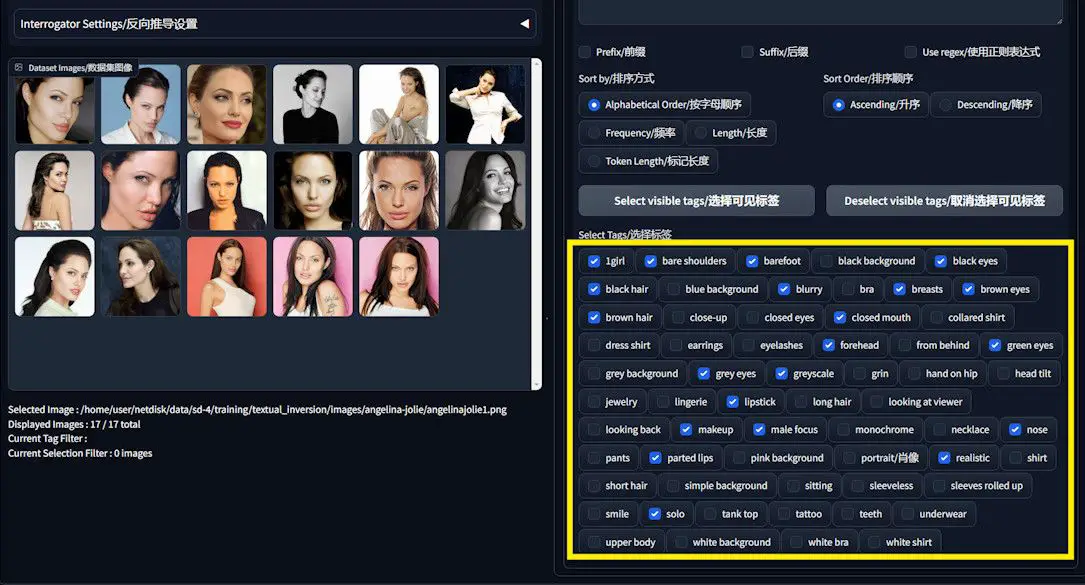
2️⃣ Executing Bulk Deletions: Utilize the “Search and Replace”, “Remove”, and “Extras” functions within the “Batch Edit Captions” section to systematically purge tags. This targeted removal ensures the AI’s focus remains on the desired elements of your images.
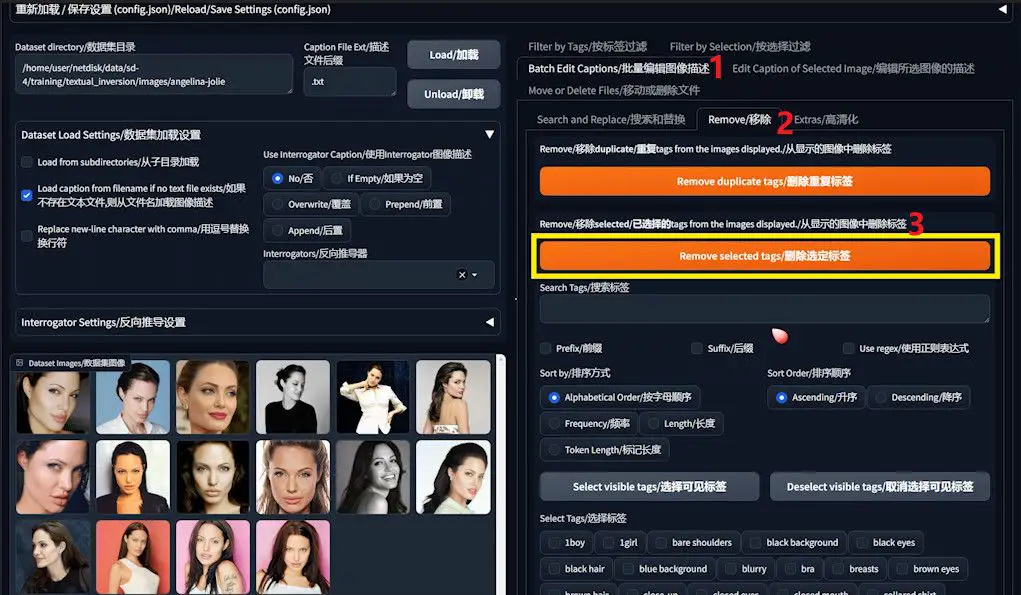
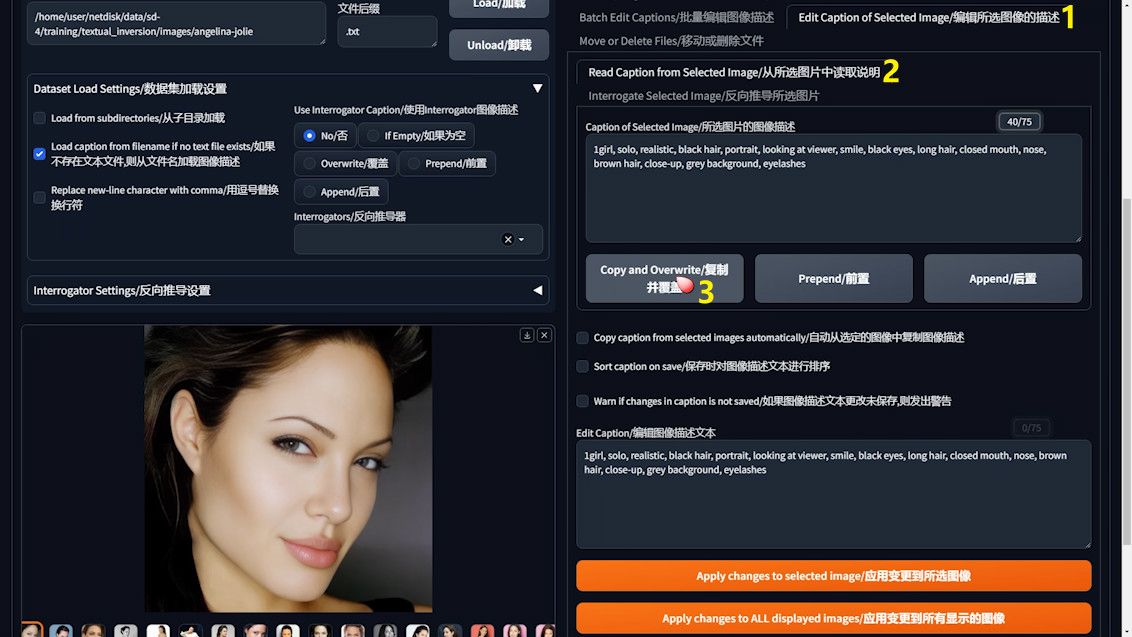
3️⃣ Individual Caption Refinement: For the occasional need to delete specific, less common words, individual caption editing is a breeze. Simply select an image, hit the “Edit Caption of Selected Image” button, and modify the caption as needed.
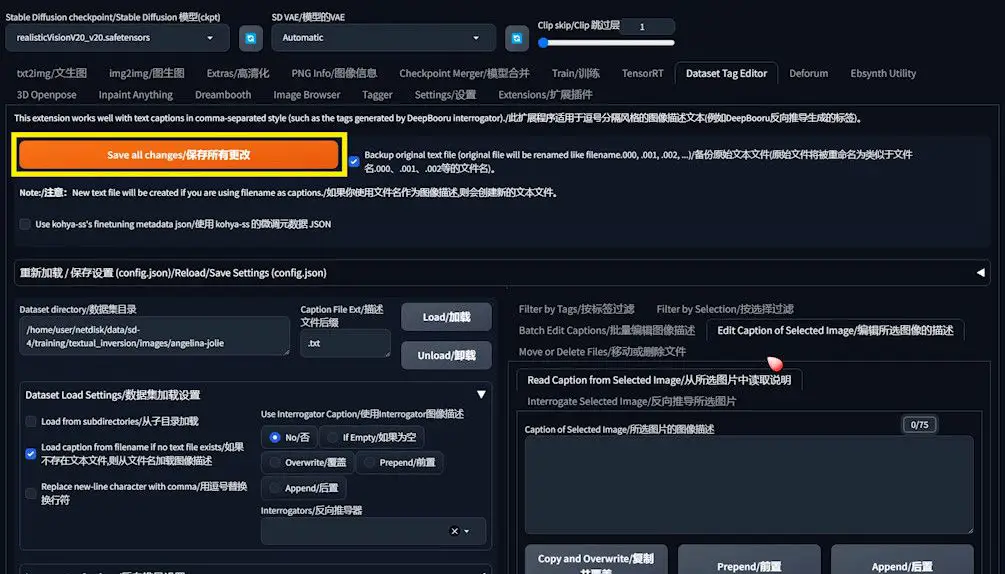
Upon completing these steps for both bulk and individual edits, remember to save all changes, solidifying your dataset’s readiness for an optimized training session. This methodical approach to caption editing underscores the meticulous preparation necessary for achieving superior Text Inversion training results.
Streamlining Your Setup for Text Inversion Training
Embarking on Text Inversion training within Stable Diffusion’s A1111 requires a keen eye for detail in configuring the settings appropriately. These configurations play a pivotal role in not just the smooth running of the training process but also in shaping the quality of the outcomes. Here’s a step-by-step guide to fine-tuning these essential settings.
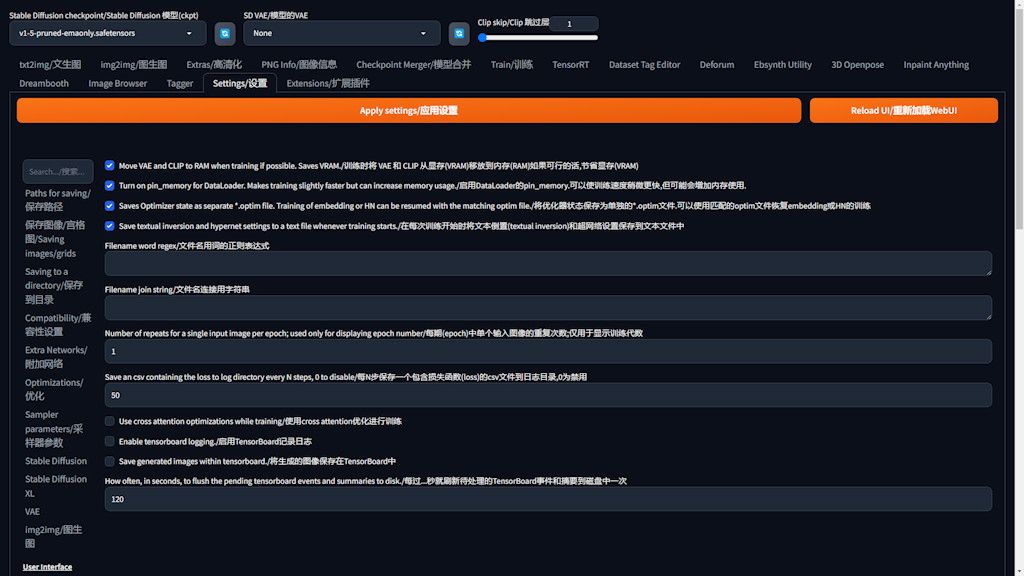
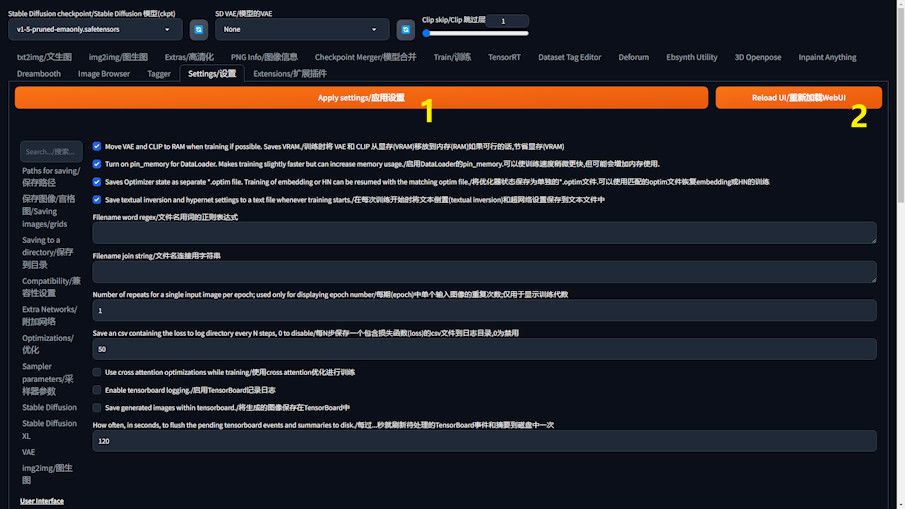
Navigating to A1111 Settings
- Within A1111, direct yourself to the “Settings” section.
- Proceed to scroll until you encounter the “Train” settings option, then select it.
- Engage in the necessary basic adjustments as per your requirements.

Essential Configurations
- More VAE and CLIP to RAM when training if possible: For those working on devices with constrained video memory, activating this option can conserve video memory usage.
- Turn on pin_memory for Dataloader: Opting for this setting accelerates the training process, albeit at the cost of heightened memory consumption.
- Saves Optimizer state as separate optim file: Enabling this feature is akin to securing a safety net, as it creates a backup in the training directory. This is crucial for resuming training seamlessly after any interruptions, a lifesaver for extensive training sessions.
- Save texual inversion and hypernet settings to a text file whenever training starts: Typically enabled by default, this function autonomously saves the training progress, providing a layer of data protection without requiring manual intervention.
- Progress Tracking: The “Save a CSV file every N steps” feature is instrumental for documenting your training journey. While the standard setting may save every 500 steps, customizing it to a more frequent interval, like every 50 steps, offers granular insights into the training dynamics.
Finalizing Your Setup
After configuring your settings, remember to apply them and then refresh the UI to activate the changes fully.
Embarking on Text Inversion Training
Upon finalizing the basic configurations, our journey advances towards initiating Text Inversion training. This segment is designed to navigate you through accessing the training interface, crafting embeddings, and pinpointing the optimal base model for your training endeavor.
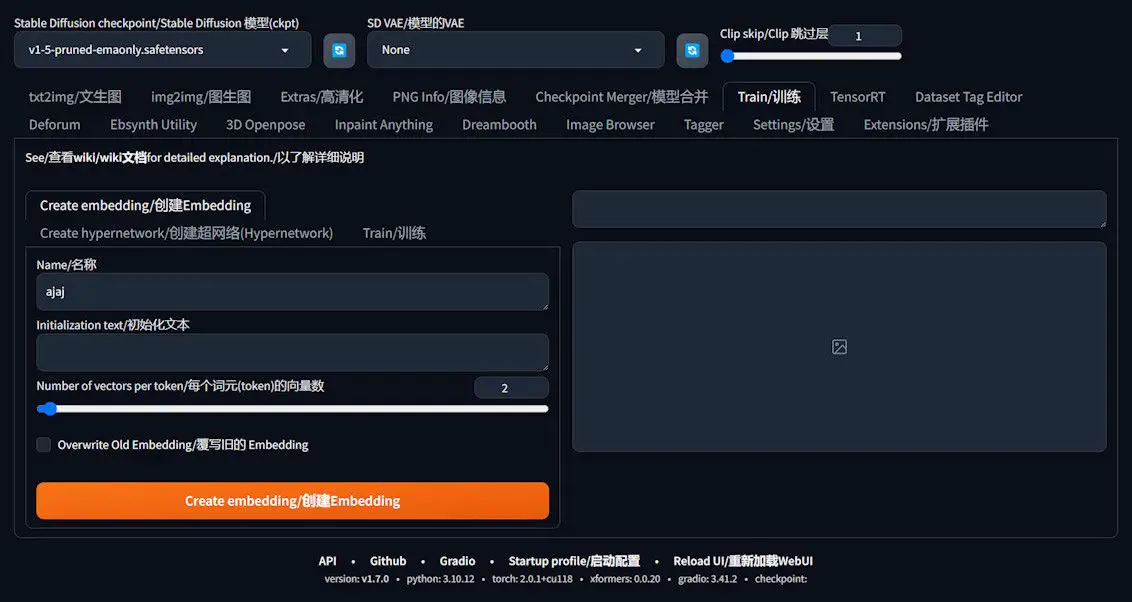
Navigating to the Training Interface
- Within A1111, seek out and activate the “Train” button to transition into the training interface. This serves as your command center for Text Inversion training, equipping you with the tools to configure and launch your training tasks.
Crafting Your Embedding
The inaugural step in your training voyage is to generate an embedding. This is a vector encapsulating the image features you aim to train. Precision in configuring your embedding is paramount, as it significantly influences the caliber of your training outcomes.
Selecting the Ideal Base Model
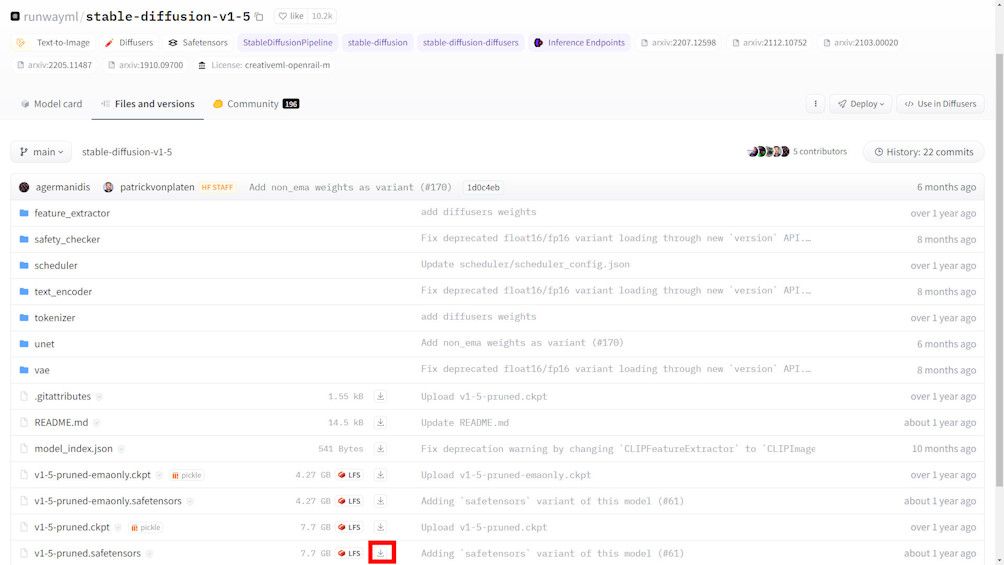
The base model selection is pivotal, profoundly impacting the efficacy of your training and the caliber of the resultant model. It’s advisable to opt for a base model of version 1.5, renowned for its enhanced generalization capabilities—ensuring that a model trained on this version exhibits commendable performance across other models based on version 1.5.
- Opting against the SDXL model: It’s crucial to note that selecting the SDXL model could potentially derail your training process.
- Acquiring the base model: Should you lack a version 1.5 base model, it’s available for download at Hugging Face ([https://huggingface.co/runwayml/stable-diffusion-v1-5/tree/main]). Opting for a more robust version of this model will further refine your training results.
Fine-Tuning Other Settings
- VAE Settings: For the Variable Auto-Encoder setup, selecting “None” is the recommended course of action.
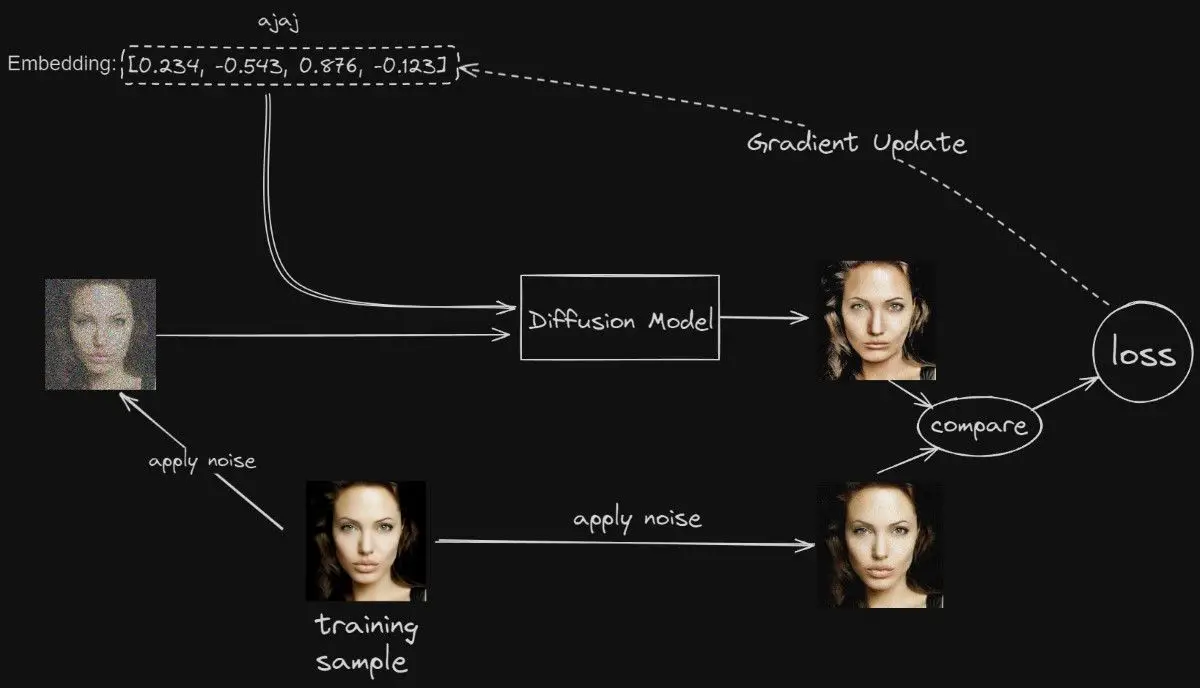
- Naming Your Training Task: Assign a name to your training task that, while arbitrary, ideally mirrors the essence or objective of your training. For instance, in this scenario, we’ve dubbed the training task “ajaj”.
- Initialization Text: Keeping this field blank is crucial to ensure the training embarks from a clean slate, uninfluenced by the base model’s predispositions.
- Number of Vectors per Token: Theoretically, a higher count could represent more features. However, in practical terms, setting this to 1 or 2 suffices.
With the parameters meticulously configured, clicking “Create Embedding” will forge an unpopulated embedding. With all preparations in place, you’re now poised to commence the training process, paving the way to forging your bespoke model.
Decoding the Essence of Text Inversion Training
The core aim of Text Inversion training within the realm of the Diffusion model is to fine-tune it in such a way that a specific embedding yields outputs closely resembling the input image.
This section is dedicated to demystifying the foundational logic of Text Inversion, spotlighting the pivotal role of embedding and elucidating the fundamental steps entailed in the training process.
The Pivotal Role of Embedding
- Understanding Embedding: In artificial intelligence and machine learning, an embedding is a sophisticated method used to translate discrete variables (like words) into vectors of continuous values. These vectors, residing in a sprawling high-dimensional space, can encapsulate and reflect various relationships among variables, including semantic similarities.
- Distinguishing Name from Prompt: In the Text Inversion paradigm, the term we assign (for instance, “ajaj”) functions more as a prompt rather than just a name. It signifies the embedding of specific image features we aim to replicate. Initially, this embedding is virtually blank, devoid of sufficient data to steer the Diffusion model towards generating the target image.
The Training Process Unveiled
- Transforming Noise into Image: The training kicks off with Stable Diffusion transforming the chosen training image (take, for example, a photograph of Angelina Jolie) from a mere array of pixels or “noise” into a structured image. Embedding acts as the beacon throughout this transformation, guiding the noise towards forming coherent images.
- Image Synthesis and Evaluation: The Diffusion model endeavors to craft a preliminary image rendition by eliminating randomness from the noise, guided by the current state of embedding. It then benchmarks this nascent version against the original training image to discern discrepancies.
- Calculating Loss: The disparity between the crafted image and the training image is quantified as a loss value, serving as a metric of difference. A diminished loss value signifies a closer resemblance between the generated image and the training image.
- Iterative Refinement: Anchored by the loss value, Stable Diffusion persistently tweaks the embedding. Through this iterative cycle, it steadily narrows the gap between the generated and training images until an optimal congruence is achieved. At this juncture, the embedding effectively instructs the model to produce images that mirror the training image with high fidelity.
Through this exposition, it becomes evident that Text Inversion training is an iterative endeavor focused on refining the embedding. This process seeks to optimize the Diffusion model’s ability to generate images that not only echo but closely align with the training image.
It delves into a profound understanding of the training image and iteratively modulates and enhances the embedding. This meticulous adjustment is aimed at elevating the quality and likeness of the generated images, ensuring they bear a striking resemblance to the original training image.
Launching Text Inversion Training: A Comprehensive Guide to Setup and Fine-Tuning
Having unraveled the intricacies of Text Inversion’s logic, the stage is set to translate this theory into action and embark on the training journey. This guide aims to delve into the nuanced settings that enhance the training’s effectiveness and efficiency.
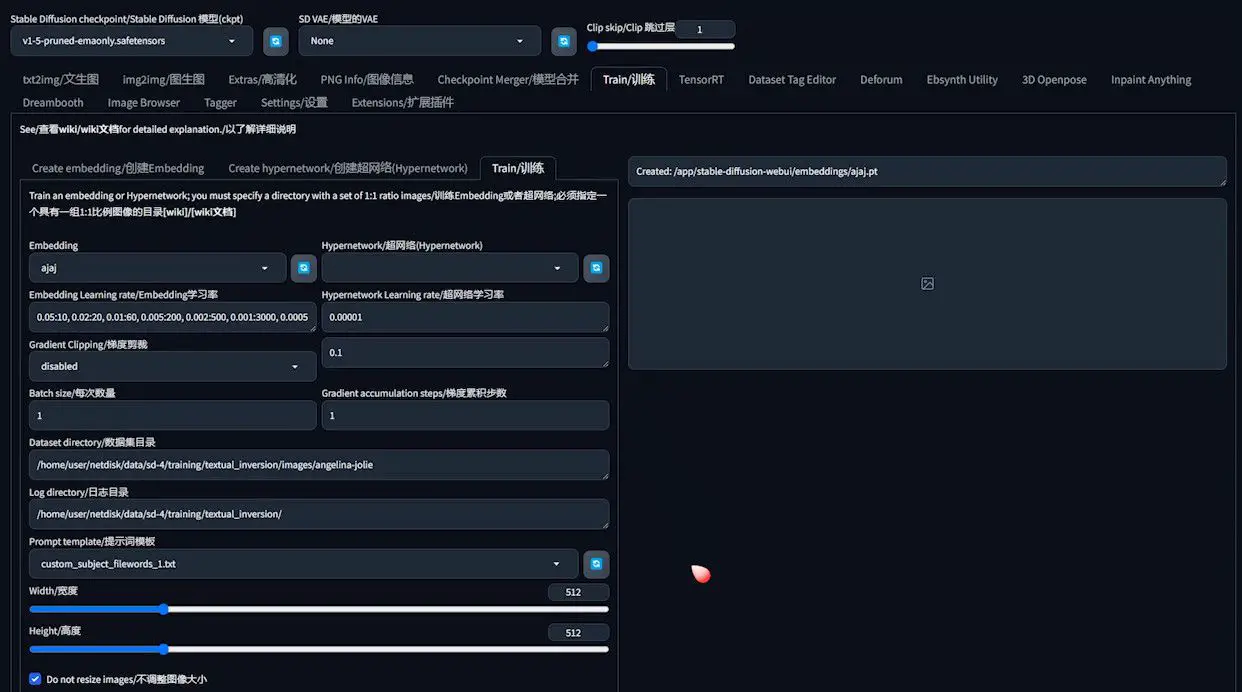
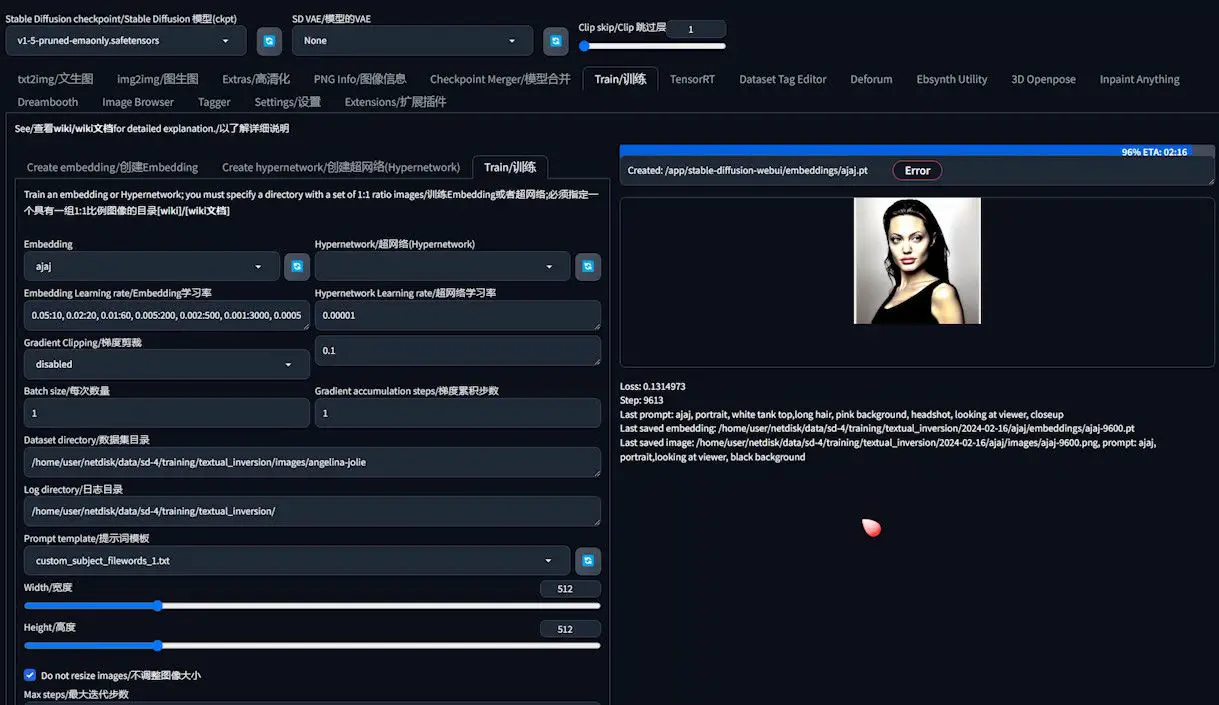
We proceed by selecting “Train” to access the interface for adjusting training parameters. The embedding we’ve previously crafted should be identifiable in the dropdown list. If it’s not immediately visible, hitting the Refresh button on the right might help.
Fine-Tuning the Learning Rate for Text Inversion Training
The learning rate is a critical dial in the Text Inversion training machine. It dictates the speed at which the AI model learns, with its setting crucial for striking a balance between rapid learning and the risk of overshooting the target.
The Criticality of Learning Rate
Consider the learning rate as the stride length in the model’s learning journey. A calibrated learning rate ensures efficient learning without the pitfalls of overfitting or underlearning, akin to adjusting the carving depth while sculpting a masterpiece.
- HIGH LEARNING RATE: Initiating training with a brisk learning rate, akin to swiftly sketching the outline of a sculpture, sets a robust foundation.
- LOW LEARNING RATE: Diminishing the learning rate over time allows for meticulous detail work, akin to fine carving, enhancing precision while averting overfitting.
Strategic Learning Rate Adjustments
A seasoned practitioner from Reddit has shared a learning rate strategy that has proven effective across various datasets:
- Initial Phase: From step 1 to 10, a higher learning rate of 0.05 kickstarts the capture of fundamental features.
- Mid-Stage Tuning: The learning rate is then tapered to 0.02 for steps 10-20 and further to 0.01 for steps 20-60, facilitating gradual refinement.
- Late Fine-Tuning: At step 3000 onwards, the learning rate is minutely reduced to 0.0005 for precision fine-tuning until training’s end.
Implementing the Strategy
- Default Learning Rate: While a fixed learning rate, say 0.05, might suffice generally, adopting a dynamic adjustment strategy could yield more nuanced control and superior outcomes.
- Dataset-Specific Trials: Experiment with various learning rate strategies on your specific dataset to discern the most effective settings for your project.
This staged learning rate adjustment strategy ensures the model is fine-tuned at different phases, promoting swift convergence and minimizing overfitting, thus paving the way for satisfactory outcomes. Remember, the learning rate should be flexibly adapted based on the model’s feedback and training progress for optimal results.
Additional Considerations for Optimization
- Batch Size and Gradient Accumulation Steps: The balance between batch size, affecting training speed and memory demand, and gradient accumulation steps, required for maintaining training stability, is delicate. Default settings are recommended unless specific speed improvements are sought.
- Dataset and Log Directories: Accurately setting the dataset directory ensures model access to training images, while the logs directory should be set for convenient training progress tracking.
Prompt Template Selection and Customization
Within A1111, a plethora of templates awaits, offering a rich foundation for training customization. These templates are neatly housed in the ‘textual_inversion_templates’ folder within the A1111 root directory. For those venturing into portrait training, the template named “subject_filewords” stands out as a prime choice.
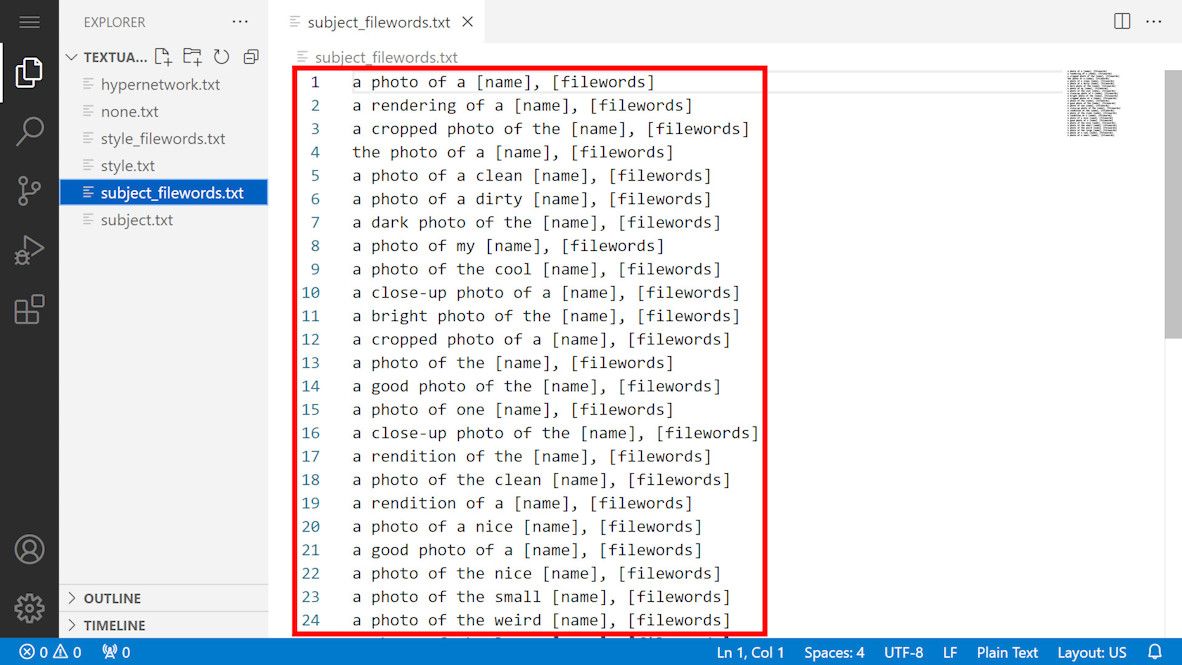
However, upon closer inspection, I discerned that the original template was cluttered with superfluous content, potentially muddling the training process. In pursuit of clarity, I ventured to streamline the template. By duplicating and then paring down the template to its essence, “[name], [filewords],” I crafted a more focused prompt. Here, “name” signifies the embedding’s identifier, in this case, “ajaj,” while “filewords” encapsulates the image’s descriptive caption.
Imagine, for a moment, our training image at a specific juncture, accompanied by the caption “looking at camera.”

In accordance with the refined template, the prompt transforms into “ajaj, looking at camera.”
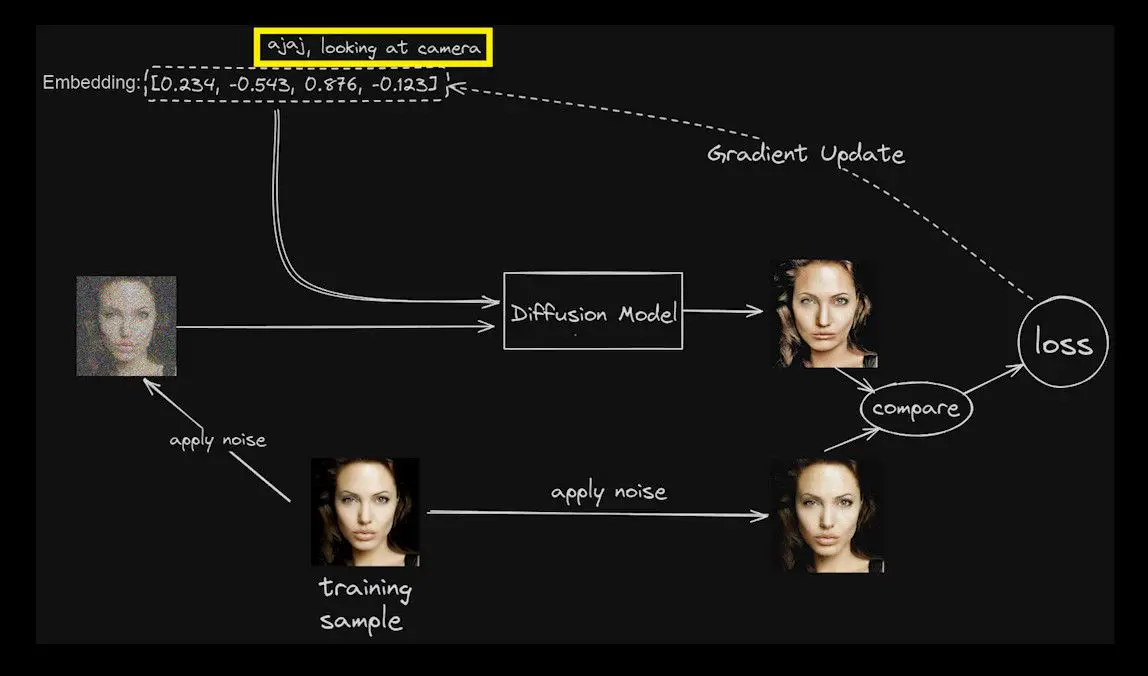
This refined prompt serves as the linchpin in the Diffusion model’s training, guiding it towards generating imagery aligned with the specified characteristics.
It’s pivotal to maintain the original dimensions for width and height, ensuring that the structural integrity of the image generation process remains uncompromised.
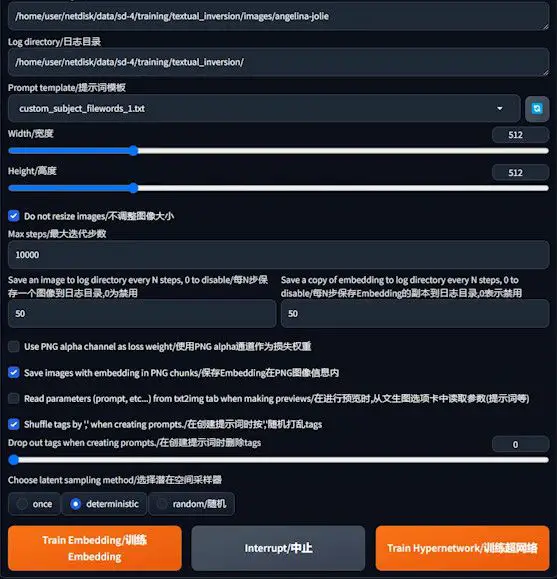
Max Steps
The term “max steps” delves into the heart of the training process, signifying the upper limit of iterations the model undergoes. Throughout these iterations, the model embarks on a meticulous journey to minimize the disparity between the generated imagery and the intended target image.
While the system might default to an ambitious ceiling of 100,000 iterations, practical experience suggests a more moderate benchmark—around 3,000 steps—usually suffices to achieve commendable training outcomes.
Exorbitantly high iteration counts risk overfitting the model, potentially leading to exaggerated representation of specific features. However, an elevated iteration limit shouldn’t cause undue concern. The training framework is designed with flexibility in mind, allowing for the training to be paused or concluded at any juncture.
Optimizing Image and Embedding Save Intervals
- Save an image to log directory every N steps: This functionality instructs the model to archive the generated image at specified intervals, depositing it into the log directory. This archival process is instrumental in visualizing the model’s evolution and its proficiency in capturing the desired imagery. Tailoring this setting to a smaller value enhances visibility into the training’s immediate impacts, allowing for real-time adjustments and insights.
- Save a copy of embedding to log directory every N steps: Echoing the principles of image saving, this parameter schedules periodic saves of the model’s embedding state throughout the training journey. This systematic preservation is crucial for evaluating the model’s alignment with the training objectives over time. By opting for more frequent saves, you avail a broader spectrum of embedding iterations to scrutinize. This granularity enables a meticulous selection process, identifying the most effective embedding that encapsulates the essence of the desired output.
Training Speed Optimization Options
- Use PNG alpha channel as loss weight: This innovative approach proposes leveraging the PNG alpha channel to dictate loss weight, potentially accelerating the training process. However, it’s accompanied by the need for meticulous dataset preprocessing and parameter adjustments. Given its complexity and the requisite fine-tuning, it’s prudent to proceed with caution, considering this option only when you’re equipped to manage its intricacies.
Harnessing Extra Features for Enhanced Training
- Save images with embedding in PNG chunks: Activating this feature will incorporate embedding details directly within PNG images generated during training. This serves as a valuable tool for monitoring and managing the training progression, offering a transparent view of the embedding’s evolution and its influence on image generation.
- Shuffle tags by ‘,’when creating prompts: The strategic shuffling of tags within the prompt, achieved by randomizing their order, stands as a method to dilute the dominance of any single term. This harmonization ensures a more equitable representation of attributes in the generated images, potentially elevating the model’s output quality.
Deliberate Sampling Method Selection
- Balancing Random and Deterministic Sampling: The default endorsement of random sampling underlines its utility in fostering diversity and exploration within generated images. However, the pivot towards deterministic sampling by a segment of the community underscores its value in enhancing the stability and reproducibility of training outcomes. This methodical approach to sampling can be particularly beneficial in scenarios where consistency and predictability of results are paramount.
Launching the Training
With parameters set, clicking “Train embedding” initiates the training. The process is designed to be paused or resumed as needed without compromising training integrity, offering flexibility to adapt or halt based on observed outcomes.
Initially, generated images may not perfectly resemble the target. However, as training progresses, the fidelity improves. Even if early previews show imperfections, refined training and the application of trained embeddings can significantly enhance output quality.
Upon concluding the training, evaluating the effectiveness of generated embeddings is crucial. This can involve testing different embeddings to ascertain which best captures the desired features, facilitated by comparison charts and organized embedding folders for thorough analysis.
This structured approach to Text Inversion training, from setup through optimization to evaluation, equips you with the knowledge to tailor the AI’s learning process to your specific needs, ensuring the creation of high-quality, custom-generated images.
Start training
Once all the parameters are set, click the “Train embedding” button to start the training process. The training can be paused and restarted at any time, and such interruptions will not affect the quality of the training, as the state of the training is saved periodically. This design ensures flexibility and control of the training, allowing the researcher to make necessary adjustments during the training process to obtain optimal results.
After starting training, scroll up. The preview area on the right allows us to monitor the training process and progress.
At first it may not look much like Angelina. Later on it will look more and more like Angelina. The preview image may not look very good, and sometimes there are chipped hands and feet. This is because it’s generated using a base model, and the prompt doesn’t have quality boosting words in it, like “best quality”, etc. There’s also no negative prompt to diminish things like “best quality”. There are no negative prompts to minimize problems such as broken hands and feet. When we use the trained embedding and other models, such as realistic vision, to generate Angelina’s image, the results will be much better. When we pause the training, or when the training has finished, we can check the effect of the generated embedding.Stable Diffusion will place the training data by date in the ‘text_inversion’ folder.
The date folder organizes the files by the name of the embedding. The trained embedding is placed in this ’embeddings’ folder. I’ve set it to generate one embedding every N steps, so here you can see that many embeddings have been generated, and the number in the name of these embeddings represents the number of steps. I’m using a server here, so the format is not quite the same as on a local computer, but the folder structure is the same.
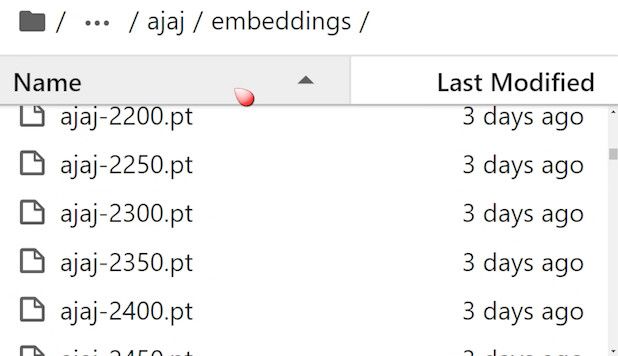
With so many embedding, how do we know which one works best? You can copy the test embedding to the embeddings folder in the A1111 root directory. Then, you can generate a comparison chart of these embeddings in A1111 to compare their actual effects.
In fact, I’ve already shown a couple of comparison charts that were generated using the method I’m about to describe.
Mastering Embedding Evaluation and Selection in Text Inversion Training
Navigating the selection of the most effective embedding during the Text Inversion training process is pivotal for achieving high-quality, customized image generation. The following guide offers a step-by-step approach to evaluating embeddings, leveraging the capabilities of A1111 to generate comparison plots that visually represent the performance of various embeddings at different stages of training.
Preparing for Evaluation
- Organize Embeddings: Begin by transferring the embeddings you wish to evaluate into the
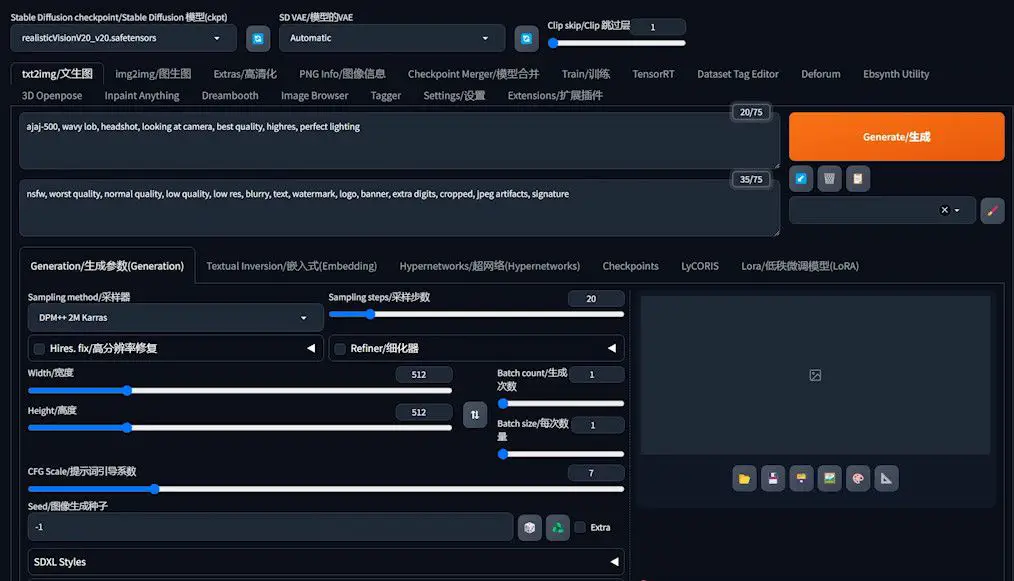
embeddingsfolder located in the A1111 root directory. - Select a Base Model: In A1111, choose an appropriate base model for testing. The selection between Realistic Vision or a 1.5 base model will depend on the specifics of your training setup and objectives.
Configuring the Testing Prompt
- Input the name of the embedding you’re starting with, such as “ajaj-500”, into the prompt input field.
- You may add additional prompts as necessary, though leaving the negative prompt blank is typically advisable.
- Maintain the default settings for the remaining options, as they usually require no alterations.
Generating a Comparison Plot
- Navigate to the Scripts section and select the XYZ Plot script from the dropdown menu.
- For the X-axis (horizontal), choose “prompt search/replace” and input the names of the embeddings to be compared, like “ajaj-500, ajaj-1000, ajaj-1500”, ensuring no commas are included at the end to prevent errors.
- Similarly, for the Y-axis (vertical), select “prompt search/replace” and input descriptors for various hairstyles (e.g., wavy, straight) separated by commas, again avoiding trailing commas.
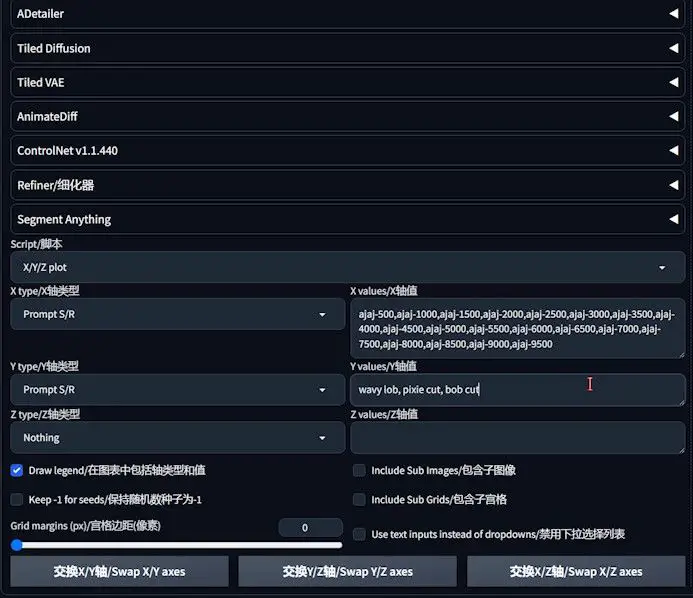
Evaluation and Decision-Making
- The resulting plot will depict how different stages of embedding interact with various hairstyle prompts, allowing for a direct visual comparison of the generated images of Angelina with different hairstyles.
- These visual comparisons facilitate an assessment of which embedding stage aligns most closely with your envisioned outcome.
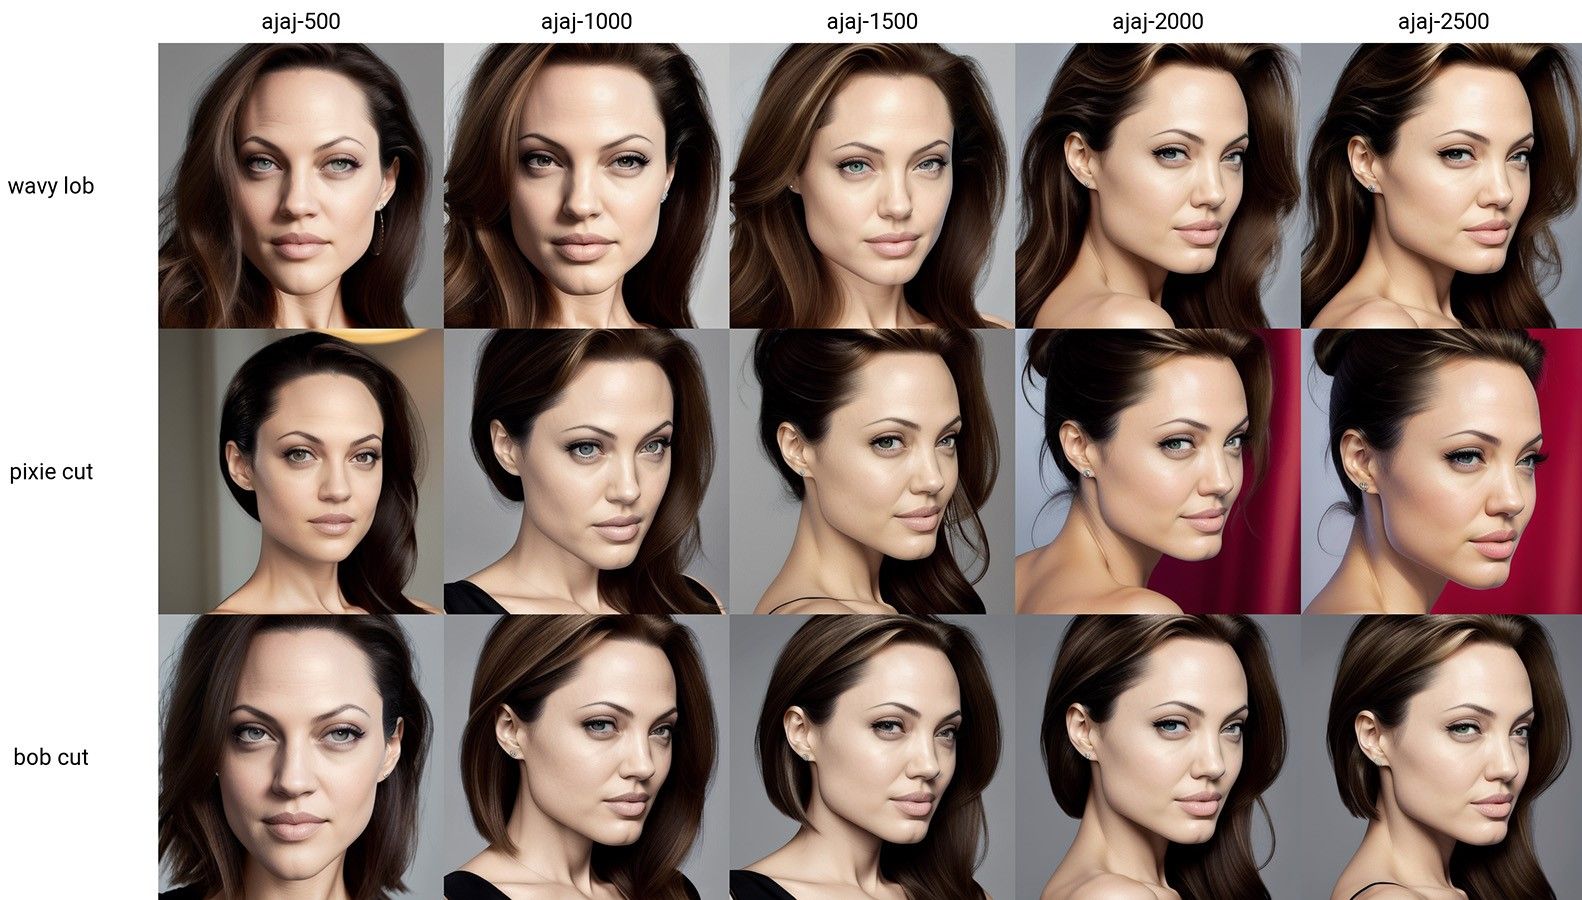
Practical Tips for Effective Evaluation
- Anticipate the necessity for patience as the generation of comparison charts can be time-intensive.
- While hairstyles serve as the example here, exploring other attributes such as expressions or scenes can offer a comprehensive view of an embedding’s versatility.
- Despite Text Inversion’s relative simplicity as a training method, meticulous evaluation and selection can lead to remarkably satisfying results.
Employing this methodical approach allows for a nuanced assessment of embeddings across various training milestones. By visually comparing the impact of different embeddings, you are better equipped to make an informed selection, ensuring the chosen embedding truly captures the essence of your desired output. This process not only streamlines the path to identifying the most effective embedding but also enhances the overall quality of the images generated through Text Inversion training.